Welcome to our February Karen Burniston Designer Challenge.
Check out Karen Burniston's blog on Wednesday (US Time) when you will be able to see what all the designers created for the challenge this month, plus Karen will have an amazing video tutorial to share with us all.
Our challenge theme this month is .... "DOUBLE" - make a card of any theme using a doubling technique. This could be a double Pivot Panel, a double Katherine, a double Surprise Ball, or any fun combination of two different pop-up dies.
Our challenge theme this month is .... "DOUBLE" - make a card of any theme using a doubling technique. This could be a double Pivot Panel, a double Katherine, a double Surprise Ball, or any fun combination of two different pop-up dies.

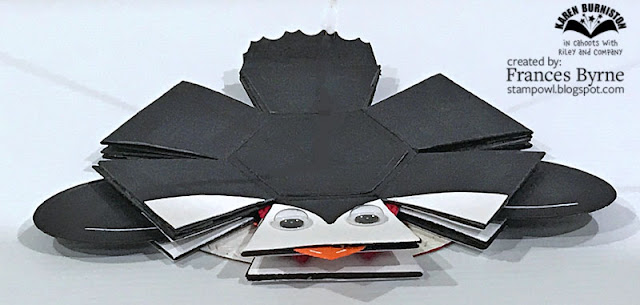
After seeing a few cards made recently using a double Surprise Ball Pop-up, I wanted to make something along those lines. After a little thought I decided to see if I could make a penguin using this technique. I created both of the Surprise Balls from black cardstock and then die cut another surprise ball from white and with a little trimming I adhered the white over the black to create the penguin.
Here is a quick video to see my Penguin Surprise Ball Pop-up in action.
I added the bow to the front of the penguin which is from the Parcel Pop-up die set.
For the penguin's flippers I die cut two ovals from black cardstock and adhered them to the sides of the penguin.

I used a piece that was leftover from the white surprise ball piece to cut out a piece to match one of the segments of the surprise ball, but so that it was folded in the centre portion. I then used one of the borders from the Border Blends - Party to cut a shape at one end. I then adhered the full portion of this panel to the back of the penguin to create the penguin's tail.
I die cut a circle from glitter cardstock using the largest circle in the Crosshatch - Circles die set and attached this to the base of the penguin using a brad.

I wanted a place to be able to write a greeting, so I die cut another large circle, this time from red cardstock and added a stamped sentiment which is from an older Whimsy Stamps stamp set. and adhered this to the back of the glitter circle. This also hid the brad ends.

Here is a look at the penguin, when it is flattened, ready to be placed in an envelope.

I had intended to add the penguin to the inside of a folded card, but after I had created the penguin, when it is flattened the card would have had to have been at least 6 1/4 inches to allow for the penguin's flippers and tail. I had been wanting to create a pocket card using the Surprise Ball Pop-up after seeing a card Sandy Diller had created recently. So I created a pocket and the penguin can be pull out of the pocket using the tail.
I added two circles using the Crosshatch - Circles die set to the centre of the front of the pocket and then added the birthday sentiment and three stars. The stars are from the Surprise Ball Pop-up die set.
Don't forget to visit Karen Burniston's blog on Wednesday when you will be able to see what all the designers created for the challenge this month.
Supplies:
For your shopping convenience, all products are linked below. Compensated affiliate links are used where possible with no extra cost to you. This helps me to continue to share all the projects I include on my blog. For the benefit of my Australia readers, I have started to include some links to Australian stores when available. Please note I only use and share products I love.
Penguin Fun Stamp Set - Whimsy Stamps (retired)


2 comments:
Super cute Frances
absolutely stunning and adorable!!! I have and love this die set!!! thanks for the inspiration!!
Post a Comment