Saturday, July 30, 2022

Gnomes and Wildflowers


 Hi Crafty Friends,

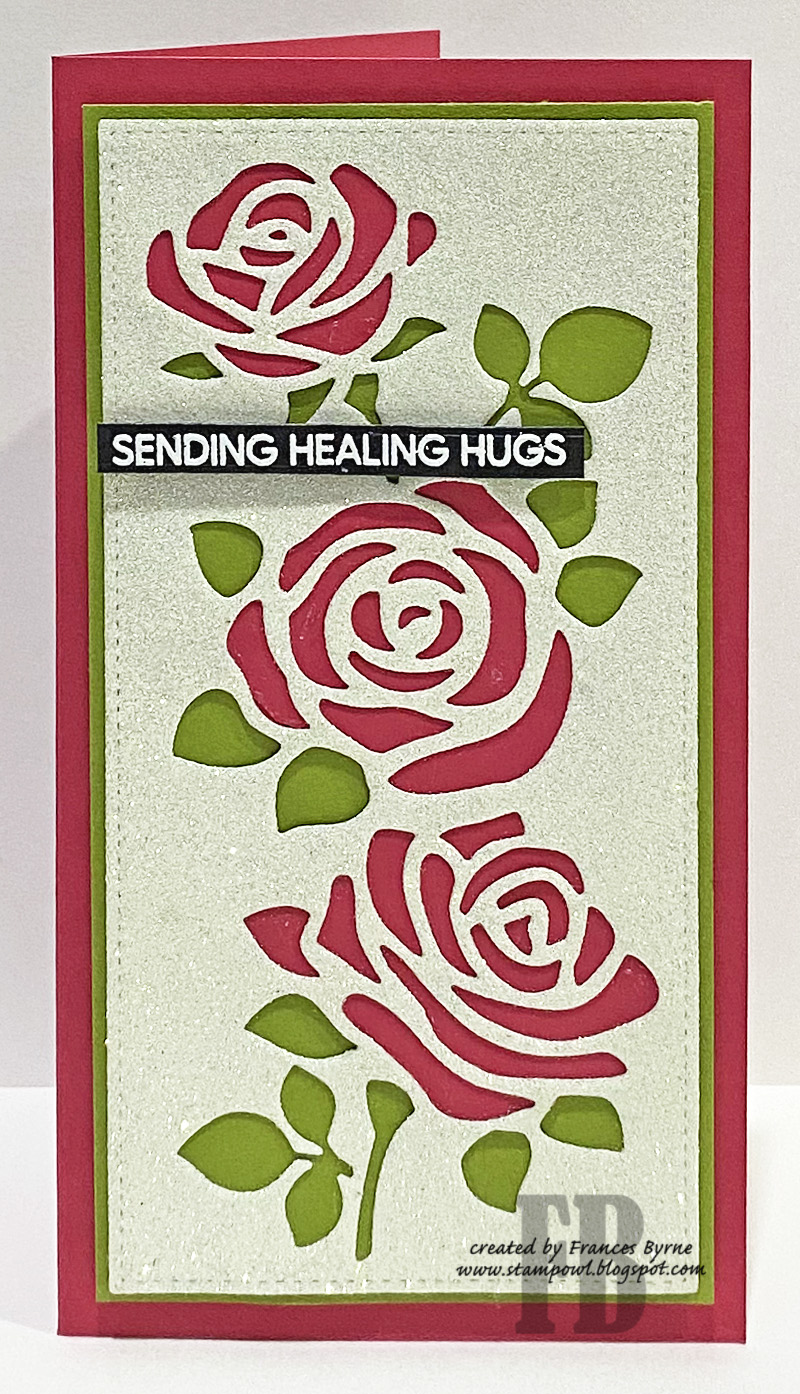
I have a fun Slimline card to share with you today using products from Divinity Designs July 2022 Blessings Box which was released a few weeks ago.

To create the slimline portion of the card I used the Slimline Card Base; Slimline Rectangles and Slimline Layering Rectangles die sets.

The pattern papers, gnomes and ladybug are all from the Gardening Gnomes Paper/Die Duo set which is included in this latest Blessings Box ... the papers and gnomes in this pack are so much fun.

Also included in this Blessings Box is the Flower Pot and Layers and Delightful Daisies die sets. I die cut three flowers for each of the daisies and inked the centres of the daisies using Catherine Pooler Shea Butter ink. 

I added a sentiment to the top of my card using one of the sentiments included in the Wildflowers Stamp set also included in the kit.


For the inside of my card, I added another of the sentiments included in the Wildflowers stamp set to the centre of the card.

I used the Grass Lawn die to die cut the grass which I added to the bottom of my card. Finally I added a gnome, flower and ladybug from the Gardening Gnomes Paper/Die Duo.


Friday, July 29, 2022

Rebus - Movies Starring Morgan Freeman


Hi Crafty Friends,


It's time to share another rebus puzzle swap with you. This month the theme is "Movies starring Morgan Freeman".

If you would like to solve my rebus puzzle, why not post a comment on my blog post with your answers. I will let you know what the correct answers are next time I post a rebus card here.

How did you go solving my May Rebus which was "Name of a Country starting with the letters O to R"

 Here are the correct answers so you can check how you did.

  1. Pakistan
  2. Papua New Guinea
  3. Peru
  4. Romania
  5. Oman
  6. Poland
  7. Pitcairn Island
  8. Rwanda
  9. Panama
  10. Russia

You can find all my past Rebus Cards here.


Thursday, July 28, 2022

Life's A Picnic Accordion


Hi Crafty Friends,

It's challenge time with my friends over on the CCEE Stampers challenge blog. Lois Bak our challenge hostess for the month, finishes off the month with one last challenge.

In the Northern Hemisphere it’s the middle of summer, and July is National Picnic Month. Include something on your card that would be part of a picnic (picnic basket, checkered tablecloth, picnic food, or even ants).

For my card today I decided to make a two page Accordion card using Karen Burniston's Landscape Rectangle Accordion die set. For the layers on the accordion I used the rectangle dies from the Short Rectangles - Crosshatch die sets.

I added the grass using the grass border die included in the Nature Edges die set.

To decorate each panel I used the Picnic Elements and the Sweet Treats Charms (watermelon) die sets.

The "Hi" sentiment is from Waffle Flower Crafts Popping Sentiments and the "Life's A Picnic" sentiment is from Lawn Fawn.


Here is a look at my card when it is closed ready to be placed in an envelope. I added a few more ants on the corner of the front frame.

Don't forget to check out the CCEE Stampers blog (goes live 12 AM EST) to see the rest of the creations the CCEE Stampers created this week. You can also see more details of their creations on their individual blogs:

Wednesday, July 27, 2022

Sending Healing Hugs

 
Hi Crafty Friends,

I have two get well themed Mini Slimline cards to share with you today using dies from Gina K Designs and Silk Microfine Glitter from Elizabeth Craft Designs.


My cards using Gina K Designs Rose Mini Slimline Die which I die cut from white cardstock as well as from white cardstock that had Double Sided Adhesive Tape on the front. I adhered the white panel to a piece of scrap cardstock that also had Double Sided Adhesive Tape on the panel. I covered the negative pieces of the leaves and stem with Go To Green Silk Microfine Glitter and then the rose petals from Peony  Pink Silk Microfine Glitter to the openings in the image.

I then layered the rose panel  onto green cardstock and then onto a side folding dark pink card.

I addd a sentiment from Simon Says Stamp Healing Hugs stamp set.


I used the largest rectangle die included in Lawn Fawn's Small Mini Slimline die set for the white panel on the inside of my card.

I pieced in another of the roses from the Gina K Designs die to the lower right hand corner of the card using green and dark pink cardstock.

To finish off the card I added two sentiments from the Simon Says Stamp Healing Hugs stamp set.


Seeing I had a panel with Double Sided Adhesive Tape adhered on the front, I decided that rather than wasting it I would create another card. So I added Warm Diamond Silk Microfine Glitter to the front of the panel. I then carefully covered the openings of the roses with dark pink and green cardstock.

This time around I added a sentiment from Waffle Flower Stamps Get Well Sentiments stamp set.


I finished the inside of my second card similar to the first one, just changing up the larger of the sentiments which is also from the Simon Says Stamp stamp set.


Tuesday, July 26, 2022

Don't Worry Beer Happy


Hi Crafty Friends,

Today I am sharing a beer themed birthday card I created using stamps and dies mostly from Made To Surprise.


Recently Sam Calcott posted a tutorial on how to create a beer crate card using her Pop-up Bouquet die set. As I had the beer bottles from her stamp set and I loved the look of her card, I decided to order the die set so I could make something similar. I am always looking for products that can be used to create male theme cards. Sam created her beer crate so it was on the front of her card, I put mine inside to create a pop-up card. You can see her tutorial here. The paper used on this card is also from Made To Surprise, however it doesn't look like it is available at the moment but it was about a month ago.

The crate itself uses the mechanism from the Pop-up Bouquet die set, adding a few strips of cardstock to make it look like a crate. I used Lawn Fawn's Light Brown Woodgrain cardstock for the crate. I added the beer crate to the centre of a folded 6 inch x 6 inch card. 

The beer bottles and sentiment on the crate are both from the Made To Surprise's Have a Drink on Me Stamp/Die set. I had planned on colouring the beer bottles an amber color as that seems to be the brand my hubby drinks and it has a clear bottle, but when I started colouring, I decided that the green stood out better for this particular card. 


I added the "Cheers" sentiment to the back of the card, this is from Trinity Stamps Cheers die set.

I added a preprinted birthday graphic to the lower right hand corner of the card using a paper included in the Paper Society's May kit.

The white strip along the bottom edge of the card is so that a hand written can be written to the recipient.


For the front of the card, I added the beer glass and bottle both of which are included in the Have a Drink on Me Stamp/Die set. The medallion next to the beer glass is from the Magic Color Slide Additions die set.

To finish off the card I added a "Beer*th*day" sentiment using a sentiment included in a Darcie's Heart & Home stamp set.


Other Supplies:

It's Only A Puppet Paper Pad - Made To Surprise


Monday, July 25, 2022

You're Tea-rrific

Hi Crafty Friends,

I have a fun slimline card to share with you today using stamps and dies from Lawn Fawn.

This slimline card measures 4 inches x 9 inches to allow for the width of the tree house. 

To create my card I started with the card base, adhering underwater patterned paper to the top portion of my card, this paper was a lovely shade of blue which I wanted for my sky and I knew the underwater portion of the paper would be covered by grass. For the grass I used the Slimline Grassy Hillside border dies cutting the green cardstock three times to create the layers.

The treehouse trunk is die cut from Lawn Fawn's Light Brown Woodgrain cardstock, I then added shading to the trunk using distress oxide inks. I die cut the leaf area of the tree five times and added shading to the lower portion of each panel. I adhered my tree house to the upper portion of my card.

To create my cute "tea party" scene I used Lawn Fawn's Tea-rrific Day and Tea-rrific Day Add-ons stamp sets. I stamped, die cut and coloured all the images before adding to my card.

To finish off the front of my card I added the two sentiments which come from both stamp sets.


For the inside of my card I used Lawn Fawn's Giant Hooray die to create my sentiment. I die cut the sentiment twice, once from holographic cardstock and once from black, I then offset the holographic sentiment over the black. I added the "It's Your Birthday" sentiment under the die cut sentiment which is from Reverse Confetti/Simon Says Stamp Celebrate Your Day stamp set.

I added more grass to the bottom of my card and added a few more of the cute images to complete my card.


Friday, July 22, 2022

Floral Birthday


Hi Crafty Friends,

I have a floral birthday card to share with you today, using a new foiling plate from Divinity Designs July release.

My card is a top folding Landscape A2 card created using Divinity Designs A2 Landscape Card with Layer die set. I used the layer from the die set for the dark green portion of the card.

For the background I used the new Leafy Background Foiling Plate with Silver foil to create my leafy foiled background. I used the second largest rectangle in the Double Stitched Rectangles die set to die cut the panel ready to adhere to the card.

To decorate my card, I added the flowers from the Beautiful Blossoms Set 3 Paper/Die Duo set. 

The sentiment was created using the All Occasions Foiling Plate and the Solid Foil Plate to use the "waste" foil to get the negative image of the sentiment (That is the silver is around the edge of the sentiment with white in the centre rather than the other way around). The sentiment is layered to two rectangle panels using the Double Stitched Rectangles and Rectangles die sets.


For the inside of my card I added another panel of foiled cardstock to the left edge which was foiled using the Leafy Background Foiling Plate and silver foil.

I added another of the roses to the lower right hand corner of my card.

The sentiment is another included in the All Occasions Foiling Plate set which I foiled using the waste silver foil to again get the negative image.


Thursday, July 21, 2022

Sweet Thing

Hi Crafty Friends,

It's challenge time with my friends over on the CCEE Stampers challenge blog. Lois Bak our challenge hostess for the month, continues to issue the challenges.

Apparently July is National Ice Cream Month. Easy challenge – include some ice cream on your card.


Earlier in the week, I shared a birthday card that was a Faceted Vertical Diamond Easel Card. I enjoyed making the card so much that I decided to make another for the challenge this week. If you are interested in learning how to make this style of card be sure to check out Sam Calcott's video tutorial found here.

For my ice cream I used Sunny Studio Stamps Two Scoops stamp set. This is a layering stamp set, having two layers for the cone and three layers for the ice cream.


I added the two ice cream cones to the centre of the faceted Diamond shape in the centre of the card, layering them onto circles. I also added the "sweet" sentiment die cut which is part of a sentiment die from Karen Burniston. I die cut the sentiment twice from brown and twice from pink, layering the colours together and then offsetting the pink over the brown. I also added some Glossy Accents over the sentiment. 

The pink panel on the right hand side of the card, is the stopper to keep the card in it's easel position. I added a birthday sentiment to the panel using one of the sentiments from the Sunny Studio Stamps stamp set. I also added three enamel dots to the top right corner of the card.


Here is a look at my card, when it is closed ready to be placed in an envelope.


For the inside of my card I added the "ice cream" sentiment which is another of the sentiments included in the Sunny Studio Stamps Two Scoops stamp set. The "Happy Birthday" sentiment is from MFT Stamps Bitty Birthday Wishes stamp set.


Don't forget to check out the CCEE Stampers blog (goes live 12 AM EST) to see the rest of the creations the CCEE Stampers created this week. You can also see more details of their creations on their individual blogs:

Wednesday, July 20, 2022

Hello Friend


Hi Crafty Friends,

Today I am sharing to get well themed Mini Slimline cards I created using Taylored Expressions Triple Slim Layering Stencil set. This set of stencils allows you to easily create three mini slimline cards all with a different design on the front. There are 4 stencils in the set, which means you can have three different colours on your card. As you can see I went with fairly bright colours for my card. 

As mentioned above you can get three cards out of this set, but as I like to decorate the inside of my cards as well as the front, I used one of the panels for the inside of one of the cards, so only have two cards.


I used inks from Catherine Pooler Designs in shades of pink, orange, yellow and purple. After adding the ink through the stencil, I then used the coordinating stamp set to add patterns to some of the half circle designs. I used a darker colour ink add the pattern onto the card.

There is also a coordinating die set that matches up with one of the stencilled panels, so I die cut that in black and adhered it over the panel. This gave me a panel that is 3 1/2 inches x 6 inches. As I wanted some colour around the edge of the card, I die cut a frame using two rectangle dies from Waffle Flower Crafts Mini Slimline Layering dies. This was then adhered to a top folding slimline card.

I added a black foiled sentiment using Waffle Flower Crafts "Hey There" foiling plate with coordinating dies.


For the inside of my card, I grabbed the stencil again and inked up one side of the centre design to create the design on the right hand side of my panel using the same colours as I did on the front. 

I then added a stamped sentiment using Picket Fence Studios' Ways To Say Get Well" stamp set.


For my second card, I used the second panel of the stencilled panel I created to create all cards. I layered this onto black cardstock and then onto a top folding pink cardstock.

I added the "Hello" sentiment using Waffle Flower Crafts Oversized Hello Hot Foil Plate with coordinating die.


For the inside of this card I used the design created on my third stencilled panel. I cut the design down so I could create a border along the bottom of my mini slimline card panel.

I then used the Picket Fence Studios' Ways To Say Get Well" stamp set to add the get well sentiment to my card.


Tuesday, July 19, 2022

Birthday Candles


Hi Crafty Friends,

Last month, Spellbinders Paper Arts celebrated their 20th birthday. To celebrate their released a number of  fun birthday themed stamps, dies and glimmer hot foil plates. As I make a lot of birthday cards I decided to add a few of the new items to my stash.

The photo of this card doesn't do it justice, being that the front is all gold foiled.  It's very difficult to photograph anything that is foiled.

For my card today I used the new Spellbinders So Many Candles Glimmer Hot Foil Plate, this is a large plate that fills an A2 card. As I wanted to make a slimline card using this plate, foiled the one side of the cardstock first and then carefully moved the plate down and foiled the remaining portion of my slimline card panel. I coloured all the colours using rainbow colours, adding pink at the beginning of each section. I layered my card onto gold mirror cardstock and then a top folding red card. 

For my sentiment I used Waffle Flower Crafts Happy Birthday Duo Hot Foil Plate, for this sentiment I also used Pinkfresh Studio's Solid Foil Plate so that I could use the negative foiled sentiment where the gold was on the outside rather than the middle. Both the sentiment and candles were foiled using gold foil.


For the inside of the card I used Spellbinders new Awesome Birthday stamp set. I gold embossed a portion of the candle bunch on either side of the card. I also added the sentiment which is also gold embossed to match all the gold on the front of the card.


Monday, July 18, 2022

Happy Birthday Easel

Hi Crafty Friends,

I have a fun easel style card to share with your today.

Recently I saw a video by Sam Calcott on how to create a Faceted Vertical Diamond Easel Card, as it looked like a fun card I decided to give it a go. You can see Sam's tutorial here


Here is another view of my card which was inspired by the patterned paper used on the front of the card, normally I select the image first. 


To decorate the front of the card I added a gold foiled birthday sentiment using a hot foil plate from Waffle Flower Craft Happy Birthday Duo Foil Plate set. I layered the sentiment on older elongated ovals and scallop ovals.

To finish off the front of the card I added gold metallic pearls at the side stopper of the card.


Here is a look at my card, when it is closed ready to be placed in an envelope.


For the inside of my card I added a birthday sentiment from Honey Bee Stamps Birthday Wishes stamp set.

Other Supplies:
Elongated Oval Nesting Dies - Spellbinders (discontinued)
Elongated Scallop Oval Nesting Dies - Spellbinders (discontinued)