It's time to share another rebus puzzle swap with you. This month the theme is Names starting with the letter "T".
If you would like to solve my rebus puzzle, why not post a comment on my blog post with your answers. I will let you know what the correct answers are next time I post a rebus card here.
How did you go solving my February Rebus which was "Meryl Streep Movies". Here are the correct answers so you can check how you did.
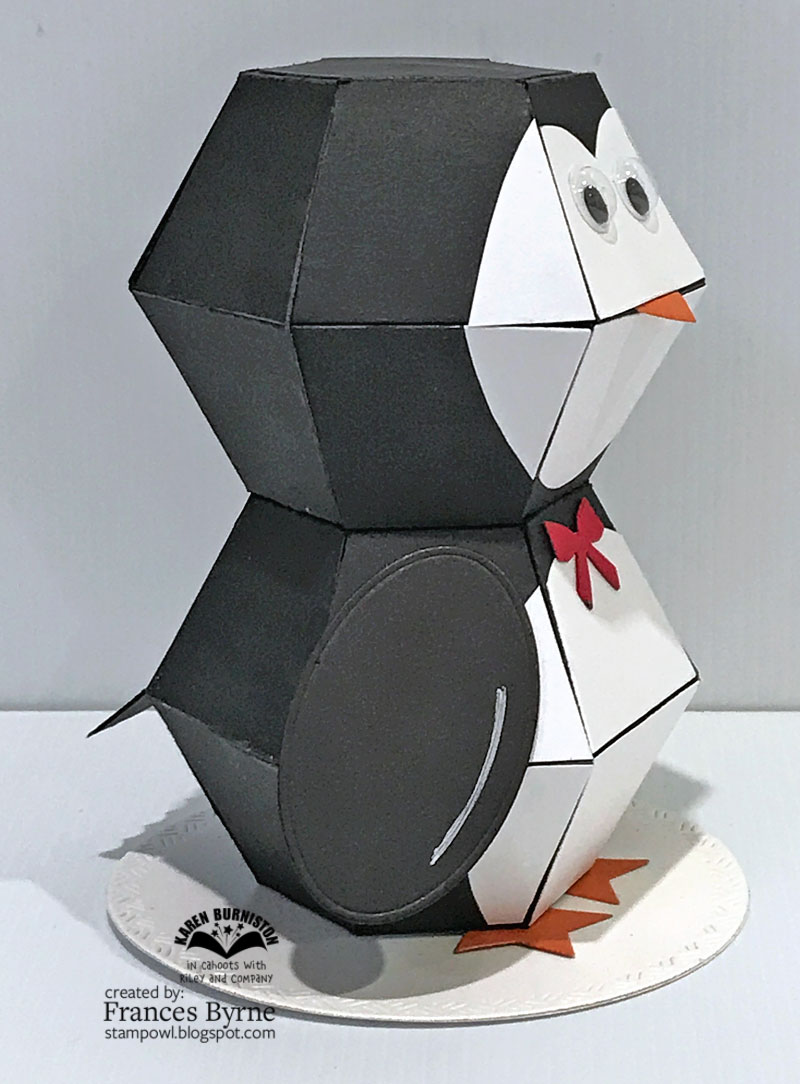
Earlier last month, I created a penguin using Karen Burniston's Surprise Ball Pop-up die set. After I had created my penguin, Karen requested some help from the Design Team to make some samples for when she demonstrated in the UK on Hochanda which is a TV Craft Show. One of the items Karen requested was some Surprise Ball Animals, but we needed to use just dies that she would have available for sale during this event through Hochanda so my original penguin wasn't suitable. So of course I decided to make a new one with a couple of alterations.
The penguin is basically pretty much the same as my original penguin, except this time I used a bow from the Gift Pivot Panels die set.
Here is a side view of my penguin. I used the largest circle from the Crosshatch - Circles die set to die cut the glittered circle my penguin is standing on.
I also changed the tail slightly. This time I used the border die included in the Circle Tag Book Pop-up up die set to create the fancy edge at the bottom of the tail.
The penguin's flippers were die cut using one of the ovals included in the Crosshatch Ovals die set.
Here is a look at the penguin, when it is flattened ready to be placed in an envelope or pocket card.
My favorite way to present this Surprise Ball Animals, is a pocket card. This one is the same design as my previous one, however I selected a different patterned paper. The stars and the hanging heart (which I used on this card to point to the penguin's tail sticking out off the pocket) are also included in the Surprise Ball Pop-up die set.
When you pull on the tail, the penguin jumps up and out of the pocket to surprise the recipient.
Supplies:
For your shopping convenience, all products are linked below. Compensated affiliate links are used where possible with no extra cost to you. This helps me to continue to share all the projects I include on my blog. For the benefit of my Australia readers, I have started to include some links to Australian stores when available. Please note I only use and share products I love.
I have been having lots of fun lately created this fun animals using Karen Burniston's KB Riley LLC Surprise Ball Pop-up die set. Recently Tanya the owner of Riley and Company and part owner of KB Riley LLC asked me if I could make her a Surprise Ball Pop-up Card that looked like Riley the Moose which is a popular stamp sold by her company. Of course I am always up for a challenge, so of course I said yes.
Here is a quick video of my card in action.
To create my moose I created two Surprise Ball Pop-up using a tan colored cardstock. I adhered one on top of the other, to create a Double Surprise Ball Pop-up animal.
To create the face, I die cut the main die from the Surprise Ball Pop-up die set from a lighter tan card. I trimmed off two segments which I adhered to the bottom of the top ball for part of the face. I trimmed of two more segments and used an oval die as a template to trace a curve at the top of the segments, and adhered these to the top ball for the other part of the face.
I created two nostrils which I placed on the bottom face area.
I used the same oval die I used to trace the shape of the top portion of the face to create a thin black piece which I added to the top portion of the face. The eyes are created using the wheels from the Train Pivot Panels die set.
As I have most of the Riley stamps, I used one as a model to create enlarged antlers and ears so they resembled Rileys and added them to either side of the head.
For the little tuft of fur that Riley has at the top of his head, I die cut the grass from Nature Edges die set, layering two pieces together for extra strength and trimming off any extra blades of grass.
Of course Riley had to have a tail, and for that I used the small flame from the Rocket Pop-up die set, trimming off the section I needed. This is adhered to just one side so the ball can open and close when needed.
For Riley's arms and legs, I used the fishtail banner from the Triple Flip die set. I die cut two for each arm/leg and layered them together. I die cut additional banners from brown cardstock, trimmed that and added that for the bottom portion of the arms/legs. I then trimmed the points off so it looked more like the arms/legs on the Riley stamp image.
The base of Riley is attached to a green circle using the largest circle from the Crosshatch Circles die set. To cover the brad that attaches the circle, I adhered another circle over it. I used two of the sentiments from Riley and Company's Moose Sayings 2 stamp set for the sentiment which I placed underneath the base.
I needed something to pull the pop-up out of the pocket that I created for it to be delivered in, so I die cut an oval from the Crosshatch - Ovals die set, folded it in half and adhered it to the side of the circle base.
I created a pocket for my Surprise Ball Pop-up to live in when it is presented to the person receiving the card. Of course as I have most of the Riley images I decided to add one to my card ... I decided to go with Hollywood Star Riley image as this one includes his name.
I also added another sentiment from the Moose Sayings 2 stamp set.
Supplies:
For your shopping convenience, all products are linked below. Compensated affiliate links are used where possible with no extra cost to you. This helps me to continue to share all the projects I include on my blog. For the benefit of my Australia readers, I have started to include some links to Australian stores when available. Please note I only use and share products I love.
It’s challenge time with the “Crazies” over on the Crazy 4 Challenges blog. As challenge hostess for the month, I finish off the month with one last challenge.
Our challenge this week is .... Gatefold Cards. Create A Gatefold Card. There are many ways you can create a gatefold card. If you need inspiration on different types of Gatefold Cards, I have included links to some of Jennifer McGuire's Gatefold Card tutorials on the Crazy 4 Challenges blog.
For my card today I decided to create a Gatefold Shuttter Card, it's been a while since I have made one of these, so I thought it was time to pull out one of my Gatefold Shutter die sets to create one.
I had some sunflower sitting on my desk which I had made a few days prior to making my card using Lawn Fawn's Stitched Flower Frame die set. I had recently purchased this set to use with the new Lawn Fawn Magic Iris die set. As I will pulling out some supplies to make my card I thought as it would work with the Magic Iris, why not a shutter card too.
For my gatefold card today I decided to create a belly band to help keep my card closed. I added the sunflower to the centre of the belly band.
I decorated the front of the card and sunflower using Lawn Fawn's Hey Lady stamp set, adding a few of the lady bugs and a magnifying glass. The sentiment is from the Reveal Wheel Circle Sentiments stamp set.
When you open the card, the shutter portion of the card starts to open to reveal a sentiment or image. I used MFT Stamps Shutter Card Components Die-namics set for the shutter portion of the card.
To decorate the circle area of the card, I used the Stitched Flower Frame again, creating another sunflower from it. I needed to die cut a smaller circle in the panel in the centre so the circle was hidden by the sunflower. I added the stem and leaves to the sunflower. Along the bottom of the card I added a grass strip using Lawn Fawn's Grassy Hillside Border die set.
I stamped a birthday sentiment in the centre of the sunflower which is revealed when the card is fully open.
I added a few more of the lady bugs and magnifying glasses to the card.
Don't forget to check out the rest of the “Crazies” cards over on the Crazy 4 Challenges blog and also their individual blogs for more details.
For your shopping convenience, all products are linked below. Compensated affiliate links are used where possible with no extra cost to you. This helps me to continue to share all the projects I include on my blog. For the benefit of my Australia readers, I have started to include some links to Australian stores when available. Please note I only use and share products I love.
Today I am sharing a baby card using the Triple Tier Slider Card with Layers die which was released by Divinity Designs earlier this month.
To decorate my card I used the Baby Blessings die set to create the onesie. This is layered to the card using ovals from the Double Stitched Ovals and Ovals die sets.
I used papers from the Baby Boy Paper Collection for all the layers of my card.
When you pull the tab on the top of the card, it reveals the first tier. On this panel I have the "Welcome Sentiment" also from the Baby Blessings die set. This is layered using the Double Pierced Vintage Labels die set.
By pulling the tab further, it reveals the third or top tier. On this I added the word "Boy" using the Alphabet Flags die set.
Supplies:
For your shopping convenience, all products are linked below. Compensated affiliate links are used where possible with no extra cost to you. This helps me to continue to share all the projects I include on my blog. For the benefit of my Australia readers, I have started to include some links to Australian stores when available. Please note I only use and share products I love.
It's challenge time with my friends over on the CCEE Stampers challenge blog. Maryann Einam our challenge hostess for the month,finishes off the month with one last challenge.
Apparently March is Caffeine awareness month, so for our challenge this week create a coffee themed card.
I have been having fun this month playing with Lawn Fawn's Magic Iris die set, so I decided to pull it out again to make another card. This time around I used it on it's own without either of the add-on dies.
I die cut all the parts for the Magic Iris from white cardstock and then used Distress Oxide inks in Spun Sugar and Picked Raspberry.
I used some patterned paper from Doodlebug Design Inc for the coffee cup paper on the top of the Magic Iris.
Here is a quick video to see my card in action.
I used Honey Bee Stamps Coffee Break die set to create the coffee cup that is revealed when the magic iris is fully opened. I added a face from Lawn Fawn's Reveal Wheel Circle Sentiments to the coffee cup.
The "Latte Love" sentiment above the cup is from Hero Arts August 2018 My Monthly Hero Kit.
I added the "Let's Have Coffee" and coffee beans to the centre of the magic iris when it is closed. These are both from a Honey Bee Stamps Perfect Blend stamp set.
Here is a quick look at my card showing the Magic Iris closed, partially open and then fully open.
For the inside of my card I added a coffee themed sentiment which is from La La Land Crafts Coffee Mug Marci stamp set which was part of the July 2019 kit. I added five more die cut coffee cups in the colors used on the designer paper on the front of the card. Don't forget to check out the CCEE Stampers blog (goes live 12 AM EST) to see the rest of the creations the CCEE Stampers created this week. You can also see more details of their creations on their individual blogs:
For your shopping convenience, all products are linked below. Compensated affiliate links are used where possible with no extra cost to you. This helps me to continue to share all the projects I include on my blog. For the benefit of my Australia readers, I have started to include some links to Australian stores when available. Please note I only use and share products I love.
My card today is for a challenge I do with a friend of mine. Each month we challenge each other to create something using supplies we all own.
As we both purchased Lawn Fawn's new Magic Iris dies last month when it was released, it made perfect sense for us to use that for our challenge this time around.
Here is a quick video to see my card in action.
To decorate my card, I used Gerda Steiner's Meerkats on the Lookout stamp set. This is such an adorable stamp set,
I used Distress Oxide inks in Antique Linen & Vintage Photo to create my sand along the base of my card.
I used Tumbled Glass Distress Oxide ink for the clouds, using MFT Stamps Mini Cloud Stencil.
Here is a quick look at my card showing the Magic Iris closed, partly open and then fully open.
I used one of the sentiments included in the stamp set, to add my sentiment on the front of the card.
On the inside of my card, I continued the sentiment on the front by adding the ... the birthday boy. I added a second sentiment underneath the first one. These sentiments are from MFT Stamps Birthday Birthday Sentiments stamp set.
I also added a couple of meerkats and a rock along the bottom of the card.
Supplies:
For your shopping convenience, all products are linked below. Compensated affiliate links are used where possible with no extra cost to you. This helps me to continue to share all the projects I include on my blog. For the benefit of my Australia readers, I have started to include some links to Australian stores when available. Please note I only use and share products I love.
It's my birthday today, so I thought I would share a birthday card I created recently.
Today I am playing with a Hello Bluebird die set to create the background scene for my card. I have been seeing some wonderful creations made with these dies for the past few months or more and decided it was about time I had a few myself.
For this card I used Hello Bluebird's Oak Tree Scene die set. I die cut the image from white cardstock and then colored the individual pieces using inks.
To decorate my card I used MFT Stamps Birthday Buds stamp set, this is such an adorable stamp set and I have lots of fun coloring all these fun images who are celebrating the elephant's birthday!
For the inside of my card, I decided to create a pop-up card using Lawn Fawn's Pop-up Hello die set, this pop-up die can be used in either a landscape or portrait style card. After adding the pop-up to the card, I adhered the letters from Oliver's Alphabet over the white letters.
I finished the inside by adding a few more of the animals from the Birthday Buds stamp set.
Supplies:
For your shopping convenience, all products are linked below. Compensated affiliate links are used where possible with no extra cost to you. This helps me to continue to share all the projects I include on my blog. For the benefit of my Australia readers, I have started to include some links to Australian stores when available. Please note I only use and share products I love.