Thursday, August 31, 2023

Santa's Workshop


Hi Crafty Friends,

Today I am sharing a fun Christmas theme Kinetic Card using some new stamps and dies from Made To Surprise by Sam Calcott.

Everything used here is from the new Moving Scenes Collection which was released earlier this month. For this card I used the 5 x 7 mechanism die set along with the North Pole Christmas stamp set. I also used the coordinating Snow Patterned Paper that is also included in the collection. For the sentiment I used one of the sentiments from the Moving Scenes Christmas Sentiments stamp set.

As you can see by the photo above, there is a pull tab at the lower right hand corner of the card. On this card it controls three of the elves making them move slightly.


Here is a quick video so you can see my card in action, the movement is subtle, but it is still lots of fun.


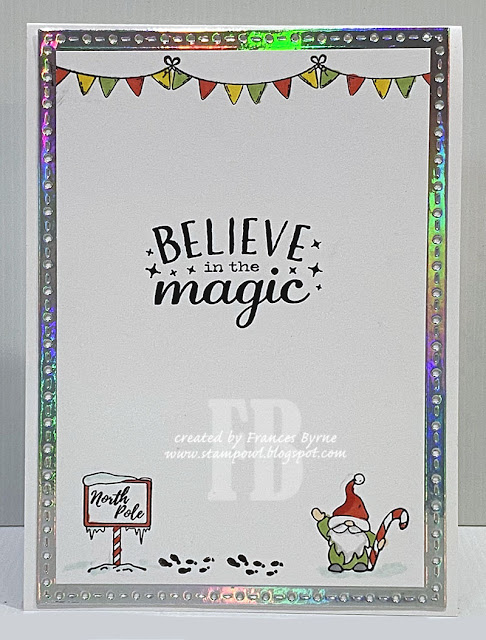
Here is a look at the inside of my card. I added another sentiment from the sentiment set as well as a few more images from the North Pole stamp set.


Rebus - Jackie Collins Books


Hi Crafty Friends,


It's time to share another rebus puzzle swap with you! This month the theme is "Books written by Jackie Collins".

If you would like to solve my rebus puzzle, why not post a comment on my blog post with your answers. I will let you know what the correct answers are next time I post a rebus card here.

How did you go solving my July Rebus which was "Movies starring Julia Roberts  "

 Here are the correct answers so you can check how you did.

  1. Firehouse (1987)
  2. Dying Young (1991)
  3. The Pelican Brief (1993)
  4. Wonder (2017)
  5. Notting Hill (1999)
  6. Runaway Bride (1999)
  7. Hook (1991)
  8. Pretty Woman (1990)

You can find all my past Rebus Cards here.


Wednesday, August 30, 2023

Celebrate You


Hi Crafty Friends,

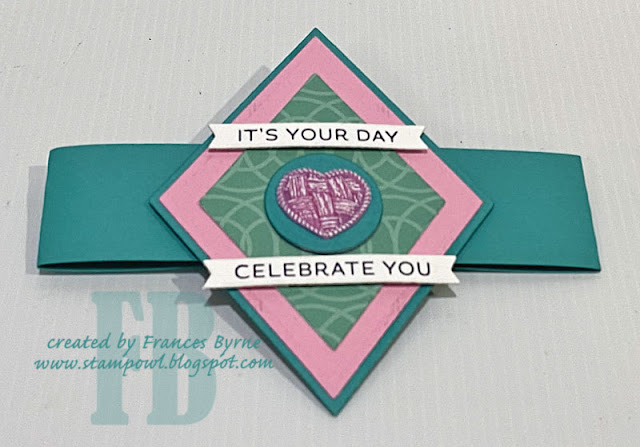
About a year ago, I shared a 6 x 6 version of a Gatefold Pop-out card, today I have a 5 x 7 version. 


For this card I pulled out another Betterpress Plate I got when I purchased my Spellbinders Betterpress recently ... this one is the Diamond Aviary Press Plate. After creating the image, I coloured it using my Black Widow Pencils. 


When the card is closed it becomes a Gatefold Fold Card, and is held closed using a Belly Band.

The sentiments used on the front and on the bird are also Letterpresses using the Betterpress System. 


In the centre of the diamond panel, I added a woven heart wax seal using a wax seal that I found on eBay. After pouring the wax and stamping the wax seal stamp into the wax, I used scissors to cut around the outline of the heart. I then used white ink to highlight the weaving.


Here is a look at the back of my card. The two side panels form the front of the gatefold card when the card is closed. 

I added two white panels to the next two panels, for a place to stamp a sentiment and also to be able to write a personal greeting when this card is given to someone. Both sentiments are from Stampendous' Cheap Tweets stamp set.


Other Supplies:
  • It's Your Day Betterpress Press Plate - Spellbinders
  • Tweet Chirps Stamp Set - Stampendous (discontinued)
  • Woven Heart Wax Seal 


Tuesday, August 29, 2023

To My Favourite Person


Hi Crafty Friends,

I finally got my hands on one of the new Spellbinders Betterpress system. I have been waiting patiently for the store I purchase many of my supplies from here in Australia to get it in. For now I only got the system, some Cotton Cardstock and a few Betterpress Plates. I will get more over time. 

For my first play with the system I used the Pressed Bouquet Plate. I placed it in the corner of the magnetic base in one corner for a 5 x 7 card panel and used the ink pad that came with the system to ink up the plate. Once I had run the Betterpress system through my die cutting machine, I then inked up my plate an again and flipped the platten that had the cardstock attached, so that I could get an image in the opposite corner.

I also used one of the sentiments from the exclusive die that comes with the Betterpress system. I like how Spellbinders included the two different spellings of the word "favourite", I hope they do this more often when words I spelt differently in other countries.

Even though Spellbinders, says you can't colour the image using alcohol markers if you use the included ink pad, I had no trouble colouring the image using my markers.

I die cut my panel using a stitched rectangle die, so I could adhere it to a top folding 5 x 7 card.


For the inside of my card, I die cut another white panel, and then time I inked the Betterpress plate using a pink Catherine Pooler ink. As I only used normally cardstock it just stamped the image, it didn't leave any impression into the cardstock as it does when you use Cotton Cardstock. 

I also added a sentiment, using a stamp from a Creative Craft Products stamp set.


Monday, August 28, 2023

Joyful Stocking


Hi Crafty Friends,

Today I am sharing another Christmas card I created recently. This time around I have used Spellbinders July 2023 Large Die of the Month which is called Stocking Full Of Joy. I thought this was great value as it includes dies for the Christmas Stocking; Gingerbread Man, Gnome, Candy Cane, Sentiment and various foliage.

For the background of my card I used Creative Craft Products Crosses Background 5 x 7 Cover Plate, but rather than die cutting the background I embossed it. 

My wax seal is part of a collection of Christmas Wax Seals I found on Amazon. I also used a metal Wax Seal Mould to use when pouring my wax, to give a fun shape to the seal. I also found the moulds from Amazon. My burner and wax are from Made To Surprise.


For the inside of my card I used an older Retro Merry Christmas sentiment die set from Sizzix/Tim Holtz.

I also added another gnome above the sentiment to finish off the card.

Other Supplies:
  • Retro Merry Christmas - Tim Holtz/Sizzix
  • Stocking Full of Joy - Spellbinders July 2023 Large Die of the month
  • Merry Christmas Wax Seal 
  • Red Wax Seal Beads
  • Floral Wax Seal Mould


Friday, August 25, 2023

Doggone Great Day


Hi Crafty Friends,

According to the Days of the Year website, tomorrow (26th August) is National Dogs Day. As you can see, I decided to create a dog themed card in honour of the occasion.


As you can see, I created a Slimline card.  I used the Be A Dog die set from Waffle Flower Crafts to create the two dogs I added to my card. I also used the bone die from the Stampendous Puppy Hugs die set which I used to add the "Happy Birthday" sentiment to my card. The sentiment is from a Creative Craft Products Birthday Sentiments stamp set.

To finish off the front of my card, I added the paw print wax seal to the middle area of my card.


For the inside of the card, I created a double pop-up card using Karen Burniston's Katherine Label Pop-up.

I added the dog faces to each of the labels using the Stampendous Puppy Hugs stamp set.

Both sentiments are from La-La Land Crafts' Pawsome Friend stamp set.


Other Supplies:

  • Paw Print Wax Seal
  • Green Wax Beads


Thursday, August 24, 2023

Gnomefuls of Christmas Wishes


Hi Crafty Friends,

As today is the 24th August, it is almost 4 months until Christmas ... YIKES! So today I am sharing a gnome themed Christmas card I created.


I created a 5 x 7 Flip Card, using Creative Craft Products Perfect Flips - Circle die set. For the layers I used a patterned paper from Simply Made Crafts Winter Sparkles 12 x 12 Paper Pad.

I decorated the card using Stampendous' Slim Winter Gnomes, this is a slimline style stamp which I stamped and then cut apart and positioned the gnomes where I wanted on my card. 


When you pull the left side of the card the card opens and the circle in the centre "flips" to reveal the other side. Here I stamped a Christmas sentiment and a few snowflakes. The "GNOEL" is from an older Honey Bee Stamps stamp set which may be discontinued now. The rest of the sentiment is from MFT Stamps Bitty Holiday Sentiments stamp set.


As you can see, I decided to decorate the back of my card. I used white cardstock on the left panel so that I could add another sentiment and some images and have a place to write a personal greeting. The rest I decorated using the same patterned paper I used on the front.


Other Supplies:
  • Slim Winter Gnomes - Stampendous
  • Gnome Place Like Home - Honey Bee Stamps (discontinued)


Wednesday, August 23, 2023

Hands Up If You've Been Good


Hi Crafty Friends,

Over the past few months, I have been enjoying making "puppet" themed cards using the It's Only More Puppets Collection from Made To Surprise by Sam Calcott. Last year I was able to get some of the puppet dies from the original It's Only A Puppet Collection, however the embossing folder and Santa/Rudolph die set weren't available to purchase.

A few weeks ago, I received an email notification from Craft Stash to say that the whole collection of It's Only A Puppet was back in stock and available to purchase .., yay! So of course I ordered what I didn't have :)

My dies arrived last week, so I wasted no time pulling out the Santa from the Santa & Rudolph die set to make a Christmas card. 


Here is a quick video to see my card in action.


For my card today, I decided to combine the It's Only a Puppet 6 x 6 mechanism die set with a Wiper Card. So it has two kinetic actions going on. For the Wiper card, I used Made To Surprise's 6 x 6 Square Pop-up Wiper Card die set.

As you can see, I also used the Snow Angel Embossing Folder for my background, I love how this looks, I used pearlescent white cardstock for this panel to add some shimmer to the card.


When you pull the sides of the card, it reveals the speech bubble with the "Ho Ho Ho" sentiment coming out  of the top of the card. The speech bubble is attached to a clear acetate wiper mechanism using one of the dies included in the Wiper Card die set. The "Ho Ho Ho" sentiment is from the Christmas Words die set also from Made To Surprise.

Along the bottom of the square panel, I added another sentiment which is from the Christmas Fun Sentiments stamp set. I white embossed the sentiment on red cardstock and then added a silver holographic border.

The wax seal on the top right hand corner of the card was created using a Spellbinder's Wax Seal Stamp ... Do Not Open. I also added a few extra red beaded embellishments which were also created using the red wax seal beads I used for the wax seal.


I added a white panel to the back of the wiper card, so I could have a place for more sentiment and a personal greeting.

I used another sentiment from the Christmas Fun Sentiments stamp set and also added the Merry Christmas from the Creative Craft Products Inside Out Sentiments Christmas Card die set.


Tuesday, August 22, 2023

Sweet Christmas


Hi Crafty Friends, 

It's almost 4 months until Christmas, so today I am sharing a Christmas card I created.

In July, Craft Stash released their Creative Craft Products Sweet Christmas Collection die sets. These dies make cute little holders for a round chocolate. Today I am using the Santa Himself die set to make a Christmas card, instead of the chocolate holder it is meant to make.

I also used one of the Fancy Folds die sets from Creative Craft Products ... this one is the A6 Window Card die set. 


Because the Sweet Christmas Collection die sets are made to display a chocolate, there is a hole die cut into each of all the Christmas Characters. In the case of Santa Himself, his tummy! As I wanted to use this on a card rather than a treat box, I decided to cover the hole by using a wax seal. 

My wax seal is part of a collection of Christmas Wax Seals I found on Amazon. I also used a metal Wax Seal mould to use when pouring my wax, to give a fun shape to the seal. I also found the moulds from Amazon.


Here you can see the card when it is folded ready to be placed in an envelope.

I used the Made To Surprise by Sam Calcott's Ditsy Embossing Folder for the background layer on the front panel of my card.


Here is a look at the back of my card. I added a white panel to the centre to add the sentiments and write a personal greeting. The sentiment and Santa in his Sleigh are both from an Apple Blossom Stamp set called Santa Claus is Coming To Town from their Festive Globes Collection.


Other Supplies:
  • Festive Globes/Santa Claus Is Coming To Town Stamp Set - Apple Blossom
  • Merry Christmas Wax Seal 
  • Green Wax Seal Beads
  • Floral Wax Seal Mould


Monday, August 21, 2023

You're Sweet!


Hi Crafty Friends,

Today I am sharing a Slimline Pop-up card I created recently.


For my card today I used stamps that were included in Creative Stamping Magazine Issue 122. This stamp set included afternoon tea related stamps included a number of different popular biscuit images.

One of the cards included in the the magazine was a square card with the background full of biscuits that had been masked. I love the look of the card, so I decided to do something similar, but as a slimline card.

I used two Picket Fence Studios Slimline die sets to die cut the background and layers. 

To finish off the front of the card, I added the "You're Sweet" sentiment which is a Karen Burniston die.


As you can see by the photo above, I created a pop-up card for the inside of my card using Karen Burniston's Katherine Label Pop-up die set. The sentiment used on the label also comes from the stamp set that the biscuits are in.

I created two more smaller panels full of biscuits, to use on the top and bottom edges of my card.


Here is another look at the inside of my card. 


Friday, August 18, 2023

Drive Me Happy


Hi Crafty Friends,

Today I am sharing a 5 x 7 Card I created recently.

For the layers of this card I used Card Making Magic's 5 x 7in Alternative Stitched Nestables die set. 

I used Lawn Fawn's On the Road die set for the road at the bottom of the card.

The car is Studio Light's Creative Craft Lab Car die set. I also used Benny Bear from the Missees Pets line from Studio Light.

I pulled out an older Pine Tree die from Sizzix to add the trees on either side of the card.

Finally I used a sentiment from Stampendous, which is one I have had in my stash for years.


For the inside of the card, I added the road again to the bottom portion of my card. I used a mix of sentiments from two Honey Bee Stamps stamps sets to add the sentiment.

Other Supplies:
  • Missees Pets Benny Bear Stamp/Die Set - Studio Light 
  • Drive Me Happy Stamp - Stampendous (discontinued)
  • Pine Tree Die - Sizzix (discontinued)
  • Love Bug Stamp Set - Honey Bee Stamps (discontinued)