Thursday, January 31, 2019

Thank You Bouquet


Hi Crafty Friends,

It's challenge time with my friends over on the CCEE Stampers challenge blog. Liz Williams our challenge hostess for the month, finishes off the month with one last challenge.

Apparently March was National Thank You month. So, before the month is over, make a thank you card and send an unexpected thank you to someone whose small act of kindness has not gone unnoticed by you.

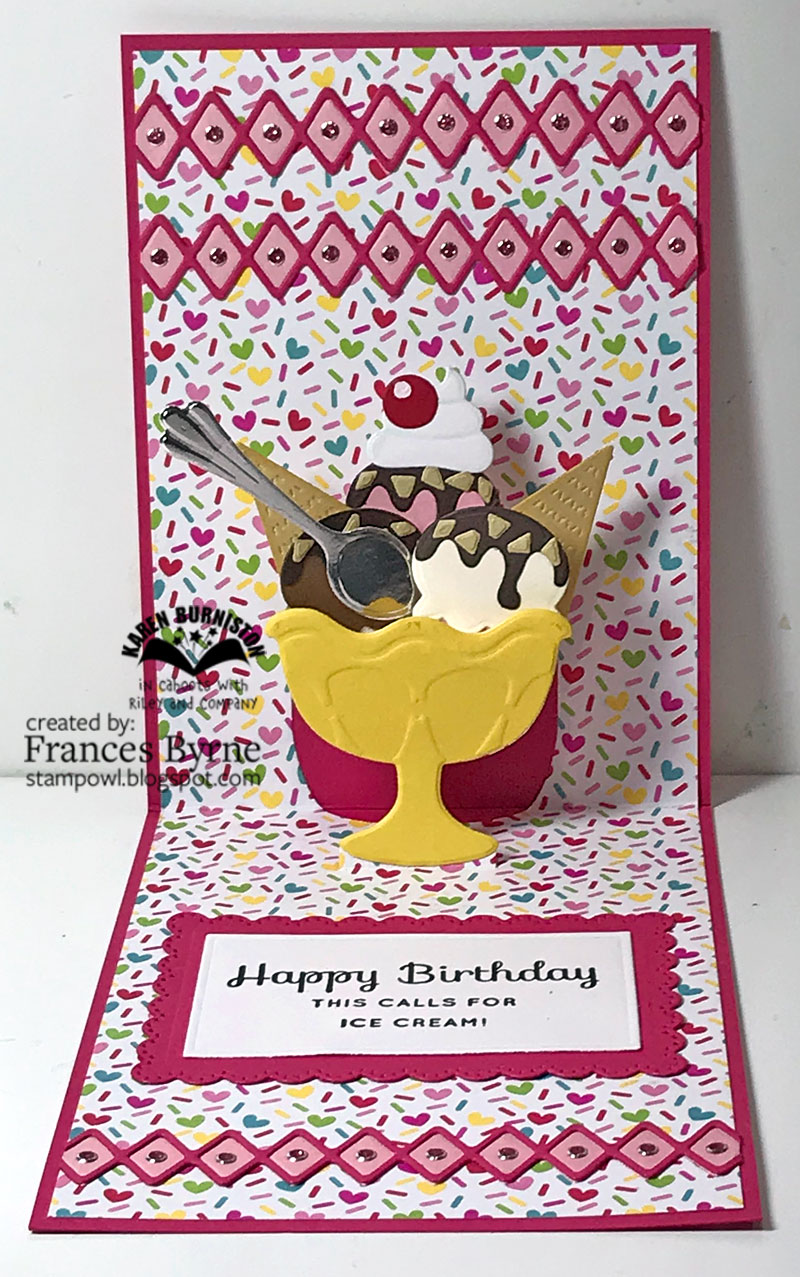
For my card today, I decided to say "Thank You" with a bouquet of flowers! I used Karen Burniston's new Woven Basket die set which is a variation on a Pop-up Box Card. The die comes with the pieces to die cut the basket and create the woven effect, the grass, flowers and stems.


I die cut my flowers using various shades of orange cardstock and some orange polka dotted patterned paper, layering them all together. I added Nuvo Drops to the centres of each of the flowers.


Seeing this is for a Thank You challenge, I die cut Karen Burniston's Thank You die from teal cardstock 3 times layering them all together for added strength. I then attached the sentiment to the basket using acetate.

I wan't to play with the new owl from the Feathered Friends die set, so I die cut that and added it so it is peeking out behind the flowers on the front of the basket.


Here you can see my card when it is folded flat ready to be placed in an envelope so it can be mailed.

Don't forget to check out the CCEE Stampers blog (goes live 12 AM EST) to see the rest of the creations the CCEE Stampers created this week. You can also see more details of their creations on their individual blogs:


Supplies:
For your shopping convenience, all products are linked below. Compensated affiliate links are used where possible with no extra cost to you. This helps me to continue to share all the projects I include on my blog. Please note I only use and share products I love.


Wednesday, January 30, 2019

Rebus - Song by Cliff Richard


Hi Crafty Friends,

It's been a couple of months since I posted my last rebus card, as my friends and I who do this each month always take a break for December. Now that it is the new year, it is fun to dig out all my rebus stamps again and figure out what I would do for our January theme.

This month the theme is Cliff Richard Songs. 

If you would like to solve my rebus puzzle, why not post a comment on my blog post with your answers. I will let you know what the correct answers are next time I post a rebus card here.

How did you go solving my November Rebus which was"Names Starting with 'O' ".
 Here are the correct answers so you can check how you did.

  1. Oliver
  2. Odette
  3. Omar
  4. Oleander
  5. Orson
  6. Ogden
  7. Ophellia
  8. Oxley
  9. Owen
  10. Orpheus


You can find all my past Rebus Cards here.

Tuesday, January 29, 2019

All I Need Is ....


Hi Crafty Friends,

Apparently today (29th January) is Puzzle Day, so I thought it would be fun to create a puzzle themed card using stamps & dies I had in my stash.

A while ago I purchased Tonic Studios All You Need Is die set, which contains a collage of jigsaws. A month or two ago I was finally able to get hold of Pink & Mains's To Pieces stamp set. As soon as I saw this stamp set I knew I wanted to use it with the jigsaw puzzle die set.

I die cut the top puzzle pieces from white cardstock and then used Distress Oxide Inks in Dried Marmalade & Abandoned Coral inks. I then spritz each of the pieces using Perfect Pearls mixed in water. For the layering pieces I used a pink cardstock and then adhered this to a folded red card.


I stamped the bears and jigsaw pieces and adhered them to the puzzle panels. 

I die cut the "All I Need Is" from red cardstock and adhered it to the puzzle piece. I white embossed the "Love ya to pieces" sentiment. You can read this as both Love ya to Pieces and All you Need Is Love.


For the inside of my card I used two more of the puzzle pieces from the die set, and added two of the bears to the centre of the pieces. I added some hearts die cut from the All You Need Is die set and the sentiment which is from the stamp set.


Supplies:
For your shopping convenience, all products are linked below. Compensated affiliate links are used where possible with no extra cost to you. This helps me to continue to share all the projects I include on my blog. Please note I only use and share products I love.


Monday, January 28, 2019

Love You To The Moon and Back


Hi Crafty Friends,

My card today is for a challenge I do with a couple of friends of mine. Each month we challenge each other to create something using supplies we all own.

As this is our first challenge for the year and just after Christmas, our challenge this month was to create a card using anything new.

As I had just received the Sunny Studio Stamps Sliding Window Card die set and some fun space themed stamps from Whimsy Stamps, I decided to combine the two to create my card.


Here is a quick video to see my card in action.


To create my card I started by covering a piece of white cardstock with Altenew's Watercolor Nebula Washi tape, this washi tape is about 6 inches wide and gives a great galaxy or space background without lots of work.

I die cut the washi tape cardstock using the largest rectangle from Heffy Doodles Imperial Stitched Rectangles die set. Next I used the main die from Sunny Studio  Stamps Sliding Window die set to die cut the centre of the panel.


For the moon I used Whimsy Stamps Moon Background stamp. I seem to make a few spaced themed cards each year and I know this stamp will get a work out in the future. I do have another moon surface type of stamp however this one is much deeper so a must have for me.

I stamped the moon background onto thinner white cardstock and colored the image and cut around the top edge of the moon. I then lay this over my card where I knew I wanted it to lay and used the same rectangle die to die cut the image so the stitched lines where on both the washi taped background and the moon.

Next I lay the moon back over the card and positioned the sliding window die back over where I cut it on the washi card panel and die cut the lower section of the sliding window portion.

I cut a rectangle panel which also had washi tape on it the same size as the sliding window and then adhere the moon to both this panel and around the bottom of my main card.


I constructed the card as per the instructions provided on Sunny Studio Stamps web site.

To decorate the card I used Whimsy Stamps Space Dragon for the main image on the panel that moves up. This image is also adhered to the panel using a action wobble so this gives the image some extra movement.

The sentiments and all other images used on this card are from Whimsy Stamps A Boy's Dream.


For this style of card you have the option of either mounting the sliding window to the front of a folded card or keeping it flat by just adhering it to a piece of cardstock. I decided to just adhere my card to a flat black rectangle panel so my card could be displayed as per the photos in this post.

Of course I still had to decorating the back of my card (it's what I do LOL!) so I added the moon, and a few more of the images from the A Boy's Dream stamp set.


Supplies:
For your shopping convenience, all products are linked below. Compensated affiliate links are used where possible with no extra cost to you. This helps me to continue to share all the projects I include on my blog. Please note I only use and share products I love.


Sunday, January 27, 2019

You Are Koalafied For A G'day


Hi Crafty Friends,

Yesterday was Australia Day down here in Australia. I had something else I had to post on my blog yesterday, but seeing I had the cute Koala from Simon Says Stamp I thought I would create a card using it for today.

With a little bit of imagine, the Leafy Frame also from Simon Says Stamp could be gum leaves so I decided to combine the frame, the koala and the Hugs body to create my card today. 

The background was created using Distress Inks in blues and then spritz using Perfect Pearls in water. I then added the body so it would be underneath the frame. I die cut an additional piece of frame using scrap paper so I could cut some extra leaves and place them in the koala's paws.


For the koala's head I adhered it to the card using an action wobble, so the head will move when you touch it.


For the inside of the card, I die cut an additional frame . I added one of the sentiments and a small koala image from Gerda Steiner's You're Koalafied Stamp set. I also added the G'day which is from Ultimate Crafts.


Supplies:
For your shopping convenience, all products are linked below. Compensated affiliate links are used where possible with no extra cost to you. This helps me to continue to share all the projects I include on my blog. Please note I only use and share products I love.


Saturday, January 26, 2019

This Calls For Ice Cream


Hi Crafty Friends,


It’s challenge time with the “Crazies” over on the Crazy 4 Challenges blog. Karen Aicken our challenge hostess for the month, continues to issue the challenge.

Celebrate! January always feels so long, but it’s coming to a close. Make a card to Celebrate! You can make a birthday card, a card to celebrate an upcoming holiday, a card for someone who has a new job, going on a vacation etc. Let’s Celebrate!


What better way to celebrate than with ice cream right!!!! I decided to create a birthday card using the new Karen Burniston Ice Cream Sundae Pop-up die set ... what fun is this!!!! You can whatever flavoured ice cream you want and it's no calories!!!! 

I have vanilla, chocolate and strawberry ice-cream on mine, with chocolate topping, cream, nuts, wafers and a cherry on top! And of course you need a spoon to eat it.

For the sentiment I used an old stamp set that included an ice cream sentiment. This is layered using scallop rectangle and plain rectangle from the new Rockin' Rectangles Pop-up die set.


I used the Border Blends - Argyle die set to create the borders on this card.


For the front of the card, I added another ice cream sundae and also added the You're Sweet sentiment which is again layered using the scallop rectangle panel from the Rockin' Rectangles Pop up.

Don't forget to check out the rest of the “Crazies” cards over on the Crazy 4 Challenges blog and also their individual blogs for more details.


Supplies:
For your shopping convenience, all products are linked below. Compensated affiliate links are used where possible with no extra cost to you. This helps me to continue to share all the projects I include on my blog. Please note I only use and share products I love.


Friday, January 25, 2019

Divinity Designs - Apple Branch & Stencils


Hi Crafty Friends,

I have 2 more projects using some of the Divinity Designs January Release products. Today I am  focusing on the new Apple Branch Stamp set with the two new stencils ... Circles & Petals.


For my first card today I have used the Apple Branch stamp set along with the Circles Stencil and the Half-Shutter Card with Layers die set. 

The Apple Branch stamp set includes 6 sentiments for various occasions, two of the sentiments are Get Well related so I decided to use those to for this card to make a get well card.


Another die that Divinity Designs released this month is the Belly Band die set which is great to help keep cards closed. I have used that for my Half Shutter card as you can see in the photo above.


When you remove the Belly Band from the card it reveals the complete image of the apples.

The apple image and sentiments used on this card are all layered using the Double Stitched Ovals die set.


Here is a look at my card as it is partially open.


Here is a look at my card and the belly band when it is removed.

Both the panels on the Half-Shutter card and those on the Belly Band have been decorated using the Circles Stencil. For the Belly Band and also the smaller panels on the Half-Shutter card I used a technique to enable me to get two different colors on the stencil panel and also gives a different look.


To create the two colored background I started by applying Candied Apple Distress Oxide ink through the stencil onto a piece of white cardstock. The photo on the right is how the stencil should look like when you use it as it was meant to be used.


For a different look and or two colored once you have applied the ink through the stencil the first time, remove the stencil and then place the stencil back onto the card so that you now have white space between the pattern. In the case above I used the same color, sponging lightly, but in my first project I used Peel Painted Distress Oxide inks to give a two tone look. Both work and give you are completely different look using your stencil, so you have more options. 


Here is a close up of my Belly Band showing the two  colored stencilled panel. I added the Get Well Soon sentiment layering the sentiment using the Double Stitched Ovals die set.


For my second card today I have again used the apple branch from the Apple Branch stamp set and another of the sentiments from the stamp set.

This time around I created a Tri-fold Card using the Tri-fold Card with Layers die set.


To decorate this card I used the Petals Stencil. I first applied Peeled Paint Distress Oxide ink onto a piece of white cardstock. I then placed the stencil over the panel and applied Candied Apple Distress Oxide ink all over. I used the layer dies from the Tri-Fold Card with Layers die set to die cut all the panels and added it to the card.

Along the left and right edges, I added a border using one of the borders from the Bitty Borders die set.


Here is a look at my card when it is closed ready to be placed in an envelope. The sentiment has been layered using the Double Stitched Circles die set sponging red ink over the centre of the white circle before removing the die.


Thanks for visiting my blog today, I hope you enjoyed my projects.

Supplies:
For your shopping convenience, all products are linked below. Compensated affiliate links are used where possible with no extra cost to you. This helps me to continue to share all the projects I include on my blog. Please note I only use and share products I love.


Thursday, January 24, 2019

60th Anniversary


Hi Crafty Friends,

It's challenge time with my friends over on the CCEE Stampers challenge blog. Liz Williams our challenge hostess for the month, continues to issue the challenges.

Apparently Gold was discovered in California on Jan. 24, 1848. For our challenge this week we are to use some “gold” on our creations.


A couple that attend a club I attend are celebrating their 60th wedding anniversary this month, so I wanted to create a special card to give to them. Of course this challenge was the perfect opportunity to create my card for them.

To create my card I have used Karen Burniston's new Circle Tag Pop-up die set to create a tag book pop-up. This die set is one of the new die sets being released at the end of the month, this and all the other new die sets are available for pre ordering now ... link at the bottom of this post. I used vanilla pearlescent cardstock for the base of the card and then used gold cardstock and gold patterned papers to decorate the card.


I used some of the heart dies from the Hearts Pivot Panels die set which is another new die set being released this month. I also used the Numbers die set to add the "60th" to one of the circle panels.  


I used the congrats sentiment from the  Word Set 1 - Greetings die set to add the sentiment to the card.


For the front of the tag book I used one of the ovals from the Crosshatch Ovals die set as the base for my sentiment. the Congrats is from the new Word Set 9 - Congrats die set.


Don't forget to check out the CCEE Stampers blog (goes live 12 AM EST) to see the rest of the creations the CCEE Stampers created this week. You can also see more details of their creations on their individual blogs:


Supplies:
For your shopping convenience, all products are linked below. Compensated affiliate links are used where possible with no extra cost to you. This helps me to continue to share all the projects I include on my blog. Please note I only use and share products I love.