Wednesday, May 31, 2023

What's More Fun Than Blowing Out Candles?


Hi Crafty Friends,

It was my daughter's birthday earlier in the month, and as she wanted money to buy ski clothes to take on a skiing holiday she has planned, I gave her money so she could get what she wanted. Of course I had to make a money card to add the money to.

As you can see, I decided to go with a winter them and added snow, snowmen etc seeing that was the theme of her present.

I used the Money Card Die-namics from MFT Stamps to create the base of my money card and the sentiment is from their Birthday Cash stamp set. 

The snow and snowman pieces were created using Karen Burniston's Snowman die set and also the Nature Edges die set.


For the back of the money card I added this cute snowman on skis which is a Daisy Mae stamp. I added another sentiment from the Birthday Cash stamp set from MFT Stamps and the "Hit the Slopes" is from a Hello Bluebird Stamp set.


Rebus - Types of Biscuits


Hi Crafty Friends,


It's time to share another rebus puzzle swap with you! This month the theme is "Types of Biscuits or Cookies ".

If you would like to solve my rebus puzzle, why not post a comment on my blog post with your answers. I will let you know what the correct answers are next time I post a rebus card here.

How did you go solving my April Rebus which was "Songs by Barbra Streisand "

 Here are the correct answers so you can check how you did.

  1. The Way We Were
  2. Funny Face
  3. No More Tears
  4. People
  5. You Don't Bring Me Flowers
  6. Somewhere

You can find all my past Rebus Cards here.


Tuesday, May 30, 2023

Coffee Cup Rainbow


Hi Crafty Friends,

Today I am sharing a Coffee themed Slimline Pop-up Card using dies from various companies.


First up ... the front of my card. I started with the coffee cups using MFT Stamps Creature Comforts Die-namics. I die cut the coffee cups and saucers in two shades of rainbow coloured cardstock and assembled.

I used Spellbinders Slimline Hemstitch die set to die cut the centre white panel which I then layered onto a black panel. 

I used the rainbow coloured circles that were left over from die cutting the cups (the inner portion of the cup) to decorate around the edge of my slimline card. I cut each of the circles in half and then adhered them to the edge of the card, alternating the position of the semi circles.

Next I added the inner panel to my card and adhered the coffee cups in rainbow order.


For the inside of my card I created a pop-up card using Karen Burniston's Little Labels Pop-up die set. I die cut it in white and added it to the centre of my card.

I die cut two more coffee cups and adhered them to the outer labels of my pop up.

For the sentiment in the middle of the card I used a sentiment stamp from MFT Stamps Coffee Order stamp set.


To decorate the edges of my card and the long strip of the pop-up, I used Mama Elephants' Quick Stripes die and die cut the same coloured cardstock I used for all the coffee cups on the front. I then added Double Sided Adhesive Tape to the front of a panel of cardstock which was slightly longer and wider than I needed and adhered the stripes diagonally in rainbow order.

I trimmed the top and bottom edge panels using my guillotine and then used the dies included in the Little Labels Pop-up die set to create the rainbow banner to add to the pop-up portion of the card.


Monday, May 29, 2023

Time To Celebrate


 Hi Crafty Friends,

My grandson turned 13 this month! Wow where has the time gone, it seems like only a few years ago that I held my first grandchild in my arms not long after he was born! Thirteen of course means that he is now a teenager, so I wanted something special to celebrate the occasion. 

As both my grandchildren liked the 3D Display Card I made earlier in the year, I decided I would make him one of those. I also made a special Envelope Gift Bag which was designed to fit the 3D Display Card. 


For this card I used the Made to Surprise 3D Display Card & Stand die set along with the Circular Frame Clock die set to make this fun clock card. I figured a clock went well with turning 13!


As you can tell by the photo above, I added lights to the inner hollow portion of the card along with plenty of cogs which are from the Time Clock Additions Stamp/Die set. I die cut all the cogs from silver holographic cardstock and added them inside the clock, behind the face of the clock. 


As it was a card for a teenager, I wanted to add a few things that I know my grandson would like. So I added a small game controller using a die set from MFT Stamps and a Pokemon thingy that I found already made up when I went to get my game controller dies. I also added a few more silver cogs to balance off that side of the card a little.


On the right hand side of the card I added the "13th" using the Large Modern Numbers die set also from Made to Surprise.

I added the fun "face" to the Clock Face using dies included in the Time Clock Additions Stamp/Die set. I added googly eyes to the eyes, I would have like larger ones but that is all I had on hand, so they had to do. I also found a large blue brad which worked perfectly to secure the hands of the clock.

The sentiment is also from the stamp set included in the Time Clock Additions Stamp/Die set.


On the back of my card, I computer generate the blurb which tells you how many years, months, minutes, weeks etc 13 years is.

I added a blank white panel to the stand of my card, so I had a place to write a personal greeting.


After going to all that trouble making the 3D Display Card, I wanted to make something to carry it in and that would protect it. When Sam Calcott released the 3D Display and Stand Collection, she shared a tutorial on how to make an Envelope Gift Bag to fit the 3D Display Card in, so I decided to make one of those. I kept mine fairly simple, as a 13 year old boy isn't going to care too much about a gift bag. You can see Sam's video here


As you can see I added the number "13" to the front of the bag using the Large Modern Numbers die set. I also added a strip of card along the bottom with the sentiment "Woohoo!" 


Friday, May 26, 2023

Here's To You


Hi Crafty Friends, 

Today I am sharing a male themed Gatefold Card that I created recently.


This card uses one of the Gatefold die sets from Creative Craft Products Perfect Gatefolds Collection. This one is the Star Gatefold card and measures 5 inches square. 

For this card I made use of some leftover beer themed paper that I had after making another card earlier in the year. I had just enough to make this card.


I created a belly band for my card, to help keep it closed. There is a die set available to make these with a fancy edge, but I didn't get that. I used the star dies included in the Star Gatefold Card die set to add to the belly band. I added the "Here's To You" sentiment using part of a sentiment included in MFT Stamps Here's To You Stamp set.


For the inside of my card, I used the reverse side of the patterned paper. I added another of the sentiments from the Here's To You stamp set, stamping it so it can be seen through the star aperture when the card is closed.


Thursday, May 25, 2023

Wheely Awesome Day


Hi Crafty Friends,

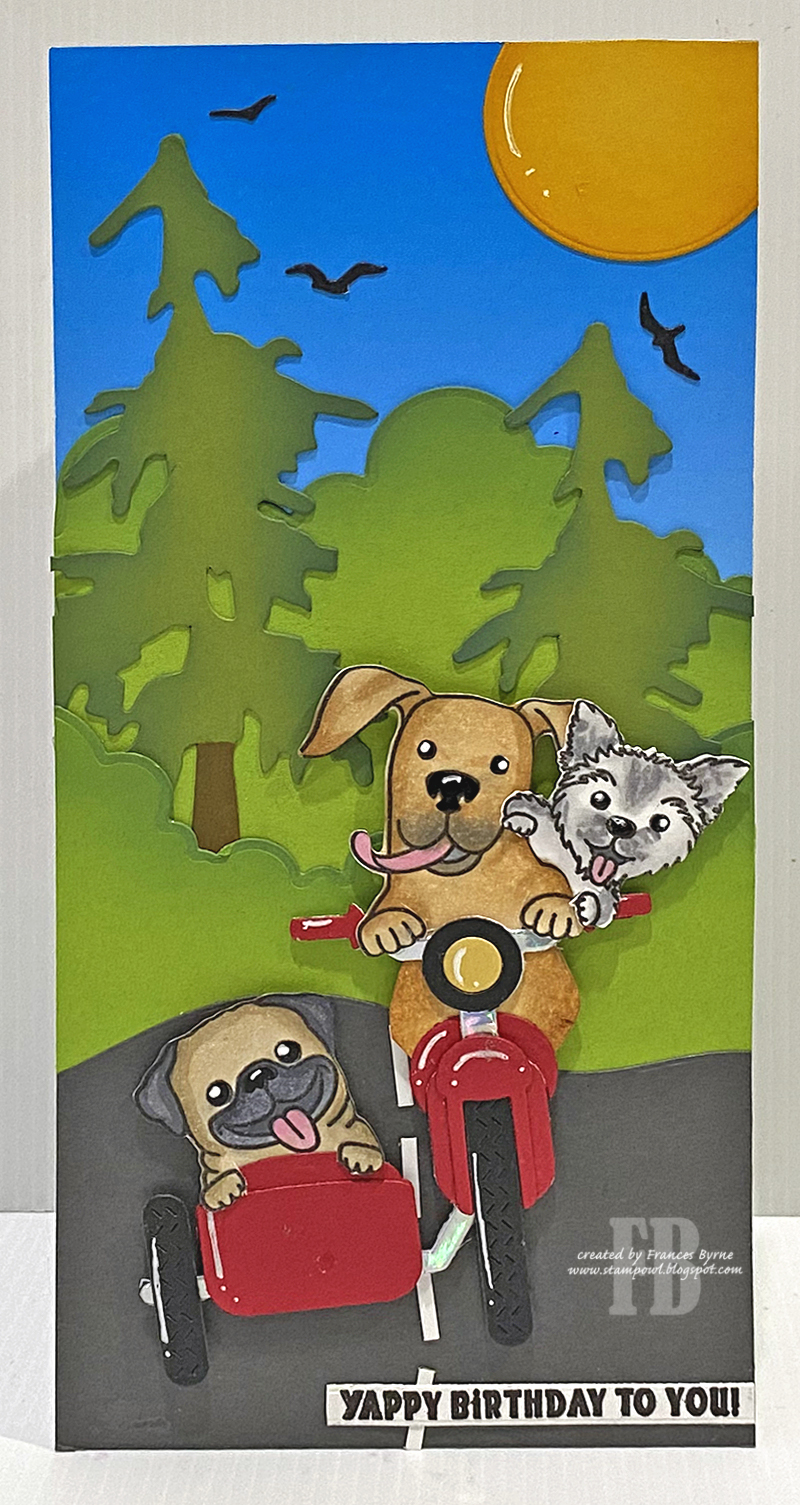
Today I am sharing a fun dog themed Slimline Pop-up card I created recently using stamps and dies from various companies.

La-La Land Crafts recently released a kit that included a dog themed stamp set that included a pug. I am always looking out for pug stamps and I am a grandmother to a pug LOL! The first thing I did when I started playing with the stamp set, was to stamp and colour all the images. I noticed one of the dogs could look like a Maltese terrier and as I have one of those, I coloured the image like mine. I had also coloured another of the dogs brown which then looked like my other daughter's dog, so of course I had to make a card that incorporated all three.


I created a Slimline card that measures 4 inches x 8 1/2 inches, I wanted the wider size so the dogs all fitted easily.

I used ombre designer paper for the sky. I then used the cloud die included in Spellbinders Hummingbird & Lily die set, I have a feeling I will be using this a lot as those clouds are very pronounced and work well for bushes too. Finally I added the road at the bottom of the card.

I die cut two pine trees using an older Sizzix Big die which I added to the top of the card. I also added a circle for the sun to the top right hand corner of my card.

I used the Motorcycle w/Side Car die and the Pawsome Friend stamp set, both from La-La Land Crafts to add my doggy scene. To finish off the front of the card, I added three birds using a Honey Bee Stamps stamp set.


As you can see, I created a pop-up to the inside of my card using Karen Burniston's Katherine Label Pop-up die set. I love adding a double pop-up with these dies when I make a Slimline card.

I used the Cloud border from the Spellbinders die set again to create the greenery along the bottom of my card. I also added another pine tree.

As the dogs on the front are in a motorcycle, I thought the "Wheely Awesome Day" sentiment which is from a Made To Surprise stamp set. The dog themed sentiment is from the Pawsome Friend stamp set.

Finally I stamped out three more of the dogs and added them to the labels. Maybe they flew off the motorcycle and landed there LOL!

Other Supplies:

Pine Tree - Sizzix / Tim Holtz (discontinued)


Wednesday, May 24, 2023

Love and Best Wishes


Hi Crafty Friends,

Today I am sharing a Fancy Fold Card, this style of card is called a Diamond Flip Fold Card. This card is the 5inch x 7 inch version of the card and you can find a tutorial for it here.


This is a fairly simple card as it uses no dies and only one stamp set. The flowers around the sentiment on the front of the card have been cut from the patterned paper.


When you open the card, the diamond panel on the front "flips" so it can be seen in the opened position. 

Both sentiments are from a Card Making Magic stamp set which I have linked below.

For a variation, you could opt for only cutting the pointed edge on the front panel and have the back panel a rectangle shape so that part of the rectangle can be seen from the front.


Tuesday, May 23, 2023

Have A Beautiful Day


Hi Crafty Friends,

Thanks for visiting my blog, today I am sharing an Offset Gatefold card I created recently using dies from Crafter's Companion.

I created a 5 x 7 inch Offset Gatefold card using Crafter's Companion's Vintage Ticket Layering Edge Gatefold die set. To create this I started with a 14 inches x 5 inches piece of white cardstock and then scored at 5 inches and 12 inches. 


To decorate my card I used My Creative Life's All Dressed Up die set along with the Beautiful Sentiments and Fabulous Sentiments stamp sets.


Here is a look at the inside of my card, The "Birthday Wishes" sentiment can be seen when the card is closed. The other sentiment is only revealed when the card is opened.


Monday, May 22, 2023

Every Day is a Fairytale


Hi Crafty Friends,

Today I am sharing a fairytale themed Pop-up Card using dies from Creative Crafter Products & Crafter's Companion.


For the pop-up portion of the card, I used Creative Craft Products' Inside Out Sentiments Best Wishes Card die set. I die cut the pop-up from dark pink cardstock, the photo shows it a lot darker than it actually is.

To decorate the card I used dies from the Crafter's Companion's Once Upon A Time Collection and Zig Zag Scene Builders Collection. The castle is from the Once Upon A Time set from the Zig Zag Collection and the other stamps/dies are from the Once Upon A Time Collection.


The patterned paper is a digital paper from Made To Surprise. 

For the two stamped sentiments I used oval dies from Crafter's Companion.


For the front of the card, I used two more die sets from the Once Upon A Time Collection from Crafter's Companion. I used the Ovals and Filigree Ovals die sets from Creative Craft Products.


Friday, May 19, 2023

Rainbow Presents


Hi Crafty Friends,

 I recently ordered and received the Picket Fence Studios' Paper Pouncers, so of course I wanted to have a play with them. One of the things the Paper Pouncers are supposed to be good for is stencils, so I pulled out my Pretty Pink Posh Layered Presents Stencil set to create the background for this card. I used Catherine Pooler inks, using three colours per colour family that I used on the background. For the final layer after adding the ink, I cleaned the stencil and repositioned it to add some glitter glitz gel over the top.

I die cut the panel and the black layer using Creative Craft Products Notched Nested Squares die set.   

I wanted to have the colours of the presents repeated on the base of my card, so I used Slimline rectangle die to die cut the 5 colours and adhered them to a 6 x 6 panel. I then used the Made To Surprise Linen Embossing Folder to add texture to the panel before adding it to a top folding 6 x 6 card base.

I hot foiled birthday sentiment using Waffle Flower Crafts Birthday Duo Hot Foil Plate. I used Pinkfresh Studio's Solid Foil Plate to get the negative image of the sentiment.

To finish off the card I added some iridescent jewels to the card.


For the inside of the card, I used the Notched Nested Squares again for the layers of the card. I added two sentiments using two stamp sets from Creative Craft Products.