Saturday, October 31, 2015

Merry Christmas


Hi everyone,

It’s challenge time with the “Crazies” over on the Crazy 4 Challenges blog. Jessie Rone, the challenge hostess for the month, finishes off the month with one last challenge.

For our challenge this week Jessie challenges us to .... get a start on Christmas….I know it’s early, but if you don’t start now, it’s never going to get done!! Cards or projects inspired by the jolliest of holidays.


I purchased this cute Uptown Girl from Stamping Bella at a recent Craft Show I attended, so decided I would use that for my card this week.

Of course I had to make a pop up card using the Lots of Pops Pop Up die set designed by Karen Burniston for Elizabeth Craft Designs.  At the top and bottom edges of the card I added the Agatha Edges die set. And the sentiment is stamped onto a label from the Katie Label Pivot Card die set.


I thought my card needed something else behind the girl dressed as a tree, so I added some glitter ornaments hanging down.


For the front of my card I used the Quietfire Merry Christmas die and then embellished the panel by added holly and poinsettia flowers from the Candle die set.

Don't forget to check out the rest of the “Crazies” cards over on the Crazy 4 Challenges blog and also their individual blogs for more details.


Anja de Regt
Barbara Anders
Danielle Lounds
Jessie Rone
Joanne Grzelak
Karen Aicken
Kelli Hull
Vicki Burdick
Peggy McCurry
Raquel Mason
Tangaii Crain (October Guest Designer)


Stamps: Uptown Girl Savannah Has a Star - Stamping Bella; Wishing You a Christmas ….- Printworks
Paper: White; Red; Green; Joyous DP - Kaisercraft
Dies: Lots of Pops Pop Up Card; Agatha Edges; Katie Label Pivot Card - designed by Karen Burniston for Elizabeth Craft Designs; Quietfire Merry Christmas; Candle Die Set - Elizabeth Craft Designs; Ornament Die - Spellbinders
Other ECD Products: Warm Diamond Silk Microfine Glitter; Transparent Double Sided Adhesive Tape 64mm; Gold Glitter Dots Peel Off Stickers;  Clear Glitter Dots Peel Off Stickers; Gold Lines Peel Off Stickers;
Other: Black Ink; Purple Ribbon; Foam Tape; Copics


Elizabeth Craft Designs October Designer Challenge


Hi everyone,

It's time for our September Elizabeth Craft Designs Designer Challenge. Check out the Elizabeth Crafts Designs blog today where you will be able to see what all the designers created for the challenge this month.

Our challenge this month was to create a holiday gift and a coordinating gift tag using Shimmer Sheetz and at least one die and one embossing folder.


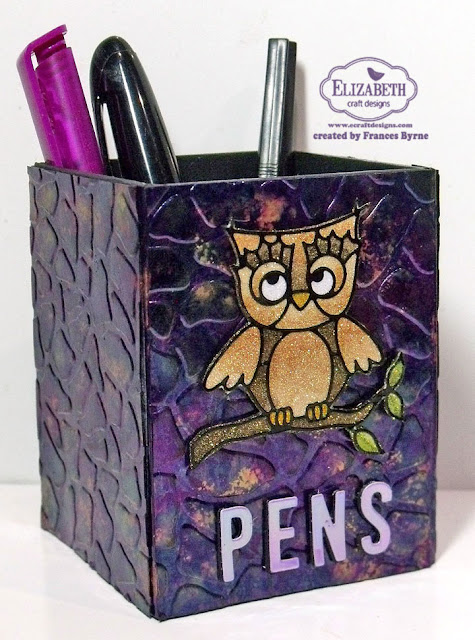
While out shopping recently I found a pen holder which I thought would be fun to alter for this challenge. The first thing I did was paint the pen holder inside and out using black paint.

I cut four pieces of Black Iridescent  Shimmer Sheetz to fit the size of my pen holder and also cut four addition pieces the height of the holder but only 2 inches wide. I scored and folded these narrow pieces in half.

Next I used my alcohol inks to color my Shimmer Sheetz pieces. For this project I used Stream; Wild Plum and Gold Metallic Adirondack Alcohol Inks. 

Once the pieces where all dry I added Transparent Double Sided Adhesive Tape to the back of the larger pieces and embossed these pieces using the Sea Glass Embossing Folder.


I added  Transparent Double Sided Adhesive Tape to the scored pieces and then attached these to my Pen Holder on each corner. Once these were in place I then attached the four embossed pieces to each side of the Pen Holder.

As this Pen Holder had originally be decorated with owls, I decided to keep with that theme and hey I like owls so why not haha!

 The owl is from the Lots of Owls Peel Off Stickers.  I adhered the owl on branch onto Transparent Double-Sided Adhesive Tape which had been attached to card and then covered this with Warm Diamond Silk Microfine Glitter and then colored with Copics. For more details on how to do this technique you can see a video Els created using this technique here.

Finally I die cut the letters "P E N S" from black card and Purple Iridescent Shimmer Sheetz which had Transparent Double-Sided Adhesive Tape adhered to the back and layered together and added to the bottom of my Pen Holder.


For my coordinating gift tag, I selected another of the owls from the Lots of Owls Peel Off Stickers. I added the owl onto Transparent Double-Sided Adhesive Tape which had been attached to card and then covered this with Warm Diamond Silk Microfine Glitter and then colored with Copics.

I cut a piece of Soft Finish Cardstock 100b to 2 1/4 inches and scored the card in half. Next I positioned the tag shaped die from the Tags and More 6 - Daisy die set at the top of the open end of the card and ran this through my die cutting machine.

I then opened up the tag/card and positioned the decorative edge so it would only die cut on the front and die cut this too.


I sponged around the edge of the front of the card using the Violet Tint PanPastel from the Susan's Garden PanPastel Flower Coloring Kit 2.

To finish off the front I die cut the Merry Christmas (944) from Purple card and added it to the front.


For the inside of my gift tag I used the tag shape die from the Tags and More 6 - Daisy die set to cut a piece of purple card. I trimmed it down to approx 1 3/4 inches and adhered it to the inside of my card. I added a Gold Ribbon Fantasy Peel Off Stickers Border to the edge of the purple card.

To create the "To:" and "From:" I used the Black Alphabet 1 Upper Key Peel Off Stickers.

That's it from me today, thank you for visiting my blog. To see what the other designers created for this challenge don't forget to check out the Elizabeth Craft Designs blog post which goes live 8AM MT.


Supplies:

Elizabeth Craft Designs:


Other:
Adirondack Alcohol Inks - Stream; Wild Plum; Gold Metallic and Blending Solution
Black Acrylic Paint
Purple Ribbon
Foam Tape


Friday, October 30, 2015

Whoo's having a Birthday!


Hi everyone,

My card today is one I created for my daughter who is celebrating her birthday today! She has been living in London since February, teaching and as she is a big fan of Dr Who I decided to use this thing for her birthday this year. 

As I don't have anything Dr Who related in stamps, I decided to Google Dr Who digital stamps and discovered some from MayzyArt which I liked so purchased those. 


I knew I wanted to create a Pop Stand Card, so used the Pop Stand die from the Eiffel Tower Pop Card Stand die set designed by Karen Burniston for Elizabeth Craft Designs.

I had to add some grass to the bottom of the Tardis as it wasn't level and I needed it to be so it could be adhered to the Pop Stand piece of the card. 

All the sentiments for this card are computer generated.


The bonus of digital stamps is that you can print them out whichever size you need and you can also flip them if needed. As I needed the other side of the Tardis & Dr Who be the mirror image of the front image this was easy to do. You can tell it is mirrored as the words Police Box are back to front ... but it worked for my purposes ... this is the back of the card after all.


Here is a side of photo of my card so you can see the Pop Stand part of the card a little better.


For the front of my card I used MFT Stamps Concentric Circles stencil and 4 different distress inks to  ink my background. I also added some flicks of white paint to give it a more out of this world look.

As my daughter is living in London at present I also added the London Skyline and the Tardis flying over the skyline ... I am not sure where it will land haha!


Stamps: Doctor Who Digital Stamp; Tardis Digital Stamp - MayzyArt
Paper: White; Black; Blue; Twinkling DP - Kaisercraft
Dies: Eiffel Tower Pop Stand Card; Katie Label Pivot Card - designed by Karen Burniston for Elizabeth Craft Designs; London Skyline - MFT Stamps
Other: Peacock Feathers Distress Ink; Broken China Distress Ink; Blueprint Sketch Distress Ink; Picked Raspberry Distress Ink; Concentric Circles Stencil - MFT Stamps; Foam Tape; Copics


Thursday, October 29, 2015

Oceans of Joy


Hi everyone,


It's challenge time with my friends over on the CCEE Stampers challenge blog. Maryann Einam the challenge hostess for October finishes off the month with one last challenge.

This week Maryann has challenge us to Create a card with something down under, it could be under the sea, or a tree or underground, under an umbrella or even from down under in the world.


As I recently purchased the La-la Land Crafts Shell and Mermaid stamp sets, it wasn't hard to decide what I would use for our "down under" challenge this week. As you can see I have gone under the sea ... well not me personally, my card would have gotten wet if I did that haha.

I created a Pop Up Card using the Lots of Pops Pop Up Card die set designed by Karen Burniston for Elizabeth Craft Designs. I also used the sand die from the Beach Edges die set and for the seaweed I used Susan's Garden CountryScapes Country Flora 1.


Here is a side view of my card so you can see the pop up portion of my card a little better.


I kept the front of my card fairly simple seeing the inside is the feature. I used the fish from the Mermaid stamp set and another of the sentiments.

Don't forget to check out the CCEE Stampers blog (goes live 12 AM EST) to see the rest of the creations the CCEE Stampers created this week. You can also see more details of their creations on their individual blogs:


Amber Hillman
Anne Harmon
Joanne Grzelak
Liz Williams
Lois Bak
Lynn McAuley
Maryann Einam
Sabrina Friel
Vicky Gould


Stamps: Sitting Mermaid Marci; Shell & Rocks Set - La La Land Crafts
Paper: White; Green;  Kraft; Build a Scene DP - Taylored Expressions
Dies: Lots of Pops Pop Up Card; Lorna Label Pop Up Card; Beach Edges - designed by Karen Burniston for Elizabeth Craft Designs; CountryScapes Country Flora 1 - Elizabeth Craft Designs; Fishtail Flags Stax - MFT Stamps
Other: Black Ink; Pearl; Rhinestones; Foam Tape; Copics


Wednesday, October 28, 2015

Rebus - Horror Movies


Hi everyone,


It is time for another Rebus swap to share with you all. This time round our theme is 
"Names of Horror Movies". 


If you would like to solve my rebus puzzle, why not post a comment on my blog post with your answers. I will let you know what the correct answers are next time I post a rebus card here.


How did you go working out my September Rebus which was 'Things found in a Hardware Store' .... here are the correct answers for you to check how you did.


  1. Wheelbarrow
  2. Jack Hammer
  3. Clamps
  4. Cement Mixer
  5. Varnish
  6. Doors
  7. Pliers
  8. Nails
  9. Masking Tape
  10. Timber
  11. Screws


You can find all my past rebus cards here.


Tuesday, October 27, 2015

You say Witch!


Hi everyone,


It's our Riley and Company Design Team challenge time again over on the Riley and Company blog. This time round our challenge is hosted by Sandye.

For our challenge this week Sandye has challenged the Design Team to create a card with a Halloween theme.

For my card today I have used Riley and Company's Witch on Broom Riley to create a Flip-Its Card. 


On the 'flip' side of my card I used the You Say Witch Funny Bones sentiment. I masked off the solid witch on the broom before inking the sentiment so I only stamped the sentiment. 

Don't forget to check out the Riley and Company Design Team's cards on their blogs:


Heather Bolli
Joy Stagg
Kelly Santi
Kendra DeCota
Monica Taylor
Sandye Curry

Stamps:  Witch on Broom; You Say Witch - Riley and Company
Paper: White; Black; DP
Dies: Sizzix Circle Flip-its Card #4 Framelits; Circle Stax - MFT Stamps
Other: Black Ink; Black Ribbon; Black Rhinestones; Foam Tape; Copics


Monday, October 26, 2015

Somebunny's Birthday


Hi everyone,

Today I am sharing a card I created using the new Lucky Birthday 3" x 4" clear stamp set designed by Karen Burniston for Elizabeth Craft Designs. This stamp set will be released in late October.

For my card today I decided to create a 'flat card', I don't do that often especially when using anything designed by Karen. However I thought it would be fun to use this set with the Susan's Garden Garden Patch 1 1/2 inch & Mini Roses available at Elizabeth Craft Designs.

I had some carrot buttons in my stash, so I added one of these to the top right hand corner of my card.


For the inside of my card I used Susan's Garden Garden Patch 1 1/2 inch & Mini Roses for the orange squares and Susan's Garden Garden Patch 1 3/8 inch & Mini Daffodils for the designer paper layer.

In the square on the left of my card I added the "Hop, Hop Hooray!" sentiment which is also from the Lucky Birthday stamp set.

Stamps: Lucky Birthday 3" x 4" Clear Stamp Set - designed by Karen Burniston for Elizabeth Craft Designs
Paper: White; Cream; Green; Orange; Carrots DP & Orange Dots and Stripes DP  - Echo Park
Dies: Garden Patch 1 1/2 inch & Mini Roses; Garden Patch 1 3/8 inch & Mini Daffodils - Elizabeth Craft Designs; Fishtail Flags Stax - MFT Stamps
Other: Black Ink; Hemp Cord; Carrot Button; Foam Tape; Copics


Sunday, October 25, 2015

Twinkle in a Tangle


Hi everyone,

Today I am sharing a card I created using a couple of things I purchased at recent Craft Show I was working at.


The image and sentiment used on the front of my card uses a new Art Impressions stamp set.  I added glitter and amazing glaze to the lights.

The holly background is a new stencil from Penny Black and I used Viva Champagne Glitter Paste.


For the inside of my card I created a pop up card using the Merry Christmas Pop Up Card die set designed by Karen Burniston for Elizabeth Craft Designs. I used Champagne Silk Microfine Glitter to the sentiment and decorative pieces on the pop up piece of the card.

I used one of the labels from the Lorna Label Pop Up Card die set for the sentiment.


Here is a photo of my card taken at an angle so you can see the pop up part a little better.

Stamps: Twinkle in Tangle - Art Impressions; Season's Gift - Penny Black
Paper: White; Red; Green
Dies: Merry Christmas Pop Up Card; Lorna Label Pop Up Card - designed by Karen Burniston for Elizabeth Craft Designs; Circle Stax; Fishtail Flag Stax - MFT Stamps
Other ECD Products: Champagne Gold Silk Microfine Glitter; Transparent Double Sided Tape 64mm
Other: Black Ink; Holly Medley Stencil - Penny Black; Viva Champagne Glitter Paste; Wink of Stella Clear Glitter Pen; Glossy Accents; Foam Tape; Copics


Saturday, October 24, 2015

Fall Time


Hi everyone,

It’s challenge time with the “Crazies” over on the Crazy 4 Challenges blog. Jessie Rone our challenge hostess for the month, continues to issue the challenge.

This time round Jessie has given us a color challenge using the colours Rust, Hunter Green, and Sun Yellow(think Fall leaves)


Jessie told us to think Fall Leaves so that is exactly what I did haha! First up I grabbed card that matched the colours I needed to use and added bands of color to the inside and front of my card. I use versa mark ink to add the acorn images onto the card on the inside of my card.

As you can see I have created a Pop Up Card using the Lots of Pops Pop Up Card die set designed by Karen Burniston for Elizabeth Craft Designs.

The cute hedgehog image is one of the new stamps designed by Bianca Petroschi for Elizabeth Craft Designs. I also die cut a whole bunch of leaves from the new Woodland leaves die set designed by Susan's Garden also for ECD. I cut the leaves from white card and then added yellow, green and rust colours to get the autumn leaf look.


Here is another view of the inside of my card taken at an angle so you can see the pop up portion of my card.


For the outside of my card I added bands of the three colours I needed to use onto a piece of card and then used a new Woven Embossing Folder from We R Memory Keepers to emboss the colors, I love the texture this gives. I also rubbed a little gold over the card for a bit of shimmer, it may be hard to see in the photo but it is there and I added a little more after I took the photo too.

I added a sentiment on the front of the card and some more leaves. I layered most to the bottom of the card so it looks like they have landed on the ground after falling from the trees.


Don't forget to check out the rest of the “Crazies” cards over on the Crazy 4 Challenges blog and also their individual blogs for more details.


Anja de Regt
Barbara Anders
Danielle Lounds
Jessie Rone
Joanne Grzelak
Karen Aicken
Kelli Hull
Vicki Burdick
Peggy McCurry
Raquel Mason
Tangii Crain (October Guest Designer)


Stamps: Daisy Hedgehog All Seasons; All Things in Nature - Elizabeth Craft Designs; Fall Time - CC Rubber Stamps
Paper: Soft Finish Cardstock 100lb - ECD; Rust; Green; Yellow
Dies: Lots of Pops Pop Up Card; Lorna Label Pop Up Card - designed by Karen Burniston for Elizabeth Craft Designs; Susan's Garden Woodland Leaves - Elizabeth Craft Designs; Vertical Stitched Stripes - MFT Stamps
Other: Black Ink; Versamark Ink; Barn Door Distress Ink; Peel Paint Distress Ink; Fossilised Amber Distress Ink; Woven Embossing Folder - We R Memory Keepers; Foam Tape


Friday, October 23, 2015

Flower Basket


Hi everyone,

My card today used the Royal Stand-Ups Card Framelits. I have decorated the card using The Stamps of Life's Strawberry Basket die and flowers from the Sizzix Flower Triplits die set.


Here is another view of my card at a different angle, so you can see the pop up portion of the card.


Here is my card when it is closed ready to be placed in an envelope.


Dies: Sizzix Royal Stand-Ups Card Framelits; Sizzix Flower Triplits; Sizzix Phrases Framelits w/stamps; TSOL - Strawberry Basket
Paper: White; Pink; Dark Pink; Yellow; Blue; DP
Other: Black Ink; Foam Tape