Saturday, November 30, 2019

Showers of Love


Hi Crafty Friends,

It’s challenge time with the “Crazies” over on the Crazy 4 Challenges blog. Nicky Foden our challenge hostess for the month finishes off her month with one last challenge.


This week Nicky has given us an Inspiration Challenge. Use this piece of art as inspiration, you can choose it as a colour challenge or design, texture, however it speaks to you. 


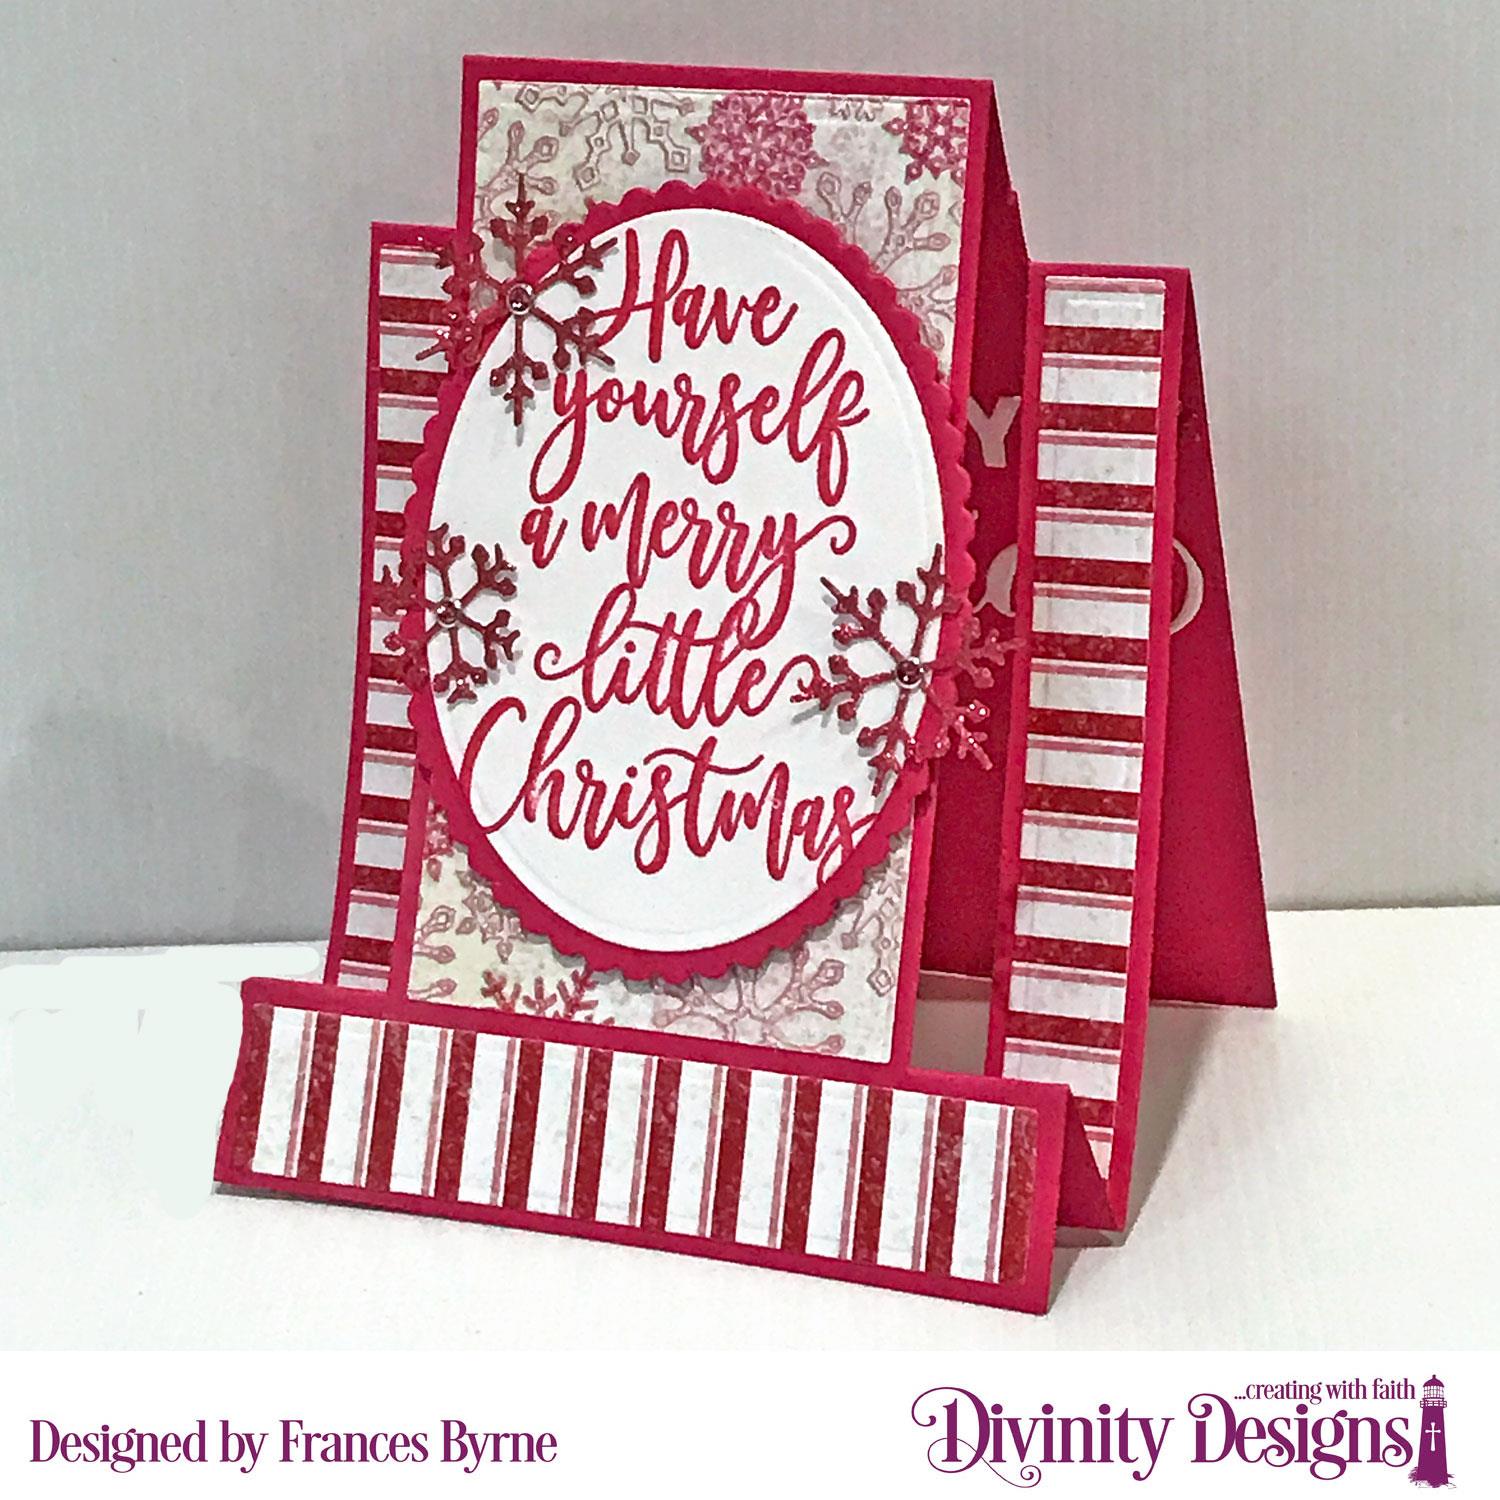
For my card today I took my inspiration from the girl holding the yellow umbrella. I created a seed bead shaker card using MFT Stamps Falling From The Clouds Die-namics and the Rain and Shine stamp set.


Here is a quick video to see my card in action.


The Falling From The Clouds Die-namic comes with the frame and a die that has slits in it for using to hold the clear thread which has the seed beads added to it.

I die cut a second frame from the set so I could trim out the clouds only for the top portion of the card.

Along the bottom of the card I used the Tucked In Turf - Vertical Die-namics.

I added the girl and ducks to the card.

On the top cloud portion of the card, I added a stamped sentiment which I stamped and then die cut using Honey Bee Stamps Banner Builder die set.


For the inside of my card I added the other girl that is included in the Rain or Shine stamp set, along with the puddle, clouds and sun. I also added another sentiment.

Don't forget to check out the rest of the “Crazies” cards over on the Crazy 4 Challenges blog and also their individual blogs for more details.


Supplies:
For your shopping convenience, all products are linked below. Compensated affiliate links are used where possible with no extra cost to you. This helps me to continue to share all the projects I include on my blog. For the benefit of my Australia readers, I have started to include some links to Australian stores when available. Please note I only use and share products I love.


Friday, November 29, 2019

Have Yourself A Merry Little Christmas


Hi Crafty Friends,

Today I have another card to share with you, using a few of the new products from Divinity Designs November release.

As you can see I created a Center Step Card using Divinity Designs Center Step A2 with Layers die set.

To decorate my card I added a sentiment from the new Silent Night stamp set which I stamped and layered using the Ovals and Scalloped Ovals die set.


For the layers of my card I used papers from the Snowflake Season Collection Paper Pad.

I added snowflakes around the sentiment using two of the snowflake dies from the Christmas Dove die set.


For the inside of the card I used the "Merry Christmas" sentiment from the Merry Christmas die set which was one of the dies from the October release. I also added a few snowflakes around the top of the sentiment.

Supplies:
For your shopping convenience, all products are linked below. Compensated affiliate links are used where possible with no extra cost to you. This helps me to continue to share all the projects I include on my blog. For the benefit of my Australia readers, I have started to include some links to Australian stores when available. Please note I only use and share products I love.


Thursday, November 28, 2019

GNOEL


Hi Crafty Friends,

It's challenge time with my friends over on the CCEE Stampers challenge blog. As challenge hostess for the month, I finish off the month with one last challenge.

November is also known as Movember which is a time to celebrate and raise funds for male issues. For our challenge this month include a Moustache (Mo) on your card in some way.


Being just under a month until Christmas, I am in Christmas card mode right now. I don't really need anymore, but I still have stamps and dies I want to play with so I might as well keep making and start on my stash for next year. I was happy when I saw that the gnomes in the new Honey Bee Stamps Gnome Place Like Home stamp set had moustaches, so of course that is what I have used for my card today.

I pulled out my Karen Burniston Rectangle Pull Card die set to create a Pull Card, it has been a while since I have used these dies seeing they are now discontinued, but I do love using them.


For the layers on the sides of the card, I used Altenew's Classic Pine Stencils A & B. This is an amazing stencil and I love how each it is to get a beautiful and colored background.

When you "pull" the card open, it reveals a sentiment and tree image. 

Don't forget to check out the CCEE Stampers blog (goes live 12 AM EST) to see the rest of the creations the CCEE Stampers created this week. You can also see more details of their creations on their individual blogs:


Supplies:
For your shopping convenience, all products are linked below. Compensated affiliate links are used where possible with no extra cost to you. This helps me to continue to share all the projects I include on my blog. For the benefit of my Australia readers, I have started to include some links to Australian stores when available. Please note I only use and share products I love.

Pop It Ups Rectangle Pull Card -  Elizabeth Craft Designs (discontinued)
Pop It Ups Rectangle Accordion Card - Elizabeth Craft Designs (discontinued)


Wednesday, November 27, 2019

Walking In A Winter Wonderland


Hi Crafty Friends,

My card today is for a challenge I do with a couple of friends of mine. Each month we challenge each other to create something using supplies we all own.

This month the theme for our challenge is .... Christmas.

For my card today, I decided to create a Shaker Card using MFT Stamps Classic Snow Globe Die-namics and their coordinating Snow Globe Shaker Pouches.

For the background of my card I used Concord & 9th's Holly Berry Turnabout Stamp set, stamping it on white cardstock using Catherine Pooler inks in Mint To Be; It's A Boy; Sage; Aquatini; Polished and Rouge. I used Elizabeth Craft Designs Dashing Squares to die cut my panel.

For the snow globe scene, I applied Tumbled Glass Distress Oxide ink onto a white panel. I then splattered white paint over the background.  I die cut  the snow hills from white cardstock that had Clear Double Sided Adhesive Tape on the front. I then covered the adhesive with Warm Diamond Silk Microfine Glitter. I added three trees to the background which are from Karen Burniston's Evergreen Trees Pivot Panels die set. Finally I added the snowman to the scene which also comes with the Snow Globe die set. 

I die cut the snowglobe shape from the Holly Berry background and then added one of the shaker pouches. I then adhered the holly berry background to the panel with the blue sky, snowbanks and trees.

I added three of the sentiment using Taylored Expressions Simple Strips - Christmas and coordinating die set to my card.


For the inside of my card, I added another panel I created using the Holly Berry Turnabout stamp set along the bottom of the card.

The sentiment is also from the Holly Berry Turnabout stamp set.


Here is one last look at my card, this time when it is laying flat and the chunky glitter has been shaken up over the while shaker window.

Supplies:
For your shopping convenience, all products are linked below. Compensated affiliate links are used where possible with no extra cost to you. This helps me to continue to share all the projects I include on my blog. For the benefit of my Australia readers, I have started to include some links to Australian stores when available. Please note I only use and share products I love.


Tuesday, November 26, 2019

Rebus - Names Starting With "S"


Hi Crafty Friends,

It's time to share another rebus puzzle swap with you. This month the theme is Names starting with the letter "S". 

If you would like to solve my rebus puzzle, why not post a comment on my blog post with your answers. I will let you know what the correct answers are next time I post a rebus card here.

How did you go solving my August Rebus which was "Movies starring James Stewart."

 Here are the correct answers so you can check how you did.

  1. Rose Marie (1936)
  2. Rear Window (1954)
  3. Speed (1936)
  4. The Big Sleep (1978)
  5. Firecreek (1968)
  6. The Man From Laramie (1955)
  7. Harvey (1950)
  8. Take Her, She's Mine (1963)


You can find all my past Rebus Cards here.

Monday, November 25, 2019

Christmas Milk Cartons


Hi Crafty Friends,

Today I am sharing two more boxes that I have been creating to use at a Christmas Party for a club I attend.

This time around I used the new Divinity Designs Milk Carton With Layers die set.


For my first Milk Carton, I created a "Santa's Suit". I die cut the milk carton from red cardstock and didn't add the layers which come with the die set.

The buttons and belt are from an older Taylored Expressions Sack It To You plus BONUS Santa die set. I added the glittered scalloped border around the base of the milk carton which is from an older MFT Stamps die.


I used the layer die from the milk carton die set for the white glittered panel at the top of the box.

I added a Christmas sentiment to the tag which I tied to the clip which is holding the box closed.


For my second Milk Carton I die cut the milk carton using green cardstock and this  time used patterned paper for all the layers.

I added one of the images from MFT Stamps Christmas sELFies stamp set.


I again added a Christmas sentiment and tag to the clip that holds the milk carton closed.

Supplies:
For your shopping convenience, all products are linked below. Compensated affiliate links are used where possible with no extra cost to you. This helps me to continue to share all the projects I include on my blog. For the benefit of my Australia readers, I have started to include some links to Australian stores when available. Please note I only use and share products I love.

Sack It To You Plus BONUS Santa - Taylored Expressions - discontinued
Blue Prints 1 Die-namics (Tags) - MFT Stamps - discontinued
Mini Scallop Border - MFT Stamps - discontinued


Sunday, November 24, 2019

Divinity Designs November Color Challenge


Hi Crafty Friends,

Today I am sharing a card I created for Divinity Designs Color Combo Design Team Challenge. This month the colours to be used are  from the Christmas 2014 Paper Pad:  Light Teal, Rose, Gold.   For more inspiration from the Divinity Designs Design Team visit the Divinity Design blog.


For my card today I have created a Centre Step Card using Divinity Designs Center Step Card With Layers die set.

I used the new Christmas Birdhouses stamp set for my image, coloring the birdhouses to match the colors of the challenge. I stamped the birdhouses onto white cardstock and die cut and layered the image using the Ovals and Scalloped Ovals die set.


I die cut the "Greeting" portion of the Christmas Greetings die set from gold cardstock twice, layering the two together. I then adhered it to a rectangle panel which is die cut using the long rectangle panel of the Center Step Card With Layers die set. I trimmed the ends of the rectangles into fishtails and sponged around the edges with blue ink.

I stamped the "Merry Christmas" sentiment from the Christmas Birdhouse stamp set onto blue cardstock and gold embossed it. I then trimmed it down to a thin strip and added it over the birdhouses.

Finally I die cut the snowflakes from the Christmas Dove die set and covered them with gold glitter. I added these snowflakes to the side panels and the top of the oval.


For the inside of the card, I used the Rectangles and Scalloped Rectangles die set. I gold embossed a sentiment from the Christmas Wishes stamp set to the centre of the rectangles. To finish off my card I added the rose snowflakes.

Don't forget to check out the Divinity Designs Blog, so you can see what the other Design Team members created for this challenge.

Thanks for visiting my blog today!


Supplies:
For your shopping convenience, all products are linked below. Compensated affiliate links are used where possible with no extra cost to you. This helps me to continue to share all the projects I include on my blog. Please note I only use and share products I love.


Saturday, November 23, 2019

We Wish You A Merry Christmas


Hi Crafty Friends,

It’s challenge time with the “Crazies” over on the Crazy 4 Challenges blog. Nicky Foden our challenge hostess for the month continues to issue the challenges.

For our challenge this week, Nicky has asked that we use a card that you have received from someone as inspiration, it can be handmade or store bought, post the inspiration card as well.

I didn't have a card that I could use as inspiration, but I had recently seen a card on line by Stephanie Davis who used the Lawn Fawn Build A House die set in a different way to make a large house. So I decided to use this for my inspiration. You can see Stephanie's card on her YouTube channel here.


To create the brick work on the houses I used Honey Bee Stamps new Perfect Bricks stencil. The bricks on this stencil are small, which makes them perfect to use on these smaller houses.

I did more or less CASE the house Stephanie made, I did change up the size of the bricks and added an extra lantern near the door, but other than that it is pretty much very similar to hers.

As it is summer where I live at Christmas, I decided to go with grass rather than snow. I used Lawn Fawn's Stitched Hillside Border for the grass area.

As you can see I created an Easel Card to add my house to. For the sky I used Distress Oxide Inks in Tumbled Glass and Faded Jeans.

Along the bottom of the card I used Crafter's Companion's Merry Edge'able die/stamp set. I die cut this three times and layered it up, so I had something to keep the card open. 


I used Mama Elephant's Little Girl Agenda and Little Boy Agenda to add a few children to my scene.

I also added the "We Wish You A" which is from MFT Stamps Bitty Holiday Sentiments. I used Honey Bee Stamps Banner Builder die set to die cut the sentiment.


Don't forget to check out the rest of the “Crazies” cards over on the Crazy 4 Challenges blog and also their individual blogs for more details.


Supplies:
For your shopping convenience, all products are linked below. Compensated affiliate links are used where possible with no extra cost to you. This helps me to continue to share all the projects I include on my blog. For the benefit of my Australia readers, I have started to include some links to Australian stores when available. Please note I only use and share products I love.


Friday, November 22, 2019

Deer and Trees Milk Cartons


Hi Crafty Friends,

Today I have another project to share with you, using a few of the new Divinity Designs dies which are from the November release.

For my project today I have created another set of Milk Cartons and a Milk Carton Holder using the new Milk Cartons With Layers and Milk Carton Holder die sets.

I used papers from the Holly Jolly Collection Paper Pad for all the layers of my project.


To decorate the front of the Milk Carton Holder, I used the Curvy Slopes die to die cut a piece of white cardstock which had Clear Double Sided Adhesive Tape on the front. I then covered the adhesive with Warm Diamond Silk Microfine Glitter.

I added the trees and deers to the snow area which are from the Trees and Deer die set.


I die cut circles for the fronts of the Milk Cartons using the Circles and Scalloped Circles die sets.

I then used the "Merry Christmas" sentiment from the Christmas Birdhouses stamp set. I white embossed the sentiment onto red cardstock and then cut them apart so they would fit within the circles.

I added a clip to each Milk Carton to help keep it closed and added a ribbon bow to each clip.


Here is one last look at the Milk Cartons and Milk Carton Holder so you can see each of the items separately.

Supplies:
For your shopping convenience, all products are linked below. Compensated affiliate links are used where possible with no extra cost to you. This helps me to continue to share all the projects I include on my blog. For the benefit of my Australia readers, I have started to include some links to Australian stores when available. Please note I only use and share products I love.