Monday, February 28, 2022

Rebus - Elizabeth Taylor Movies


Hi Crafty Friends,

It's time to share another rebus puzzle swap with you. This month the theme is 

If you would like to solve my rebus puzzle, why not post a comment on my blog post with your answers. I will let you know what the correct answers are next time I post a rebus card here.

How did you go solving my November Rebus which was "Name of a Country starting with the letter L; M or N.". Here are the correct answers so you can check how you did.

  1. Luxembourg
  2. Malta
  3. Laos
  4. Nambia
  5. Niger
  6. Myanmar
  7. New Zealand
  8. Norway
  9. Latvia


You can find all my past Rebus Cards here.

Friday, February 25, 2022

Easter Lily Trifold

Hi Crafty Friends,

I have an Easter themed Trifold card to share with you today, using stamps and dies from Divinity Designs.

To create my card I started by die cutting the card base using Divinity Designs Tri-Fold Card with Layers die set. For the layers of my card I used one of the papers included in the Slimline Geometrics Paper Pad.


To decorate my card, I added a lily using the new Lily die set from the February/March release.

For the sentiment I used the Easter Words Stamp/Die Duo set using the stamp "Happy" to the top left corner and using the coordinating rectangle dies included in the set. The "Easter" word is die cut using the word die included in the set.

To finish off the card, I added some pearls to the right side and the top.


Here is a look at my card when it is closed, ready to be placed in an envelope.


Thursday, February 24, 2022

Congratulations Mr & Mrs


Hi Crafty Friends,

It's challenge time with my friends over on the CCEE Stampers challenge blog. Liz Williams, our challenge hostess for the month finished off the month with one last challenge.

Apparently February is also National Wedding Month. Make a wedding card to send to a couple who might be tying the knot during this month of love.


I have been playing with Creative Expressions Paper Cuts Edger dies lately, so for my card today I pulled out my Champagne Celebration Edger die to make my card today.

I created a square card that measures 5 1/2 inches square. I die cut the edger die from white pearlescent cardstock and then layered this onto a piece of gold pearlescent cardstock. This was then adhered to a side folding white card base.

I die cut the edger again from gold glitter cardstock and added the glitter pieces into the area inside the glasses.

I used the "Mr & Mrs Sentiment" from Spellbinders Mr & Mrs Wedding Cake die set to add the sentiment on the top left of the card. I die cut the sentiment three times from gold cardstock and once from white pearlescent cardstock. I layered the gold pieces together and then layered the white sentiment on top, offsetting the piece.

The "Congratulations" sentiment was created using Spellbinders Wedding Wishes Glimmer Plate set. To create the the solid gold sentiment I also used the Solid Glimmer plate from Pinkfresh Studio, which allows you to use the left over pieces of gold foil to create a solid sentiment. 

To finish off the front of the card, I added gold jewels around the card.


For the inside of the card, I added the border to each edge of the card using Crafter's Companion's Wedding Day Edge'ables die.

To create the pop-up in the centre, I used Karen Burniston's Paper Frames Pop-up die set. 

I added two sentiments to the labels on the pop-up. The first on the left label is from an older Karen Burniston's Best Wishes stamp set from her Elizabeth Craft Designs. These stamps where the perfect size to fit on the labels.

The second sentiment is from Craftin Desert Divas Hitched stamp set. Both sentiment were gold embossed.

Don't forget to check out the CCEE Stampers blog (goes live 12 AM EST) to see the rest of the creations the CCEE Stampers created this week. You can also see more details of their creations on their individual blogs:


Other Supplies:

  • Die'sire Wedding Day Edge'ables - Crafter's Companion (discontinued)
  • Best Wishes Stamp Set - Karen Burniston for Elizabeth Craft Designs (discontinued)
  • Hitched Stamp Set - Craftin Desert Divas (discontinued)


Wednesday, February 23, 2022

With Sympathy Centre Step


Hi Crafty Friends,

I have another sympathy card to share with you today using stamps, dies and papers included in Divinity Designs January 2022 Blessings Box.

This time I created a Centre Step Card using Divinity Designs A2 Center Step Card with Layers die set.

I used papers from the Beauty in Bloom Paper Pad for the layers of the card.

To decorate the card I used the Spiral Sphere die from the Blessings Box, I die cut the die from cream cardstock and then layered it to a pink circle which I die cut using the Circles die set.

I used the Layering Cross Combo 2 die set to add to the centre of the Spiral Sphere.

I added the "With Sympathy" sentiment along the bottom of the card which is also from the Blessings Box.


For the inside of my card, I added a strip of patterned paper along the bottom of the card.

I added another Spiral Sphere die cut to the centre of my card. I then added a sympathy sentiment from then Sorry for your Loss stamp set. The sentiment was layered to circles using the Double Stitched Circles and Circles die sets.


Tuesday, February 22, 2022

Eastertime Gift Set


Hi Crafty Friends,

I have an Easter themed card and treat holder to share with you today, using stamps from Divinity Designs February/March release.


For my card, I created a Peek-A-Boo card using Divinity Designs Peek-A-Boo Card with Layers die set. I decorated the panels using papers from Spring Flowers 6 x 6 paper pad.


The lambs and sentiments are all from the new Lamb of God stamp set. The sentiment on the front of the card is layered using the Ovals and Double Stitched Ovals die sets.


When the card is closed the view from the oval opening is the standing lamb. As you open the card another layer starts to appear through the oval.


When the card is full opened, the original image is replace with something different. In this case a lamb sitting on the grass with a sentiment above it.


To accompany my card, I created a milk carton treat holder using the Milk Carton with Layers die set. I again used papers from the Spring Flowers 6 x 6 patterned paper to decorate the sides of my milk carton.


I added the lamb sitting on the grass to the front of the card using Circles and Double Stitched Circles die sets to layer.


Monday, February 21, 2022

Congrats Nana


Hi Crafty Friends,

Today I am sharing a baby card I created for a friend who became a Grandma (or Nana) for the first time recently. Being a Grandmother is the best thing in the world!

I created a 5 inch x 7 inch Fabulous Flip Card using Made To Surprise by Sam Calcott's Fabulous Flip Card die set.


To decorate the front of my card I added the baby using a die set from Marianne Design. The "Congrats" sentiment uses an older Alphabet die set from Elizabeth Craft Designs which I don't think is available anymore.

I adhered the flip card onto a top folding white card that measures 5 inches x 7 inches. I cut a strip of cardstock that measures 3 inches x 7 inches. I scored along the 3 inch side at 1/2 inch; 1 1/2 inches and 2 1/2 inches and then folded to create an "M" shape.I adhered this piece to the bottom of the inside of the card to turn it into a tent style card. This makes it easier to display.


I die cut a pink arrow using Karen Burniston's Waterfall Card die set and adhered it to the centre of the right edge. This tells the recipient to pull in that direction. When you pull the arrow, the front of the card flips to reveal the other side of each panel and a sentiment on the inside.


The "It's a Girl" sentiment is from Dress My Craft. It's a new one for me so I had to include it on this card.

I added the stork to the first flip panel which is an older die from Impression Obsession. I paper pieced the baby bundle the stork is holding in it's beak.

My friend told me to call her "Nana", so I added that to the next panel rather than "Grandma". I also added a pair of baby feet to the bottom of the panel.


Seeing the card doesn't open, because I turned it into a tent card, I added a few panels to the back so that I could add a sentiment and hand written greeting to the new Nana.

I found a sentiment online which was suitable for this occasion which I created using my computer & printer.

I added two baby bottles using a die included in Karen Burniston's Baby Charms die set.

Some of the products used to make this card are fairly old and may no longer be available anymore. Those that are fairly new I have included in the supply list below, those that may no longer be available are listed at the end of the supply graphic.


Other Supplies:
Stork Die - Impression Obsession (discontinued)
Baby Die - Marianne Design
Feet Die - Marianne Design
Alphabet Caps 1 Die Set - Elizabeth Craft Designs (discontinued)


Saturday, February 19, 2022

Fore! Three Two One


Hi Crafty Friends,

Today I am sharing a card I made for a good friend who celebrated her birthday last week. My friend loves playing golf, and for as many years as I can remember I have created a golf themed card to give to her for her birthday. After all this time she more or less expects it.

it's getting harder as the years go by, as I haven't purchased new golf theme stamps in years and they are hard to find, especially ones to suit a female golfer.


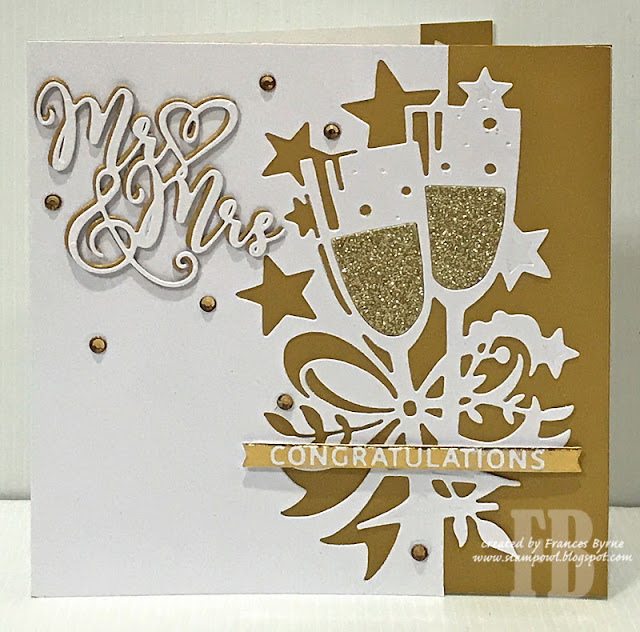
After a lot of thought on what style of card I would create this year, I decided to create a Building Block Card using my Studio Light Building Block die set. I die cut the base of my card using black cardstock. I used border dies from Lawn Fawns Stitched Hillside Borders die set to die cut the grass portion of the card.

For the layers I used papers from Lawn Fawn's Watercolor Wishes in blue and greens.

To decorate the card I added the Golf Flag which is an older Magnolia Stamps stamp. The golfing peanuts are from an older "Golfing Nutz" stamp set from Cornish Heritage Farms Tom Fun Collection.

The tee and golf ball on the middle bottom square are both older Print Blocks stamps.

The sun on the top right square is another older stamp from Print Blocks.

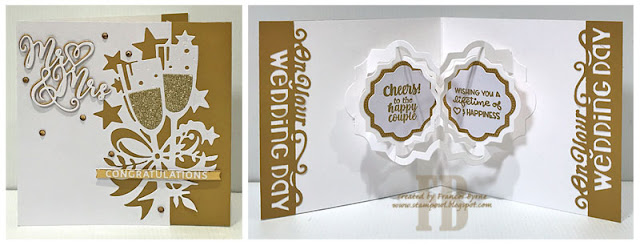
For the sentiments I used the "Fore! Three Two One" sentiment from Rubbernecker, which I cut in half so I could add it to two blocks. The "Have a tee-rific day" is from an old stamp set from Clear Dollar Stamps.


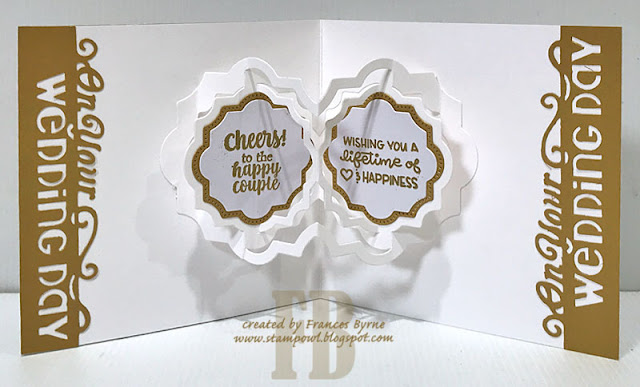
My card folds flat and will fit into a 5 inch square envelope.


Other Supplies:
Building Block Die Set - Studio Light
Golf Flag Rubber Stamp - Magnolia Rubberstamps
Tom Fun Golf Nuts - Cornish Heritage Farms (discontinued)
Fore! Three Two One ... - Rubbernecker Stamps (discontinued)
Golf Set - Clear Dollar Stamps, LLC (discontinued)
Tee & Golf Ball - Print Blocks (discontinued)
Sun - Print Blocks (discontinued)


Friday, February 18, 2022

Happy Easter Bunny


Hi Crafty Friends,

I have another Easter themed card to share with you all today. My card today is a window card using Divinity Designs A2 Portrait Card Base with Layers; Matting Rectangle and the Floating Frame  Front die sets.

I used papers from the Slimline Heavenly Sky Paper Pad for the background panel of my card.


The "Happy Easter" sentiment was created using Divinity Designs Easter Words Foiling/Die Duo set. I just love how the sentiment looks with the pink glittery foil.


On the inside of the card I added the cute bunnies from the Bunny Kisses stamp set. This image was layered to the inside of the card using the Squares and Double Stitched Squares die sets.

I also added a stamped sentiment which is also included in the stamp set.


Thursday, February 17, 2022

Faux Embroidered Roses


Hi Crafty Friends,

It's challenge time with my friends over on the CCEE Stampers challenge blog. Liz Williams, our challenge hostess for the month continues to issue the challenges.

Apparently February is National Embroidery Month, so make use of stitching, faux stitching, cross-stitching, or any other embroidery stitching you might want to feature on your card. 


Late last year Divinity Designs released some cross stitch/embroidery stamp and die sets, including a cross stitch background for both Slimline and A2 cards; embroidery hoop and some cross stitched sentiments. I decided to pull these out to create my card for this challenge.

When I first received my stamps/dies last year I created two cards using a faux embroidered technique. For this technique you need two sheets of patterned paper that are exactly the same, I used Divinity Designs Floral Favorites Slimline Paper Pad. Using one of the sheets of patterned paper, I die cut the panel using the Slimline Cross Stitch Background die. I then applied adhesive all over the back of the die cut panel and adhered it directly over the second piece of patterned paper so that the pattern lined up perfectly to create the desired effect. This has become my favorite way to use the cross stitched background dies.

I layered the Slimline Cross Stitched Background panel onto Divinity Designs Slimline Rectangles die and Slimline Card Base dies.

To decorate my card I used the Embroidery Hoop die set, I die cut a circle using the same patterned paper I used for the background. I stamped the sentiment using the Keep Me In Stitches stamp set. I then adhered this hoop to the front of  my card. 

I added the needle which is also die cut using the Embroidery Hoop die set and adhered it to the top of the hoop, and then thread some pink twine through the eye of the needle.

To finish off the card, I added some pink clay hearts to the background.


For the inside of my card, I added strips of the patterned paper to the top and bottom edges. 

I created a simple box pop-up, which I placed in the centre of the card and added the embroidery hoop to this.

I used another sentiment to the inside of the hoop, using the same stamp set I used on the front.

I die cut another needle, which I again threaded with pink twine and added to the lower left hand side of my card.


Don't forget to check out the CCEE Stampers blog (goes live 12 AM EST) to see the rest of the creations the CCEE Stampers created this week. You can also see more details of their creations on their individual blogs:


Wednesday, February 16, 2022

Sending Charming Floral Wishes


Hi Crafty Friends,

Today I am sharing a birthday themed Slimline card I created recently.

For my card I used Whimsy Stamps Slimline Twisty Frame die set to create the frame background and the inner panel. On the inner panel I embossed this using Whimsy Stamps Thatched Embossing Folder.

To decorate the inner panel I used Pinkfresh Studio's Charming Floral Border Hot Foil Stamp with the coordinating stencils and die. This piece is foiled using gold foil.

I added a birthday sentiment using Spellbinders Mini Everyday Sentiments Glimmer Plate, this sentiment is also gold foiled this time onto black cardstock.


For the inside of the card, I die cut a white panel using Picket Fence Studios' Slimline Die Cutting System. I also die cut the Slimline Happy Birthday Word Topper from colored cardstock and then gold foiled the "For Someone Special" sentiment on the strip underneath. 

On the right side of the card I added part of the negative image of the Charming Floral Border image when I used my Pinkfresh Studio Solid Hot Foil Plate.