Tuesday, January 31, 2023

Rebus - Flowers starting with the Letters A, B or C


Hi Crafty Friends,


It's time to share another rebus puzzle swap with you, my first for 2023! This month the theme is "Flowers Starting with the Letters A, B or C".

If you would like to solve my rebus puzzle, why not post a comment on my blog post with your answers. I will let you know what the correct answers are next time I post a rebus card here.

How did you go solving my November Rebus which was "Songs by Bruce Springsteen"

 Here are the correct answers so you can check how you did.

  1. Bobby Jean
  2. Thunder Road
  3. From Small Things
  4. Lucky Town
  5. Born To Run
  6. Dancing in the Dark

You can find all my past Rebus Cards here.


Monday, January 30, 2023

One Martini, Two Martini ...


Hi Crafty Friends,

Today I am sharing a 5 x 7 Gatefold Shutter card using Made To Surprise by Sam Calcott's Effortless 5" x 7" Shutter Card die set. This die set had been out of stock for ages and it snuck back in about a month or so before Christmas, so my friend ordered it for me as a Christmas present. 


Late last year I purchased this martini themed patterned paper, so decided to pull that out to use on my card today. I used the layering die included in the die set to die cut the patterned paper for the four panels and then hand cut some holographic cardstock for the layers.

The belly band was created also using the die included in the set. I used circle dies included in the die set and also the Creative Craft Products Circles die set for the layers. 


The martini is from a card kit I purchased a year or so ago from Picket Fence Studios. I used some Ombre Cardstock that had the right shade of teal on it to die cut the actual martini to put in the glass.

The "Cheers" sentiment is from the Here's To You stamp set from MFT Stamps. I also added the Martini Sentiment which is an older wood mounted stamp from Inky Antics.

To finish off the front of my card I added the Clear Drops Iridescent Pearls from Pink Fresh Studio.


Here the card is partially opened, starting to reveal the sentiment which is hidden behind the shutters.


Finally the full reveal. The sentiment in the centre of the card is also from MFT Stamps Here's To You stamp set. I also added two smaller martini glasses using dies from an older MFT Stamps die set called Let's Toast.


Other Supplies:

  • One Martini, Two Martini ... Wood Mounted Stamp - Inky Antics (retired)
  • Let's Toast Die-namics - MFT Stamps (retired)
  • Martini Shaker Die - Picket Fence Studios (retired)


Friday, January 27, 2023

Zest Wishes


Hi Crafty Friends,

Today I am sharing a birthday themed pop-up card I created recently.


 I used Karen Burniston's Cupcake Pop-up die set for the pop-up portion of the card. While this die is an actual cupcake image on the pop-up it also makes a fabulous generic pop-up like I've used on my card today.

I adhered the lemon patterned paper to the centre of my card base and then used the pop-up die included in the Cupcake Pop-up die set to die cut the pop-up art of the card.

I added coordinating patterned paper on the outer edges of my card adding a border between the two patterned papers using one of the border dies included in the Border Blends - Party die set also from Karen Burniston.

To decorate the inside of my card I used Lawn Fawn's Fruit Basket which I die cut from Silver Holographic Cardstock and the lemons using the Zesty Lemons die set.

I added a few of the mice to my card, using mice from two Lawn Fawn stamp sets which I have listed in the supply list below.


For the sentiment I first added the oval layers using the Ovals - Crosshatch die set. The "Zest" Word was created using Karen Burniston's Alphabet die set.

I added the stamped sentiment above the "Zest" word using two sentiments from MFT Stamps Bitty Birthday Sentiments stamp set.


For the front of my card, I used the same papers as I used on the inside changing which of the papers was in the centre. 

I again used the Lawn Fawn Zesty Lemons die set to add the lemons to my card.

For the sentiment I again created the word "ZEST" this time using Karen Burniston's Mini Alphabet & Numbers die set. I added the "Wishes" using another stamp from the Bitty Birthday stamp set.


Thursday, January 26, 2023

Swimming By

Hi Crafty Friends,

To all my Aussie readers, Happy Australia Day.

It's summer down here in Australia, so in honour of Australia Day,, I decided to create a card with a summer theme.

To create my card I created a Centre Step Card using Creative Craft Products High Centre Stepper Card die set which is available from Craft Stash. This and a number of other stepper card die sets were on special last year during their Black Friday sale and as the prices were really good a few landed in my cart! This one is different to others I already have in that the finished size measures 8 inches wide by 5 3/4 inches high.


As I wanted to create a pool scene I decorated the white card base using blue patterned paper on the top portion of the card. I then used green patterned paper and a hill border die from Honey Bee Stamps Horizon Slimline Borders die set. I also added the fence from the same die set to the top portion of the grass area.

I used the Swimming Pool die and Kiddie Pool Stamp set from Sunny Studio Stamps to create my swimming pool scene.


For the palm trees I used Lawn Fawn's Tropical Backdrop die set.

I die cut a yellow circle for the sun which I added to the top right hand corner of the centre step portion of the card.

For the sentiment I used Whimsy Stamps' Fintastic stamp set.

The beach ball is from a Lawn Fawn stamp set.


For the inside of my card I used the rectangle dies included in the High Centre Stepper Card die set.

The sentiment here is from MFT Stamps BB Sunshine and Friendship stamp set. 

To finish off the card I added two more of the images from the Kiddie Pool stamp set.


Wednesday, January 25, 2023

Opposites


Hi Crafty Friends,

I enjoy exploring the Days of the Year website to discover all the fun and interesting days of the year that people celebrate. Today Apparently is National Opposite Day, so of course I decided to celebrate by using opposites in my card.

If you want to know what Opposite Day is all about you can find out here.


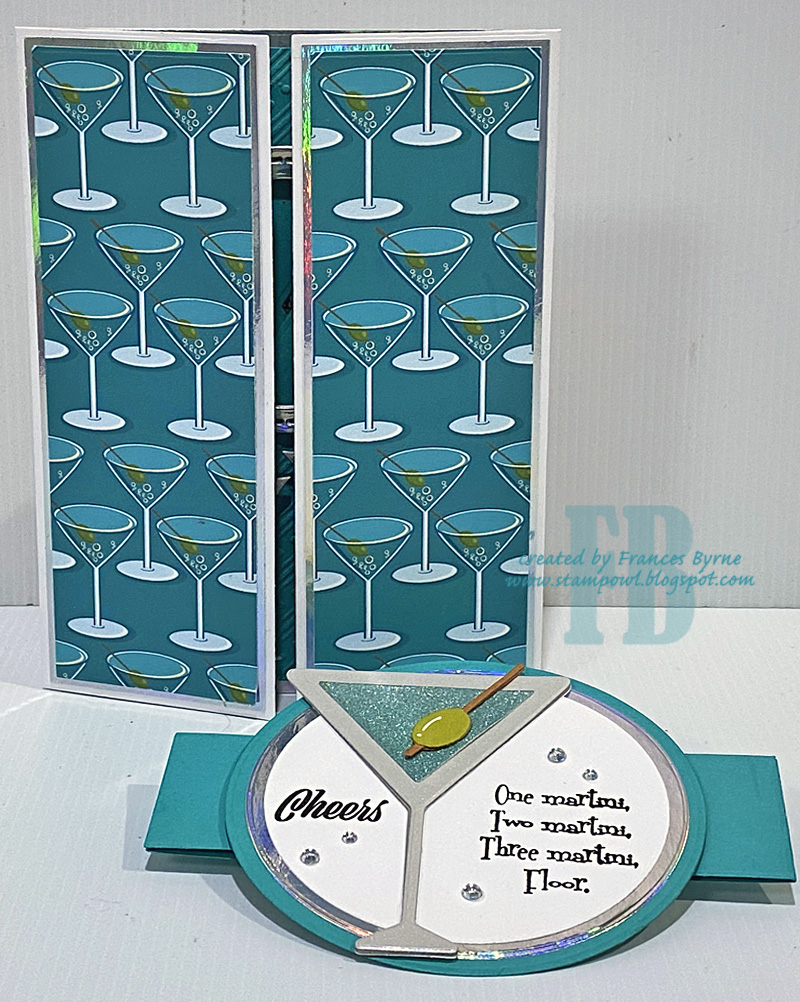
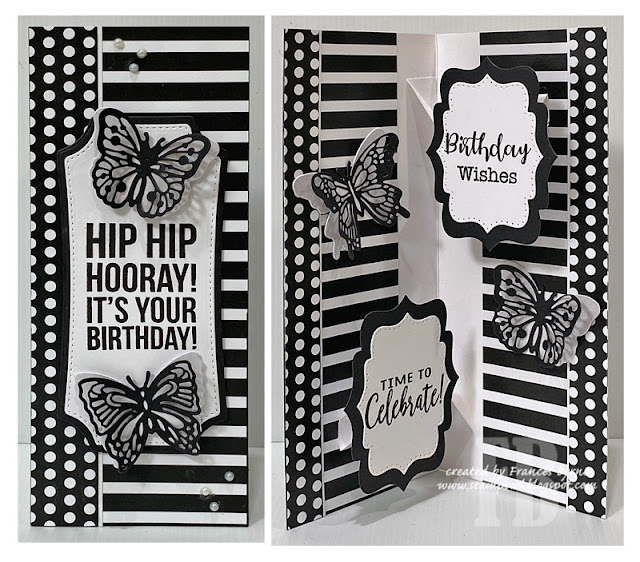
I think I have included at least three different things on my card that would be considered "Opposite" two on the outside and the third on the inside. First up there is the colours ... black and white, I have then gone with stripes and dots.

I have created a Slimline card using patterned papers from Catherine Pooler Designs to create the first two opposites of my card. 

I added the large labels using Whimsy Stamps Mini Slimline Notched Labels die sets to the centre of my card. The sentiment is an older sentiment from my stash from Kaisercraft which I stamped in the middle of the labels.

I added the two butterflies using Made To Surprise by Sam Calcott's Butterflies Galore Stamp/Die set, using the stand alone dies from the set only which I die cut from black and white cardstock. 

To finish off the front of the card I added a few pearls.


The inside of the card, repeats the first two opposites of black and white; stripes and dots and then we have the addition of the pop-up. The pop ups are adhered to the card on opposite ends (one at the top and one at the bottom and also on the opposite sides (left and right).

I used Karen Burniston's Katherine Label Pop-up for the pop up portion of my card which is always my go to pop up die set. I added two birthday themed sentiments to each of the labels.

I also die cut two more butterflies which I added to each side of my card.

Other Supplies:

Little Black Dress Slimline Patterned Paper - Catherine Pooler Designs (retired)

Hip Hip Stamp Set - Kaisercraft (retired)


Tuesday, January 24, 2023

It's A Girl


Hi Crafty Friends,

Today I am sharing a Baby themed Slimline card I created recently.


This card started by creating the cute little bear which uses Studio Light's Creative Craft Lab Ted die set. After I had made it, I had to decide what I was going to do with it and as you can see it was to make a baby themed Slimline card. I added a nappy to the bear to help it suit the theme a little better.

For the Slimline portion of the card I used Spellbinders' Half Diamond Fleur Bouquet Slimlines die set. I added white glitter cardstock underneath the diamond panels, so that it would look different to just white cardstock. 

For the sentiment I used Dress My Craft It's A Girl die set. The "It's a" portion of the sentiment is normal attached above the "Girl", but I trimmed that off and added it to the left of the word.

To finish off the front of the card I added flowers using Spellbinders Pettit Floral Potpourri die set.


For the inside of the card I added the diamond panels to each of the edges of the card. 

When I was looking through my baby themed dies for something to add to this card, I found Tailored Expressions Block Party - Baby die. I decided to die cut it into the front of a basic pop up block that I created. 

I added the "Welcome" sentiment to the top of the pop-up using a sentiment from an older MFT Stamp set.


To finish off the inside of the card I added some more flowers using the Spellbinders Pettit Floral Potpourri die set.


Other Supplies:

  • Block Party Die - Taylored Expressions (retired)
  • Baby Onesie Stamp Set - MFT Stamps (retired)


Monday, January 23, 2023

Fortune Cookies


Hi Crafty Friends,

Apparently yesterday (22nd January), was Chinese New Year so for my card today I decided to create a card which had a Chinese/Oriental theme.


For my card, I created a Double Gatefold Card using Creative Craft Products Double Gatefold Card die set which is available from Craft Stash. I love the look of the diamond shape that is formed when the card is closed and I thought it would work well with an Oriental theme. 


I used gold mirror cardstock for my matting layer and oriental themed papers for the background paper.

I added gold metallic pearls to the diamond section on the front of my card.


Here is a look at my card when it is partially open.


As there isn't any room on my card when it is closed, I added the fortune cookies to the inside of my card. I thought this sentiment would work for either a New Year for Chinese New Year or a birthday which is what I ended up making my card for as I didn't have a need for the former.

The fortune cookies and sentiment are both older sets from MFT Stamps.


I added a panel to the back of the card as the place to add a birthday sentiment and also a place to write a personal message to the recipient of the card.

Other Supplies:
Chinese Take Out Die-namics - MFT Stamps (retired)
Good Fortune Stamp Set - MFT Stamps (retired)


Friday, January 20, 2023

Banana Swing Boat Card


Hi Crafty Friends,

Today I am sharing a fun kinetic card I created recently. 

This card uses the Made To Surprise by Sam Calcott's Swing Boat die set which is part of her Fun at the Fair Collection. A little while before Christmas, Sam Calcott did a Facebook live where she made a Christmas themed card using this die set. During the live Benita Lundgren mentioned that she had made the swing boat into a Banana Boat, this sounded interesting so I decided that I would make my version of this eventually.


Here is a quick video to see my card in action.


I wanted a monkey that I could put in different positions on my card and wasn't either too big or small. I used the Monkey die set from Elizabeth Craft Designs, the banana die is also included in this die set.

I added the palm tree branches to the top of the card, so it did look like the swing was in a banana tree.


Here is a view of the back of my card. I used the "It's your Birthday" sentiment from a sentiment set from Made To Surprise Terrific Towers Collection. I then added the "Go Bananas" using Karen Burniston's Mini Alphabet and Numbers die set.

Other Supplies:
Palm Tree Die - MFT Stamps (retired)


Thursday, January 19, 2023

Mini Slimline Birthday


Hi Crafty Friends,

Today I am sharing two Mini Slimline Cards I created recently. 


I haven't played along on sketch challenges for many years other than any that were associated with the two challenge groups I used to be part of. But now that I am no longer on any challenge teams, I decided to play along with this month's Sheetload of Cards challenge. 

Each month Call Me {Crafty} Al shares a new sketch complete with cutting guide etc over on her YouTube channel. This month the sketch is for a Mini Slimline Card with details on how you can efficiently create 8 cards using the supplies. I don't need 8 cards, but I did decide to do two so that I could alternate the order of the patterned papers.


For my two cards, I used papers from Simply Made Cards and then added a sentiment using stamps from Made To Surprise by Sam Calcott.


I kept the insides of my card simple, using two sentiments from another Made To Surprise Sentiment stamp set.