Tuesday, March 31, 2015

All for One ....


Hi everyone,

It's challenge time again over on the Riley and Company blog. This time round our challenge is hosted by me!

For our challenge this week, I have challenged the Design Team to create a card with more than one fold.

I have used Riley and Company's The Three Moosekateers and All for One... sentiment to create an Accordion card. After stamps the image on card I cut each of the Moosekateers out separately so I could divide them on the two outer circles of the card.

For the base of my card I have used the Circle Accordion Card die set designed by Karen Burniston for Elizabeth Craft Designs


Here is my card when it is closed ready to be placed in an envelope.


Want to Play Along?

If you would like to play along with us of course we would love to have you!

To play create a card using Riley and Company images.

Once you have created your card/project, come back here and place a comment with a link to your card so we can see what you have created. If you upload your card/project to Splitcoast Stampers please use the keyword Riley0715. We can't wait to see what you create!

Don't forget to check out the Riley and Company Design Team's cards on their blogs:


Stamps: The Three Moosekateers!; All For One - Riley and Company
Paper: White; Brown; Blue; DP - Kaisercraft
Dies: Circle Accordion Card; Circle Frame Edges - designed by Karen Burniston for Elizabeth Craft Designs
Other: Black Ink; ECD Transparent Double Sided Adhesive 64mm; Foam Tape; Copics


Monday, March 30, 2015

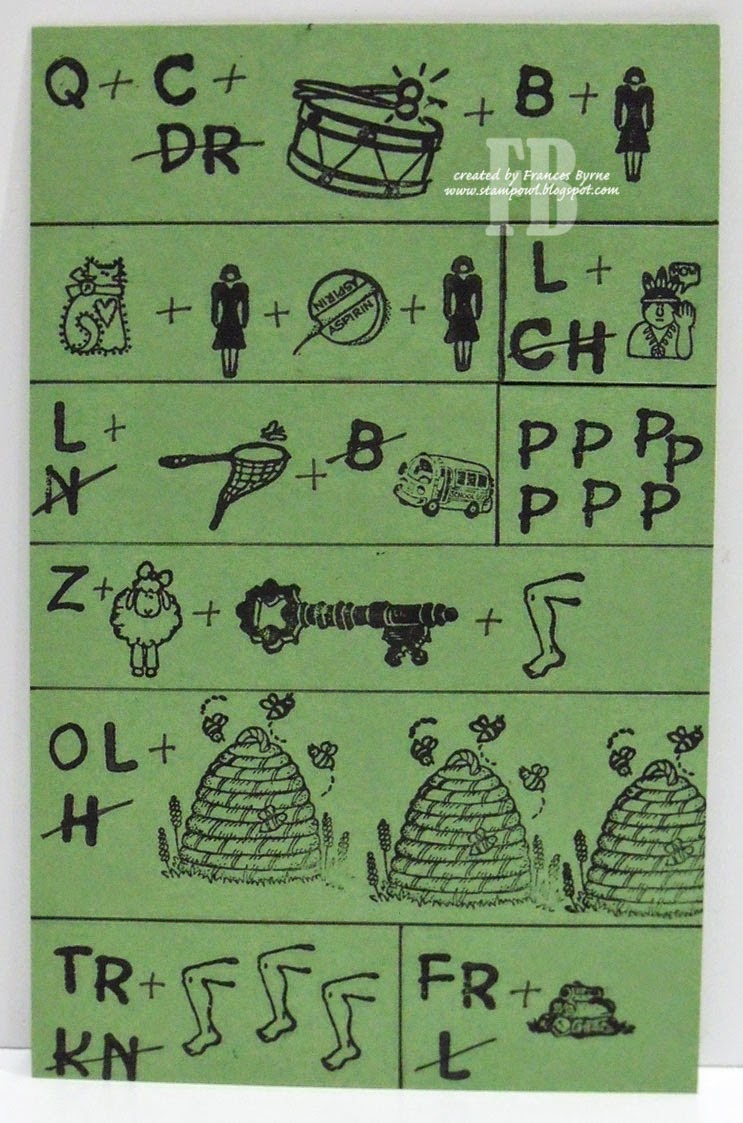
Rebus - Things that are Green


Hi everyone,

It is time for another Rebus swap to share with you all. This time round our theme is "Things that are Green". 

If you would like to solve my rebus puzzle, why not post a comment on my blog post with your answers. I will let you know what the correct answers are next time I post a rebus card here.

How did you go working out my February Rebus which was Names Starting with 'D' .... here are the correct answers for you to check how you did.


  1. Dorothy
  2. Dixie
  3. Danny
  4. Dawson
  5. Dianne
  6. Dot
  7. Denver
  8. Drew
  9. Denise
  10. Dora
  11. Dick
  12. Daisy
  13. Dace


You can find all my past rebus cards here


Sunday, March 29, 2015

Happy Birthday


Hi everyone,

Today I am sharing a pop up card I created recently using the Adirondack Chair Pop Up Card die set and Whiskers the Cat which was designed by Karen Burniston for Elizabeth Craft Designs


I die cut the Adirondack Chair Pop Up in the centre of the spotted designer paper and then again from red card. I cut the red chair out and adhered it over the spotted chair.

For the cat I die cut the top layer from woodgrain designer paper to give it a look of texture.


Here is a side on view of my card so you can see the pop up portion of the card a little easier.


Here is the front of the card. I added a couple strips of designer paper I had left over from making the inside. Along the edge of the strips I added Lines Peel Off Stickers. I also added a few paw prints on the card.

Paper: White; Black; Kraft; Pink; Red; Symmetry DP - Authentique; Wildflower DP - Carta Bella
Dies: Adirondack Chair Pop Up Card; Happy Birthday Pop Up Card; Whiskers the Cat; Props 4 Pets - designed by Karen Burniston for Elizabeth Craft Designs.
Other ECD Products: Black Lines Peel Off Stickers; Transparent Double Sided Tape 64mm


Saturday, March 28, 2015

Hoppy Easter


Hi everyone,


It’s challenge time with the “Crazies” over on the Crazy 4 Challenges blog.  Anja de Regt our challenge hostess for March, brings one last challenge for the month. 

This time round Anja has challenged us to Let's Think Spring!

I guess technically I cheated for this challenge as Easter is in Autumn where I live not Spring. But I know it is Spring in the Northern Hemisphere and as I will be sending this to my daughter who has recently moved over to England for the year, I went with it hehe!

I have created an Accordion card using the Fancy Label Accordion Card set designed by Karen Burniston for Elizabeth Craft Designs.

To decorate my card I have used stamps from Sugar Pea Designs. 


Here is my card closed ready to be placed in an envelope. 

Don't forget to check out the rest of the “Crazies” cards over on the Crazy 4 Challenges blog and also their individual blogs for more details.


Stamps: One Big Hoppy Family; Gnome Sweet Gnome - Sugar Pea Designs;  Stacked Eggs; Chocoholic Riley - Riley & Company
Paper: White; Peach; Party Perfect DP - Graphic 45; Best Wished DP - Graphic 45
Dies: Fancy Label Accordion Card - designed by Karen Burniston for Elizabeth Craft Designs
Other: Black Ink; Foam Tape; Copic Air Brush; Copics


Friday, March 27, 2015

Hello Ladybug


Hi everyone,

Today I am sharing a card I created earlier in the year using the new Sizzix Forever Friends Step-Ups Card Framelits. 

To decorate my card I used the new Sizzix Bugs Framelits  die set w/stamps 


Here is a different view of my card, so you can see all the folds on the card.


Dies: Sizzix Friends Forever Step-Ups Framelits; Sizzix Bugs Framelits w/stamps
Paper: White; Black; Green; Love Story Collection DP - TSOL
Other: Black Ink; Red Ink; Foam Tape


Thursday, March 26, 2015

Happy Birthday to Ewe!


Hi everyone,

It's challenge time with my friends over on the CCEE Stampers challenge blog. This week Anne Harmon our challenge hostess for March challenges us with one final challenge for the month.

Anne tells us .... March goes out like a lamb.  The theme is farm animals if you don't have a lamb image.

This apparently is the end of the verse that we started the challenges with at the beginning of the month ... even doing challenges you learn something as until I discovered this challenge I had never heard of this saying as of course down here in Australia it is the beginning of Autumn. 

For my card this week I pulled out a really old stamp set that I have had for over 20 years, it actually took me ages to find it as I didn't realise it was a foam mounted set which I store in a different spot to my wood mounted stamps and I went searching though so many drawers looking for it LOL!

I created a Pull Card using the Rectangle Pull Card die set designed by Karen Burniston for Elizabeth Craft Designs


This is what my card looks like when you pull open the front flap .... I have added a lamb at the top of the card using the spiral which is included in the die set. The sentiment was computer generated.

Don't forget to check out the CCEE Stampers blog (goes live 12 AM EST) to see the rest of the creations the CCEE Stampers created this week. You can also see more details of their creations on their individual blogs:

Stamps: Just For Ewe Stamp Set - Imagine That/Azardi Earles; Sentiment - Computer Generated
Paper: White; Imagine DP - Authentique; Up and Down DP - Fab Scraps
Dies: Rectangle Pull Card; Outdoor Edges - designed by Karen Burniston for Elizabeth Craft Designs
Other ECD Products: Cloud Embossing Folder  - designed by Karen Burniston for Elizabeth Craft Designs
Other: Black Ink; Foam Tape; Copics


Wednesday, March 25, 2015

Happy Birthday


Hi everyone,

It's time for another CHF challenge over on the Cornish Heritage Farms Blog. This week the challenge is hosted by me!

As today is my birthday, l challenged the DT to make a Birthday Card for this week's challenge.
(My birthday is on the 24th, I am actually posting this blog post on the 25th Australian time, as I have something else on my blog for the 24th .... but of course it is still the 24th in the US!)

For my card this week I have used Cornish Heritage Farms Dog with Balloons Digital Stamp to create a Flip-its card.


On the 'flip' side of my card I have used two of the sentiments from the Birthday Greetings Stamp set


Want to play along?????

If you would like to play along with us of course we would love to have you!

To play create a card using CHF images. You can use either CHF digi or rubber stamps to create a card or project ... anything you like as long as the stamps are Cornish Heritage Farms. (Yes, they can be older stamps.)

Once you have created your card/project come back here and place a comment with a link to your card/project to the CHF blog post so that we can see what you created. If you upload your card/project to SCS don't forget to included the keyword CHF75. We can't wait to see what you create!

Don't forget to check out the rest of the Design Teams blogs today to see what they created for this challenge.


Stamps: Dog with Balloons Digital Stamp; Birthday Greetings - Cornish Heritage Farms
Paper: White; Orange; Green; Sugar DP - Kaisercraft
Other: Black Ink; Sizzix Circle Flip-its Bigz Die; Circle Die; Foam Tape; Copics


Tuesday, March 24, 2015

Karen Burniston March Designer Challenge Day 2


Hi everyone,

As promised yesterday, I am  back with another card for this month's Karen Burniston Designer Challenge. This time round the theme for our challenge is Make 'em Laugh! - Funny cards for any theme. Here's a chance for you to use all those funny stamps you have, or make up your own greetings - you decide! 

As I am celebrating my birthday today and it is one of those BIG ones .... I figured it was only appropriate to create a birthday card for my challenge card today. I have been wanting a reason to play with some new stamps from Art Impressions which some friends gave me for Christmas.


The base of my card was created using the Rectangle Pull Card die set designed by Karen Burniston for Elizabeth Craft Designs

I just love that woman holding the fire extinguisher and that sentiment above ... it's probably not a good idea to put the number of candles that match my age on a cake this year haha ... maybe one candle per decade will be plenty!  The speech bubble used for the sentiment is from the Rectangle Accordion Card set


When you pull open the card it reveals another woman who is holding balloons which are attached to a spiral ... and the sentiment of the inside panel says "Happy 29th Bday! .... Again.  If only!!!!!!!!!!!

The balloons are included in the Spiral Circle Pull Card. The orange dots on the top closure piece and the left hand panel are from the Fancy Seasons Frame Edges set

If you are looking to purchase Karen's Pop It Ups dies in Australia you can find them at Craft Giraffe (formerly Photo Continental). 

Don't forget to check out the Elizabeth Craft Designs blog on Wednesday when you will be able to see what all the designers created for the challenge this month, plus an amazing card/video tutorial from Karen Burniston.


Stamps: Burnadette; Fire Out Set; Giant Cake Set; Happy 29th Set; 29 Again Set;  Dog  - Art Impressions
Paper: White; Cream; Teal; Green; Red; Orange; Cars DP - Echo Park
Dies: Rectangle Pull Card; Rectangle Accordion Card; Spiral Circle Pull Card; Fancy Seasons Frame Edges; designed by Karen Burniston for Elizabeth Craft Designs
Other: Black Ink; Foam Tape Copics


Monday, March 23, 2015

Karen Burniston March Designer Challenge Day 1


Hi everyone,

It's time for our March Karen Burniston Designer Challenge. This time round the theme for our challenge is Make 'em Laugh! - Funny cards for any theme. Here's a chance for you to use all those funny stamps you have, or make up your own geetings - you decide! 

For my card today I have decided to create an Accordion card. I used the Rectangle Accordion Card die set and the Katie Stars Frame Edges designed by Karen Burniston for Elizabeth Craft Designs.

Normally this accordion card is in portrait form, but using Karen Burniston's YouTube instructions I was able to change the format to landscape form. You can see Karen's video here


Here is a closer look at the first two pages of my Accordion Card, the bear cooking a BBQ is from Lili of the Valley. The sentiment is one of the Funny Bones sentiments from Riley and Company.

Here is a closer look at the last page of my Accordion card, this time round I used the Sausage Snatcher from Lili of the Valley, I think it works perfect with that sentiment haha!

And here is a look at my card when it is folded ready to be placed in an envelope.

If you are looking to purchase Karen's Pop It Ups dies in Australia you can find them at Craft Giraffe (formerly Photo Continental).

Don't forget to check out the Elizabeth Craft Designs blog on Wednesday when you will be able to see what all the designers created for the challenge this month, plus an amazing card/video tutorial from Karen Burniston.


Stamps: Top Chef; Sausage Snatcher - Lili of the Valley; People Who Don't Have Dogs - Riley and Company
Paper: White; Black; Red
Dies: Rectangle Accordion Card; Katie Stars Frame Edges designed by Karen Burniston for Elizabeth Craft Designs
Other: Black Ink; Foam Tape; Copics


Sunday, March 22, 2015

Happy Easter


Hi everyone,

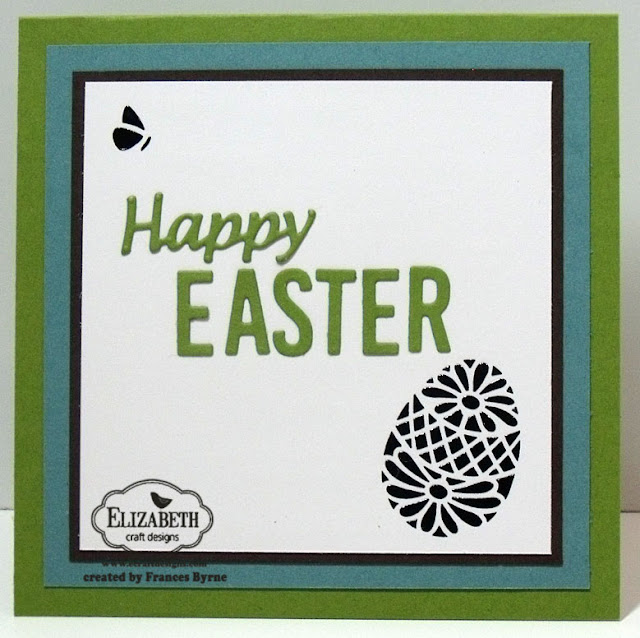
It's my turn to post a project on the Elizabeth Craft Designs blog today. As Easter is only two weeks away, I decided to create an Easter card for my tutorial today. I have used some of Elizabeth Craft Designs Peel Off Stickers and another one of the grids from Susan's Gardens Garden Patch range of dies.

Here is how I created my card:

1. Die cut the grid from the Garden Patch 7/8 inch & Mini Leaves die set using brown card and also designer paper.


2. Trim out the grids on the left hand side of the grid as per photo above. Layer grid to a piece of blue card which is 4 1/2 inches square. Add the designer paper squares to the outer grids. Cut a piece of white card 2 7/8 inches square and adhere it into the large grid.

3. Create a top folding card from green card which is 5 inches square and attach the layers created in step 2 to card.

4. From the Small Eggs Peel-Off Stickers, place three eggs and two butterflies onto white card that has Elizabeth Craft Designs Transparent Double Sided Tape on top. Remove release sheet, cover peel-offs with Cool Diamond Silk Microfine Glitter and polish glitter with your finger. You can see a video Els created using this technique here. Color your images as desired.

5. Cut a piece of green card 1 inch x 3 1/2 inches and another which is 2 inches x 3 1/2 inches. Use the grass die from the Outdoor Edges set to die cut grass, keeping the die near the top of the card so you keep the full depth of the card. Sponge edges using green ink. Trim grass so it is 2 7/8 inch wide.

6. Assemble Easter Eggs and grass, adhering one of the eggs to the white card first, then the 2 inch deep grass over this. The last two Easter Eggs are attached to card using foam tape and finally the 1 inch deep grass again adhering with foam tape.


The Inside of the Card:

7. Cut a piece of white card 3 7/8 inches square and layer this to a piece of brown card 4 1/16th inches square. Layer this to a piece of blue card 4 1/2 inches square which is adhered to the inside of the card.

8. Roughly trim around the negative Easter Egg and butterfly image which remains after using the peel-off for your card. Peel off any excess black peel off sticker that may be around your image until you just have the image as per photo above.

9. Cut a piece of Sticker Transfer Sheet large enough to fit over Easter Egg and butterfly. Remove the protective backing and place the tacky side of the Transfer Sheet onto the negative shapes/ Burnish with a bone folder  or your fingers and carefully lift the Transfer sheet checking to ensure that all of the pieces lift at once. You can see Els’s video using this technique HERE.

Now move the Transfer Sheet with negative shapes attached to it over to the card. When it is in the right spot, place it down onto the card and rub the front of the Transfer Sheet to release the pieces onto the card. Carefully lift the Transfer Sheet to check and makes sure all of the negative image pieces are now on the card. (Don’t remove the Transfer sheet till all pieces are in place).

10. Use the Alphabet 1 - Caps die set die cut the letters E; A; S; T; E; R from green card that has Transparent Double Sided Adhesive Tape to the back of it. Adhere the letters so they are centred to the inside white card.

11. Die cut "Happy" from the Happy Birthday die from green card that has Transparent Double Sided Adhesive Tape to the back of it. Adhere this above and to the left of the word EASTER.

Thanks for stopping by today. I hope you have enjoyed my tutorial.
 
Supplies:
Elizabeth Craft Designs
Garden Patch 7/8 inch & Mini Leaves (1004)
Outdoor Edges (914)
Happy Birthday (783)
Alphabet 1 – Caps (967)
Small Eggs Peel Off Stickers (SKU 898)
Transparent Sheet (SKU 600)
Transparent Double Sided Tape 64mm (508)
Cool Diamond Silk Microfine Glitter (641)
 
 
Other
White Cardstock
Brown Cardstock
Blue Cardstock
Green Cardstock
Echo Park Bundle of Joy New Additions Boy 6 x 6 Paper Pad
Green Ink
Copics
Foam Tape

Saturday, March 21, 2015

Ahoy There!


Hi everyone,

It’s challenge time with the “Crazies” over on the Crazy 4 Challenges blog.  Anja de Regt our challenge hostess for March, continues to bring us fun challenges. 

This week being the third Saturday of the month it is time for a sketch challenge. 


For my card this week I have used A Random Fan's My Anchor Stamp set, which I have used in place of the oval shown on the sketch.


Oh course if you know me by now, I could just create a plain flat card ...  so on the inside of my card I added a Pop Up.

I used the Happy Birthday Pop Up Card die set designed by Karen Burniston for Elizabeth Craft Designs.

I kept the label on the bottom of the card blank so it is ready for someone to write their greeting to whoever this card eventually goes to.


Here is a side on view of my card so you can see the pop up portion of the card a little easier.

Don't forget to check out the rest of the “Crazies” cards over on the Crazy 4 Challenges blog and also their individual blogs for more details.


Stamps: My Anchor - A Random Fan; Ahoy There - Hanna Stamps
Paper: White; Red; Blue; Ahoy There DP - Carta Bella
Dies: Happy Birthday Pop Up Card; Katie Label Pivot Card - designed by Karen Burniston for Elizabeth Craft Designs; MFT Die-namics Fishtail Flags Stax
Other ECD Products: Transparent Double Sided Tape 64mm;  Blue Glitter Dots; Clear Glitter Dots; Cool Diamond Silk Microfine Glitter
Other: Black Ink; Nautical Buttons; Foam Tape; Copics


Friday, March 20, 2015

Bear Hugs!


Hi everyone,

My card today is an Accordion card using the Rectangle Accordion Card die set designed by Karen Burniston for Elizabeth Craft Designs

This time round I created a two page accordion card and then added the doily edge from the  Paris Edges die set to the right hand side of my card. I did this recently on a baby card I created, but for that one I added it to each end, this time round I just added it to one side.


I used the Bear Hugs set from Art Impressions to decorate my card. this stamp set is designed to use with an action wobble which I used on my bear. I have included a short video so you can see the bear in action.


Stamps: Bug Hugs Set - Art Impressions
Paper: White; Cream; Bright Pink; Spark DP - Authentique; Attraction DP - Authentique
Dies: Rectangle Accordion Card; Paris Edges - designed by Karen Burniston for Elizabeth Craft Designs
Other: Black Ink; ECD Pink Glitter Border Peel-Off Stickers; Action Wobble; Foam Tape; Copics