Saturday, June 30, 2018

You Brighten My Day


Hi Crafty Friends,

It’s challenge time with the “Crazies” over on the Crazy 4 Challenges blog. As challenge hostess for the month, I finish off the month with one last challenge.

Our challenge this week is .....
I love the look of inlaid de cutting using alphabet or word dies over a design on a card which is becoming popularly known as the Eclipse Technique. 


For my card today I pulled out my Painted Peonies stamp set from The Ton which I purchased earlier in the year and hadn't gotten around to using. 

For the Inlaid Die Cutting /Eclipse Technique part of the card I die cut the word "YOU" using the Alphabet set from Karen Burniston.

The "Brighten My Day" sentiment is from a Honey Bee Stamps stamp set.


For the inside of the card I created a pop-up card using the Katherine Label Pop-up die set adding a sentiment from the Painted Peonies stamp set.

I die cut one of the edges from the MFT Stamps Stitched Scallop Basic Edges die set and stamped the peonies over the panels for both the top and bottom of the card.


Here is a side on look at my card so you can see the pop-up portion of the card a little better.

Don't forget to check out the rest of the “Crazies” cards over on the Crazy 4 Challenges blog and also their individual blogs for more details.


Supplies:
Painted Peonies Stamp set - The Ton


Friday, June 29, 2018

Rebus - Doris Day Movies


Hi Crafty Friends,

It's time to share another rebus puzzle swap with you. This month the theme is "Movies Starring Doris Day"

If you would like to solve my rebus puzzle, why not post a comment on my blog post with your answers. I will let you know what the correct answers are next time I post a rebus card here.

How did you go solving my May Rebus which was "Songs by Herman's Hermits".
 Here are the correct answers so you can check how you did.

  1. Sunshine Girl
  2. Leaning on a Lamppost
  3. Dandy
  4. Here comes the star
  5. Can't You Hear My Heartbeat
  6. Must to Avoid
  7. Listen People
  8. Silhouettes


You can find all my past Rebus Cards here.

Thursday, June 28, 2018

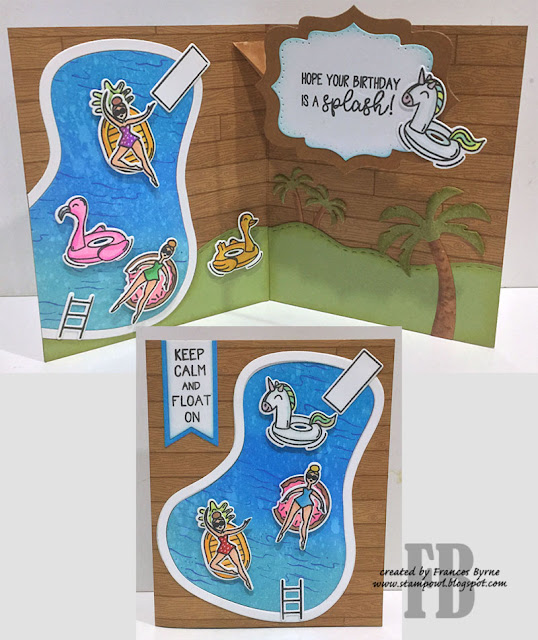
Hope Your Birthday is a Splash


Hi Crafty Friends,

It's challenge time with my friends over on the CCEE Stampers challenge blog. Joanne Grzelak our challenge hostess for the month, continues to issue the challenges.

This week's challenge is "Relaxation". Create a card that depicts Relaxation to you. Can be a place where you are relaxed or what you do to relax.


I have been wanting to create a card using Avery Elle's Splash stamp set with coordinating dies for a while now and today's challenge seemed like the perfect time to make it.

I created a pop-up card using Karen Burniston's Katherine Label Pop-up die set along with the Nature Edges; Palm Tree and Tropical Scene die sets.

I used part of the pool on the left hand side of the card for the inside of the card.


Here is a quick video to see my card in action.


For the front of the card, I repeated the pool element I used on the inside. This time including the whole pool. The water inside the pool was created using distress oxide inks.


Don't forget to check out the CCEE Stampers blog (goes live 12 AM EST) to see the rest of the creations the CCEE Stampers created this week. You can also see more details of their creations on their individual blogs:


Wednesday, June 27, 2018

Coffee Time Reveal Wheel


Hi Crafty Friends,

My card today is for a challenge I do with a couple of friends of mine. Each month we challenge each other to create something using supplies we all own.

For our challenge this month are theme is Coffee.

As you can see I have created another Reveal Wheel Card using the Lawn Fawn Reveal Wheel die set and stamps from Honey Bee Stamps.


Here is a quick video showing my card in action.


To decorate my card I used the Coffee Break and Perfect Blend stamp sets from Honey Bee Stamps. I used words that would work after "Coffee" for the reveal wheel part of the card.


For the inside of the card, I added another of the images from the Coffee Break stamp set and a sentiment created from the Perfect Blend stamp set.


Supplies:


Tuesday, June 26, 2018

Monsterous Birthday Wishes


Hi Crafty Friends,

I have a fun birthday card to share with you today, using some cute monster images that I purchased recently at a Paper Craft Show I attended. These monsters look pretty excited to help celebrate someone's birthday!

To create the background I sponged some clouds onto a piece of blue cardstock which was die cut using a Stitched Rectangle die. I then added two layers of grass using Lawn Fawn's Grassy Hillside Borders die set.

I stamped the monsters and using my Scan N Cut to cut out all the images and added them to my card.

For the sentiment, I used a speech bubble from Lawn Fawn and also added a few hearts from the same die set to the sky.


For the inside of the card, I added the blue cardstock and grassy hillside panel to the bottom. I then stamped two of the sentiments from the stamp set and added another of the cute monsters.

Supplies:
Out of this World Stamp set - Uniquely Creative
Stitched Rectangles - Simon Says Stamp


Monday, June 25, 2018

Hello ... Relax


Hi Crafty Friends,

For my card today, I pulled out some of my Silk Microfine Glitters and Clear Double Sided Adhesive Tapes to create this fun background. For this card I used Sea Glass, Forest Green and Light Brown Silk Microfine Glitters.


To decorate my card I added a Palm Tree scene which I layered using the Stitched Hexagons and Fitted Hexagons die set. The sentiment is from Words 2 - Thinking of You die set.


For the inside of the card, I added an off cut from the glitter background I created for the front of the card. I added sentiments and the palm trees from the Beach Sentiments & General Sentiments Clear Stamp sets.

Supplies:


Sunday, June 24, 2018

Hello, How Are You


Hi Crafty Friends,

How are you today? I hope you are all enjoying your weekend! 

I have been playing with some new stamps and dies to create the card I am sharing with you today. 

To start I used the Deco Diamond Background stamp from Simon Says Stamp to create the background on this card. I stamped the background onto white cardstock using VersaMark Ink and embossed using white embossing powder. I then created a rainbow look by sponging on Candied Apple, Wild Honey and Salty Ocean Distress Oxides inks. 

I used the Hello die and coordinating stamp set from Paper Rose (Australian Company) to create the sentiment for the card. 

To finish off the front of the card I added some clear crystals randomly over the background.


For the inside of the card, I added a strip of card to the left side of the card which was leftover from when I decorated the front of the card. I then added a sentiment from the same stamp set used for the front sentiment.


Supplies:
Deco Diamond Background - Simon Says Stamp
Hello Stamp and Coordinating Die Set - Paper Rose


Saturday, June 23, 2018

Wishing You a Fairy ....


Hi Crafty Friends,

It’s challenge time with the “Crazies” over on the Crazy 4 Challenges blog. As challenge hostess for the month, I continue to issue the challenges.

Our challenge this week is .....
Ombre 
Definition - a french word meaning "shaded". Ombre is the gradual blending of one color hue to another, usually moving tints and shades from light to dark.

The ombre technique has become very popular in stamping over the past few years. Use this technique in some way when creating your card this week.

Here are a few links to YouTube videos for inspiration:
Ombre Stamping- Jennifer McGuire 
Easy Ombre Backgrounds– Jennifer McGuire
Ombre Background Stamping– Yana Smakula


Original I started making this card for tomorrow, as apparently it is "Fairy Day", however half way through I discovered this would fit for today's challenge so decided to use it for today instead.

I used Karen Burniston's Circle Charm Pop-up die set. To create the ombre background, I sponged on Tattered Lace; Warm Lipstick and Abandoned Coral Distress Oxide ink in ombre fashion. And spritz with water from a Distress Sprayer. On the top half of the background I added hearts using Honey Bee Stamps Fall Showers Stencil set.

After creating the backgrounds, I die cut the panels using the Rectangles Crosshatch die set.


The circle frames around the opening and the back panel of the card are die cut using the Circles Crosshatch die set.

The fairy is an old one from my stash from The Greeting Farm.

I used Simon Says Stamp Center Cut Flowers stamp for the flowers, cutting out the flowers and adding to the bottom of each panel.

The "fairy" birthday sentiment is from on older Paper Pretties stamp set, which is no longer available.


Here is one more photo of my card taken from over head.

Don't forget to check out the rest of the “Crazies” cards over on the Crazy 4 Challenges blog and also their individual blogs for more details.


Supplies:

Stamps: Center Cut Flowers - Simon Says Stamp; Chloe - The Greeting Farm; Fairy Special - Paper Pretties


Friday, June 22, 2018

Happy 4th of July Shaker Card


Hi Crafty Friends,

It's my turn to post a tutorial on the Elizabeth Craft Designs blog. With the 4th of July being less then 2 weeks away, I thought I would create a shaker card to celebrate the occasion. 

Now of course living in Australia I don't actually celebrate the day, but I had fun playing with a number of the new die sets which included the 4th of July & Frame It/Stitched Rectangle die sets.

Here is how I created my card:


Step 1 - 
  • Cut a piece of blue cardstock that measures 5 1/2 inches x 8 1/2 inches, score and fold along the 8 1/2 inch side at 4 1/4 inches to create a 4 1/4 inch x 5 1/2 inch top folding card.
  • Using the second largest rectangle from the Fitted Rectangles die set, die cut a rectangle from White Soft Finish Cardstock. 
  • Adhere to the centre of the folded blue card.

Step 2 - 
  • Starting with blue cardstock, centre the third largest rectangle from the Garden Notes - Frame it Stitched Rectangles die set into the largest rectangle from the Fitted Rectangles die set. Die cut frame.
  • Remove the inner rectangle die from the two dies and replace with the next smaller rectangle from the die set and die cut a piece of white cardstock.
  • Repeat this process each time using a smaller rectangle and die cut a piece of red cardstock and then another piece of blue cardstock.

  • Layer all rectangles together, so you have the larger blue frame at the top and finishing with the smallest blue frame at the bottom.
  • Using the solid star from the Summer Fun Sentiment set, stamp around the large blue frame only using VersaMark Ink.
Step 3 -
  • Place the frame over the folded card and mark around the opening in the centre of the frame onto the white cardstock on the front of the folded card.
  • Remove the frame and stamp the sentiment "Happy 4th of July" to the centre of the white cardstock using black ink.
Step 4 - 
  • Add foam tape all around the front of the base card so that the foam tape is slightly in from the mark placed on the white card in step 3. 
  • Using the two star decorative pieces from the 4th of July die set, die cut stars from red, white and blue cardstock. (I die cut each color 4 times to get enough stars).
  • Place all the stars in the centre of the base card. Carefully remove protective backing from foam tape.
  • Add acetate to the back of the opening of the red, white and blue frame created in step 2 and adhere to the foam tape on the front of the card.
Step 5 - 
  • Die cut two large star bursts from the 4th of July die set from white cardstock that has Clear Double Sided Adhesive Tape on the front.
  • Remove protective backing and cover the adhesive with Silver Silk Microfine Glitter. Polish glitter with your finger to bring out the maximum shine of the glitter.
  • Die cut the hat and two fireworks from the 4th of July die set from red, white and blue cardstock. Assemble images.
  • Adhere silver starbursts, hat and fireworks to opposite corners of the card.

Step 6 - Inside of Card:
  • Using the second largest rectangle from the Fitted Rectangles die set, die cut a rectangle from red cardstock.
  • Using the third largest rectangle from the Stitched Rectangles die set, die cut a rectangle from white cardstock.
  • Die cut the word "Celebrate" from the Words 1 - Celebration die set from red cardstock and adhere to the top centre of card as per photo above.
  • Using the Blackboard Alphabet die set, die cut the letters U S A from blue cardstock and adhere to the bottom left hand corner of card.
  • Die cut the American flag from the 4th of July die set, assemble and adhere to the bottom right hand corner of card.
  • Adhere panel to inside of card.


Thank you for stopping by, I hope you enjoyed my tutorial.


Supplies:
Elizabeth Craft Designs:


Thursday, June 21, 2018

Have A Sublime Birthday


Hi Crafty Friends,

It's challenge time with my friends over on the CCEE Stampers challenge blog. Joanne Grzelak our challenge hostess for the month, continues to issue the challenges.

Joanne tells us that the ocean is her favorite place ... and her annual trip to Maine is sacred. So, in honour of that, our challenge this week is to create a card inspired by the ocean or beaches.


Here is a quick video showing my card in action
I finally received my Lawn Fawn order from the May release, so I wanted to use the other accessories that went with the Reveal Wheel card and as I also had ordered the You Are Sublime stamp set it was easy to decide what to use on my card.

For the background of my card I die cut the sand and waves on my background and then used used Distress Oxides to color the background.


For the inside of the card I added a sandy bottom to the base of my card and added another sentiment from the stamp set.

Don't forget to check out the CCEE Stampers blog (goes live 12 AM EST) to see the rest of the creations the CCEE Stampers created this week. You can also see more details of their creations on their individual blogs: