Thursday, October 31, 2019

Halloween Haunted House

Hi Crafty Friends,

It's challenge time with my friends over on the CCEE Stampers challenge blog. Kelly Santi our challenge hostess for the month, finishes the month with one last challenge.

Today is Halloween! Although many celebrate - let's keep it simple and create a card with anything Halloween OR Harvest ... costumes, candies, spooky things or just use orange and black!

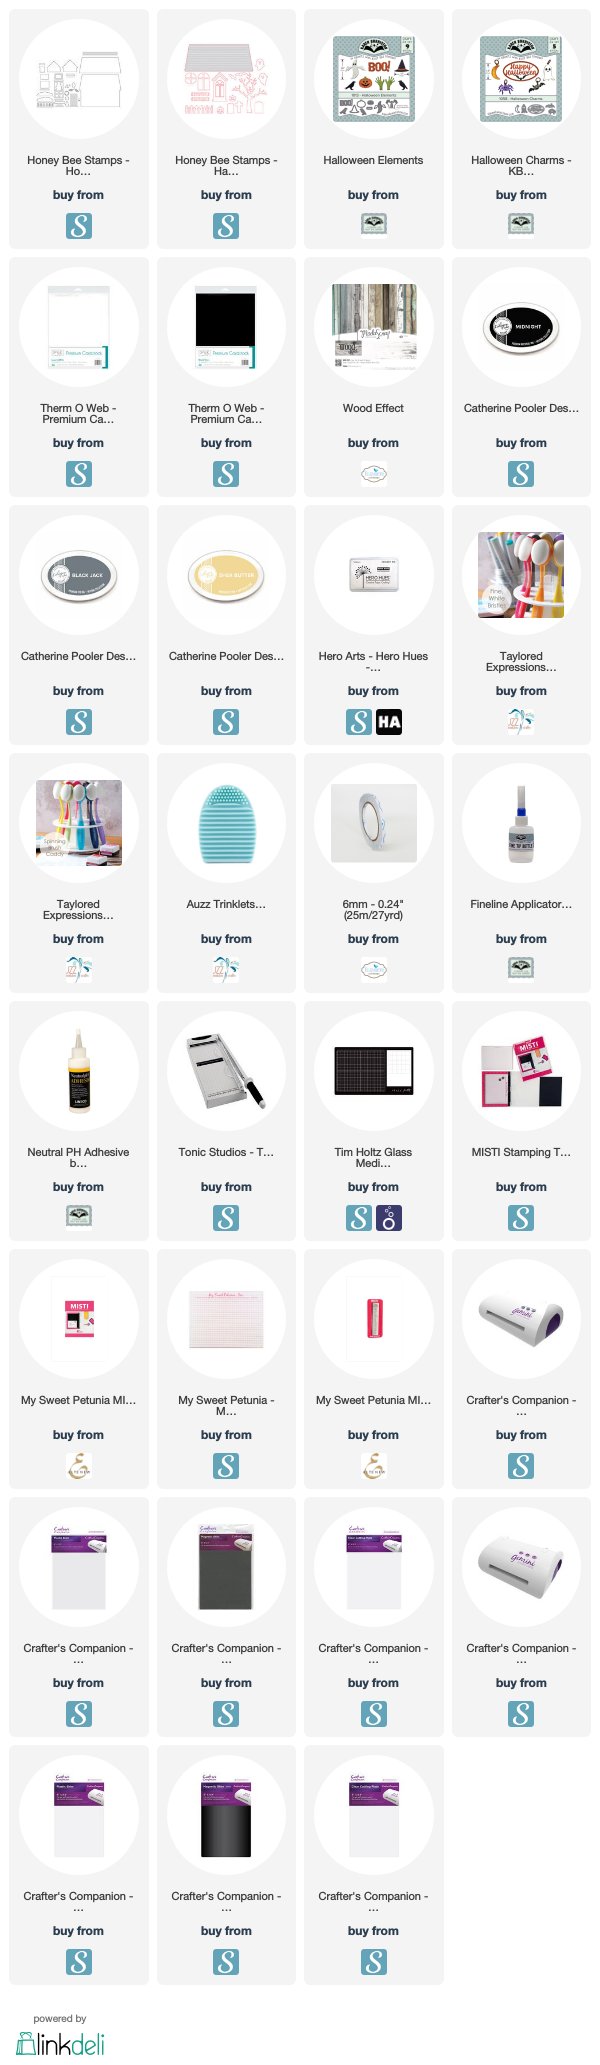
As you can see I have created another House Easel Card using Honey Bee Stamps House Builder Card Base and their Haunted House Add On die set. When I ordered the house die set, I figured I should include the Haunted House die set in my order so of course wanted to use it before it was too late for this year.

I had thought about created a pop up card with the haunted house, but in the end opted for another easel card as it was the easier option and looked more interesting.


To help the house stand as an easel, I die cut the  "Happy Halloween" sentiment from Karen Burniston's Halloween Charms die set which I die cut three times an layered for extra height. I also die cut an additional one in black so I could have a black bat.

On the corners of the front of the card base I added some spiders webs which is from an older MFT Stamps die set.


Here is a look at my card when it is closed ready to be placed in an envelop.


And finally a look at the back of the card .... I decided to add "Boo!" and some haunted hands to the back for some extra spooky fun! These are from Karen Burniston's Halloween Elements die set.

Don't forget to check out the CCEE Stampers blog (goes live 12 AM EST) to see the rest of the creations the CCEE Stampers created this week. You can also see more details of their creations on their individual blogs:


Supplies:
For your shopping convenience, all products are linked below. Compensated affiliate links are used where possible with no extra cost to you. This helps me to continue to share all the projects I include on my blog. For the benefit of my Australia readers, I have started to include some links to Australian stores when available. Please note I only use and share products I love.


Wednesday, October 30, 2019

Mermaid Wishes


Hi Crafty Friends,

My card today is for a challenge I do with a couple of friends of mine. Each month we challenge each other to create something using supplies we all own.

This month the theme for our challenge is .... Under the Sea.


I decided to create an interactive card using MFT Stamps new Launch Party Die-namics. When you pull the tab on the right side of the card a turtle that is hidden under the oyster swims up to appear next to the sentiment. At the same time the seahorse on the left hand side of the card, swims behind the mermaid to the right side of her. Here is a quick video of my card in action.


To create my background I blended Salty Ocean and Mermaid Lagoon Distress Oxide inks onto white cardstock. I used Antique Linen and Brushed Corduroy Distress Oxide inks to the sand portion of the card which was created using Lawn Fawn's Stitched Hillside Borders.

The mermaid and all the underwater images are from Simon Says Stamps Beautiful Mermaid stamp set.


For the inside of my card I added another of the mermaids from the Beautiful Mermaids stamp sets. The "Mermaid Wishes" & "Let's Shellabrate" sentiments are from Honey Bee Stamps Mermaid Song stamp set. The "It's Your Birthday" sentiment is from MFT Stamps Bitty Birthday Sentiments.


Supplies:
For your shopping convenience, all products are linked below. Compensated affiliate links are used where possible with no extra cost to you. This helps me to continue to share all the projects I include on my blog. For the benefit of my Australia readers, I have started to include some links to Australian stores when available. Please note I only use and share products I love.


Tuesday, October 29, 2019

Rebus - Movies Starring James Stewart


Hi Crafty Friends,

It's time to share another rebus puzzle swap with you. This month the theme is Movies Starring James Stewart.

If you would like to solve my rebus puzzle, why not post a comment on my blog post with your answers. I will let you know what the correct answers are next time I post a rebus card here.

How did you go solving my July Rebus which was Songs by The Seekers.
 Here are the correct answers so you can check how you did.

  1. The Carnival Is Over
  2. Come The Day
  3. Five Hundred Miles
  4. Morningtown Ride
  5. Sinner Man
  6. Lemon Tree
  7. Georgy Girl

You can find all my past Rebus Cards here


Monday, October 28, 2019

Creepy and Kooky, Mysterious and Spooky


Hi Crafty Friends,

Today I have a Creepy & Kooky, Mysterious & Spooky card to share with you all today. 

I have had the Spooky Family stamp set from Kindred Stamps sitting on my desk for a while. My husband loves the tv show that the characters in this stamp set represent, that I had to add it to my stash. It has taken me a while, but I have finally pulled it out and created a card using it.

A month or two ago I also purchased Lawn Fawn's Build A House Stamp die set. Besides the main die set I also purchased the two add-on die sets .... Christmas add-on and Halloween add-on. I have already used the Christmas add-on, and with Halloween only a few days away I wanted to play with the Halloween version.

While my card could be a Halloween card, I opted to turn it into a birthday card.


For my card today, I created a U Fold or Bridge Card. To create the U Fold card I started with a piece of white cardstock that measures 8 inches x 5 inches. I then scored along the 8 inch side at 1 1/4 inches and 2 1/2 inches on each side. 

I then used Distress Oxide inks in Stormy Sky, Faded Jeans, Chipped Sapphire and Black Soot to create my sky background.

For the grass areas, I used MFT Stamps Tucked-in Turf - Horizontal Die-namics. This die was actually a tiny bit small for the width of the card, so I did some partial die cutting to make the right hand side a fraction longer and then trimmed off the excess when I adhered it to the front of the card. The grass has been colored using Distress Oxide inks in Peeled Paint, Forest Moss & Black Soot.


I used a circle die to cut out a circle  from white cardstock which I adhered to the back of the card.

I added the house to the centre of the back panel.

I added the characters, from the Spooky Family stamp set, to the grass area on the front portion of the card.

I added a number of bats randomly over the card which are also from the Halloween Add-on die set.

The "Creepy", "Kooky", "Mysterious" and "Spooky" sentiments are also from the stamp set. I adhered them to the card in the order they appear in the lyrics of the song from the show. I also added the "&" symbol before both sets of sentiments, which is from Honey Bee Stamps Mermaid Song stamp set.


For the back panel I used MFT Stamps Tucked-in Turf - Vertical Die-namics. I added two of the characters to the grass area.

For the sentiments I used "Have A" & "Spooktacular" from Lawn Fawn's Tiny Halloween Stamp set and the "Birthday" from Lawn Fawn's Reveal Wheel Sentiments stamp set.

I then added a couple of bats which are also from the Tiny Halloween stamp set.

Supplies:
For your shopping convenience, all products are linked below. Compensated affiliate links are used where possible with no extra cost to you. This helps me to continue to share all the projects I include on my blog. For the benefit of my Australia readers, I have started to include some links to Australian stores when available. Please note I only use and share products I love.


Sunday, October 27, 2019

Deer Silhouette Treat Tower


Hi Crafty Friends,

Today I am sharing another project using some of the new Divinity Designs products from the October release.

This time around I created another treat box using the new Treat Tower Box. This is the one where when you open the box you discover 4 boxes inside for treats or small gifts.

For the pattern paper layers, I used papers from the Winter Collection Paper Pad. I selected the papers which had a more coppery look to them.

To decorate the front of the box I die cut the Deer Silhouette from Copper Metallic Cardstock and the pine branches from the Pinecones and Pine Branches die set was cut using gold metallic cardstock. I also added a little silver ink to the tips to the pine branches ... this picked up the other metallic colors in the papers.


When you open the box it reveals the four little boxes which are adhered one to each of the four panels of the box.


Here is one last look at the inside of my treat box, this time without the lid showing.

Supplies:
For your shopping convenience, all products are linked below. Compensated affiliate links are used where possible with no extra cost to you. This helps me to continue to share all the projects I include on my blog. For the benefit of my Australia readers, I have started to include some links to Australian stores when available. Please note I only use and share products I love.


Saturday, October 26, 2019

From Our House To Yours Centre Step Card


Hi Crafty Friends,

It’s challenge time with the “Crazies” over on the Crazy 4 Challenges blog. Tracey Farr our challenge hostess for the month finishes off her month with one last challenge.

Wreaths - Tracey just loves the look of wreaths, she says there's just something about them that appeals to her eye. So our challenge this week is to put a wreath on your card, any style or theme you like.

I created a christmas themed Centre Step Card using Divinity Designs Center Step Card with Layers die set. For my card today I omitted the layers and stencilled bricks direct to the base of the white card to create the look of the house.

I added some glittery snow to the base of the card using the snow/dirt border from Elizabeth Craft Designs Adventure Edges 2 die set. I die cut this from white cardstock that had Clear Double Sided Adhesive Tape on the front and covered the adhesive with Warm Diamond Silk Microfine Glitter.


I then used Elizabeth Craft Designs Christmas Door die set to decorate the front of the card. I love this die set, it has everything you need to create a front view of a house scene. Of course the wreath which I needed to add for the challenge, is adhered to the door.


For the inside of my card, I added another snowy hill along the bottom of the card. I also added a large Christmas tree to the left side of the card using dies included in the Sleigh die set.

To finish off the card I added two sentiments "From Our House To Yours" and "Merry Christmas To You & Yours". Both sentiments are from a long retired Waltzing Mouse Stamps stamp set, as I wanted to include the "From Our House To Yours" on my card.  I believe ECD has a similar sentiment included in their "Joyful Wishes" stamp set but as I don't have that set I used what was on hand. I have linked to the ECD version below in case you are interested.

Don't forget to check out the rest of the “Crazies” cards over on the Crazy 4 Challenges blog and also their individual blogs for more details.


Supplies:
For your shopping convenience, all products are linked below. Compensated affiliate links are used where possible with no extra cost to you. This helps me to continue to share all the projects I include on my blog. For the benefit of my Australia readers, I have started to include some links to Australian stores when available. Please note I only use and share products I love.


Christmas Cottage - Waltzing Mouse Stamps (retired)


Friday, October 25, 2019

Happy Fall


Hi Crafty Friends,

Today I am sharing another card using a few of the new Divinity Designs products from the October Release.

This time around I created a diorama card using Divinity Designs Diorama Card with Layers die set. I used one of the wood papers from the Weathered Wood Paper Collection to layer the front of the diorama.

To decorate my diorama I used the Loads of Love Stamp/Die Duos set. The pickup truck included in the stamp set is empty and you have the choice to fill the back with either the pumpkins, apples, flowers or Christmas Tree. There are also a number of sentiments to suit many occasions. 


After die cutting the dividers for the inside of the diorama, I then used the two border dies from the Curvy Slopes die set to create two grassy hills.

I then used the Trees and Deer die set and die cut two sets of trees and one set of deers and adhered them to the inside.

The "Happy Fall" was stamped onto white cardstock and then I used one of the dies from the Sentiment Strips die set to die cut the sentiment.


The diorama folds flat so it can be placed in an envelope for mailing.


Supplies:

For your shopping convenience, all products are linked below. Compensated affiliate links are used where possible with no extra cost to you. This helps me to continue to share all the projects I include on my blog. Please note I only use and share products I love.


Thursday, October 24, 2019

Home Is Where Our Story Begins


Hi Crafty Friends,

It's challenge time with my friends over on the CCEE Stampers challenge blog. Kelly Santi our challenge hostess for the month, continues to issue the challenges.

Fall Porch - thinking of a porch in the fall ... leaves, pumpkins, rocking chairs, wreaths on the door, decor.  Create a card with a fall porch in mind or use fall colors.

I confess! my card isn't really very fall related. I was focusing more on the porch angle of the challenge as where I live it is spring and I don't really have any need of fall cards. I figured the porch was in front of the house where I have included a fence, flower pots, flower boxes etc. My card does however include a wreath.


I recently purchased Honey Bee Stamps House Builder Card Base die set, and I have been bursting to use it. So I figured today's challenge was the ideal opportunity.

I assembled the house on a flat card and then mounted it onto an easel card base.

I added two little girls which are from Mama Elephant's She's So Lovely stamp set, which I added in front to the fence.

To hold the easel portion of the card up I added the "Home" sentiment from Karen Burniston's Home Sweet Home die set. I die cut the red part of the sentiment three times for extra height and also added foam tape under the white solid panel.  I stacked the hearts that came out of the middle of the heart in the word "Home" and added them to the right hand side of the card to also help keep the card open.


Here is a look at my card when it is closed ready to be placed in an envelope. When I first made this card I think I was thinking Christmas, hence the more Christmasy wreath, but the sentiments are probably more generic.


Here is a look at the back view of my card where I added another sentiment from a Stampendous stamp set which was layered using ovals from Karen Burniston's Crosshatch - Ovals die set.

Don't forget to check out the CCEE Stampers blog (goes live 12 AM EST) to see the rest of the creations the CCEE Stampers created this week. You can also see more details of their creations on their individual blogs:


Supplies:
For your shopping convenience, all products are linked below. Compensated affiliate links are used where possible with no extra cost to you. This helps me to continue to share all the projects I include on my blog. For the benefit of my Australia readers, I have started to include some links to Australian stores when available. Please note I only use and share products I love.


Wednesday, October 23, 2019

Oh Christmas Tree


Hi Crafty Friends,

Today I am sharing another card using a few of the new Divinity Designs products from the October Release.

For my card today I wanted to use the Christmas Tree Table Top Decor in a different way than what it was designed for. Normally you would die cut 4 - 6 Christmas Trees and fold them in half and then glue them together to create a decoration for a table display. Today I decided to use it on a card. 

This is a tall card as the Christmas tree is tall. I did trim off the top part of the Christmas tree so the card wasn't too tall. The final size of the card measures 8 3/4 inches.

For the base of card I splattered on various shades of gold paint using Gansai Tambi Starry Colors paints. I then die cut the Christmas Tree and embossed it to bring out the detail on the branches and cut it down then middle to get half a tree. I sponged green ink around the edges of the tree. I adhered the tree to the left side of the card. Next I decorated the tree using the  Star, Christmas Lights and Christmas Decorations included in the die set.

I added a snowy ground to the base of the tree using the Curvy Slopes die set and glitter.

To the base of the card I added the "Christmas" part of the Merry Christmas die set. I added the "Merry" using the sentiment stamp from the Deer Ornament Stamp/Die Duos set.


For the inside of my card I added another sentiment from the Deer Ornaments Stamp/Die Duos which I stamped and layered using the Pierced Vintage Labels die set. I also added a couple of the ornaments from the Christmas Tree Table Top Decor die set to the label.

Supplies:

For your shopping convenience, all products are linked below. Compensated affiliate links are used where possible with no extra cost to you. This helps me to continue to share all the projects I include on my blog. Please note I only use and share products I love.