Tuesday, May 31, 2022

Rebus - Types of Cakes


Hi Crafty Friends,


It's time to share another rebus puzzle swap with you. This month the theme is Type of Cakes.

If you would like to solve my rebus puzzle, why not post a comment on my blog post with your answers. I will let you know what the correct answers are next time I post a rebus card here.

How did you go solving my April Rebus which was "Songs by The Monkees". Here are the correct answers so you can check how you did.

  1. The Monkees
  2. Goin' Down
  3. I'm A Believer
  4. Take A Giant Step
  5. Last Train To Clarksville
  6. She

You can find all my past Rebus Cards here.


Monday, May 30, 2022

Pug Sympathy


Hi Crafty Friends,

My daughter recently asked me to make a sympathy card for her friend who had just lost her beloved pug. Of course I said yes.

I created a Slimline card using Whimsy Stamps Slimline Dog Bone die set. As I was making a bone shaped card, I positioned the bone die onto my top folding card, so that the top cut lines were slightly over the fold. I die cut another bone shape from white cardstock and used a cloud stencil to add clouds to the top portion of the card.

Next I die cut the bottom of the bone from green cardstock and then using a slimline grass die to die cut the grass. This was then adhered to the bottom of the bone shaped card.

As my daughter also owns a pug, I have lots of pug stamps. For this card I used a pug fro Whimsy Stamps Wrinkles stamp set.

The "With Sympathy" sentiment uses the dies from Karen Burniston.

To finish off my card I die cut the collar, also from the Slimline Dog Bone die set, I added the dogs name to the name tag.


For the  inside of my card, I added another grass border along the bottom of the card. 

The dog bowl is also from Whimsy Stamps Slimline Dog Bone die set. I added another pug image from the Wrinkles stamp set.

To finish my card I added a sympathy sentiment from Honey Bee Stamps Rainbow Bridge stamp set.


Friday, May 27, 2022

Divinity Designs May Inspiration


Hi Crafty Friends,

I have two more cards to share with your today using some of the new products from Divinity Designs May release.

For my first card I used three of the foil plates just released ... Waves Hot Foil Plate; Solid Foil Plate and the All Occasions Foiling/Die Duo set.

My card is a A2 Card which was created using the A2 Portrait Card Base with Layer, along wiith the Matting Rectangle die.


When you foil the Waves Foil Plate on white cardstock, you get the look of the white panel on the left of the photo above. You are then left with a scrap of foil, which once upon a time we would throw out. Now with the introduction of the Solid Foil Plate, by adding the left over foil onto the solid plate and adding another panel of white cardstock you get a very different look, as you can see by the card on the right above. So rather than getting just one card from a piece of foil you can get two, or combine the two different options on the one card whichever you want to do.

I used the Double Stitched Rectangles die set to die cut the foiled background panel and adhered that to my card.

For the sentiment I gold foiled the All Occasions Foiling/Die Duo set and added it to a circle panel using the Double Stitched Circles and Circles die sets.


For the inside of the card, I added another piece of the solid foiled piece that I had in my stash. I also added another foiled sentiment, this time opting for one of the negative foiled sentiments.


For my second card today I created another A2 Card using the A2 Portrait Card Base with Layer and the Matting Rectangle die sets.

I added the Pierced Waves Background die to my card.

To decorate the card I added the cup, saucer and spoon from the Cups & Mugs die set. I then used one of the dinosaurs and a sentiment from the new Dinosaurs stamp/die duo set.


 For the inside of the card, I added another of the dinosaurs and a sentiment from the Dinosaur Stamp/Die Duo set.


Thursday, May 26, 2022

(Spec)tacular Birthday


Hi Crafty Friends,

It's challenge time with my friends over on the CCEE Stampers challenge blog. Kelly Santi our challenge hostess for the month, finishes off the month with one last challenge.

Apparently May is Healthy Vision Month - show us your cards with glasses, eye charts, any kind of eye balls as the focal point.

I recently had to go to the optometrist to get new glasses, when you get the glasses they are put into a white paper bag which has images of different glasses all over. I decided to keep the bags to use for the background of my card. As I ended up making a Slimline card, I had to carefully piece together the paper.

To decorate my card, I pulled out my Studio Light Missees die sets to create this cute girl ... complete with glasses.

I used my computer and printer to create the sentiment at the top of the card.


For the inside of my card, I added four pair of spectacles to the white panel using MFT Stamps Geek is Chic die-namics set.

I also added the Eye Chart Birthday sentiment I have had in my stash for years.

Don't forget to check out the CCEE Stampers blog (goes live 12 AM EST) to see the rest of the creations the CCEE Stampers created this week. You can also see more details of their creations on their individual blogs:


Other Supplies:
Geek is Chic Die-namics - MFT Stamps (discontinued)
I Chart Wood Mounted Stamp - Penny Black (discontinued)


Wednesday, May 25, 2022

Tropical Diorama


Hi Crafty Friends,

I have a tropical themed diorama card to share with you today using some new dies from Crafter's Companion.

This card uses the Tropical Paradise Interchangeable Scene die set which was recently released by Crafter's Companion. There are 6 different die sets that can either be used on there own or combined with another of the die sets to create wonderful 3D scene cards. These looked so much fun that I had to add them to my stash.


This diorama card measures 5 inches square, I added the accordion sides to add the various layers to the inside of my card, to give the look of depth.  The accordion piece on this card measures 5 inches x 3 1/2 inches and I scored along the piece at 1/2 inch intervals.

There are two different square panels on the inside of the diorama, one has palm trees and the other leaves. Also included in the die set are extra leaves, the parrot and flamingoes.


I blended various shades of yellow and orange inks to the back panel to create my sunset sky. I also added a moon using a circle die.


The blue frame around the opening was created using a frame included in Mama Elephant's Framed Tags Union Square die set.

I added a birthday sentiment using a stamp set from Colorado Craft Company.


I added another of the frames and the inner panel to the back of my card, so I had a place to add a sentiment and also to write a personal greeting.

The sentiment is one from MFT Stamps called Tickled Pink.

Other Supplies:
Tickled Pink Stamp Set - MFT Stamps (discontinued)


Tuesday, May 24, 2022

Sunny Side


Hi Crafty Friends,

Today I am sharing a card I created recently using products from Hero Arts and Waffle Flower Crafts.

For the breakfast scene I used Hero Arts Eggcellent stamp set which I purchased recently. As soon as I saw the "Sunny Side" sentiment included in this stamp set I knew I had to pair it with the new Waffle Flower Crafts Sunburst Foil Plate. I foiled the the sunburst plate onto white card using gold foil and then added color using yellow and red ink.

I added gold metallic pearls to finish off the card.


For the inside of the card, I added the boiled egg and also another sentiment included in the Eggcellent stamp set.


Monday, May 23, 2022

Mother's Day Accordion Card


Hi Crafty Friends,

Today I am sharing a Mother's Day Accordion card I created recently. I know Mother's Day was a few weeks ago now, however this could easily be adapted for a birthday or other occasion for someone special.

For my card today I used Karen Burniston's new Landscape Rectangle Accordion die set that was released last week. I die cut the main "pages" of the card three times from pink cardstock and three times from patterned paper. I cut the centres out of the patterned paper pieces and then adhered the frames to the front and back of the first page and the front of the last page.

I used the stencil feature on the die to sponge in the stripes to the page in the centre.


I used one of the rectangle dies from the Short Rectangles - Crosshatch die set to die cut white rectangles which I adhered to the centre of each panel.

I used dies from the Dolled Up Charms die set to add the nail polish, lipstick and perfume. The purse uses the purse die from the Purse Pop-up die set.

I added the Happy Mother's Day to the centre panel, die cutting it from pink and black cardstock and layering together.


For the last panel I added the nail polish (hidden behind the fold on the photo above) and lipstick to the last panel. I also added the "Love You" sentiment which is from the Pop 'N Swap die set.


Here is a look at the front of my card when it is closed ready to be placed in an envelope. 

I added a border using a die included in the Border Blends - Trims die set to the top and bottom edges of all the patterned paper panels.


Friday, May 20, 2022

Slimline Cards

Hi Crafty Friends,

I have two Slimline cards to share with you today, using new products from Divinity Designs May release.

To create both Slimline Cards, I used the Slimline Card Base and Slimline Rectangles die sets. 


For my first card today I create a gnome themed card using the Buzzing Gnomes Paper/Die Duo set. All the gnome/bee images and the patterned paper are all included in this fun set.

I use the new Slimline Pierced Large Windows die to create the yellow frame around the top of my card.


For the sentiment I used the All Occasion Foil/Die Duo set along with the Solid Foil Plate, foiling with black foil.

When you foil the sentiments on the All Occasion Foil Plate you will get coloured lettering (in this case black seeing I used black foil) with the outline around the letters being the color of the cardstock. It will look like the "Happy Birthday" on the left side of the photo above. Once upon a time once we had foiled the image/sentiment the left over foil was thrown in the bin. However now with the release of a Solid Foil Plate, you can place the left over foil over the top of the solid foil plate and get what is referred to as the negative image/Sentiment. The color of the lettering will be the color of the cardstock and the foil color will be the surrounding color. The sentiment on the right hand side is the negative image using the Solid Foil Plate.

I used the negative sentiment to add to the centre panel of my slimline card.


Here is a look at the inside of my card, I added a few more gnomes and another sentiment.

The All Occasions sentiment set comes in either a Foil/Die Duo set or a Stamp/Die Duo set, so if you don't own a foiling machine you can still purchase a version of the sentiments.


For my second card, I used the Slimline Pierced Petals Background die which I die cut from purple cardstock.

I added a stamped sentiment using one of the sentiments included in the Bold Blessings Stamp/Die Duo set. Like the All Occasion sets, the Bold Blessing set comes in both Foil/Die Duo or Stamp?Die Duo.

To decorate my card I added two flowers using the Flower Layering Combo 2 and Rose Leaves die sets.


Thursday, May 19, 2022

Just Chicken In


Hi Crafty Friends,

It's challenge time with my friends over on the CCEE Stampers challenge blog. Kelly Santi our challenge hostess for the month, continues to issue the challenges.

Apparently National Dance Like a Chicken Day was this week -and it encourages everyone to dance like a chicken! This day entertains with people flapping their arms and strutting chicken-like. Create a card with chicken(s) as the star! Dancing optional.

I have been wanting to play with Whimsy Stamps Slimline Chicken Coop die for months, but when I saw this challenge earlier in the year, I decided to wait until the challenge and make use of it then. This die can either be adhered to a slimline card like have have used it today or make a fun shaped card. The door on the left side of the card, can open but for this card I adhered it closed.

I was going to use a chicken themed stamp set from Whimsy Stamps, but then I remembered to Mama Elephant stamp sets ... Zodiac Roster and Little Chickie Agenda which were so cute that I decided to pull them out to use on this too.

I added grass to the lower portion of my slimline card using MFT Stamps Slimline Grassy Hillside Borders.


For the inside of my card I added two layers of grass using the MFT Stamps Slimline Grassy Hillside Border dies. I also added the chickens and chicks from the two Mama Elephant stamp sets.

For the sentiment, I used Karen Burniston's Mini Alphabet and Numbers die set to add the "Hey Chickie". I then added the "Just Chicken In ..." using the Zodiac Roster stamp set.


Don't forget to check out the CCEE Stampers blog (goes live 12 AM EST) to see the rest of the creations the CCEE Stampers created this week. You can also see more details of their creations on their individual blogs:


Wednesday, May 18, 2022

Divinity Designs Blessings Box

 
Hi Crafty Friends, 

Today I am sharing three more cards using stamps, dies and papers from the Divinity Designs April 2022 Blessings Box. 


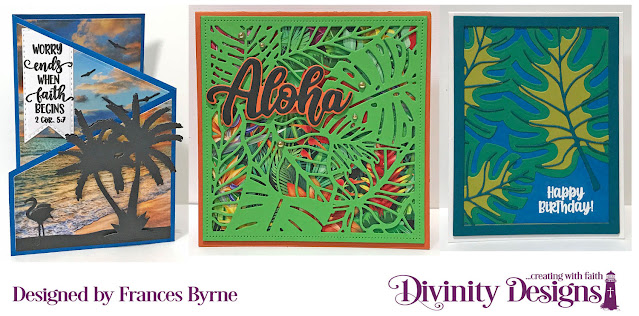
For my first card today I have a Z Fold Card using Divinity Designs Z Fold Card with Layers die set.


I used patterned paper from the Sunset Skies Slimline Sized Paper Pad to add the layers to each of the various panels.

I decorated each of the panels using the Beach Silhouettes die set, die cutting each of the images from black cardstock.

I used three of the sentiments from the Mahola Stamp set to add to my card.

I die cut the "No Worries!" sentiment using one of the sentiment strips from the Sentiment Strips die set. The larger sentiment on the last panel is die cut using the Double Stitched Circles and Circles die sets.


The sentiment on the front panel is die cut using one of the pennants from the Double Stitched Pennants die set. 

I added more images to the panels using the Beach Silhouettes die set. The palm tree of the right panel is ahead behind the one on the front panel so it can only be seen when you open the card. This meant I had to use the back side of the die for this particular image 


For my second card, I created a square card using the Square Card Base with Layer die set. I added the Tropical Leaf Square Background die which I die cut from green cardstock. I layered this over a square panel of patterned paper using the Tropical Brights Paper Pad.

I used the Aloha sentiment which I added to the top left corner of the card.


For my final card I create a A2 Card using the A2 Card Base with Layer die set.

The inspiration for the colours used on this card was a background of a message I saw on Facebook recently. I loved the look so tried to replicate it on my card.
 
I used the Monstera Layering Combo die set to die cut the layered dies in various colours and layered them up. 

I white embossed the birthday sentiment to the lower right hand corner of my card using one of the sentiments included in the Mahola stamp set.