Sunday, November 30, 2014

Elizabeth Craft Designs November Designer Challenge

ECDNoteswm

Hi everyone,

It’s time for our November Elizabeth Craft Designs Designer Challenge. Check out the Elizabeth Crafts Designs blog today at 8AM MST when you will be able to see what all the designers created for the challenge this month.

Our theme this month is Gifts – create something fun that can be used as a gift. No cards this time.

ECDCalendarwm

I created three projects for this challenge. The first two are more or less the same, except I have changed the post –it note to a mini calendar.

Both projects use the Birds and Branches Peel-Off Stickers; Blue Iridescent Shimmer Sheetz and the new Clouds Embossing Folder designed by Karen Burniston.

I cut the Blue Iridescent Shimmer Sheetz to 6 inches x 4 inches. I embossed this using the Clouds embossing folder and then used a sanding block to stand the raised areas to reveal the white core.
The bird is adhered to a piece of white card which has been covered using Elizabeth’s Transparent Double Sided Tape and then covered with Warm Diamond Silk Microfine Glitter and then colored with copics.

Once I had adhered all the Bird Peel-Off Stickers to the Shimmer Sheetz, I inserted the Shimmer Sheetz into an Acrylic Photo Frame the opposite way as to how you would normally insert a photo.

ECDNotes3wm

I used Peel-Off Sticker Alphabets and Numbers to apply the words “Notes” and “2015” to each piece.

Peel Off Stickers: Birds & Branches; Numbers 2; Alphabet Upper Key – Elizabeth Craft Designs
Other ECD Products: Warm Diamond Silk Microfine Glitter; Elizabeth’s Transparent Double Sided Tape; Cloud Embossing Folder; Blue Iridescent Shimmer Sheetz
Other: Acrylic Photo Holder; Post It Note Book; Mini Calendar; Sanding Block; Copics
. ECDNotebookwm

For my final project today I have decorate a store bought notebook. I cut my Amethyst Gemstone Shimmer Sheetz so it was slightly larger than the book. I adhered Elizabeth’s Transparent Double Sided Tape (152mm) to the back of the shimmer sheetz. I colored the Shimmer Sheetz using Wild Plum; Stream and Lettuce Alcohol Inks and Blending Solution and then used the Sea Glass Embossing Folder to add texture to my panel which I then used to cover my notebook.

I used Jackie’s Dolls and Ribbon Swirls Peel Off Stickers which I adhered to a piece of white card / Elizabeth’s Transparent Double Sided Tape, applied Warm Diamond Silk Microfine Glitter and colored with copics. Normally these girls don’t have facial features, I added some to mine using black glitter dots and a piece of leftover spiral from the Ribbon Swirls Peel-Off Stickers, this was a little less scary then adding features using a marker as I knew if I didn’t like it I could remove the stickers.

Thanks for stopping by, don’t forget to check out the Elizabeth Crafts Designs blog where you will be able to see what all the designers created for the challenge this month.

Peel-Off Stickers: Jackie’s Dolls in Circle; Ribbon Swirls; Black Glitter Dots
Other ECD Products: Amethyst Gemstone Shimmer Sheetz; Sea Glass Embossing Folder; Elizabeth’s Transparent Double Sided Tape 152mm; Warm Diamond Silk Microfine Glitter; Clocks & Gears Die Set (circle);
Other: Wild Plum; Stream and Lettuce Alcohol Ink; Blending Solution; Sanding Block; Foam Tape

#aa-owl-signature

Happy Birthday

TSOLShapedCar-wm

Hi everyone,

Today I am sharing a shaped card I created using the largest Car die from the Sizzix Cars Framelits Die set with stamps.

To create the windows I die cut a piece of white card using a circle die, cut the circle in half and then a little over half and adhered these to my car shape.

TSOLShapedCar2-wm

Here is another view of my shaped card.

TSOLShapedCar3-wm

Here is the inside of my card … I used a couple of stamps from the stamp set include with the dies.

Stamps: Cars – Sizzix
Paper: White; Blue; Black; Grey
Dies: Sizzix Cars Framelit Dies with Stamps; Sizzix Circles Framelits; Talk Bubbles Dies – TSOL
Other: Black Ink; Blue Ink


#aa-owl-signature

Saturday, November 29, 2014

Square Dancing

C4C264Dance1wm

Hello everyone,

It’s challenge time with the “Crazies” over on the Crazy 4 Challenges blog. This week I finish up my month as challenge hostess with one last challenge.

Apparently today is Square Dance Day, so to celebrate let’s get those square cards, dies etc out! Bonus points if you incorporated Dancing somehow on your card as well. 

C4C264Dance2wm

I have had this cute Magnolia Tilda & Edwin Dancing stamp for a few years and hadn’t gotten around to using it, so of course I had to use it for my card today. I computer generate the sentiment on the front, so it would work with the theme.

C4C264Dancewm

I thought it would be fun to cut the dancing couple apart and have them appear on the inside of my pop up card, after all often when you dance you separate for a few steps … especially in square dancing! I did have to doctor Tilda’s leg and Edwin’s arm as these were joined in the original image.

I have used  the Lorna Labels Pop Up Card die set designed by Karen Burniston for Elizabeth Craft Designs to create the pop up portion of my card. The “Happy Birthday” words are from the Happy Birthday Pop Up Card set.

C4C264Dance3wm

Here is a side on view of my card, so you can see the pop up elements better.

Don't forget to check out the rest of the “Crazies” cards over on the Crazy 4 Challenges blog and also their individual blogs for more details.

  • Anja de Regt
  • Barbara Anders
  • Heather Pulvirenti
  • Helen Cryer
  • Jessie Rone
  • Joanne Grzelak
  • Karen Aicken
  • Kelli Hull
  • Kristine Reynolds
  • Peggy McCurry
  • Tanya Adams (November Guest Designer)
  •  

    Stamps: Tilda & Edwin Dancing – Magnolia Stamps
    Paper: White; Pink; Blue; Poolside DP – Pebbles Inc.
    Dies: Lorna Labels Pop Up; Happy Birthday Pop Up; Fancy Seasons Frame Edge – designed by Karen Burniston for Elizabeth Craft Designs; MFT Die-namics Circle Stax; MFT Die-namics Fishtail Flags Stax
    Other: Black Ink; Foam Tape; Copics


    #aa-owl-signature

    Friday, November 28, 2014

    Vroom Vroom

    TSOLCarFlip-wm

    Hi everyone,

    I have a Flip-its card to share with you today using the Sizzix Flip-its Card die. I used the Sizzix Cars Framelit Die Set with stamps to decorate my card.

    TSOLCarFlip2-wm

    Here is the ‘flip’ side of my card.

    Stamps: Cars – Sizzix
    Paper: White; Red; Black; DP
    Dies: Cars Framelits with stamps; Majestic Flip-its Card – Sizzix
    Other: Black Ink; Red Ink; Foam Tape


    #aa-owl-signature

    Rebus - Names Starting with ‘C’

    RebusNov14CNameswm

    Hi all,

    It is time for another rebus swap to share with you all. This time round our theme is “Names Starting with the letter ‘C’”. This is our final rebus for the year as my friends and I take a break for December, but we will be back in January.

    If you would like to solve it, why not post a comment to this blog post with your answers. I will let you know what the correct answers are next time I post a rebus card here.

    How did you go working out the solutions for my October Rebus which was “Types of Fabric” …. here are the correct answers for you to check how you did.

    1. Gingham
    2. Lace
    3. Grosgrain
    4. Chenille
    5. Organza
    6. Tartan
    7. Denim
    8. Gabardine
    9. Angora
    10. Felt

    You can find all my past rebus cards here.


    #aa-owl-signature

    Thursday, November 27, 2014

    From Our Family

    CCEE1448Owlwm

    Hi everyone,

    It's challenge time with my friends over on the CCEE Stampers challenge blog. Our challenge hostess for the month,Maryann Einam continues to bring us fun challenges.

    Our challenge this week is to create a card using the Telescoping Image Technique, you can find out how to create this technique over in the tutorial section of Splitcoast Stampers.

    I created an Accordion card using the Fancy Labels Accordion Card die set designed by Karen Burniston for Elizabeth Craft Designs

    CCEE1448Owl2wm

    For the Telescoping Image part of my card, I used Crafter’s Companion Wish Upon A Star stamp set. I created three layers to my image as I thought that would work better for the image I chose for this challenge.

    Don't forget to check out the CCEE Stampers blog (goes live 12 AM EST) to see the rest of the creations the CCEE Stampers created this week. You can also see more details of their creations on their individual blogs:

    Stamps: Mulberry Wood’s Wish Upon A Star – Crafter’s Companion
    Paper: White; Blue
    Dies: Fancy Label Accordion Card; Fancy Seasons Frame Edges – Designed by Karen Burniston for Elizabeth Craft Designs; Merry Christmas – Elizabeth Craft Designs
    Other: Black Ink; Foam Tape; Copics


    #aa-owl-signature

    Wednesday, November 26, 2014

    From Our House To Yours

    FGM9MerryChristmaswm

    Hi everyone,

    My card today is for a challenge I am doing with a couple for friends of mine this year. Each month we get together and go to our favorite stamp/scrapbook store and come home with one or two new goodies Winking smile. This year we decided to also challenge ourselves each month using a product we all have.

    Our challenge this month was to create a card using Karen Burniston’s Holiday House Die set.
    For my card I decided to create a Z fold style card using the Holiday House and the Evergreen Pivot Card die set.

    Here is how I created this card:
    1. Cut Designer paper so it is 12 inches x 5 3/4 inches (14.8cm)
    2. Score along long edge at 4 inches & 8 Inches. Fold along these lines.
    3. Line Pivot card die along fold of the 8 inch fold. Die cut.
    4. Decorate as desired.
    The snowflakes are from the Spiral Circle Pull Card die set.

    FGM9MerryChristmas2wm

    Here is the front of my card when it is folded ready to be placed in an envelope. I added a few extra trees from the Evergreen Pivot Card die set to decorate my card.

    Stamps: Bebunni Christmas Present – Crafter’s Companion; Christmas Joy Girl – Stamps U Love
    Paper: White; Green; Red; Brown; Yellow; Stars/Baby Mine DP – Carta Bella
    Dies: Evergreen Trees Pivot Card; Holiday House; Outdoor Edges; Spiral Circle Pull Card; Katie Label Pivot Card; Lucy Label Pop Up Card – designed by Karen Burniston for Elizabeth Craft Designs
    Other ECD Products: Warm Diamond Silk Microfine Glitter; Elizabeth’s Transparent Double Sided Tape; Gold Glitter Dots; Red Glitter Dots; Transparent Glitter Dots
    Other: Black Ink; Foam Tape; Copics

    #aa-owl-signature

    Tuesday, November 25, 2014

    Merry Christmoose!

    Riley2414Christmoose1wm

    Hi everyone,

    It's challenge time again over on the Riley and Company blog.

    Our challenge this week is a Recipe challenge... to use 3 designer papers, 1 ribbon and 3 of one kind of embellishment (brad, button, etc.)

    Riley2414Christmoosewm

    For my card today I have used Riley and Company’s Merry Christmoose Riley Clear Set.  I substituted twine for the ribbon and probably have an extra embellishment as I included a button to the twine.

    The candy dots on the lower right hand corner are hand made using the dot frame edge die from the Fancy Seasons Frame Edge die set. I applied some double sided tape to the card and then die cut the dot frame and then layered 2 or 3 circles to each other and then covered them with Amazing Glaze.

    Riley2414Christmoose2wm

    For the inside of my card I created a Pop Up Card using the Lorna Label Pop Up Card die set designed by Karen Burniston for Elizabeth Craft Designs.

    The sentiment on the inside is from the Carrying Tree Riley Clear Set.

    Riley2414Christmoose3wm

    Here is a view of my card at an angle so you can see the pop up portion of my card.

    Riley Challenge Winner copy_thumb

    Want to Play Along?

    If you would like to play along with us of course we would love to have you!

    To play create a card using Riley and Company images.

    Once you have created your card/project, come back here and place a comment with a link to your card/project to this post so we can see what you have created. If you upload your card/project to Splitcoast Stampers please include the keyword Riley2414. We can't wait to see what you create!

    Don't forget to check out the Riley and Company Design Team's cards on their blogs:

    Stamps: Merry Christmoose Riley Clear Set; Carrying Tree Riley Clear Set – Riley and Company
    Paper: White; Burgundy; Silver and Gold DP – Bo Bunny
    Dies: Lorna Label Pop Up; Fancy Season Frame Edge designed by Karen Burniston for Elizabeth Craft Designs; MFT Die-namics Fishtail Flags Stax; MFT Die-namics Pierced Circle Stax
    Other: Black Ink; Button; Hemp Cord; Foam Tape; Copics


    #aa-owl-signature

    Monday, November 24, 2014

    Peace on Earth

    PeaceAccord2wm

    Hi everyone,

    I have another Christmas card to share with you all today. This time round I created an Accordion Card using the Fancy Label Accordion Card die set designed by Karen Burniston for Elizabeth Craft Designs.

    PeaceAccord3wm

    I used Penny Black’s stamp set to decorate my card.

    PeaceAccordwm

    Here is the front of my card when it is closed ready to be placed in the envelope. I have also used the Fancy Seasons Frame Edges to decorate each page of this card.

    Stamps: Peace on Earth – Penny Black
    Paper: White; Purple; Green; Burgundy
    Dies: Fancy Label Accordion; Fancy Seasons Frame Edge designed by Karen Burniston for Elizabeth Craft Designs
    Other: Black Ink; Foam Tape; Copics


    #aa-owl-signature

    Sunday, November 23, 2014

    Unwrap the Spirit of Christmas

    Unwrapwm

    Hi everyone,

    i have another Christmas card to share with you today. This card features one of the Crafter’s Companion Bebunni stamps, which I have layered onto a card using the new Sizzix Snowflake Card Front.

    For the Snowflake Card Front I covered a piece of white card with Elizabeth’s Transparent Double Sided Tape (152mm) die cut the snowflake card front and then added Elizabeth Craft Designs Warm Diamond Silk Microfine Glitter.

    Unwrap2wm

    Here is the inside of my card, I kept it fairly simple adding a sentiment to a fishtail flag.

    Stamps: Bebunni Christmas Present – Crafter’s Companion
    Paper: White; Blue; Pink
    Dies: Sizzix Snowflakes Card Front; MFT Die-namics Fishtail Flags Stax
    Other: Black Ink; Elizabeth’s Transparent Double Sided Tape 152mm; Warm Diamond Silk Microfine Glitter; Pink Button; Hemp Cord; Foam Tape; Copics


    #aa-owl-signature

    Saturday, November 22, 2014

    World Hello Day

    C4C263Hello1wm

    Hello everyone,

    It’s challenge time with the “Crazies” over on the Crazy 4 Challenges blog. This week I continue to issue the challenges.

    Yesterday was World Hello Day … So for our challenge this week let’s create a card that says “Hello”. Bonus points if your card shows some way that we can say Hello … e.g. by using speech bubbles on your card, using a phone stamp/die; using letters/envelopes on your card; Image of someone sending or delivering mail; saying Hello is different languages etc. 

    C4C263Hello2wm

    I am still trying to use as many of the Christmas stamps and dies I have purchased this year and I am running out of time LOL … my friends say I can’t do it .. but I will give it a go, I have until the end of December after all.

    For my card I created a Spiral Circle Pull Card using the die set designed by Karen Burniston for Elizabeth Craft Designs.

    C4C263Hellowm

    When I was going through my Christmas stash I have on my table, I was excited to see this stamp set with the cute little girl posting a letter/Christmas card. I cut the girl away from the mail box … restamped the mailbox so the letter which normally is overlapping the mailbox was removed, and also stamped the girl again this time mirror imaging her so I could attach her to the back of the one on the front.

    For the right hand side of the card the snow drift is included in the stamps … for the left hand side I used Karen Burniston’s Outdoor Edges die set.

    C4C263Hello3wm

    I got so engrossed creating this card that I almost forgot the challenge which was to include the word Hello … so I added a die cut “HELLO” to the spiral.

    Don't forget to check out the rest of the “Crazies” cards over on the Crazy 4 Challenges blog and also their individual blogs for more details.

  • Anja de Regt
  • Barbara Anders
  • Heather Pulvirenti
  • Helen Cryer
  • Jessie Rone
  • Joanne Grzelak
  • Karen Aicken
  • Kelli Hull
  • Kristine Reynolds
  • Peggy McCurry
  • Tanya Adams (November Guest Designer)
  •  

    Stamps: Christmas Joy Girl – Stamps U Love; Party Paws Sending Love – Crafter’s Companion; Mini Envelope – Stamp It (Aust)
    Paper: White; Red; Wreath DP – Kaisercraft
    Dies: Spiral Circle Pull Card; Clocks & Gears; Outdoor Edges – designed by Karen Burniston for Elizabeth Craft Designs; Hello – Cheery Lynn Designs
    Other: Black Ink; Warm Diamond Silk Microfine Glitter; Rock Candy Distress Stickles; Transparent/Gold Glitter Dots;  Foam Tape; Copics


    #aa-owl-signature

    Friday, November 21, 2014

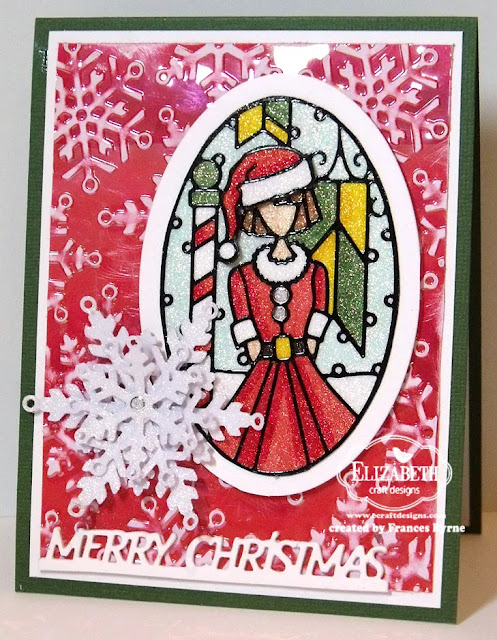
    A Snowy Christmas Card


    Hi everyone,

    It’s Frances here today. It's my turn again to share a card over on the Elizabeth Craft Designs blog

    Living in Australia it is summertime for Christmas ... so I would be very surprised to see any snowflakes haha ... especially seeing we don't even get snow where I live in winter. Even so I still love creating Christmas cards that use snow/snowflakes ... maybe it will cool us down a little ;).

    Here is how I created my card:


    1. Cut a piece of Red Iridescent Shimmer Sheetz that measures 3 3/4 inches x 5 inches. Layer the Shimmer Sheetz onto a sheet of Elizabeth's Transparent Double Sided Tape Sheet and trim off excess tape.

    2. Place Red Iridescent Shimmer Sheetz into Snowflakes Embossing Folder and emboss.

    3. Use a sanding block to sand the raised snowflakes to reveal the white core of the Shimmer Sheetz.

    4. Layer the Red Embossed Shimmer Sheetz to white card that measures 4 inches x 5 1/4 inches. Cut a piece of Dark Green card that measures 4 1/4 inches x 11 inches, score at 5 1/2 inches and fold in half so it measures 4 1/4 inches x 5 1/2 inches. Layer the Shimmer Sheetz panel to folded card.


    5. Cut a piece of white card and a piece of Elizabeth's Transparent Double Sided Tape Sheet  that are approx 2 3/4 inches x 5 inches. Remove the release sheet from one side of the tape sheet and set it aside upside down on your desk (shiny side up). Adhere the Double Sided Tape sheet to the piece of white card.

    6. From the Jackie's Christmas Dolls in Oval Peel-Off Stickers remove the Girl in Oval wearing the Santa Hat and the Santa Hat. Place your pieces sticky side up onto the release sheet that we set aside earlier.

    7. Take your white card and place it with the adhesive side facing down onto the release sheet with the Peel-Offs on it. The Peel-Offs will lift from the release sheet and stick to the adhesive on the card stock.

    8. Turn your card so the release sheet is now on top. Take off the release sheet and make sure not to touch the images on the adhesive.

    9. Cover the adhesive with Warm Diamond Silk Microfine Glitter and polish with your finger. You can see a video Els created using this technique here. Color your images as desired. 

    10. Cut out around the oval shape and also the separate Santa hat. Attach the Santa Hat on top of the one in the oval using foam tape.

    11. Using the main die from the Oval Accordion Card die cut the inner oval from white card. Trim off oval from the frame and layer the glittered oval shape to the white oval. Attach to the top right hand side of card as per photo using foam tape.

    12. Using the Merry Christmas Stand Up Helper die, die cut this 3 times from white card. Trim each piece at the bottom oval and adhere each sentiment onto the other so you have a chipboard like thickness. Adhere this to the lower left hand corner of the card.

    13. Cut a piece of white card 3 1/4 inches x 6 inches, adhere a piece of Elizabeth's Transparent Double Sided Tape Sheet to the front of the card. Die cut the three snowflakes from the Snowflakes die set. Remove protective backing from the front of each snowflake and cover each snowflake with Warm Diamond Silk Microfine Glitter, polishing the glitter with your finger.

    14. Layer each snowflake to each other using foam tape. To the centre of the top snowflake add a Transparent/Gold Glitter Dot. (I also added the Glitter Dots to the buttons on the girls dress.) Attach snowflake to the lower left hand side of the card so it is overlapping the oval.

    To Decorate the inside of the Card:


    15. Roughly trim around the negative Girl in Oval wearing Santa Hat image which remains after using the Peel Off Stickers for your card. Peel off any excess black peel off sticker that may be around your image until you just have the images as per the photo above. 

    16. Cut a piece of Transfer Adhesive approx 3 inches x 4 1/2 inches. Remove the protective backing from the Transfer Sheet and place this onto the Negative portion of the Peel Off Sticker sticker side down. Rub all over the top of the Transfer Sheet and carefully lift this off the Negative image ensuring that the Negative image lifts off with the Transfer Sheet. 

    17. Bring the Transfer Sheet to where you wish the Negative Image to be placed on the inside of your card and place it down on your card and rub all over the image. Carefully lift off the Transfer Sheet ensuring that the Negative image stays on the white card. You can see a video Els created using this technique here. 

    18. Stamp the sentiment on the left hand side of the card. Layer this panel to the inside of your card.

    Thanks for stopping by today!

    Supplies: 

    Elizabeth Craft Designs
    Snowflakes Die (757)
    Merry Christmas Stand Up Helper (939)
    Accordion Oval Card (772) designed by Karen Burniston
    Snowflakes Embossing Folder (E126)
    Jackie's Christmas Dolls in Oval Peel-Off Stickers (SKU 2587)
    Transparent / Gold Glitter Dots (SKU7018)
    Red Iridescent Shimmer Sheetz (SS 0226)
    Warm Diamond Silk Microfine Glitter (639)
    Elizabeth's Transparent Double Sided Tape Sheet (502)
    Tranfers Tape (SKU 600)

    Other
    White Card
    Dark Green Card
    Black Ink Pad
    Verses - Vertical We Wish You Stamp.
    Sanding Block
    Glue
    Foam Tape


    Happy Birthday For You

    FB34-BalloonStepCard-wm

    Hi everyone,

    Today I have another Step-Ups Card to share with you using the Sizzix Balloons Step-Ups Card Framelits designed by Stephanie Barnard.

    The balloons on the concertina part of this die are cut into the card and then you can layer the other balloons over these.

    FB34-BalloonStepCard2-wm

    Here is a side on view of my card so you can see the dimension of the card.

    Dies: Balloons Step-Ups Card Framelits – Sizzix


    #aa-owl-signature