Sunday, March 31, 2019

Rebus - Names Starting with "P"


Hi Crafty Friends,

It's time to share another rebus puzzle swap with you. This month the theme is Names Starting with the Letter "P". 

If you would like to solve my rebus puzzle, why not post a comment on my blog post with your answers. I will let you know what the correct answers are next time I post a rebus card here.

How did you go solving my February Rebus which was "John Wayne Movies ".
 Here are the correct answers so you can check how you did.

  1. Rio Bravo
  2. True Grit
  3. The Comancheros
  4. Big Jake
  5. Hatari
  6. Chisum
  7. El Dorado
  8. McLintock
  9. Brannigan


You can find all my past Rebus Cards here.


Saturday, March 30, 2019

Get Wild Waterfall Card


Hi Crafty Friends,

t’s challenge time with the “Crazies” over on the Crazy 4 Challenges blog. As challenge hostess for March, I finish off the month with one last challenge.

April Fools  Day is right around the corner. For our challenge this week, create a card that has some sort of "trick to it. It could be an interactive card of some sort or maybe an image that has some humour to it.

For my card today I decided to create another Waterfall Card using Karen Burniston's Frame Pull Pop-up die set. I am having lots of fun creating this style of card using this die set, and it is really easy to adapt the Frame Pull Pop-up to make it suitable for a Waterfall Card, Karen Burniston showed us how a few months ago in her video here.


Here is a quick video to see my card in action.


To create the backgrounds of my card, I used pale blue cardstock and then sprayed from a distance Faded Jeans Distress Oxide Spray.

Each panel is decorated using the tree and grass from Lawn Fawn's Shadow Box Card Add-On Park die set.


The animals and people are from Craftin' Desert Divas' Get Wild Clear Stamp set.


For the base of my card I die cut Simon Says Stamp's Leafy Frame which I adhered to another blue panel which had Distress Oxide Spray added to it. The decorate panel needed to be adhered well to the base so it didn't interfere with the movement of the waterfall card.


I like to keep my waterfall cards on a flat card rather than adhered to a folded card. So on the reverse side of my card I added a white panel and also another Leafy Frame and added a sentiment to the centre.

Don't forget to check out the rest of the “Crazies” cards over on the Crazy 4 Challenges blog and also their individual blogs for more details.


Supplies:
For your shopping convenience, all products are linked below. Compensated affiliate links are used where possible with no extra cost to you. This helps me to continue to share all the projects I include on my blog. Please note I only use and share products I love.


Friday, March 29, 2019

Divinity Designs - Flower Burst Stencil


Hi i Crafty Friends,

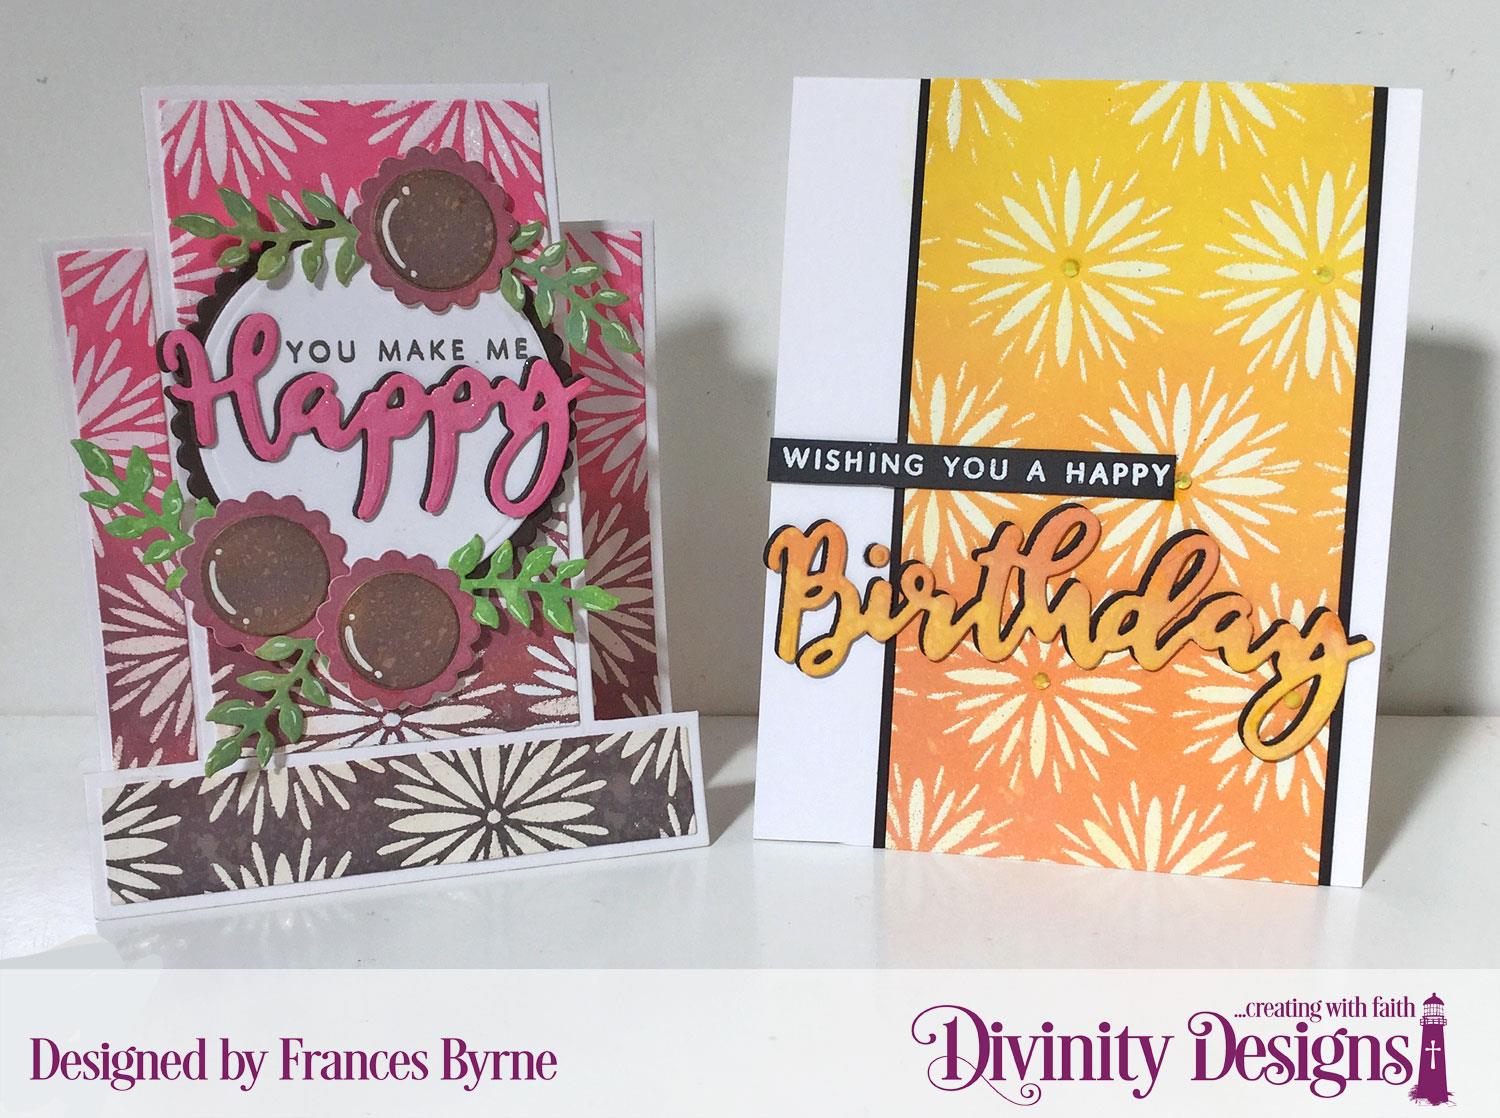
I have 2 more projects using some of the Divinity Designs March Release products. Today I am  focusing on the new Flower Burst Mixed Media Stencil and the Birthday and Happy Stamp/Die Duos Clear Stamp sets.


For my first card today I created a Centre Step Card using the Center Step A2 Card & Center Step A2 Layers die set.

I used the Flower Burst Mixed Media Stencil for the panels of my card, all 4 panels were able to be die cut using the layering dies. 

To create the background I attached the stencil to my white cardstock and then applied VersaMark Ink through each of the flower openings. I then covered the ink with White Embossing Powder and heat embossed. 

I then applied Picked Raspberry, Aged Mahogany and Ground Espresso Distress Oxide inks to the cardstock in an ombre effect.


I die cut circles for the sentiment using the Circles and Scalloped Circles die sets. I then die cut the "Happy" from the Happy Stamp/Die Duos Clear Stamp set using brown and pink cardstock and added a coordinating sentiment from the stamp set included with the dies.

I used the same Circles and Scalloped Circles die sets to create the flowers which were die cut using white cardstock and colored using Aged Mahogany & Ground Espresso Distress Oxide inks. The leaves are die cut using one of the dies from the Festive Favors die set.


I always like to finish the inside of my card when I create my card. So I added another stencilled panel along the bottom of the card and added the sentiment "happy Everything".


For my second card today, I have again created my stencilled background using the Flower Burst Mixed Media Stencil. I applied VersaMark ink to the open areas of the stencil and covered the ink with white embossing powder and heat embossed this. I then applied Squeezed Lemonade, Wild Honey and Spiced Marmalade Distress Oxide to the panel in ombre fashion.

I cut a stripe which I edged using black cardstock and adhered to a top folding white card. I then added the "Birthday" sentiment from the Birthday Stamp/Die Duos Clear Stamp set which I die cut once in white and colored with yellow/orange inks and one in black and offset.

The stamped sentiment was stamped onto black cardstock and white embossed.


For the inside of my card, I added the remaining strip of stencilled cardstock and then added the other die cut birthday sentiment and two stamped words from the coordinating stamp set.

Thanks for visiting my blog, I hope you enjoyed my cards.

Supplies:
For your shopping convenience, all products are linked below. Compensated affiliate links are used where possible with no extra cost to you. This helps me to continue to share all the projects I include on my blog. Please note I only use and share products I love.


Thursday, March 28, 2019

To A Fabulous Teacher


Hi Crafty Friends,

It's challenge time with my friends over on the CCEE Stampers challenge blog. Kelly Santi our challenge hostess finishes the month with one last challenge.

 Tomorrow is National Pencil Day!  Create a card coloring your image with colored pencils (no markers, watercolors, etc OR feature an image with a pencil or BOTH!.  


For the challenge today, I decided to opt for an image of a pencil rather than coloring in with pencils, as that isn't my favorite way to color.  Pencils also remind me of school and teachers, so I took this opportunity to create another Teacher thank you card for my Grandchildren's teachers at the end of the year. Seeing I need a few it doesn't hurt to get an early start.                                                                          

Here is a quick video to see my card in action.

As you can see by the video above, I created another Magic Picture Changer card using Lawn Fawn's Magic Picture Changer die set.
The cute little girl holding a pencil is from Mama Elephant's She's So Lovely Clear Stamp set, around the images I added stamps from Ellen Hutson's Teacher Leading Lady stamp set.

I also used patterned paper from Elizabeth Craft Designs which feature pencils ... whole pencils on the smaller panel and on the paper on the base, the pattern looks like it might be looking at the end of pencils.


Here you can see the card as the image on the front starts to change to reveal the message underneath.


For the message that is reveal when the picture changes, I used stamps from Heffy Doodle. I added a couple on small pencils which I found in a Craftin' Desert Divas stamp set.

I also added the "To A Fabulous Teacher" sentiment to the frame surrounding the message which are also from Heffy Doodle.


For the inside of the card I added under another sentiment also from the Heffy Doodle stamp set and added a stack of books on either side of the sentiment which is from Mama Elephant's Bookworm stamp set.
Don't forget to check out the CCEE Stampers blog (goes live 12 AM EST) to see the rest of the creations the CCEE Stampers created this week. You can also see more details of their creations on their individual blogs:


Supplies:
For your shopping convenience, all products are linked below. Compensated affiliate links are used where possible with no extra cost to you. This helps me to continue to share all the projects I include on my blog. Please note I only use and share products I love.


Wednesday, March 27, 2019

Just Saying Hello


Hi Crafty Friends,

My card today is for a challenge I do with a couple of friends of mine. Each month we challenge each other to create something using supplies we all own.

This month our challenge is .......
Monoprint Technique - in the past couple of months Jennifer McGuire has shared three videos using a variation of the monoprint technique. Use one of these techniques on your card this month. If you are interested in any of these techniques I have included links to Jennifer's three blog posts below.

It was very hard to decide which of the three techniques to use for the challenge as each time you watched another one of Jennifer's challenges you wanted to use that. In the end I decided to go with the Distress Monoprint technique.

For this portion of my card I used Distress Oxide inks in Picked Raspberry, Mowed Lawn and Wilted Violet and applied this to my card. I then used the Simon Says Stamp Circle Doodle Background stamp and clear embossed this over the inked background.

Following the directions on Jennifer's video I was able to get two backgrounds. The one on the right is the original background and the one of the left the one that printed onto my other piece of cardstock.


To decorate my card I used Hero Arts Vintage Window Fancy Die to create a frame around the card using white cardstock. 


I added a flower to the lower left hand corner of each card using Altenew's Build A Flower - Japanese Mum Clear Stamp set and coordinating dies. I used softer colors on the flower with the pastel background and darker colors on the one with the bright background.

I added a sentiment to both cards using one of the sentiments from the Japanese Mum stamp set.


For the inside of the card I stamped the same flower used on the front on the centre of a white panel and then added a sentiment which is from Lawn Fawn's Happy Happy Happy.

Supplies:
For your shopping convenience, all products are linked below. Compensated affiliate links are used where possible with no extra cost to you. This helps me to continue to share all the projects I include on my blog. Please note I only use and share products I love.


Tuesday, March 26, 2019

Happy Easter Reveal Wheel Card


Hi Crafty Friends,

Easter is less then a month away, so I decided to pull some Easter Themed stamps/dies from Lawn Fawn to create my card today.

Lawn Fawn released a number of fun add on dies and a stamp set to their Reveal Wheel Collection in February. As I have the original dies etc I decided I needed to add the new products to my list as well. 

It was a hard decision as to whether I would use the Easter Egg Add-On die set or the Spring Sentiments Add On Stamp set which one of the original dies for the reveal wheel. But as you can see in the end I decided to use the Egg Egg Add-On for the Reveal Wheel part of the card and then use the sentiment set just as sentiments.


Here is a quick video to show my card in action.


For the Reveal Wheel part of the card I die cut the wheel using three different colors of cardstock, cut them into quarters and then adhered 4 different colored quarters to the wheel. Before adding the wheel to the card I also applied Tonic Studios Aqua Shimmer Pen over the cardstock.


I used the grass border from the Mushroom Border die set to create the grassy panel along the bottom of the card. To decorate my card I used the cute chick from the Happy Hatchling die set and it is juggling Easter Eggs which were created using the Mini Easter Eggs die set which coordinates with the Reveal Wheel Easter Egg Add-On


I added three of the sentiments from the Reveal Wheel Spring Sentiments Clear Stamp set to the top of the card.

Here is a look at each of the 4 different colored eggs which are revealed when you turn the wheel at the side of the card.


For the inside of my card, I added the large cracked egg from the Happy Hatchling die set and then a few of the smaller Easter Eggs from the Mini Easter Eggs die set. The sentiments are also from the Reveal Wheel Spring Sentiments Clear Stamp set.

Supplies:
For your shopping convenience, all products are linked below. Compensated affiliate links are used where possible with no extra cost to you. This helps me to continue to share all the projects I include on my blog. Please note I only use and share products I love.


Monday, March 25, 2019

I Like You A Waffle Lot


Hi Crafty Friends,

According to the Special Days of the Year website, today (25th March) is Waffle Day. Who knew there was such a day, right! Well apparently Waffles have two special days to celebrate them, the second being 24th August!

Anyway back in January when Hero Arts released their January My Monthly Hero Card Kit, one of the add on stamp sets on offer was the Color Layering Waffles stamp set which I purchased along with the card kit and a few other goodies. Seeing I had the stamp set (which I hadn't used yet, and there is a Waffle Day I figured this was a good enough reason to pull out the stamp set and play!


To create my card I used Divinity Designs Center Step A2 Card and the coordinating Center Step A2 Layers die sets to make a Center Step Card. I love the cute size of this card and it is perfect for all those smaller images you might have.

I also pull out my new Lawn Fawn Really Rainbow Scallops 6 x 6 Paper Pad and used the two different red papers to use for the panels of my card.

I used Altenew inks to stamp the various layers of my waffles and strawberries, Altenew colored ink sets make it so much easier to figure out what colors to use for layering.

Along the bottom of my card I used the Crafter's Companion Gemini Stamp & Edge'ables Word Die - Hello set. 

I finished off my card by adding a few Doodlebug Designs Inc Heart Sprinkles and red jewels.


Of course I couldn't forget the inside of my card. I stamped another lot of waffles & strawberries on the inside and added the "waffle" sentiment and two hearts.

Supplies:
For your shopping convenience, all products are linked below. Compensated affiliate links are used where possible with no extra cost to you. This helps me to continue to share all the projects I include on my blog. Please note I only use and share products I love.


Sunday, March 24, 2019

No One Is Too Old For Fairy Tales


Hi Crafty Friends,

Today I am sharing a Shadow Box Card I created using stamps from Craftin' Desert Divas and dies from Lawn Fawn.


Recently Lawn Fawn released two Add-On die sets for their Shadow Box die set. As I already have the Shadow Box die set, I had to purchase the Add-On die sets and it gives you more options on how to use these dies.

For my card today I pulled out the new Shadow Box Add-On Park die set to use with the Shadow Box die. 

Last year I had fun using the Lawn Fawn Shadow Box die set in the centre of the card, so I decided to continue to do that for my card today.


I added the trees from the Add-On die set to the shadow box and also on each end of the card. 

To decorate my card I used Craftin' Desert Divas Dragon Tales Clear Stamp set.


Here is another view of my card when it is opened. The grass along the bottom of the card is the grass die included in the Add-On die set which is used inside the Shadow Box.


For the front of the card I added two trees to both edges of the card and added the knight on the horse along with a sentiment.

Supplies:
For your shopping convenience, all products are linked below. Compensated affiliate links are used where possible with no extra cost to you. This helps me to continue to share all the projects I include on my blog. Please note I only use and share products I love.

Fairy Tale Squidgies - Stamping Bella