Tuesday, February 28, 2023

Rebus - Movies Starring Michael Caine


Hi Crafty Friends,


It's time to share another rebus puzzle swap with you! This month the theme is "Movies starring Michael Caine".

If you would like to solve my rebus puzzle, why not post a comment on my blog post with your answers. I will let you know what the correct answers are next time I post a rebus card here.

How did you go solving my January Rebus which was "Flowers Starting with the Letters A, B or C"

 Here are the correct answers so you can check how you did.

  1. Agapanthus
  2. Banksia
  3. Begonia
  4. Coneflower
  5. Cymbidium
  6. Bougainvillea
  7. Anthurium

You can find all my past Rebus Cards here.


Monday, February 27, 2023

Pand-tastic Birthday


Hi Craft Friends,

I have a birthday themed Slimline card to share with you today.

Last month I shared a baby card using Studio Light's Creative Craft Lab Ted die set. Today I have used this set again, this time turning the bear into a Panda. 

For the background of my card I used Apple Blossom's Bamboo Cane's die set. I die cut the background using green and black cardstock and then layered them together offsetting the green over the black slightly to create a shadow.

I die cut another small section of the background which I used for the panda to hold.

I die cut a yellow circle from yellow patterned paper and adhered it under the background before adding it the the patterned paper which is from Divinity Designs.

For the sentiment I used Creative Craft Products Modern Sentiments die set.


For the inside of the card, I added another panda to the bottom off the card.

I added two sentiments ... the "Happy Birthday". is from Altenew's Birthday Builders die set. The "Pand-tastic" is from a stamp set from Art Impressions.


Other Supplies:

Pand-tastic - Art Impressions 


Friday, February 24, 2023

Be-Leaf In You


Hi Crafty Friends,

Today I have another fun stepper card to share with you using one of Creative Craft Products Step On Up dies available from Craft Stash. This one uses the Scalloped Stepper Card die set. I love that it includes all the layers for both the front and back of the card, so that I can add layers to the inside of the card.

I die cut the Scalloped Stepper Card base from dark red cardstock and the layers from holographic and Ombre Glitter Card. I cut the tiniest sliver off the centre scallop, which stopped it from rocking.


To decorate my card I used some of the flowers from Creative Craft Products Floral Nostalgia Ephemera Pack, I love that large red rose.

I stamped the "I be=leaf in you" sentiment from the Floral Nostalgia stamp set onto white cardstock and then cut the word out using scissors, cutting around the outline of the letters.

To finish off the card I added pearls using Pink Fresh Studios Champagne Pearls.


For the inside of the card, I used the other layers included in the die set (the back and front of this card are different). I added another of the stamped sentiments from the stamp set and a flower, which is an off cut from the flower on the front.


Thursday, February 23, 2023

Oriental Screen


Hi Crafty Friends,

Today I am sharing a fun fold card I created recently.

This card uses Paper Discovery's Room Divider die set to create the tri-fold screen card base. The set came with two different style base dies, two different decorative panels and two rectangle shaped panels. I cut the silver layer by hand as I wanted something between the decorative panel and the base panel. I used papers Divinity Designs Rainbow Sherbet Slimline Paper Pad as the panel behind the decorative panel.

On the left hand panel, I used Creative Craft Products' Modern Sentiments die set to die cut the word "Happy" from pink cardstock and layered onto the silver holographic card. The "Birthday" word is silver embossed onto pink cardstock. I used a sentiment from Altenew's Birthday Builder stamp set for the word "Birthday"

Along the top edge of the screen/card, I added pink/silver Glitter Dot Peel Off Stickers. I used the stickers as I didn't want and bulk when the card was folded.


The card is folded so that the right hand panel when the card is opened, becomes the front of the card when it is closed. I added La-La Land Craft's Kimono Marci to the lower portion of the card.


Here is a look at the back of the card. The decorative panel on the right hand side is the back of the card when it is closed, so both the front and back of the card in the closed position is pretty. 

For the other two panels I added white panels layered to the holographic cardstock and a sentiment to each of the panels which I silver embossed to match the card. Both sentiments are from Made To Surprise's Showstopper Sentiments stamp set.


Other Supplies:

Room Divider Die Set - Paper Discovery/Craft Stash.


Wednesday, February 22, 2023

Fore! Three Two One


Hi Crafty Friends,

Today I am sharing a card I made for a good friend who celebrated her birthday last week. My friend loves playing golf, and for as many years as I can remember I have created a golf themed card to give to her for her birthday. After all this time she more or less expects it.

it's getting harder as the years go by, as I haven't purchased new golf theme stamps in years and they are hard to find, especially ones to suit a female golfer.


This year I created a pop-up card using Karen Burniston's Cupcake Pop-up die set, to hide the cupcake I added a rectangle panel which was decorated the same as the background. 

I used Magnolia stamps Golf Flag stamp and Kraftin Kimmie Stamps Good Sports stamp set to add the girl on the golf green.

The sun and clouds are from Karen Burniston's Landscape Scene die set.


I added the diagonal stripe paper along the bottom edge of my card. I then added the circle border from Karen Burniston's Border Blends - Trims die set. This looks like a row of golf balls.

For finish off the inside of a card I added a golf themed birthday sentiment.


I kept the front of the card simple, as the focus is on the inside. I created the golf green scene using papers from Lawn Fawn's Watercolor Wishes 12 x 12 Paper, it's the same paper I used on the inside.

I added the golf ball and tee from Karen Burniston's Sports Charms die set. The sentiment is an older one from Rubbernecker Stamps.


Other Supplies:

Good Sports Stamp Set - Kraftin' Kimmie Stamps (discontinued)
Golf Flag Rubber Stamp - Magnolia Rubberstamps
Fore! Three Two One ... - Rubbernecker Stamps (discontinued)


Tuesday, February 21, 2023

Karen Burniston - KB Riley LLC February 2023 Release Blog Hop


Hi Crafty Friends, 


Welcome to our Karen Burniston Products - KB Riley LLC February Release Blog Hop. The Design Team have come together with Karen today for a fun blog hop to celebrate the release of 6 new dies. Sneak peeks of the new release started last week, and the dies are available to order NOW!


This release includes:

  • 1 new Charm die sets
  • 1 new Word set
  • 1 new Tiny House Add-Ons sets
  • 1 new Pop-up die sets
  • 1 new Crosshatch die sets
  • 1 new Border die set


Dies are available to order now on the website. 


GIVEAWAY:


To celebrate the release Karen Burniston and each of the Karen Burniston - KB Riley LLC Design Team members will be giving away a $25 Gift Certificate to some lucky person who comments on our blog posts, so make sure you join the hop and comment on everyone's blog post. Winners will be randomly chosen from ALL of the blog hop comments received on our blog posts by Monday, 27th February 2022. Lots of chances to win some goodies, so just leave a comment on this post or any other blog hop posts to enter! Don't forget to leave some way for us to contact you, in case you are a lucky winner!


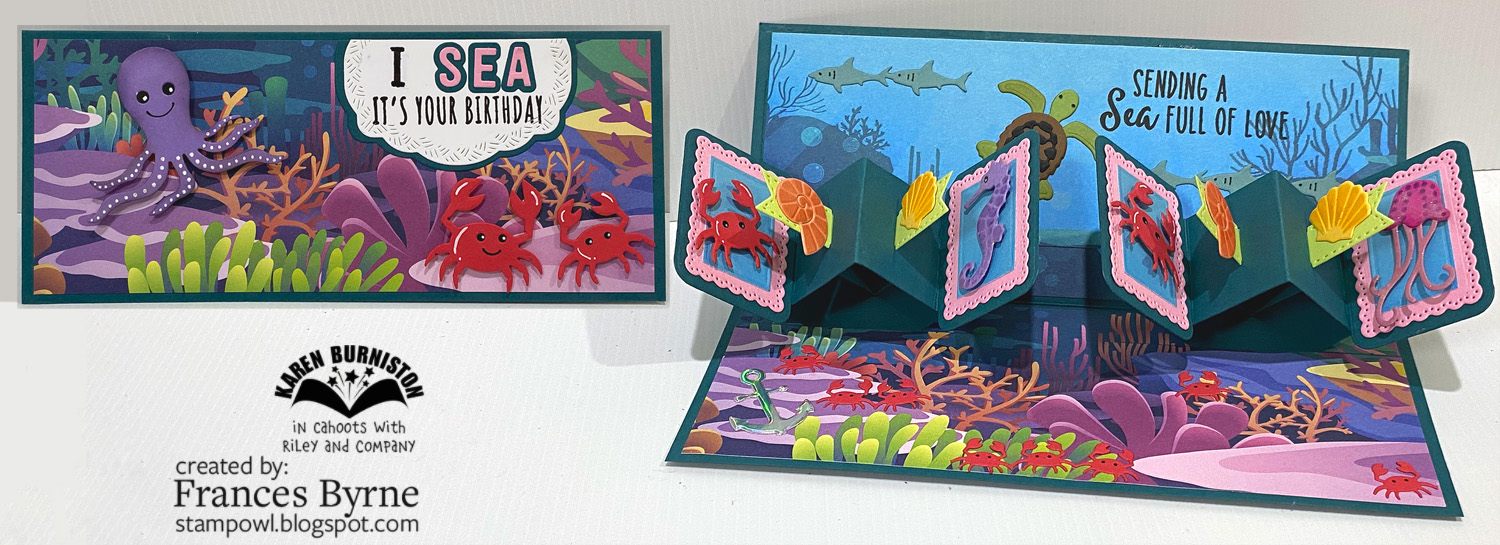
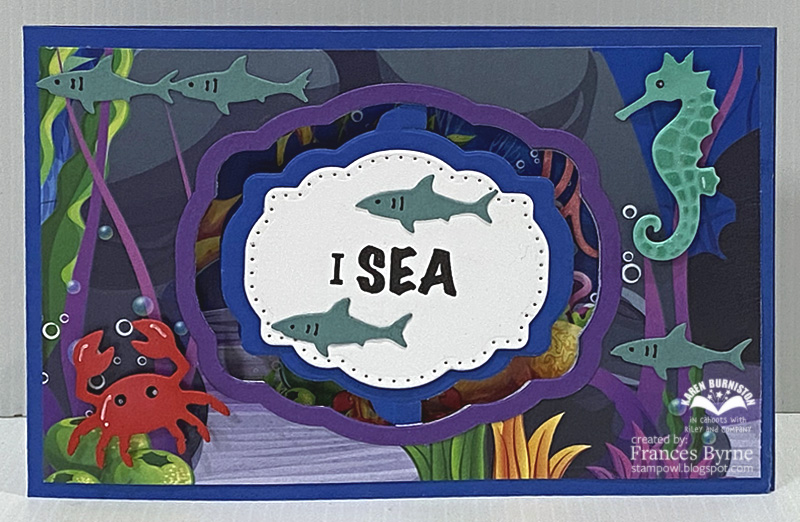
For my card today I have used four of the new dies to create my "Sea/Ocean" themed card. First up is the Little Twist Panel Pop-up die set which is very easy to use and works with most sizes of cards included Slimline and Mini Slimline cards. Have already shared a Mini Slimline and 5 X 7 version using this die on my blog yesterday and last week, so scroll down if you missed those cards.   I added two of the "little twist panel pop up's" this time, seeing I was creating a slimline card. I hid the mechanism base of the "little twist panel pop-up" underneath the patterned paper, I cut two strips of patterned paper about 1 inches wide which I adhered close to the fold before adding the mechanism, and then once the two pop up mechanisms were in place, I added the remainder of the paper lining up the pattern as close as I could.


Here is a quick video to see my card in action.
 

To decorate my card I used the Seas Charms (the animals and shells on the Little Twist Panel Pop-up mechanism) and Beach Borders (the tiny crabs and sharks) die sets along with two previously released die sets ...  Sea Animals and Ocean Animals die sets. I love that the Beach Borders can be used as a border, or cut apart as needed for your card, making them perfect for any sized card. I cut mine apart putting them in groups of 1, 2 or 3 images. In the bottom left hand corner of the card, I added the anchor which is from the Cruise Charms die set.

To finish off the inside of the card, I added a stamped sentiment to the top portion of the card.


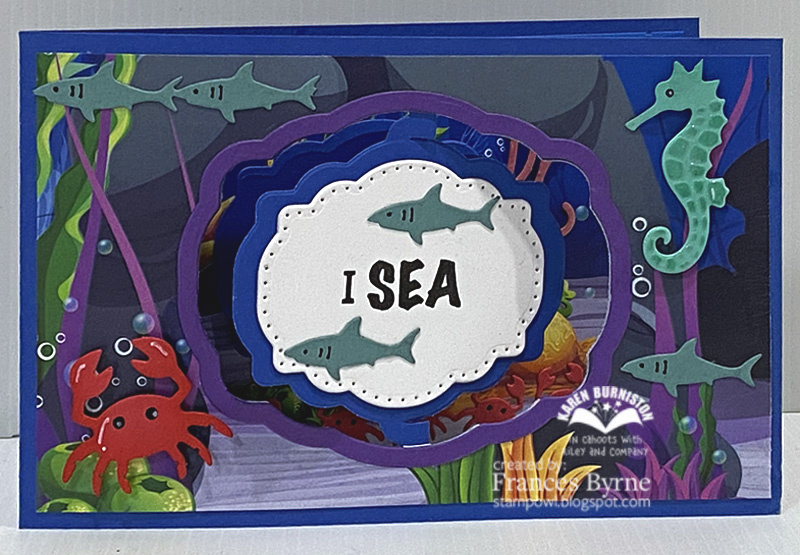
I kept the front of the card simple, seeing the focus is on the inside of the card. I added the same patterned paper I used on the front.

I added two different sized crabs, the smaller from the Sea Charms die set and the larger one from the Sea Animals die set. The Octopus is from the Ocean Animals die set.

For the sentiment, I used the new Rectangles and Labels Crosshatch die set, using two of the label dies included in the set. As I was limited on space, I cut the label down slightly. I used the Mini Alphabet and Numbers to add the word "See" the rest is from a stamp set.

Well that's about it from me today, thank you for dropping by. To continue on the blog hop, click on the next person on the list, which is  Suzanne Smit


Here is the complete blog hop list in case you need it.


Blog Hop List:


Karen Burniston

Lois Bak

Sue Small-Krieder

Karen Aicken

Jennifer Webster

Frances Byrne. <<<< YOU ARE HERE >>>>

Suzanne Smit

Sandy Diller

Fran Sabad

Nicky Foden


Monday, February 20, 2023

Celebrate Your Special Day


Hi Crafty Friends,

Today I am sharing another sneak peek of some of the new dies being release by Karen Burniston tomorrow.


This card actually looks a lot nicer in real life than it does in the photos, that paper is a nice pastel paper and the red portion of the card is a dark pink ... I tried a number of times to get photos I was happy with and edit them but this was the best I could get. 

I have been having such fun playing with the new Little Twist Panel Pop-up die set, creating cards in various sizes. Last week I shared a 5 x 7 card and today I have a Mini Slimline card, no matter what the size this die will work in it. According to Karen Burniston, you can make a card as small as 3.5 inches square if you really wanted to.


To decorate my card I used the Big Birthday Charms die set. I die cut a number of the presents included in the set and die cut them from coordinating papers. I also die cut the candles which I adhered to the banner piece that goes through the slits in the centre panels.

The rectangle panel at the top of my card, and the label at the bottom are both from the Rectangles and Labels - Crosshatch die set.


For the front of the card, I added the "Happy Birthday" sentiment using the Happy Birthday and Happy Birthday Shadow die sets. I die cut the sentiment twice once from the dark pink card and one from yellow, offsetting the yellow slightly behind the pink one.

I also added a few more of the presents around the sentiment.


Friday, February 17, 2023

"Purse"- onally You're the Best


Hi Crafty Friends,

Today I am sharing a purse shaped card I created recently. Last month, Scrappy Tails had a new release and some of their new products were around "fashion" ... I thought a few things were cute, so I placed a small order.

As you can see above, one of the things I ordered was this purse die set. This die creates a purse card/bag, the flap opens so you can add a gift card, notes or small gifts.


I grabbed some patterned paper from an old paper pad, the red paper is glittery which gives the purse a nice look in real life.

I added a birthday sentiment to the tag on the left side of the purse, using a stamp set called Big News from Mama Elephant. The tag is pretty small and when I saw this stamp set I figured it would be perfect as all the sentiments are small.


The photo above shows the back of my purse, which is pretty much how the front looks without the purse flap etc.


As you can see, I added a sentiment to the inside flap of my card. If I had thought about it before assembling the purse, I would have stamped it directly to the flap ... but I didn't. The sentiment is an older stamp from Darcie's Rubber Stamps and of course is perfect for this card. I used Oval dies from. Creative Craft Products to layer the sentiment.


As I mentioned earlier in this post, this purse is perfect to put a gift card. I added a gold gift card from my stash into this purse which you can see in the photo above. 

You could also add a small note card, about the same size as a gift card if you wanted to as a place to add a sentiment and to write a personal message. I haven't done that as yet, but may end up doing that when I decide where this is going.

The purse folds flat and will fit in a 5 x 7 envelope for mailing.


Thursday, February 16, 2023

Dad's Tools


Hi Crafty Friends,

Today I am sharing another pop-up card using some of the new dies which are being released next Monday 20th February. Even though Father's Day isn't until September where I live, I couldn't resisted pulling out the Tool Charms die set to make this Father's Day card.


For the pop up on this card, I used the new Little Twist Panel Pop-up die set. This pop-up mechanism, glues into the card rather than being die cut into the card as the Twist Panel Pop-up does. This pop-up will work on just about any card size, here I have created a 5 x 7 card, but it will also work on A2; Mini Slimline and Slimline Cards.

I found this fun male themed nuts & bolts patterned paper in my stash so I used that on my card. I used the two larger rectangles included in the new Rectangles and Labels Crosshatch die set for the layers both inside and out. 

Most of the pop-up mechanism base is hidden under the nuts and bolts paper, so I had to trim approximately 1cm off the bottom edge of the paper. I glued the cut off portion of the paper to the back of the card first and then adhered the pop-up mechanism. Once that was in place I could adhered the remainder of the paper onto my card. There was a slight gap where the papers meet, so I hid that by adding a border using the Border Blends - Argyle die set.


I added the Happy Father's Day to the top portion of the card.

The label on the lower panel, uses the two larger labels from the Rectangles and Labels - Crosshatch die set. This is a place to write a personal message.

I found some ruler paper in my stash so I added that for the little flag thing in the centre of the pop-up. 

I die cut the tools from the Tool Charms die set from holographic and black cardstock, layering together before adding to my card.


I added some of the same elements that I used on the inside of my card, on the front. The "Dad" uses the Alphabet die set.


Wednesday, February 15, 2023

"Sea" Label Charm Pop-up

 
Hi Crafty Friends,

Today I am excited to share with you some of the new dies being release by Karen Burniston - KB Riley LLC next Monday 20th February. There are six dies being released this time around, four of them having a beach/sea theme.


One of the dies I was glad to see in this release was the new Rectangles and Labels - Crosshatch die set. This set includes rectangle dies that work with 5 x 7 cards and also labels including a frame that work with the Label Charm Pop-up die set. Both these additions were something I had requested. 


For my card today I created a Label Charm Pop-up Card which is the size of a Mini Slimline card. Of course I added the label included in the new Rectangles and Labels - Crosshatch die set, I love how that finishes the look of the card. 

I used patterned papers from Whimsy Stamps for the layers of my card.


To decorate my card I used the Sea Charms and Beach Borders die sets.

For the sentiment I used a sentiment from Made To Surprise by Sam Calcott's Under the Sea Sentiment Stamp set. I cut the sentiment apart, so that I could have part of the sentiment on each label.