Wednesday, August 31, 2022

Thank You Teacher

Hi Crafty Friends,

Today I am sharing another sneak peeks of one of the new Karen Burniston die sets which is being released next Monday 5th September.


Yesterday I shared a card using the new Label Charm Pop-up die set which I created in Mini Slimline format. For my card today I decided to use the same die set, however I created a side folding A2 card. This die set was designed to work on a side folding card which was 5 - 6 inches wide.


I need teacher thank you cards for my grandchildren to give to their teachers at the end of the year when school breaks up for the year. So for this card I pulled out Clearly Besotted's School Day Play stamp set, I love the cute characters in this set that are holding school related items.

I used Karen Burniston's Thank You die which I cute apart to make in one line and added it along the bottom of my card.


When you open the card, the images that show on the label when the card is closed pivot around so they can be seen on the inside too. I added a sentiment to the centre label which is from Heffy Doodle's Teach Me Words die set.


Rebus - Jeffery Archer Books


Hi Crafty Friends,


It's time to share another rebus puzzle swap with you. This month the theme is "Books written by Jeffery Archer".

If you would like to solve my rebus puzzle, why not post a comment on my blog post with your answers. I will let you know what the correct answers are next time I post a rebus card here.

How did you go solving my June Rebus which was "Movies starring Morgan Freeman"

 Here are the correct answers so you can check how you did.

  1. Now You See Me
  2. Brubaker
  3. Unforgiven
  4. Driving Miss Daisy
  5. Ben Hur
  6. The Dark Knight
  7. Batman Begins

You can find all my past Rebus Cards here.


Tuesday, August 30, 2022

Out of this World


Hi Crafty Friends,

Today I am excited to be able to share I card I created using one of Karen Burniston's new die sets which will be released next Monday 5th September. There will be 13 new die sets that will be released on this day.


For my card today I have used the new Label Charm Pop-up, this die was designed to fit into a side fold card that measures 5 to 6 inches wide and works perfectly with Mini Slimline cards, which is what I created today.


As you can see, I created a space themed card using the Space charms die set. The layers on each of the panels were die cut using the Short Rectangles - Crosshatch die set.


When you open the card the image that appears when the card is closed, pivots so it can be seen on the inside too.

To finish decorating my card I added Whimsy Stamps'  Moon Background which I added to the bottom corners of the card. 

The Label Charm Pop-up die set also comes with a few accessory dies which included the star. I die cut the star from holographic cardstock and added it randomly over the card.

I added a birthday sentiment using Lawn Fawn's Beam Me Up stamp set.


Monday, August 29, 2022

Male Birthday


Hi Crafty Friends,

I have a male themed birthday card to share with you today, which I created to give to my Son In Law who celebrated his birthday this month.

Earlier in the year, I saw a card using the Missees Men range of dies that reminded me on my son in law, so for his birthday card this year I figured I would pull out my dies and see if I could do something similar.  I am not sure whether he will be able to tell it is supposed to look a little like him, but I am happy with how it turned out. I used dies from both the Brian Man Fancy and Andrew Man Classic to create my image.

I adhered him higher up on my slimline card, so that I could add something below the image to make it look like he was behind something ... maybe a table, bar etc. I added Picket Fence Studios' Slimline Happy Birthday Word Topper to the base of my card.

The beer mug which is sitting on the last to letters of the word "birthday" was created using MFT Stamps Pint Sized die set.

The layers of the slimline card were created using Picket Fence Studios Slimline Nesting Rectangles die set.

Finally I added a few holographic stars to finish off the card.


For the inside of my card I added Picket Fence Studios' HB2U die and added some more woodgrain card along the bottom of the card, so that I could add two more beer glasses.


Friday, August 26, 2022

Mini Slimline Petals Background

Hi Craft Friends,

Welcome to my blog. Today I am sharing two Mini Slimline cards that uses some of the new dies from the Divinity Designs August release.Both cards use the new Mini Slimline Petals Background die set.


For my first card, I die cut the Mini Slimline Petals Background die from white cardstock and three more times from pink, purple and green cardstock.

I adhered the white Mini Slimline Petals Background outline onto a rectangle panel which I covered with Double Sided Adhesive Tape.  I then paper pieced the various color pieces from the three coloured die cut pieces into the white outline. This was then adhered onto a top folding Mini Slimline card using the Mini Slimline Card Base.

I added silver pearls to the centres of all the purple flowers.

To finish off the card I added the "Get Well Soon" sentiment which is from the All Occasion Foiling/Die Duo set, hot foiling the sentiment with black foil.


For my second card, I used the pink Mimi Slimline Petals Background which was leftover from creating my first card. I adhered the background onto a panel of clear acetate. I then die cut the Mini Slimline Thin Pierced Frame die to die cut a matching pink frame which I adhered to the background panel.

I added foam strips the outline of background and added sequins into the middle of the panel. This was then covered using a rectangle panel which was die cut using one of the papers from the Sweet Hearts Paper Pad.

I added the completed shaker background to the front of a pink Mini Slimline card using the Mini Slimline Card Base die.

To finish off my card I added two gold pearls to the two outer flowers in the centre of the card. I also added the "Thinking of You" sentiment which is also from the All Occasion Foiling/Die Duo set. I foiled the sentiment using gold foil.


Thursday, August 25, 2022

Happy Birthday Earthling


Hi Crafty Friends,

It's challenge time with my friends over on the CCEE Stampers challenge blog. As challenge hostess of the month, I finish off the month with one last challenge.

According to the Days of the Year web site, yesterday 24th August was Pluto Demoted Day, this day marks the occasion in 2006 when Pluto was demoted from being a planet to a dwarf planet. For our challenge today, create a card that has a space theme.


Over the years, I have created many space themed cards so I wanted to make something different to the ones I have made in the past. It has also been about a year since I have made a Magic Iris card, that that is what I decided to use for our challenge this week. I used Lawn Fawn's Magic Iris and Magic Iris Add-On die sets to create the magic iris portion of this card.

Here is a quick video to see my card in action. 


To create the background of my card I grabbed some papers from the Craft Consortium's Ink Drops Vivid Paper Pad. This has to be one of the most versatile papers as I have used it for so many different themes, all I needed to do for this card is splatter over some white paint and Liquid Stardust to give it the outer space feel.


Here you can see my card with the "Magic Iris" full open. I had made this card and was ready to video the opening and closing of my magic iris and it started playing up, so I carefully removed the front from the card base (I didn't want to ruin the inside of my card) and. added an extra layer of foam tape around the edge of the card and a layer to the three bridge pieces on the magic iris. Once I had re-assembled my card, the magic iris worked perfectly as you can tell by the video above.


Here is a quick look at my card showing the Magic Iris closed, partially open and fully open.

To decorate the front of the card I added the moon surface using Whimsy Stamps Moon Background stamp. The sentiment shown when the magic iris is fully open is from Honey Bee Stamps Stellar Sentiments stamp set.


I had intended to keep this card to just the Magic Iris on the front, but when I had finished the front and was about to work out what to do in the inside I ended up deciding to fully decorate the inside too. So I added more splattered papers and the moon.

Most of the images used on both the front and back of my card are from MFT Stamps Space Explorer stamp set, but as I have many space themed stamp sets I did pull out a few extra planets and the alien from a couple of other sets, including Honey Bee Stamps Far Out Friends and a discontinued There She Goes stamp set called Out of this World.

I created a pop-up card for the inside using the mechanism from Karen Burniston's Katherine Label Pop-up to pop up the cute astronaut holding the balloons. You can see how the pop up mechanism moves the astronaut up and down in the video above.

Finally I added another sentiment using the Honey Bee Stamps Stellar Sentiments stamp set. I used the smallest rectangle die included in the Karen Burnsiton's Long Rectangles - Crosshatch die set to layer the sentiment. 

Don't forget to check out the CCEE Stampers blog (goes live 12 AM EST) to see the rest of the creations the CCEE Stampers created this week. You can also see more details of their creations on their individual blogs:

Other Supplies:

Out of this World Stamp set - There She Goes (discontinued)


Wednesday, August 24, 2022

Grand Piano


Hi Crafty Friends, 

Recently Craft Stash released some new dies which reminded of some templates I used to use to make unusual shaped cards. As I enjoyed making those cards previously, I decided to buy them. Later Sam Calcott shared a video tutorial sharing four cards she created using each of the die sets, one of the cards was a piano shaped card using the Creative Craft Products Heart Easy Folds die set.

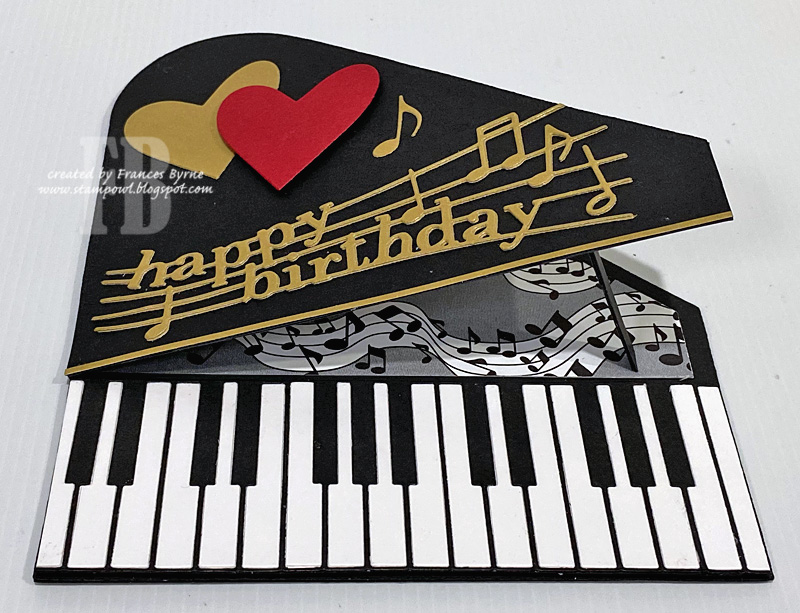
 I have made a piano shaped card in the past, many years ago. That card I created using a template I created, it's always easier to create a card with dies rather than templates and as I was going to have this die set I knew I needed to make another one using these dies. While I was inspired by Sam's card to make this using the new Easy Folds die set, I also used my previous card as inspiration. The die is designed in the opposite orientation to the shape of a piano, but it was easy enough to flip the cardstock once die cut.

 I didn't have the piano border Sam used on her card, however I did have an older one from Memory Box which needed a little alteration to make it fit the width of the card, but that was easy enough to do. My piano border has been discontinued for a while now, so I will like to the one from Paper Discovery, it is out of stock right now but you can sign up to be notified when it comes back in stock.


As you can see by the photo above, the piano keys are attached to the back panel so that only the part of a grand piano that is raised normally, is raised on my card. I die cut two of the shaped panels and trimmed off the height of the piano keys to create the from panel of my card. 

To decorate the front, I added the "Happy Birthday Melody" die from Poppy Stamps, another which sadly I believe is discontinued. It's one I used a lot for music themed cards.

I die cut two hearts using the heart die included in the Creative Craft Products Heart Fold Easy Folds die set to add to the top portion of my card as well as an additional music note.

You can also see on the right hand side of my card, above the keys, the tab. which is adhered to the back of the front of the card, which keeps the front upright when sitting on a flat surface.


Here is a look at my card when it is folded ready to be placed in an envelope. It does measure 6 inches x 7 inches, so will need to go into a larger sized envelope.


And finally a look at the inside of the card. I used one of the layering die sets included in the die set to die cut the patterned paper and white panel. As luck would have it,  I recently pulled out some older patterned papers I wanted to sort through to see what I would throw and what I wanted to keep, this music themed paper was in there, so I used some for the top of the right side of the card. I added a white embossed sentiment, using an MFT Stamps stamp set.

On the left panel I added a white panel, this is where a personal greeting can be written. I also stamped a birthday sentiment using a very old stamp I have had in my stash for years.

Other Supplies:

  • Piano Border Die - Memory Box (discontinued)
  • Happy Birthday Melody - Poppy Stamps (discontinued)
  • Music Notes Die-namics - MFT Stamps
  • Happy Birthday To You Stamp - Stamp World (Australia) (discontinued)


Tuesday, August 23, 2022

Paddington Magic Colour Slider


Hi Crafty Friends,

Thanks for visiting my blog. I am sharing a fun birthday card I created recently.

For my card today I created a Magic Colour Slider card using Made to Surprise by Sam Calcott's  Magic Colour Slide 5 x 7 Mechanism die set  

To decorate my card I used Paddington and Paddington Gets Busy Stamps sets from Craft Stash. 


When you start to pull the tab at the top of the card, the black and white image starts to disappear with a coloured image. 


Here is a look at my card when the tab is completely pulled, you can see the fully coloured Paddington Bear and also a sentiment. 

I layered the slider onto a panel of Holographic cardstock which is die cut using the largest rectangle die included in the Magic Color Slide 5 x 7 Mechanism die set.


For the inside of the card I added the "HB2U" sentiment using a die set from Picket Fence Studio. I added another of the Paddington Bear and Paper Airplane images from the stamp set.


Monday, August 22, 2022

Sending Sunshine and Rainbows


Hi Crafty Friends,

Thanks for dropping by to my blog. Today I am sharing four Rainbow shaped cards I created recently using stamps and dies from Honey Bee Stamps.

A few months ago Honey Bee Stamps released a number of rainbow themed stamps, dies and hot foil stamps. I took too long to decided I wanted any of the products from that release, that when I did decide I had to wait ages for my retailer to get them back in stock ... but as you can see I finally managed to get hold of them and I just had to make some cards.


I love shaped cards, and one of the rainbow die sets included in the Honey Bee Stamps release was a rainbow shaped card base ... the Rainbow Builder A2 Card Base die set which is what I used to die cut my shaped card using white cardstock.

 Next I used the coordinating Rainbow Accents die set, using one of the dies to die cut the rainbow arches which I die cut from white cardstock and then coloured using Distress Oxide inks. The colours I used are listed in the supply list below. Another of the dies in this set was used to die cut the white arches between the coloured arches from white glitter cardstock. Finally I used the last die in the set to die cut the rainbow accents, I die cut one from Holographic Cardstock, one for pale yellow and the final one from white cardstock.

I then used the clouds and sun included in the Rainbow Builder die set to decorate the card.


I used one of the sentiments from the Honey Bee Stamps Look for the Rainbow stamp set to add my sentiment.


A few of the sentiments included in the Look for the Rainbow stamp set are suitable for get well cards, so as I need lots of this type of card these days I decided to use two of them for the inside of my card.


Saturday, August 20, 2022

Thanks Thyme


Hi Crafty Friends,

Today I am sharing another Slimline card using Divinity Designs' July 2022 Blessings Box.

To create the Slimline card I used the Slimline Card Base, Slimline Rectangle and Slimline Window Frame die sets. I used the black and white checked paper included in the Gardening Gnomes Paper Die/Duo set.

The thyme plants in two of the panels are from the Potted Herbs stamp set. The sentiment in the centre panel is from the Sow Seeds stamp set.

Along the right edge of the card, I added the "thanks" sentiment using the Alphabet Flags die set.


For the inside of my card, I used one of the negative rectangle window panels left over from the front of the card. The sentiment is from the Sow Seeds stamp set which is layered onto an oval using the Double Stitched Ovals die set.

I added another pot of thyme image to the lower right hand corner of the card which I stamped in purple ink.