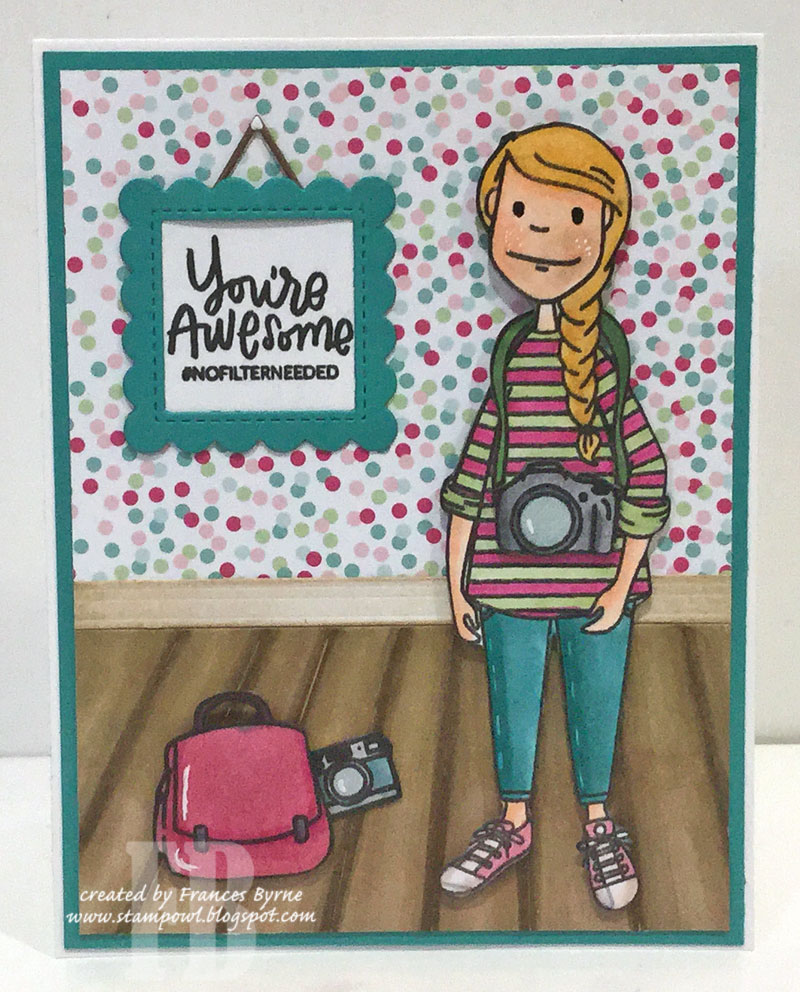
Monday, April 30, 2018

Elizabeth Craft Designs - May Day Flash Sale


Hi Crafty Friends,

USA readers ...... Elizabeth Craft Designs is having a May Day Flash Sale with 20% off all orders over $25.


Use Discount Code at Checkout: MAYDAY

  *Offer ends May 1st * U.S. only * Discount applies to orders over $25 at checkout *


Rebus - Things that are Black


Hi Crafty Friends,

It's time to share another rebus puzzle swap with you. This month the theme is "Things that are Black"

If you would like to solve my rebus puzzle, why not post a comment on my blog post with your answers. I will let you know what the correct answers are next time I post a rebus card here.

How did you go solving my March Rebus which was "Names starting with M". Here are the correct answers so you can check how you did.

  1. Megan
  2. Maxwell
  3. Margaret
  4. Mickey
  5. Mabel
  6. Marcus
  7. Mandy
  8. Maryann
  9. Meg
  10. Michelle
  11. Mark
  12. Mozart


You can find all my past Rebus Cards here.

Sunday, April 29, 2018

You are so Awesome


Hi Crafty Friends,

Today I am sharing another card I created using Gina K Designs Wreath Builder kit I received earlier in the month. The wreath builder is such fun as it allows you to create awesome patterns on either 4 inch or 3 3/4 inch square of cardstock using the wreath builder stencils included in the kit and a MISTI.


This time around I used one of the circles included in the stamp set to create my "wreath" which creates an awesome pattern.

I decided to stamp the circles in rainbow colors and as I needed to stamp 8 times and there are only 7 colors in a rainbow I added pink to the mix.

I added a sentiment to the centre of the card using Color in Sentiments from Right at Home. 


For the inside of the card I stamped another set of 8 rainbow circles and then added another sentiment directly over the top ... this sentiment is from The Stamps of Life.

Supplies:


Other: 

Stamps:  Color in Sentiments - Right at Home; Words4Crayons - The Stamps of Life
Paper: White; Blue; Yellow; Red; Black
Inks: Black VersaFine Ink
Other: Red Rhinestones; Foam Tape

Saturday, April 28, 2018

Skating By To Say


Hi Crafty Friends,

It’s challenge time with the “Crazies” over on the Crazy 4 Challenges blog. Maryann Einam our challenge hostess for the month finishes off the month with one last challenge.

Our challenge this week is a Play on words - Create a card using these words for inspiration .... "Skating on thin ice"

As soon as I saw the lantern die from SugarPea Designs I knew I had to have it in my collection. I finally received as a Christmas present a few months ago. This is the first chance I have gotten to play with it and thought it would be fun to create a skating scene inside the lantern using MFT Stamps You Make My Heart Melt stamp set.

As you can see I have created a Tri Shutter Card using a die from Tattered Lace.

On the centre sentiment panel as the sentiment was very small, I added another image from the stamp set and the sentiment.


Here is a look at my card when it is closed ready to be placed in an envelope.

Don't forget to check out the rest of the “Crazies” cards over on the Crazy 4 Challenges blog and also their individual blogs for more details.

Kelly Santi (April Guest Designer)

Supplies:

Stamps: You Make My Heart Melt - MFT Stamps; Snowy Sayings - The Craft Lounge
Paper: White; Sage; Blue; Yellow; Baby Boy Plaid/Bundle of Joy DP - Echo Park
Dies: Tri Shutter Card - Tattered Lace; Lantern - SugarPea Designs
Other: Black Ink; Broken China Distress Oxide; White Gloss Nuvo Crystal Drops; White Gel Pen; Foam Tape; Copics


Friday, April 27, 2018

Time for You Father's Day Card


Hi Crafty Friends,

It's my turn to post a tutorial on the Elizabeth Craft Designs blog today. I am sharing a Father's Day card I created. While Father's Day isn't until September in my part of the world, it's is just over a month away up there in the USA.

As you can see I created a Easel Card.


Here is how I created my card:


Step 1 - 
  • Create the Easel Card Base by cutting a piece of black cardstock so it measures 5 inches x 10 inches.
  • Score and fold in half at 5 inches.
  • Score the top section of the card at 2.5 inches and fold so it looks like the photo above.

Step 2 -


  • Cut two pieces of White Soft Finish Cardstock so they measure approximately 6 inches square.
  • Ink the Stripes Background using black pigment ink and stamp onto the white cardstock, cover with clear embossing powder and heat set. (MISTI used here for easy positioning)
  • Starting from the top and bottom edges, apply Gathered Twigs Distress Oxide Ink using a blending tool.
  • Continue sponging on color using Fired Brick Distress Oxide and then Peeled Paint Distress Oxide making sure to blend the colors as you are inking. 
  • Spritz backgrounds using water from a Distress Sprayer and blot up using paper towel.
Step 3 - 
  • Die cut both backgrounds using the second largest square from the Dashing Squares die set.
  • Adhere one of the backgrounds to the card base of the card.
  • Adhere the remaining background to a black square which measures 5 inches square. Apply adhesive to the 2 1/2 inch panel facing the front of the card and adhere this panel to it so the bottom of the background panel is level with the bottom edge of the card.

Step 4 - 

Using the Take Time for You die set die cut the following:
  • 1 x Pocket Watch from White Soft Finish Cardstock
  • 1 x Pocket Watch from gloss cardstock 
  • 1 x Pocket Watch Outline from black cardstock
  • 1 x Pocket Watch hands from black cardstock
  • 2 x Pocket Watch Chain from gloss cardstock
  • 3 x Make Time for You from black cardstock
  • 1 x Make Time for You from White Soft Finish Cardstock that has Clear Double Sided Adhesive Tape on the front.
Step 5 -
  • Apply alcohol ink to the gloss cardstock Pocket Watch and also to the Pocket Watch Chains. 
  • Trim out the watch face from the white Pocket Watch and sponge around the watch face using Frayed Burlap Distress Oxide. Adhere face onto alcohol-inked Pocket Watch.
  • Attach the watch hands to centre of the watch using a black brad.
  • Adhere Pocket Watch to solid black Pocket Watch panel.
  • Attach the chain to top of Pocket Watch.

  • Adhere Pocket Watch to lower right hand corner of card as per photo above.
Step 6 - 


  • Trim off the "Make" from all 4 of the "Make Time for You" die cut sentiments.
  • Adhere the three black sentiments on top of each other and then adhere the sentiment with the adhesive on the front to the top of the layered sentiment.
  • Remove the protective adhesive backing from the sentiment and cover with Rich Black Silk Microfine Glitter. Return any excess glitter to the jar. Polish the glittered sentiment using your finger to bring out the maximum sparkle.
  • Adhere sentiment to the top left hand corner of the card.
Step 7 - 
  • Counting from the centre, die cut the fourth circle from the Dashing Circles die set from White Soft Finish Cardstock. 
  • Cut circle in half by die cutting using a square die larger than the circle from the Dashing Squares die set. (the edge of the die will be placed where you want the edge of the circle so you have the dashed lines on the bottom of half circle.
  • Sponge around the edge of the semi circle using Frayed Burlap Distress Oxide.
  • Die cut a larger circle from the Fitted Circles die set  from black cardstock and layer the semi circle on top of this circle. Trim so black circle is flush with the white one.
  • Layer semi circle to edge of background panel which is adhered to the base of the card using foam tape.
Step 8 - 
  • Using the Words Set 3 - Happy Holidays die set, die cut the words - "Happy Father's Day" from black cardstock.
  • Adhere to the semi circle panel on card.
Step 9 - 
  • Adhere the top of the chain to the top of the card.
  • Add Ebony Black Nuvo Drops randomly to front panel of card.
Thank you for stopping by, I hope you enjoyed my tutorial.

Supplies:
Elizabeth Craft Designs:


Thursday, April 26, 2018

What a Rose Can Say


Hi Crafty Friends,

It's challenge time with my friends over on the CCEE Stampers challenge blog. Lois Bak our challenge hostess for the month finishes off the month with one last challenge.

April is National Poetry Month, and today is Poem in Your Pocket Day. Create a card using a poem as your inspiration. 

I recently received this awesome Altenew Mega Succulent stamp set and I soooo wanted to play with it. I went looking to see if I could find a poem that would work with it, I couldn't find any succulent poems, but I found plenty of rose poems and I knew this stamp if colored in rose colors could look like a rose so I went with that.

The poem I selected for this challenge is .... What a Rose Can Say by Margie Driver, you can find the poem here

I stamped the Mega Succulent image onto watercolor paper and then watercolored it using Zig Clean Color Real Brush Markers. I am not the greatest at watercoloring, but hopefully this does it some  justice.

I wanted to create something special with this image rather than just a standard flat card, so I used Karen Burniston's Fancy Label Accordion die set. I needed to make the accordion taller, so when I was cutting my cardstock I placed the the cutting plate just short of the bottom cut line so I could cut my panel to 6inches. 


Here is a look at the front of my card when it is closed ready to be placed in an envelope.

The third line in the poem mentions that "A rose can say congratulations, whatever the occasion may be" So I added the Congrats sentiment to the bottom on a strip of vellum  and made the occasion a birthday.

I also added a few red crystals to the image.

Don't forget to check out the CCEE Stampers blog (goes live 12 AM EST) to see the rest of the creations the CCEE Stampers created this week. You can also see more details of their creations on their individual blogs:


Other:


Paper: White; Canson XL Watercolor Paper; Dark Pink; Paper Scraps DP - 
Dies: Retro Squares - MFT Stamps
Other: Black Versafine Ink Pad; Altenew Permanent Black Crisp Ink; Red Rhinestones; Foam Tape


Wednesday, April 25, 2018

Dive Into Adventure


Hi Crafty Friends,

My card today is for a challenge I do with a couple of friends of mine. Each month we challenge each other to create something using supplies we all own.

For our challenge this month we are playing with alcohol inks.


For both cards I used the same four colors of alcohol inks ... Aqua; Pool; Mermaid; Aquamarine onto Yupo paper.

After adding the color to my paper I die cut a square using the Dashing Squares die set.

I then stamped the images onto my card using black ink. The hardest part of this card was the stamping, my black archival ink pad is old and was dry and when I first tried it wasn't very successful even after re-inking. I did try others even purchasing another black ink but none of those gave a clean crisp image on alcohol ink. So I tried my archival again and it worked finally ... the ink must have finally soaked in, although I did have to ink each image more than once to get a decent image. Thank goodness for the MISTI.


On the inside I added a few more stamped images from two of the stamp sets I was using for these card which are from Hunkydory.


For my second card I decided to play with a new freebie die I received from a magazine I purchased .... Enjoy Today Flip Flop Die Set by Tonic Studios. 


I like how easy this was to turn from a flip flop card to a stand up card.


Here is a look at the who panel on the card base. The "Sea You Soon" sentiment is embossed using white embossing powder onto black cardstock and is from a Lawn Fawn stamp set.


Supplies:


Other:

Stamps - Dive In; You're a Treasure; Forever a Mermaid - Hunkydory
Cardstock - Teal
Foam Tape


Tuesday, April 24, 2018

You're Awesome #nofilterneeded


Hi Crafty Friends,

During the Thanksgiving sales last year I purchased this Essentials by Ellen Leading Ladies - Photo Lady stamp set. I finally found some time to play with it!

I added a couple of dies to my collection recently .... Lawn Fawn's Mini Picture Frames and Penny Black's Wood Floors die set. I thought these two dies would work perfectly with this Photo Lady stamp set.


I die cut the wood floors die set from white cardstock and then colored it using my copic markers. I adhered this to the bottom of a patterned paper panel.

I stamped the lady, two cameras, bag and camera strap onto white cardstock, colored and cut them out using my Scan N Cut and then adhered them to my scene.

I die cut the square mini picture frame from teal cardstock, stamped a sentiment onto white cardstock and layered it behind the frame. I added this to the top left hand side of my card.


For the inside of the card I added a couple of sentiments from some Lawn Fawn stamp sets, and the "Give it your best shot" from the Essentials by Ellen stamp set. To finish off the inside of the card I stamped a few cameras around the sentiment using teal ink.

Supplies:


Other: 
Leading Ladies Photo Lady - Essentials by Ellen
Teal Cardstock
Foam Tape
Copic Markers


Monday, April 23, 2018

Cosmos Mother's Day Easel Card


Hi Crafty Friends,

Today I am sharing a card I created recently using a few more things I received for my birthday.

This is an Easel Card which I created using Crafter's Companion Floral Create-A-Card Easel Card. This die set has decorative overlays you can use to create your card, but for my card today I decorated the card using stamps.

The background on the main panel is Simon Says Stamp Cosmos Background. I have been wanting this for some time and a friend gave it to me for my birthday 😀. I stamped the background onto watercolor paper and embossed using black ink and clear embossing powder. I then watercolored the image using Zig Clean Color Real Brush Markers. I stamped two more of the lower flowers on another piece of watercolor paper, cut them out and layered over the main panel.


As Mother's Day is only a few weeks away I decided to turn this into a Mother's Day card. I always need to make a few Mother's Day cards so my daughters have enough for their needs.

To embellish my card I added some clear and pink transparent crystals to the card.


Here is a look at my card when it is closed ready to be placed in an envelope.

Supplies:


Stamps: Cosmos Background - Simon Says Stamp; The Sweetest - Penny Black; Just for Mother's Day - Print Blocks
Paper: Watercolor Paper; Purple; Pink
Dies: Floral Easel Create-A-Card - Crafters Companion; Tall Rectangles; Tall Scallop Rectangles - Spellbinders
Other: Black VersaFine Ink; Studio Katia Cupid's Kiss Crystals Mix; Dark Pink Crystals;  Foam Tape

Sunday, April 22, 2018

Bean Meaning to Say


Hi Crafty Friends,

Apparently today is Jelly Bean Day and seeing I have Lawn Fawn's How You Bean stamp set, which I have had for some time and hadn't played with. I decided it was a good excuse as any to pull out the stamp set and play.

I had a couple of ideas using this stamp set so the easiest way to decide which one to use was to do both ... creating a pop up card so I could include one idea on the inside of the card.


For the scene on the front of the card I created the sky by sponging on Catherine Pooler It's a Boy ink over white cardstock. I also created the grass using Lawn Fawn's Cloudy Hillside Pop-Up Add-On and sponging it with Garden Party ink pad.

I thought it would be fun to have the bear rolling on the ground as the jelly beans were falling out of the jar.


For the inside of the card I created a pop-up card using Karen Burniston's Cupcake Pop-up Card die set. This time around I stamped the bear so it appeared to be inside of the jar, this required a little creative masking.


I added clouds and grass using the Cloudy Hillside Pop-up Add-on and added jelly beans randomly around the card.

Supplies:

Stamps: Rolling Bear - Lindy's Stamp Gang; Peeking Bear - Darcies
Paper: White; Black; Blue
Inks: Garden Party; It's a Boy - Catherine Pooler
Other: Black Glaze Pen; Foam Tape; Copics


Saturday, April 21, 2018

Birthday Wishes


Hi Crafty Friends,

It’s challenge time with the “Crazies” over on the Crazy 4 Challenges blog. Maryann Einam our challenge hostess for the month continues to issue the challenges.

Being the third Saturday of the month it is time for a sketch challenge.


For my card I used Concord & 9th's Posie Fill-Ins Clear Stamp set with coordinating dies to created the patterned panel on the left hand side. I stamped an additional flower and leaves and popped it up (the one on the top left).

For the striped panel I used Altenew's Classy Stripes stencil to sponge peach ink over the cardstock.

To finish off the card I added a birthday sentiment.


To decorate the inside of my card I again used the Posie Fill-In stamp set and the Classy Stripes stencil to decorate.

To create a pop-up for my sentiment, I used Karen Burniston's Katherine Label Pop-up die set. 


Here is another look at the inside of my card taken at a different angle so you can see the pop up piece a little better.

Don't forget to check out the rest of the “Crazies” cards over on the Crazy 4 Challenges blog and also their individual blogs for more details.

Kelly Santi (April Guest Designer)

Supplies:


Other:


Stamps: Birthday Messages 3 x 4 - Simon Says Stamp
Paper: White; Black; Peach
Dies: Stitched Scallop Basic Edge - MFT Stamps; Wonderful Words Birthday - PTI
Catherine Pooler Inks: Bellini; Polished; Seafoam; Eucalyptus; Aquatini; Midnight
Other: Foam Tape