Thursday, March 31, 2022

Bonjour


Bonjour Crafty Friends,

It's challenge time with my friends over on the CCEE Stampers challenge blog. As challenge hostess for the month, I continue to issue the challenges.

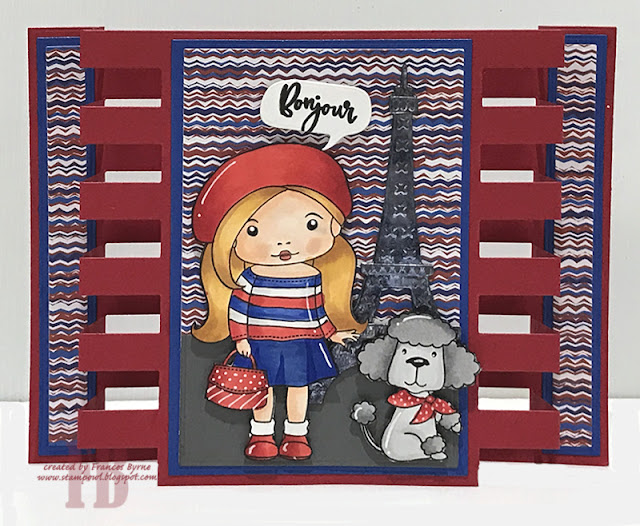
Apparently today is Eiffel Tower Day - create a card with a French theme, bonus points if you include the Eiffel Tower. 


For my card today, I pulled out a couple of Paris/Eiffel Tower themed stamps and dies. For the girl and poodle, I used stamps from La-La Land Crafts Marci in Paris stamp set, this was previously the April 2019 club kit which I was lucky to purchase back then.

The Eiffel Tower in the background uses Karen Burniston's Eiffel Tower Pop Stand die from her Pop-It-Ups collection when she was designing for Elizabeth Craft Designs. I die cut the Eiffel Tower from Shimmer Sheetz, I found this one already die cut in my die set and as the color worked I made use of it.


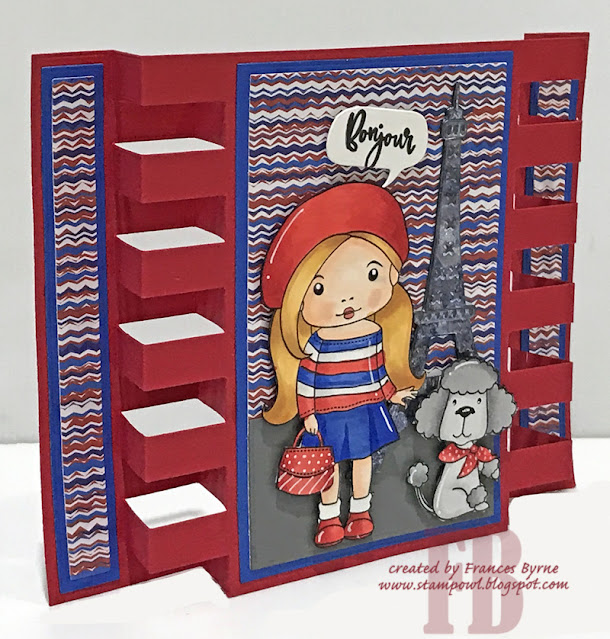
I created a Terrific Tower Card using the 6" x 6" Terrific Tower die set from Made To Surprise by Sam Calcott. 

For the "Bonjour" sentiment I used a stamp from the Marci in Paris stamp set and a speech bubble from Whimsy Stamps Comic Speech Bubbles die set.


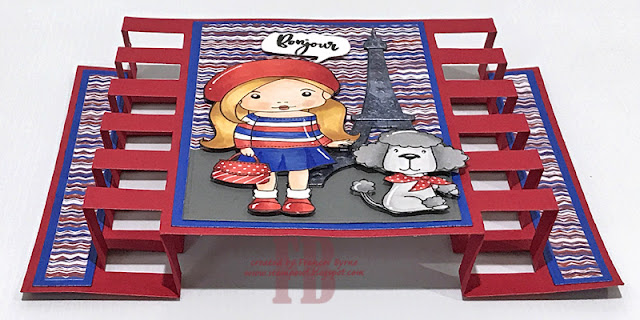
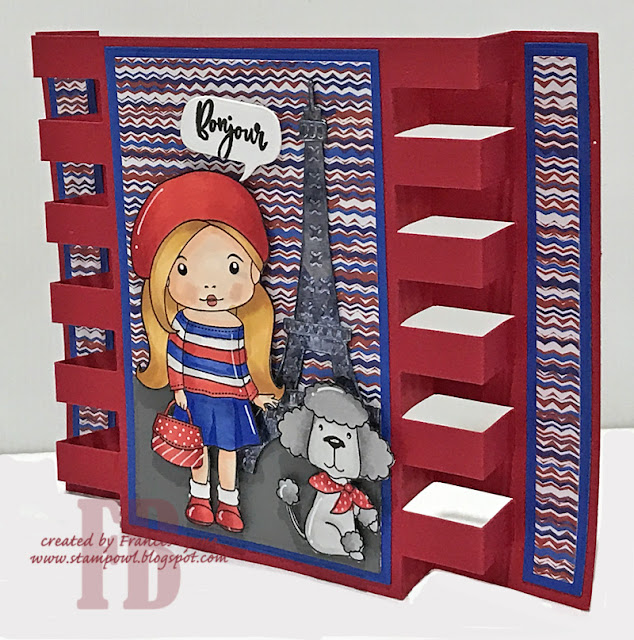
Here is another view of the card, this time when it is lying on the desk. Hopefully you can see the side panels a little better.


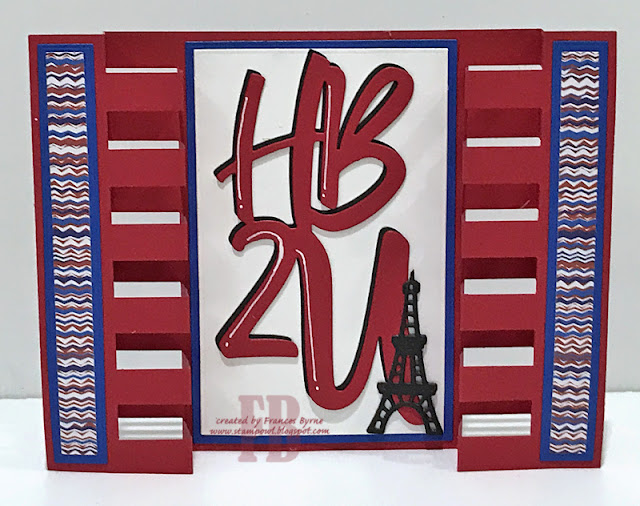
On the back of the card, I added another of the large panels I used on the front. I added Picket Fence Studios HB2U die set for the sentiment.

To keep with the Paris/Eiffel Tower theme, I added the Eiffel Tower from La-La Land Crafts Paris Die set.

Don't forget to check out the CCEE Stampers blog (goes live 12 AM EST) to see the rest of the creations the CCEE Stampers created this week. You can also see more details of their creations on their individual blogs:


Other Supplies: 
Eiffel Tower Pop Stand Die Set - Karen Burniston for Elizabeth Craft Designs (discontinued)


Wednesday, March 30, 2022

Rebus - Books by Barbara Cartland


Hi Crafty Friends,


It's time to share another rebus puzzle swap with you. This month the theme is Books Written by Barbara Cartland.

If you would like to solve my rebus puzzle, why not post a comment on my blog post with your answers. I will let you know what the correct answers are next time I post a rebus card here.

How did you go solving my November Rebus which was "Movies starring Elizabeth Taylor". Here are the correct answers so you can check how you did.

  1. A Place in the Sun
  2. Giant
  3. The Comedians
  4. The Flintstones
  5. Elephant Walk
  6. Ivanhoe
  7. Cleopatra
  8. The Sandpiper

You can find all my past Rebus Cards here.

Tuesday, March 29, 2022

Butterflies and Flowers


Hi Crafty Friends,

A few weeks ago, I pulled out my Hot Foil Machine, my Pinkfresh Studio hot foil stamps and foils and had a full day of just foiling. No cards were made, but I have lots of backgrounds, sentiments and images to turn into cards for the future. I shared one of my cards I made on this day, last week and today I have another to share with you all.

I spent a bit of time foiling my Geo Blocks Hot Foil Stamp, I stamped it in gold foils and also one using Couture Creations Pink Iridescent Flakes foil. As I also have Pinkfresh Studio's Solid Hot Foil Stamp I was also able to use all the negative pieces of foil to create background, which is what I did for this card.

As I decided to create a slimline card, I  cut the foiled background to just over 2 1/4 inch panels. I adhered these to either edge of my card. I then cut a white panel which I edged with purple cardstock to add a border to my panel. I adhered this to the centre of my card.

For the flowers I used the Pinkfresh Studio's Beautiful Blooms stamp set and coordinating stencils and dies. I love how easy it is to add color to the flowers using the stencils.

The butterflies were created using the Small Butterflies Hot Foil stamp with coordinating stencils and dies.

The sentiment is from the Fancy Script Words Hot Foil stamp set and coordinating dies. For this I used black foil and used the negative left over piece of foil to get the black outline and the white centre.


For the inside of the card, I had a tiny piece of the pink foiled background left over. So I used this to adhered to the right edge of my card.

I added another of the pink flowers, that I had used on the front to the left side of my card. The butterflies is another from the Small Butterflies Hot Foil Plate.

For the sentiment I used another of the sentiments from the Fancy Script Words Hot Foil Stamp set.


Monday, March 28, 2022

Pete's 70th

 
Hi Crafty Friends,

A friend of ours celebrated his 70th birthday earlier in the month, so of course I had to make him a card. 

As you can see I created a Slimline card which measures 4 inches x 9 inches.


I just had to try and make an image that looked similar to our friend, so I pulled out the Missees Men dies ... Brain & Andrew. I used mostly dies from the Brain die set, but I did need a couple of things from Andrew especially to add the grey hair at the sides of his head.

I am not sure if he owns a red shirt like this, but I do know for sure he has a blue one.

I added the Big Balloon designed by A Way With Words for Elizabeth Craft Designs. I added the "70th" to the balloon using two sets of discontinued dies.


For the inside of the card, I added a double pop-up using Karen Burniston's Katherine Label Pop-up die set.

I added the "Happy Birthday" sentiment to the top pop-up using Altenew's Birthday Builder stamp set. For the bottom pop-up I added the "You're How Old?" sentiment which is an older sentiment from Stamp It Australia.

Other Supplies:

You're How Old Stamp - Stamp It Australia (discontinued)
Suffix Style Die Set - Papertrey Ink (discontinued)
High Rise Numbers - MFT Stamps (discontinued)


Friday, March 25, 2022

Foiled Cross


Hi Crafty Friends,

I have another Easter card to share with you today using Hot Foil Stamps & Dies from Divinity Designs.

To create my card base I used Divinity Designs A2 Portrait Card Base with Layer die set. I used the layering die included in the set for the purple layer. The top layer is die cut using one of the rectangle dies from the Double Stitched Rectangles die set. The paper is from the Heavenly Skies 6 x 9 paper pad.

I gold foiled the sunburst hot foil stamp from the Sunburst & Cross Foiling/Die Duo set directly onto the patterned paper, close to the top of the card. I foiled the cross from the same set using the same foil, foiling it onto purple cardstock. I then die cut the cross using the coordinating die and adhered it over the sunburst using foam tape.

The "Easter" sentiment has also been foiled using the same gold foil, this. time onto white cardstock. I die cut the sentiment using the coordinating die and adhered it to the bottom of the card.


For the inside of the card, I added some of the leftover paper that I used on the front of the card along the bottom of the card. I then added the "Greetings" sentiment which was also gold foiled using the hot foil stamp included in the Sunburst & Cross Foiling/Die Duo set.


Thursday, March 24, 2022

Owlsome Birthday

Hi Crafty Friends,

It's challenge time with my friends over on the CCEE Stampers challenge blog. As challenge hostess for the month, I continue to issue the challenges.

Today is my birthday, so for our challenge this week create a card using one or more of my favourite things … Slimline cards; Interactive or Pop-up cards; owls; blue. 


Here is a quick video to see my card in action.


Some people may be surprised that I didn't make a Slimline card seeing how much I love them. I decided to make an Interactive Card, ever since I made the baby themed Flip Card for my friend Maryann to celebrate her becoming a Nanna I have wanted to make an owl themed one for myself. I used Made To Surprise's 5 inch x 7 inch Fabulous Flip Card Mechanism die set to create the base of my card.

I adhered the flip card onto a top folding white card that measures 5 inches x 7 inches. I cut a strip of cardstock that measures 3 inches x 7 inches. I scored along the 3 inch side at 1/2 inch; 1 1/2 inches and 2 1/2 inches and then folded to create an "M" shape.I adhered this piece to the bottom of the inside of the card to turn it into a tent style card. This makes it easier to display.

I pulled out a mixture of old and new owl stamp sets to decorate my card. 

On the front of my card I used the owl from Art Impression's Birthday Whoot Stamp set. 

The sentiment is a mixture of the "Owlsome" Sentiment from Uniquely Creative's Owl Family stamp set and Honey Bee Stamps Stellar Sentiments stamp set.


When you pull the arrow, the front of the card flips to reveal the other side of each panel and a sentiment on the inside.


The sentiment on the right panel and the owl are both from the Art Impression's Chatting Whoot stamp set. 

On the white panel underneath the frame, I added two sentiments ... the bottom one is from the Birthday Whoot stamp set and the "Hoot Hoot Hoo-ray" is from JustRite's Owl Be There stamp set.


Seeing the card doesn't open, because I turned it into a tent card, I added a few panels to the back so that I could add a sentiment and hand written greeting.

I added another of the owls and the sentiments from the Chatting Whoot stamp set.

The party hat on two of the owls are from the owl on the front, which I stamped separately and cut and then added onto the other owls, to give them all a birthday feel.

Don't forget to check out the CCEE Stampers blog (goes live 12 AM EST) to see the rest of the creations the CCEE Stampers created this week. You can also see more details of their creations on their individual blogs:


Other Supplies:
Birthday Whoot Stamp Set - Art Impressions (discontinued)
Chatting Whoots Stamp Set - Art Impressions (discontinued)
Owl Be There Stamp Set - JustRite (discontinued)


Wednesday, March 23, 2022

Birthday Butterflies

Hi Crafty Friends,

Today I am sharing a fun shutter card using products from Spellbinders Paper Arts.

To create my card I used the new Butterfly Bliss Garden Shutters 5" x 7" Card Base die set. This die includes the dies to create the Shutter Card as well as the butterflies. I also used the Eyelet Lace Frame to create the frame around the shutters.

Here is a quick video to see my card in action.

I added the three butterflies to the top and bottom shutter panels. The "Birthday" sentiment is from Yana's Layered Script Sentiments die set.


When you "pull" the tab at the top of the card, it reveals the sentiments on the back of each of the shutters. I used the sentiments from the More Sentiments Glimmer Plate set to hot foil each of the sentiments using gold foil.

I also added two of the butterflies on the white space at the bottom of the card.


The shutter portion of the card, is adhered to the front of a top folding 5" x 7" card base.

I used one of the rectangle panels included in the Eyelet Lace Frame die set to add the white rectangle panel. I added another of the butterflies to the lower right hand corner of the panel.

The sentiment is another sentiment from the More Sentiments Hot Glimmer set.


Tuesday, March 22, 2022

Get Well Soon


Hi Crafty Friends,

Today I am sharing a Get Well Slimline card I created recently.

Back in January, Whimsy Stamps released some Get Well themed products, including a couple of stamp sets and two slimline die sets. As I have been making a few get well cards for the members of a club I belong too, I decided I needed to include these in my stash.

I used the Slimline Big BooBoo die set to die cut the "bandaid/plaster" shape. I adhered this onto a top folding slimline card and then trimmed around the shape, to created a shaped card. I die cut the centre of the plaster three times and layered them up for a little dimension.

I stamped the "Get Well Soon" sentiment from the BooBoo Man Flu stamp set to the centre of the plastic using black ink. I also stamped the man & hand from the same set and added them to either side of the sentiment.


For the inside of the card, I die cut the "thinking of you" sentiment from the Slimline Heartbeats die set. I stamped the "Hope you feel better soon" from the stamp set underneath the sentiment.

To finish off the card I added three plasters also created using the dies from the Slimline Big BooBoo die set.


Monday, March 21, 2022

Best Ever Dad


Hi Crafty Friends,

Today I am sharing a male themed Mini Slimline card I created recently. 

For the Mini Slimline portion of the card I used dies from Lawn Fawn.

I used papers from a Fancy Pants Designs paper pad, for the background of my card.

For the "Best Ever Dad" sentiment I used The Greetery's Dad Squared Stamp and Coordinating die sets.


For the inside of my card I added a piece of the same patterned paper that I used on the front, along the bottom of the card.

I added the "Happy Father's Day" using stamps from Honey Bee Stamps Best Parents stamp set.


Friday, March 18, 2022

Pink Easter Lilies

 
Hi Crafty Friends,

I have an Easter card to share with you today using dies and hot foil stamps from Divinity Designs February/March release.

For the background of my card I used the new Chevron Foiling Plate to foil peach foil onto white cardstock. I used the A2 Portrait Card Base with Layer die set to layer the foiled panel for the base of my card.

I die cut two sets of lilies using the Lily die set, after assembling the lilies I adhered them to the centre of the card using foam tape.

I used the Easter Words Foiling/Die Duo set to foil the "Happy" and "Easter" words. These were foiled using copper foil. I used the coordinating dies to die cut the words and then added them to my card as per the photo above.


For the inside of the card, I took the leftover chevron foiled foil and used this with a solid plate to foil the negative image onto white cardstock. I then adhered this to the bottom of the white panel which was die cut using the Double Stitched Rectangles die set.

I added a sentiment to the top portion of the card using the Bunny Kisses stamp set.


Thursday, March 17, 2022

Happy St. Patrick's Day

Hi Crafty Friends,

It's challenge time with my friends over on the CCEE Stampers challenge blog. As challenge hostess for the month, I continue to issue the challenges.

Today is St Patrick’s Day. Create a card that features either leprechauns or gnomes.


I have been having fun with creating Full Front Shaker Cards, so I decided to create another for today's challenge. To create the shaker portion of the card. I used a piece of patterned paper from Whimsy Stamps St. Patrick's Day Slimline Paper Pad, I die cut the paper using one of the rectangle dies from Picket Fence Studios Slimline Die Cutting System die set.

I used packaging from a stamp or die set that I normally would throw away,  using Picket Fence Studios Slimline Full Front Shaker die set. I filled the shaker with gold and green sequins and Picket Fence Studios Diamond Crystalline Diamonds. This was then adhered to the front of a top folding slimline card that measures 3 1/2 inches x 8 1/2 inches.

Karen Burniston recently released two St. Patrick's Day die sets ... the Good Luck Charms and Happy St. Patrick's Day word sets. I used the Gnome and Santa die set to create the leprechaun.


For the inside of the card, I used another of patterned paper included in the Whimsy Stamps Slimline St. Patrick's Day patterned paper, which I adhered to the top and bottom edges of the card.

I created a pop-up using the leprechaun & pot of cord by attaching these images to the pop up included in the Street Lantern Pop-up die set. 


Along the patterned paper on the lower edge of my card, I added the "hello" sentiment using the Hello word die set.

Don't forget to check out the CCEE Stampers blog (goes live 12 AM EST) to see the rest of the creations the CCEE Stampers created this week. You can also see more details of their creations on their individual blogs: