Thursday, July 31, 2008

Shiver Me Timbers!

Shiver me timbers ..... look what Hanna stamps have come up with now .... it's Pirate Hanna!!!! Doesn't she just look fabulous, this set will be released by Hanna Stamps this Friday 1st August.

This is yet another of the cards I created for the Dare to Get Dirty challenges over on SCS .... I just have a few left to show. This challenge was Jacksonbelle's challenge which was a color challenge combined with a faux stitching challenge. The colors we had to use for this one was pink & black .... perfect for Pirate Hanna don't ya think! I almost forgot about the faux stitching .... ooops but as you can see I finally fixed that problem. I added a faux cross stitch corner to the top right of my main image panel and also to little stitch corners on the sentiment.

The treasure map used here is actually a button I found in Dress It Up's pirate button set ... I just love there themed buttons they make fantastic embellishments.

Join us on the Hanna Stamps member forum of SCS for the release party Thursday 31st July at 9pm EST.... See some great preview peeks and participate in some fun prize challenges.

Recipe:
Stamps: Pirate Hanna Set - Hanna Stamps; Sentiment - The Cat's PJ
Paper: White; Black; Rose Red & Pretty In Pink - SU; DP - Unknown
Other: Black Ink; Distress Stripes Cuttlebug Embossing Folder; Pink Brads; Pomegranate Grosgrain Ribbon; Pretty In Pink SU Ink; Long Rectangle Nestabilities; Pirate Map Button; Foam Tape


Wednesday, July 30, 2008

Life is in Full Bloom!

Hi again, it is time for this weeks sketch challenge over on SCS. This was a nice quick and easy one ... just what I needed for today.

This image is one of the new Sweet Ebony designs available through Sugar Nellie ... I just love these images. I used my photo corner punch to punch our the corners on the image panel. I also added a row of paper piercing along the bottom edge of the sentiment.

Recipe:
Stamps: Planting Some Love - Sugar Nellie; Sentiment - MFT
Paper: White; Cool Caribbean, Rose Red & Blue Bayou - SU; DP - Heidi Grace
Other: Black Ink; Pomegranate Grosgrain Ribbon; Photo Corner Punch; Paper Piercing Mat & Tool; Foam Tape


Boo!

Boo! Hope I didn't scare ya haha! Today I have another new Hanna Stamps set to share with you that will be released on Friday 1st August. The set used here is called Trick or Treat, this is a mini set and it doesn't include Hanna ... but it is perfect for Halloween cards etc.

Of course this is another Dare to Get Dirty challenge card too .. this one is Rose Ann's Flap Card challenge. I used my circle nestabilities to create my circles for this card.

The Hanna Stamps challenge over on the Hanna Stamps member forum of SCS this week was to use some form of stitching on your card ... I went with faux stitching which I put around the flap of my card.


Here is the inside view of the card and more of the images that are included in this set. I also used the magnetic closures by Basic Grey to keep this closed ... if you haven't heard about these check them out they are fantastic. They are wafer thin and one is adhered underneath the inside panel so you can't see it and the other is attached under the scallop flap ... see that circle in the pic above. They work really well!

This is a close up of the inside.

Join us on the Hanna Stamps member forum of SCS for the release party Thursday 31st July at 9pm EST.... See some great preview peeks and participate in some fun prize challenges.

Recipe:
Stamps: Trick or Treat set - Hanna Stamps
Paper: White; Black; Pumpkin Pie - SU; DP
Other: Black Ink; Pumpkin Pie SU Ink; Celery Grosgrain Ribbon; Paper Piercing Tool; White Gel Pen; Magnetic Closure


Tuesday, July 29, 2008

Teacher Hanna!

Hi as promised yesterday I have the first of my sneak peaks of the new sets to be released by Hanna Stamps this Friday 1st August. The are 4 new sets that are being released, the first I am sharing with you is the "Teacher Hanna" set. I just love this set, who wouldn't like to be taught by someone like Hanna!

Surprise surprise this card also uses two of the Dare to Get Dirty challenges over on SCS. This time I decided to do Kitty's "Create a Scene" challenge .... I decided to do an indoor scene for my card. I created the blackboard using black card, sponged the middle section of the card to make the wall. I drew in the floor boards using a black marker and then colored them. Hanna was stamped on a separate piece of card and cut out and then attached over my scene using foam tape. The books used on this card are actually from the "Bookworm Hanna" set, everything else used here is from the Teacher set.

The second challenge I did here is the DTGD color challenge, we were to use Real Red, YoYo Yellow & Brilliant Blue ... which basically are the primary colors ... a perfect color scheme for a school themed card.

A couple of weeks ago while browsing a cheap shop, I discovered these cute school theme brads... the ruler and the apple ... so of course I had to use them on my card.

Join us on the Hanna Stamps member forum of SCS for the release party Thursday 31st July at 9pm EST.... See some great preview peeks and participate in some fun prize challenges.

Recipe:
Stamps: Teacher Hanna Set & Bookworm Hanna Set - Hanna Stamps
Paper: White; Black; Real Red, YoYo Yellow & Brilliant Blue - SU; School Stripe DP - Pebbles Inc
Other: Black Ink; White Brilliance Ink; Blue Grosgrain Ribbon; School Theme Brads; Foam Tape


Monday, July 28, 2008

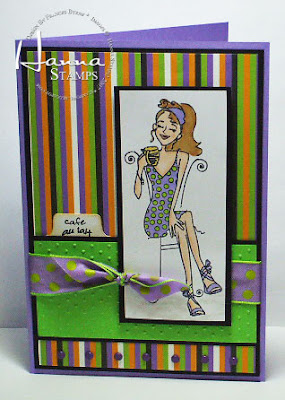
Hanna Cafe au Lait!


Happy Monday to you all, of course being Monday means it is time for another challenge I do with my goofy CCEE friends.

As it is the last Monday of the month that also means that the challenge we do is a supply challenge. A couple of months ago Deb sent all of the CCEE girls a wonderful parcel of ribbons, inside this parcel there was a special bag filled with an assortment of fancy ribbons. Deb instructed us to use something from inside that bag to create our card. We were orginally supposed to do this challenge 2 months ago but due to other commitments by some of the other CCEE members we decided to postpone it until now.

I picked out the purple with green polka dot ribbon for my card ... this is a little out of the box for me as I do tend to go for plainer ribbon most times. And pairing that with this stripe DP well that is way over the top for me ... but my DD assures me it is in fashion to use stripes & dots together so here goes!

Don't forgot to check out our CCEE Stampers blog to see the rest of my friends cards. You can also play along if you like, details are on our blog.

Of course I am still madly trying to get all those Dare to Get Dirty challenges done over on SCS ... I only have a few left to do .... again I used one of the DTGD challenges for this card ... this is Natasha's sketch challenge.

Tomorrow I will start giving you all a sneak peek of the new Hanna Stamps sets that will be released on Friday 1st August ... so don't forget to check them out.

Recipe:
Stamps: Cafe Hanna - Hanna Stamps
Paper: White; Black; Lavender Lace & Gable Green - SU; Spooky Stripe - Doodlebug Designs
Other: Black Ink; Swiss Dots Cuttlebug Embossing Folder; Tab Punch; Ribbon; Foam Tape


Clearly Pretty Bug!

Two more challenges I can cross off my list for the Dare to Get Dirty challenges that have been going on all this past week over on SCS.

Today is the last day of the challenges, and I have now finished them all ... although you won't get to see some of the others for another couple of days as I used new release stamps on those ones so I can't share just yet. I will also have another later today for my CCEE challenge that I did earlier.

The challenges used here are Rohla's "Clearly Size Matters", Rohla instructed us to make a 3 1/4" x 6 1/2" card and we also had to incorporate something clear on our card. Well I did change the size ever so slightly, only to accommodate it easier to metric measurements. And of course the clear part I went with a transparent card.

For the second challenge it was Jacksonbelle's "Color Challenge/Faux Stitching" the colors we had to use was pink & black and we also had to add faux stitching to our cards. I have done another for this particular challenge but again it is a new release so I figured it was easy enough to just use those colors again for this card.

The image I used here is another of the Lilly Ladybug stamps from alota Rubber Stamps.
I created the stitching along the edges of the pink card by using my new Tim Holtz ruler, which includes paper piercing holes.

Recipe:
Stamps: Lilly Ladybug & sentiment - alota Rubber Stamps.
Paper: White; Black; Pretty In Pink - SU; Acetate
Other: Black Ink; Paper Piercing Tool, Paper Piercing Ruler; Black Grosgrain Ribbon; Word Window Punch; Corner Rounder; Black Gems; Foam Tape.


Sunday, July 27, 2008

Howdy Ms Sheriff!

It's Sunday which means it is time for another MFT sketch challenge over on the MFT member forum of SCS.

I decided to go with a western theme and used the "Ride Em Cowboy" set. I used my rough diamonds cuttlebug embossing folder to create the texture on the river rock panel. I used the rectangle & circle nestabilities to create the scallop layers of my card.

Recipe:
Stamps: Ride Em Cowboy - MFT Stamps
Paper: White; River Rock, Buckaroo Blue & Chocolate Chip - SU; DP - Kaiser
Other: Black Ink; Close to Cocoa SU Ink; Circle & Rectangle Nestabilities; Rough Diamonds Cuttlebug Embossing Folder; Brown Brads; Foam Tape


Silhoutte Owl!

Hope you are all having a great weekend, I know I am as I am getting lots of time to play the Dare to Get Dirty challenges on SCS. On Saturday and Sunday there are 4 challenges each day.

My card today combines three of the DTGD challenges ... the first is Joan's silhouette challenge. I decided to go with this Inkadinkadoo Owl ... after all it has been a while since I have used an owl (at least 2 weeks LOL!)

The second challenge used here is Jen's DTGD sketch challenge, for some reason I flipped the sketch .... I guess when I printed it out it turned it around and I didn't go back and look at Jen's version online again. But I like it flipped anyway.

The third challenge was Laura's "Get Dirty" challenge ... I sponged ink around my owl panel to create a distress look to that piece. I also used my distressed stripes cuttlebug embossing folder to add texture to my river rock card andthen I sponged the raised areas with ink too, again to get a distress look.

I added the spiral clips to both ends of my ribbon for something a little different.

Recipe: Stamps: Owl - Inkadinkadoo
Paper: White; Black; River Rock & True Thyme - SU; DP - Heidi Grace
Other: Black Ink; River Rock & True Thyme SU Ink; Distressed Stripes Cuttlebug Embossing Folder; Brads; Spiral Clips; Grosgrain Ribbon; Foam Tape


Saturday, July 26, 2008

A Cupcake challenge or 2

Here is another card I just finished making for the Dare to Get Dirty challenges over on SCS. This one combines 3 challenges ... 2 of which are DTGD challenges, 2 are Taylor's Challenges & one is a sewing challenge.

All right, all right .... I know that 2 + 2+1 = 5 but in this case believe me it really does make 3 hehe! Ya see first up Taylor is hosting 2 challenges ... one her weekly TECC which she does on her blog Taylored Expressions, and the other one she is hosting is a DTGD challenge which is a cupcake challenge ..... well of course I combined the two right ... how easy was that ;) .

Well that was the easy part .... Julia's DTGD challenge today was to use stitching on our cards ... real stitching ... not that faux stuff which I would have had no problem with ... but real ... we could using a machine or we could sew by hand. Now I am a STAMPER ... not a SEWER ... I had parents who looked after the sewing and I threw my sewing machine out a year or two back when it decided that it would run whether the pressure foot was pressed or not ... scary. I have tried a couple of small sewing machines without much luck so kind of gave up on that idea.

Well today Julia changed all that ... and if her ears were burning ... that was most probably me cursing her hehe (nicely of course)! My DD who lives at home has a sewing machine so I got that out ... but she is out right now so I had to work out how to wind the bobbin, load the cotton and the bobbin let alone sew!!!!!!!!!! Anyway if you like around the edge of my designer paper I used on this card you can see I DID IT!!!!!!!!!!!!!!!!!!!!!!!!!!!!!!! yahhhhhhhhhhhhhhhh! Whether I will do it for another long long time who knows, but I did it .... and that was indeed a challenge for me!

Recipe:
Stamps: Cupcake Mouse - Whipper Snapper Stamps; Sentiment - Treehouse Stamps
Paper: White; Cool Caribbean, Purely Pomegranate & Pretty In Pink - SU; DP - Basic Grey
Other: Black Ink; Celery Grosgrain Ribbon; Blue Brads; Sewing Machine; Blue Cotton; Foam Tape


Simple Watercolored Flowers


Well I am still working my way through the Dare to be Dirty challenges over on SCS. Today's card combines two more of the challenges.

First up this is for Christine's "watercolor" challenge .... and I tell ya it took me forever to find my watercolor pencils, they had been relocated when I did the first section of my stamp room revamp and put in a safe place. So safe it took me about 30 mins to find them ........ arghhhhhhhhhh! But I finally did find them so I could watercolor my flowers.

The second challenge I did for this card was Sharon's "Stamp Simply" ... well I hope this is simple enough ... I so wanted to add other things, but I resisted that temptation.

Ok I am off to see if I can get some more of the challenges made today ..... there were 3 challenges posted today so I will see how I go .... fortunately you don't have to do them all on the day, we have a week or two to complete them.

Recipe:

Stamps: Flower - Simply Stated from Fancy Pants; Sentiment - Hero Arts
Paper: White; Purely Pomegranate - SU; DP - Basic Grey
Other: Black Ink; Long Rectangle Nestabilities; Watercolor Pencils; Pomegranate Ribbon; Foam Tape


Friday, July 25, 2008

Simpy De-Vine!

I am back again today with another card that I made for the Dare to Get Dirty challenges over at SCS. This card combines two more challenges ..... I am getting there! The challenges I did for this one include Holly's sketch challenge .... I had to do the sketch challenge cause I love doing sketch challenges. I also did Lauren's monochromatic challenge ... I do like the look of a monochromatic card, as you can see I went with a brown theme.

I found this designer paper while I was out shopping yesterday ... ok so I was supposed to be buying groceries not papers haha! The image used here is from High Hopes Rubber Stamps .... this is one I have had for a while but hadn't used till now ... I so love this image.

Still a few more challenges I want to try and catch up on which hopefully I will do today or tomorrow and share with you tomorrow.

Recipe:
Stamps: Monkey & Sentiment - High Hopes Stamps
Paper: White; Creamy Caramel & Chocolate Chip - SU; DP - Kaiser
Other: Black Ink; Brown Grosgrain Ribbon; Brown Brads; Foam Tape

Thursday, July 24, 2008

Black & White Inspiration

I am still working my way through the Dare to be Dirty challenges over on SCS. My card today is for Jenn's inspiration challenge .... she supplied a photo of a wonderful black & white cake that had a green bow wrapped around it.

I picked up on the black and white colors and also the flourishes that were all over the cake in the photo ... and of course I also had to have the green bow.

The flourishes were stamped using versamark ink and then embossed using white embossing powder ... wow I hardly ever emboss these days.

Recipe:
Stamps
: Flourishes - Autumn Leaves; Sentiment - Penny Black
Paper: White; Black
Other: Black Ink; Versamark Ink; White EP; Horizontal Slot Punch; Green Grosgrain Ribbon; Black & White Brads


Wednesday, July 23, 2008

alota Happy Day!

Well I am back with another card for you today ... this one is for this weeks sketch challenge over on SCS and I just had to use another one of those cute alota Rubber Stamps "Kids" images.

I used my long rectangle nestablities to create the scallop border around my image .... this time I shortened the rectangle rather than making it bigger but basically the process is just the same. I have had some queries about how this is done, so while I was creating my card I took some pics of the process and have created a tutorial for you all below.

Recipe:
Stamps: Kids set - alota Rubber Stamps
Paper: White; Blush Blossom, Pretty In Pink & Purely Pomegranate - SU; DP - Heidi Grace
Other: Black Ink; Cuttlebug Embossing Folder; Pomegranate Grosgrain Ribbon; Pink Brads; Pink Flowers; Foam Tape; Word Window Punch; Small Oval Punch


Tutorial for Joining (Shortening or Lengthening) Scallop pieces

For many of my cards the size of the scallop rectangle or square are not the size I need for the image I am using so I often either join two together or if it is too large ... make it so it is smaller.

Here I am showing you how to make the scallop rectangle shorter (I used the long rectangles), but it is the same process for when you want to join two together to make it bigger.


1. Use your nestabilities die to cut out your scallop piece .... here I used the long rectangle which I will shorten .... if you wish to lengthen, then you will need at least 2 pieces the same size & color.

2. As I am shortening I just cut my piece in half it does really matter where ... just make sure you get a nice need card at the bottom of the scallop. If you are lengthening your piece you will want to cut off at least the bottom scallop of the pieces so the rounded bottom scallop doesn't show when joined.

3. Place one of the pieces underneath your main image ... don't use any glue right now ... we are trying to work out where we need to join it ... once you have one underneath place the other piece underneath and position it how you want it to look when joined. (sorry no pics .. hard to hold two pieces and take a photo too). I normally count how many scallops down it is so I know where to apply my adhesive ... but you could also make a mark with a pencil if you wanted.


4. Apply your adhesive. I normally apply mine at both cut edges ... this will be at the back of the panel you see with the image still showing here ... and on the front of the other piece, this will make it nice and secure. You can cut some of the extra scallops you won't need if you wish ... normally I don't bother.

5. Here is my joined panel. Now all you have to do is attach your image onto it.


6. The closer the matting is to the scallop piece the harder it will be for anyone to see where you joined you piece ... I know I have had friends look at some of my joined pieces in the past and the only reason they find the join is because I told them it was joined and they have gone looking for it.

I hope that all makes sense ... and you have fun joining your scallop pieces.


Clean, Simple and White!

I can't believe I talked myself into making a card for Julie's "Embrace the White Space" which was another challenge for the Dare to be Dirty challenges today. We had to make a clean, simple white card .... which is what I did here.

Look Kim a one layer card from me ... don't fall over and faint and break your other foot LOL!

For those who haven't figured it out yet, this isn't normally the type of card I like to make ... there is nothing wrong with them when other people make em ... I actually like them when others make them ... it is just when I do something doesn't look right ... like it isn't finished! I do not know why ... but that is how it is anyway.

I used this cute little girl from alota Rubber Stamps ... isn't she just adorable .... she comes with a whole bunch of other kids in an unmounted plate. I have been wanting to play with these ever since I got them last week .... but until now haven't had the opportunity.

I used my score it board to create the score lines along the left & top edges and my paper piercing mat & tool to create the piercing under the sentiment.

Recipe:
Stamps: Kids set - alota Rubber Stamps; sentiment- Hero Arts
Paper: White
Other: Black Ink; Score It Board; Pink Grosgrain Ribbon; Pink Brads; Paper Piercing Mat & Tool


Another "Dirty" card

Get your mind out of the gutters girls it ain't that type of "dirty" card LOL ... this is for the Dirty Dare challenges being held on SCS this week. One of the challenges today was to create a masculine card ... I hope this is masculine enough ... and I thought it was a great sentiment to use to give to your DH or boyfriend ... don't you think!

The other day while browsing though the updated blog posts on my google reader I found a post from my friend Susan BlueRobot about creating lattice cards using the cricut. If you own a cricut and especially the design studio check out her blog cause she is just a wiz on that thing ... I wish I had more time to figure it out. Susan was inspired to create hers after discovering a post by Linda of Just for Sharing ... who has some wonderful lattice patterns etc that you can download and use on your cricut machine .... you do need to have the design studio though to be able to do this. Anyway I downloaded all the patterns ...thanks Linda and on Sunday I spent the afternoon just cutting out some card fronts using some of her patterns, so that I have a few to play around with when I need them.

The image used here is one of the new stamps that were released recently by H & M Stamps.

Recipe:
Stamps: Cozy on Up Set - H & M Stamps
Paper: White; Black; Really Rust & Chocolate Chip - SU
Other: Black Ink; George Cricut Cartridge; Oval Nestabilities; Black Brads; Foam Tape


Tuesday, July 22, 2008

Dare To Get Dirty!

It is Dare To Get Dirty time again over at SCS, I had so much fun participating in this last year that I have been looking forward to this years event. Past & present members of the Dirty Dozen will be hosting challenges over the next week ... 2 challenges per day on week days and 4 challenges on Saturday & Sunday.

For my card today I combined the first two challenges ... one of the challenges was to use vellum on our card. I added the vellum as a layer over my main image and then stamped my sentiment over the top of it ... this gives the image a nice subtle look! The second challenge was to use ribbon .... I love using the wide ribbon on my cards so I selected this wide ribbon from Papertrey Ink I got earlier in the year.

My card also works for this weeks OCC challenge over on Our Creative Corner's blog which was to use embossing on our card. I used my swiss dots cuttlebug embossing folder to create the embossing on the base of my card.

Recipe:
Stamps: Thomas Kinkade Christmas Village - CHF; Sentiment - Print Works
Paper: White; Always Artichoke; River Rock & Cranberry Crisp - SU; Vellum
Other: Black Ink; Always Artichoke SU Ink; Spring Moss Grosgrain Ribbon; Cranberry Eyelets; Swiss Dots Cuttlebug Embossing Folder


Monday, July 21, 2008

Real Jazzy Day!

It is Monday which means it is time for another challenge with my goofy CCEE friends. Todays challenge theme is one of my favorites of all the ones we do as it is our CNFS challenge which stands for Catchy Name Featured Stamper. Each month we select a member from SCS who has a catchy user name and we make a card using that as the theme and then send her all our cards.

This month the person we selected for our CNFS challenge is "Jazzytobi". The instructions we were given for this challenge was that our card must have something musical on it and the tea dying technique must be used.

Earlier this year I purchased this image & sentiment from Rubbernecker Stamps which I thought was perfect for this challenge ... the sentiment actually says birthday not day ... but with a little bit of masking I was able to just stamp the word day. I knew I would need these stamps one day bwahahahahahahahahaha!

For the tea dying, I just grabbed a teabag from my pantry .... placed it in some water for a few seconds to get it wet and then got rid of the excess water and used this to pounce onto my white card for my image and sentiment.

The background was created using the music wheel by SU. Hopefully Jazzytobi will like this, as it will be on its way to her shortly.

Don't forget to check out my CCEE friends cards over on our CCEE Stampers Blog. You can even participate in this challenge too, details are on our CCEE blog.


Recipe:
Stamps: Trumpet Player With Bubbles & Jazzy Birthday Sentiment - Rubbernecker Stamps; Music Wheel - SU
Paper: White; Black; Really Rust - SU
Other: Black Ink; Oval Punch; Black Brads; Music Button; Teabag; Foam Tape


Some News!

Elizabeth of Elzybells Art Stamps has just announced her new Design Team over on her blog. And look who made the team ............ ME!!!!!!!!!!!!!!!!!!!!!


That is me jumping up and down with excitement LOL!

Elzybells Art Stamps Design Team:

Alex Eaton, UK
Angel Rivera, USA
Beverly Rousch, USA
Charlene Austin, Canada
Dawn wheeler, UK
Deborah Southard, USA
Eva Costigan, USA
Frances Byrne, Australia
Inge Groot, The Netherlands
Jeanne Streiff, USA
Katie Stilwater, USA
Kim Fee, UK
Kitty Frampton, UK
Maria Adams, UK
Michelle Short, UK
Michelle Woerner, USA
Pam Fraser, UK
Paula Williamson, USA
Rachel Hope Baird, USA
Shannan Teubner, USA
Stephanie Mayne, UK
Tobi Crawford, Canada


I have added a blog roll on the side of my blog if you want to check out the other DT members blogs .... thanks to Shannan who had most of them linked in her blog post ... I still need to get Pam & Stephanie's links yet which I will add when I get them.


Sunday, July 20, 2008

Peppermint Just For You

My card here is for this weeks MFT sketch challenge ... did you know this week is the 40th sketch challenge posted to the MFT member forums. To celebrate this week if you participate you have a chance of winning a MFT stamp set, so why not head on over to the MFT Member Forums and check out the sketch.

I used one of the new Annie La Point flower images for my card today ... this one is the peppermint one. I stamp my image twice once on my white card and then onto my designer paper and cut out just the pot and layered this over my main image. I also used the same designer paper for the background of my card and the centre circle is actually the reverse side of the same designer paper.

The circle and the scallop rectangle were created using my nestabilities dies. The rectangle one was joined to get the size I needed.

I also got to use my new pomegranate ribbon. I also used my black adirondack alcohol ink to color the bookplate.

Recipe:
Stamps: Peppermint & Sentiment - MFT Stamps
Paper: White; Black; Purely Pomegranate - SU; DP - Daisy Bucket Designs
Other: Black Ink; Circle & Rectangle Nestabilities; Hodgepodge Hardware; Pomegranate Ribbon; Black Brads (lge & sml); Black Adirondack Alcohol Ink; Foam Tape


Saturday, July 19, 2008

Gridded Teapot!

My friend Cindy Motherway has started a Teapot Tuesday challenge over on her blog This is My Story. Cindy collect teapots and every week she is selecting a different teapot to use for an inspiration challenge.

Many years ago I used to collect teapots too ... so I have a few here .... not as many as Cindy does ... but I look forward each week to see what teapot Cindy is going to select, one day she might actually select a teapot I own hehe! Although many of the teapots I own are owls .... now why doesn't that surprise any of you LOL!

When I saw Cindy's blue & white teapots I immediately thought of the blue & white teapots with the willow pattern on them which reminded me of this PSX teapot I own ... so of course I had to play.

This card also fits this weeks "Try a New Technique" challenge over on the SCS. Which was to use the grid technique .... I used it on my white background panel .... after creating my grid I then carefully sponged the raised areas using Not Quite Navy SU Ink.

Recipe:
Stamps: Teapot - PSX
Paper: White; Not Quite Navy
Other: Not Quite Navy SU Ink; Photo Corner Punch; White Brads; Blue Brads; Score It Board; Grosgrain Ribbon


Friday, July 18, 2008

Merry Moosemas!

It is my turn to host the Hanna Stamps challenge over on the Hanna Stamps forum on SCS. As many of you know my favorite challenges are sketch challenges so I decided that my challenge this week would be a sketch challenge. Seeing I went with a Christmas theme for my card and it is also July .... I thought I would throw in a bonus challenge which is to make your card into a Christmas one ... we need to make a start on those Christmas cards right haha!

I used my circle nestabilites to create my circle layers. The background is created using the swiss dots cuttlebug embossing folder. I added white liquid applique to the snow and santa's beard & hat of my image. The sentiment I curved on my block so that I could stamp it around the edge of the circle ... that is one of things I love about clear stamps ... the ability to shape them how you need them and also being able to see exactly where you are stamping.

I would love you all to play along, if you don't have any Hanna Stamps please feel free to use whatever stamps you do have. Check out the Hanna Stamps Forum for more details.

Recipe:
Stamps: Santa Riley & Words Riley Would Say - Hanna Stamps
Paper: White; Real Red & Garden Green - SU; DP - Unknown
Other: Black Ink; Circle Nestabilites; White Liquid Applique; Swiss Dots Cuttlebug Embossing Folder; Red Brads; Red Grosgrain Ribbon; Foam Tape