Tuesday, February 28, 2017

Rebus - Songs by the Beach Boys


Hi everyone,

It's time to share another rebus puzzle swap with you

This month the theme is Songs by the Beach Boys


If you would like to solve my rebus puzzle, why not post a comment on my blog post with your answers. I will let you know what the correct answers are next time I post a rebus card here.

How did you go solving my November Rebus which was "Names of Groups of Animals". As mentioned last month, some of the names for the groups of animals can be used for other animals too, but the ones I have listed here is what I had chosen to rebus.Here are the correct answers so you can check how you did. 

  1. Parliament of Owls
  2. Rookery of Albatross
  3. Venue of Vultures
  4. Company of Parrots
  5. Rake of Mules
  6. Caravan of Camels
  7. String of Horses
  8. Muster of  Peacocks
  9. Pride of Lions
  10. Parcel of Crows
  11. Wisdom of Wombats


You can find all my past Rebus Cards here.


Monday, February 27, 2017

Happy Birthday


Hi everyone,

Today I am sharing another card I created using the Color Bleed Grid Technique which uses Copic Markers. I posted a card I made using this technique yesterday, I much prefer the background of the one I made yesterday. I used Copic Blending Solution only for the card I made yesterday, but for this one I started with just rubbing alcohol and then went over with the Copic Blending Solution, I think the one just with the Blending Solution bled a lot better than this one did ... lesson learned.

I have again used die cut images rather than stamped images to decorate my card today. This time round I have used the ModaScrap Ready To Bloom die and added a Birthday sentiment which was die cut using the Stitched Fishtail Banners.

The Copic Markers I used to create the Color Bleed Grid Technique for this card are: V09; BG57; RV55 and YG23.


I decorated the inside of my card using the ModaScrap Ready to Bloom die set which I used on the front of the card and added a sentiment from the Joset Designs Dream Sentiments Clear Stamp set.


Stamps: General Sentiments; Dream Sentiments - Elizabeth Craft Designs
Paper: White Soft Finish Cardstock; Dark Fuchsia Soft Finish Cardstock - Elizabeth Craft Designs; Black
Dies: ModaScrap Ready to Bloom; ModaScrap Stitched Fishtail Banners - Elizabeth Craft Designs
Other ECD Products: Clear Double Sided Adhesive Tape 101mm
Other: Black Ink; Foam Tape; Copic Blending Solution; Copics


Sunday, February 26, 2017

Follow Your Dreams


Hi everyone,

Today I am sharing a card I created using the Color Bleed Grid Technique using Copic Markers. This is such a fun and easy technique to create and as it has been a few years since I played with this technique thought I would have some fun without again.

Instead of using stamped images to decorate my card once I had created the background I decided to use die cut images. For my card today I have used the ModaScrap Dandelion Fluff die set. I die cut one large and two small dandelions and adhered them to my card.

For the sentiment I used the Joset Designs Dreams Sentiments which are layered onto the ModaScrap Stitched Fishtail Banners. I also added Black/Siliver Glitter Dots Peel Off Stickers to the bottom left and top right corners of my card.

The Copic Markers I used to create the Color Bleed Grid Technique for this card are: R27; YR07 and Y19.


For the inside of my card I die cut another dandelion which I placed on the card at an angle and then added a sentiment using the Stitched Fishtail Banners.

Stamps: Dream Sentiments - Elizabeth Craft Designs
Paper: White; Black; Red
Dies: ModaScrap Dandelion Fluff; ModaScrap Stitched Fishtail Banners - Elizabeth Craft Designs
Other ECD Products: Clear Double Sided Adhesive Tape 101mm; Black/Silver Glitter Dots Peel Off Stickers
Other: Black Ink; Foam Tape; Copic Blending Solution; Copics


Saturday, February 25, 2017

Wishing You a ....


Hi everyone,

It’s challenge time with the “Crazies” over on the Crazy 4 Challenges blog. Tammy Hershberger our challenge hostess for the month finishes off her month with one last challenge. 


"Use Your Words."  Please make the sentiment the focal point of your card.  Whether you choose to use a large sentiment, or maybe die-cut some words... whatever you decide, the words must be the focal point of your card. 

This challenge was definitely a challenge, not so much as I had to use words as a focal point that is pretty easy. But I normally challenge myself to incorporate some form of fancy fold when I do the "crazy" challenges, so the challenge was how to do that and keep the focal point the words.

As you can see in the end I decided to go with an accordion card using the Pop It Ups Gift Card Accordion designed by Karen Burniston for Elizabeth Craft Designs.


For the words I decided to use the A Way with Words "Wishing you a" and "Happy Birthday" die sets. I die cut the sentiments using white cardstock that had Clear Double Sided Adhesive Tape on the front. After removing the protective backing from the adhesive I covered the adhesive with Copper Rose Silk Microfine Glitter before attaching it to the card.


Here is a close up of the last two pages of my accordion card.


I felt that my card needed something else once I had added the sentiments, so I added some flowers using the new ModaScrap Happy Flowers die set.

Don't forget to check out the rest of the “Crazies” cards over on the Crazy 4 Challenges blog and also their individual blogs for more details.
Lisa Henke (February Guest Designer)


Paper: White Soft Finish Cardstock - ECD; Pink; Dots & Stripes DP - Echo Park
Dies: Pop It Ups Gift Card Accordion; Pop It Ups Flourish Gift Frame; A Way with Words Wishing You A; A Way With Words Happy Birthday 2; ModaScrap Happy Flowers - Elizabeth Craft Designs
Other ECD Products: Clear Double Sided Adhesive Tape - 152mm; Copper Rose Silk Microfine Glitter


Friday, February 24, 2017

Happiness


Hi everyone,

Today I am sharing a simple card using the new Krista Schneider Flower Power stamp set which was recently released by Elizabeth Craft Designs. 

I stamped one of the flower images from the stamp set all over my White Soft Finish Cardstock which had been die cut using the Stitched Rectangles die set.


After coloring the flowers I layered the rectangle panel onto a Dotted Scallop Rectangle card.

To finish off the card I added a sentiment from the new Dreams Sentiment Clear Stamp set which was layered using the ModaScrap Stitched Fishtail Banners die set.


For the inside of the card I used the Stitched Fishtail Banners die set and added two more sentiments plus a flower from the stamp set on the fishtail banner.

I also added another of the larger flowers on the top left hand side of the card.


Stamps: Flower Power; Dream Sentiments; General Sentiments; Just A Note Sentiments - Elizabeth Craft Designs
ECD Soft Finish Cardstock: White; Perfect Purple; Perfect Pink
Dies: ModaScrap Stitched Fishtail Banners - Elizabeth Craft Designs
Other: Black Ink; Copics


Thursday, February 23, 2017

Dreams Come True


Hi everyone,

It's challenge time with my friends over on the CCEE Stampers challenge blog. Liz Williams our challenge hostess for the month finishes off the month with one last challenge.

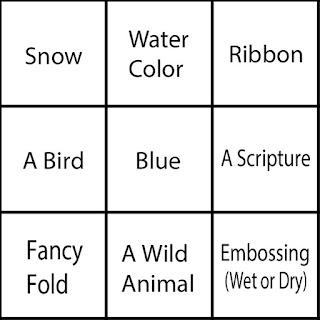
We are finishing off the month with a tic-tac-toe challenge. Select three things on the tic tac toe board below either vertically, horizontally or diagonally for the elements to complete your  card.


I was playing with the new Susan's Garden Fairy dies from Elizabeth Craft Designs. When I think about fairies, I also think about mushrooms etc so of course I had to combine both on my card today. 

As you can see I have created a pivot card using the Katie Label Pivot Card die set designed by Karen Burniston for Elizabeth Craft Designs.

As my card is a "Fancy Fold" and it also included "Blue" it was only a matter of figuring out how to include a ribbon on my card to make it work for the challenge. In the end I tied a ribbon around the fairies waist.


For the inside of the card I duplicated what I had done on the front adding a few extra mushrooms including a large one. I added two sentiments from the new Joset Designs Dreams Sentiments Clear Stamp set.


I love that the back of this style of card can also show a little bit of interest. As you can added the clouds to the blue cardstock as I did on the front & inside of the card using the Behind the Scenes Cloud & Grass Stencil also from Elizabeth Craft Designs.

As I had one mushroom left over from decorating the front and inside of the card I decided to add it to the back.

Don't forget to check out the CCEE Stampers blog (goes live 12 AM EST) to see the rest of the creations the CCEE Stampers created this week. You can also see more details of their creations on their individual blogs:


Stamps: Dream Sentiments - Elizabeth Craft Designs
Paper: White Soft Finish Cardstock - Elizabeth Craft Designs; Blue; Green DP - SU
Dies: Susan's Garden Garden Notes Fairy Rose Petal; Pop It Ups Katie Label Pivot Card; Pop It Ups Outside Edges; Joset Designs Mushroom - Elizabeth Craft Designs
Other ECD Products: Clear Double Sided Adhesive Tape; Cool Diamond Silk Microfine Glitter; PanPastel Set 1; All Metal Tool Set; Mini Molding Pad; Behind the Scenes Cloud & Grass Stencil
Other: Black Ink; Picket Fence Distress Paint; Crushed Olive Distress Ink; Festive Berries Distress Ink; Pumice Stone Distress Ink; Foam Tape; Copics


Wednesday, February 22, 2017

ECD February Coloring Designer Challenge


Hi everyone,

It's time for our February Coloring Design Team Designer challenge. Check out the Elizabeth Craft Designs blog today to see what all the talented designers created for the challenge.

Our challenge this month is ...... Things with Wings - Include something on your card this month that has wings … some  suggestions include birds; owls; bees; butterflies etc.


As you can see I used Krista Schneider's Feathered Friends Clear Stamps and the coordinating dies for my "Things with Wings".

I decided to create a birdhouse for my feathered friends and turned it into an Easel card.

*****************************

For today's challenge Elizabeth Craft Designs are giving away a "Things with Wings" prize pack which will include: Krista Schneider's Feathered Friends stamp & matching die set, ModaScrap Dancing Butterflies and Joset Designs Birds to 3 people.

To enter simply leave a comment on the Elizabeth Craft Designs Challenge post and tell us "What ECD product is on your wishlist?

We will select 3 lucky winners in a random drawing 

The winners will be announced on Friday, February 24 on the Elizabeth Craft Designs blog.

*****************************

Here is how I created my card -


Birdhouse - 

1. Cut a piece of designer paper that measures 4 3/8 inches x 5 inches. Also cut a piece of cardstock the same size as the designer paper. Adhere the designer paper to the cardstock.
2. Using the smallest circle from the Fitted Circles die set to create a hole in the designer paper panel where the dotted circle is shown in the photo above.
3. Use the straight edge from the Fishtail Borders die set, to create a reversed "V" edge at the top of the striped designer paper.

4. Cut a piece of polka dot designer paper 5 1/8 inch x 5 inches, layer onto a piece of     cardstock the same size for added strength.
5. Use the straight edge from the Fishtail Borders die set to create a reversed "V" edge at the top of the polka dot paper. Measure down approximately 1 inch from the first edge, reposition the Fishtail Border and die cut to create the roof.
6. Use the scallop edge from the Fishtail Borders die set and die cut a piece of black cardstock that measures 5 1/8 inch x 2 inches. Trim the top of the black scalloped Fishtail edge so that it will fit under the polka dot edge without being seen. Adhere the polka dot edge to the black scalloped edge and adhere to the top of the striped paper using foam tape.
7. Using the two smallest circles from the Fitted Circles die set, die cut a circle frame  from the polka dot paper. Adhere circle frame around the hole in the birdhouse.
8. Cut a piece of polka dot paper that measures 5 1/8 inch x 1/2 inch and adhere to the bottom of the birdhouse.


9. Using the Feathered Friends Clear Stamp set, stamp the three birds, leaves and flowers onto White Soft Finish Cardstock using black ink. Color images and die cut using coordinating dies.
10. Adhere the images to the birdhouse referring to photo above for placement using foam tape.
11. Cut a piece of black cardstock the same size as the birdhouse and die cut the the top of the birdhouse with the straight edge from the Fishtail Borders die set. Adhere this to the back of the birdhouse before attaching to the easel card.


Easel Card - 

1. Cut a piece of black cardstock that measures 4 1/4 inches x 9 1/2 inches. Score and fold along the the 9 1/2 inch side at 4 3/4 inches and 7inches. 


2. Cut a piece of blue designer paper 4 1/4 inches x 2 1/2 inches. Adhere this panel to the easel card so it is on the section between the two folds in the card.


3. Apply adhesive to the bottom 1/4 panel of the easel and attach the bottom of the birdhouse to this panel.


4. Cut a piece of green designer paper that measures 4 1/4 inches x 4 3/4 inches and adhere to the bottom panel of the easel.
5. Using the Stitched Fishtail Banners die set, die cut one fishtail panel from White Soft Finish Cardstock and one from black cardstock. 
6. Stamp the "happiness" sentiment from the Dreams Sentiments Clear stamp set using black ink onto the white fishtail banner. 
7. Layer the two panels together and adhere to the cards using foam tape (refer to photo above for placement).
8. Stamp three flowers from the Feathered Friends Clear Stamp set onto White Soft Finish Cardstock using black ink. Color and die cut the flowers using the coordinating die. Adhere along the bottom of the card.

That's it for me today, I hope you enjoyed my card and tutorial. Don't forget to check out the Elizabeth Craft Designs blog to see all the wonderful creations by our talented designers.


Supplies:

Elizabeth Craft Designs:

Other:
Cardstock - Black; Green; Pink
Designer Paper - Fancy Pants Feathered 12 x 12 Designer Paper; Kaisercraft Flirtatious 12 x 12 Paper; Graphic 45 Nook & Pantry Beaters 12 x 12 Paper; Fab Scraps Monkey See, Monkey Do 12 x 12 Paper
Inks - Black
Foam Tape
Copics

Tuesday, February 21, 2017

Believe


Hi everyone,

Today I am sharing a card I created using various dies and stencils recently released by Elizabeth Craft Designs.

Recently one Saturday I was decided to play with the new Susan's Garden Fairy dies. I created two of the Fairy - Rose Petal and one of the Fairy - Tiger Lily which is the one used on this card. I created a card using the Fairy - Rose Petal dies which you will see here on my blog on Thursday. The other sat in a container on my desk, ready for it to be made into a card. That was until my Grandson came to visit! He loves all my "things" and loves to play! So while we were otherwise occupied my Grandson was playing with my fairy! After they went home and I was taking the photos of the other card which I had finished just before he arrived I went looking for the other fairy and couldn't find it ..... hmmm! I messaged my daughter who asked my Grandson if he had touched it ... yes .... where did you put it???? Under the desk! I looked and couldn't find it, so my other daughter had a look with a torch and finally found it sitting on top of my compressor which is under the desk. Although a little wrinkled the fairy was ok still to use on a card. Gotta love him!!!!!


For the background at the top of the card I used the new A Way with Stencils - Dotty stencil. First I used the stencil and added orange dots and then I repositioned the stencil to add the yellow dots. If you look at the photos above you can see how I achieved this look from the stencil

For the bottom part of the front of the card I used the ModaScrap Lace Pocket I die cut this using White Soft Finish Cardstock that had Clear Double Sided Adhesive Tape on the front. I removed the protective backing from the adhesive and covered the adhesive with Cool Diamond Silk Microfine Glitter. I layered this onto a piece of Sunflower Soft Finish Cardstock.

To finish of the front of the card, I die cut the A Way with Words - Believe sentiment twice from Bright Orange & Olive Twist Soft Finish Cardstock. I layered the two sentiments together offsetting the orange one slightly and adhered it to the bottom of the card.


For the inside of the card I added two sentiments using black ink. I also used the A Way with Stencils - Butterflies and Stars Stencil to add the stencilled stars around the sentiment. The stars were stencilled using yellow and then orange inks.

Stamps: Dream Sentiments; General Sentiments - Elizabeth Craft Designs
ECD Soft Finish Cardstock:  White; Sunflower; Bright Orange; Olive Twist
Dies: Susan's Garden Fairy Tiger Lily; ModaScrap Lace Pocket; A Way with Words Believe - Elizabeth Craft Designs
Other ECD Products: Clear Double Sided Adhesive Tape; Cool Diamond Silk Microfine Glitter; PanPastel Set 1; All Metal Tool Set; Mini Molding Pad; A Way With Stencils Dotty; A Way With Stencils Butterflies and Stars
Other: Carved Pumpkin Distress Ink; Yellow Ink;  Brown Multi Liner Copic Marker


Monday, February 20, 2017

Howdy


Hi everyone,

I have another shaker card to share with you today, as you may have noticed I have been in a shaker mood lately as this is my third shaker card in a week and a half.

I wanted to do something different then the normal shaker I usually do, so decided to die cut 3 circles on my card to create 3 shaker panels.

To decorate my card I used this cute Cowboy Dog from the Simon Says Stamp! Critter Costume Party. I stamped cowboy themed sentiments into two of the shaker circles and in the third I added the number "7". My Grandson is turning 7 this year, so someone can give this card to him or give it to one of his friends birthday parties he will be invited to.


For the inside of the card I used the same designer paper I used on the outside and added a large sentiment.

Stamps: Critter Costume Party - Simon Says Stamp!; It's a Western Thing - The Cat's Pajamas; Happy Birthday - Rubbernecker
Paper: White; Brown; Teal; Thoroughly Modern DP - Stampin' Up
Dies: Stitched Circles; Fitted Circles - Elizabeth Craft Designs
Other ECD Products: Clear Double Sided Adhesive Tape 64mm
Other: Black Ink; Sequins; Foam Tape; Copics


Sunday, February 19, 2017

Par for the Course!


Hi everyone,

Today I am sharing a card I made for a very good friend who celebrated her birthday a couple of days ago. My friend loves playing golf and for as many years as I can remember I have created a golf themed card to give to her for her birthday. After all this time she more or less expects it from me haha!

In past years I have normally been able to use a stamp set that I have purchased during the year for her card, but as I didn't buy any last year I decided to pull something out of my stash. I purchased this fun Tom Fun Golf Nutz stamps some years back from the old Cornish Heritage Farms. Unfortunately it has long been discontinued, but those "nutz' were the perfect size to use to create a Twist Circle Panel Card. So that is what I did.


For the base of my card I used the Pop It Ups Twist Circle Pop Up die set designed by Karen Burniston for Elizabeth Craft Designs. I then used Karen's tutorial to convert it into a Twist Circle Panel Card, you can find the tutorial here

I also pulled out my favorite grass and cloud stamps to create the golf scene on the four panels.

The "Happy Birthday" on the bottom section of the card is from the Pop It Ups Happy Birthday Pop Up die set.


I used the last of my "golf" designer paper on the front of the card. I am happy that I was able to make at least 3 cards from this paper over the years I have had it. Unless there is another sheet hiding somewhere, that is it. I will have to start looking for something else for next year ;)


Here is a closer look at my card as it is starting to close


And one final photo as the card is closing. You can see how the accordion panel folds together in the closed position.

Stamps: Tom-Fun Golf Nutz - CHF; Golf Set (Par for the Course) - Clear Dollar Stamps; Fore, Three Two One - Rubbernecker Stamps; Grass - Rubber Baby Buggy Bumpers; Cloudy Impressions - Mostly Animals
Paper: White; Blue; Green; DP
Dies: Pop It Ups Twist Circle Pop Up; Pop It Ups Happy Birthday Pop Up; ModaScrap Stitched Fishtail Banners; Stitched Circles; Dotted Scallop Circles
Other: Black Ink; Foam Tape; Copics