Saturday, February 29, 2020

Beers, Cheers


Hi Crafty Friends,

It’s challenge time with the “Crazies” over on the Crazy 4 Challenges blog. Kathleen Adams our challenge hostess for the month, finishes off the month with one last challenge.

Apparently today is “Open That Bottle Day”! Who knew? So for our challenge today we are to make a card of “Celebration”!  

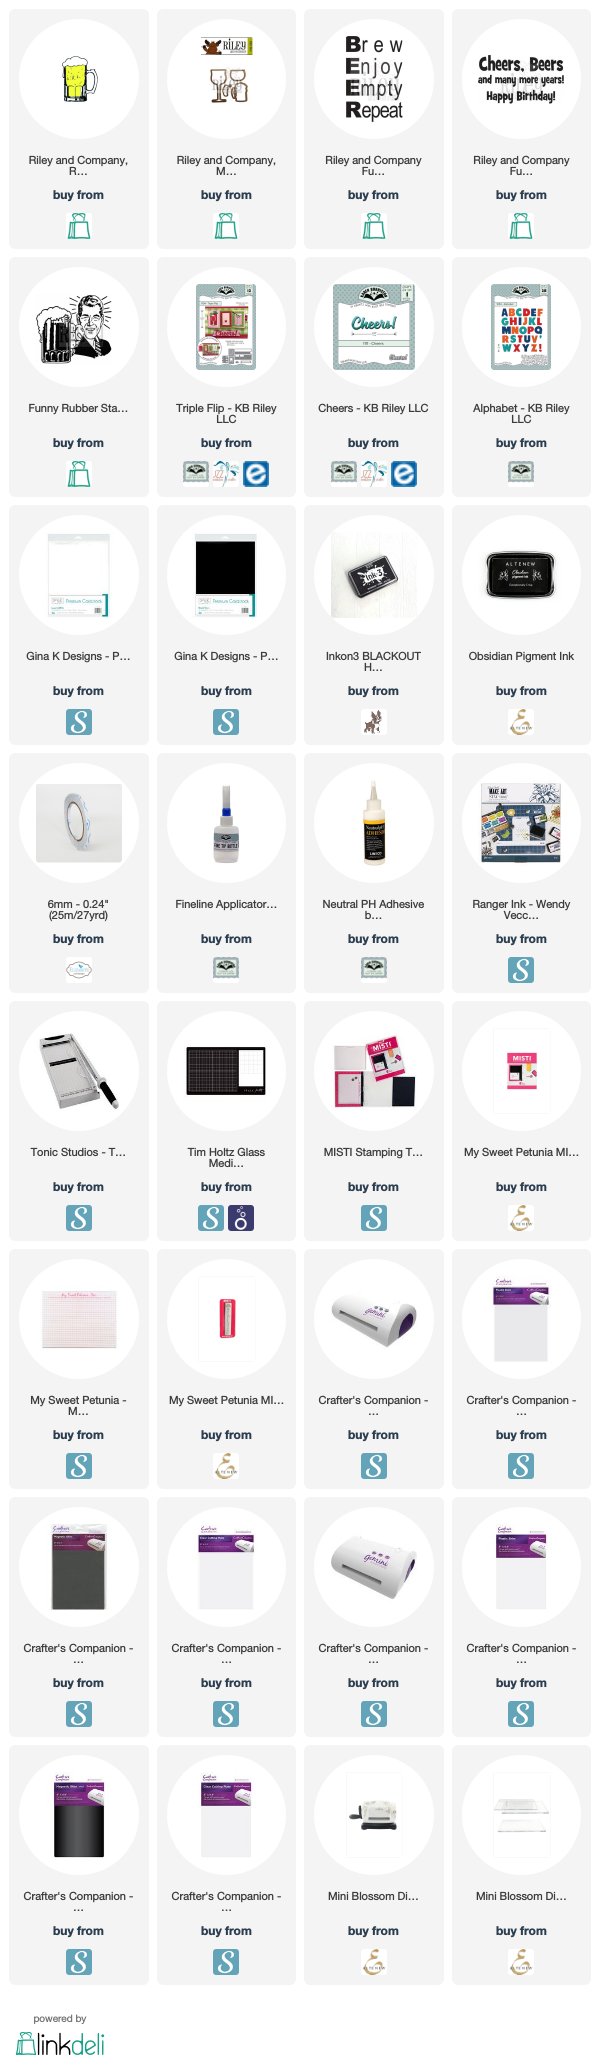
I had planned to use another card for this challenge,  but at the last minute I had to pull it and will have to wait a month or two before I can post it. Fortunately I was making this card for someone anyway, so it was easy enough to substitute my card. As beer can come out of bottles, I figured it was perfect for this challenge.

For my card today I decided to create a Triple Flip Card using Karen Burniston's Triple Flip Card die set. 

As you can see I created a male themed birthday card by using stamps from Riley and Company. The small beer mug is the perfect size for the triple flip panels. For the centre panel I used one of Riley and Company's Funny Bones sentiments "Brew Enjoy Empty Repeat" if you read the first letters of each of the words downwards it spells beer!


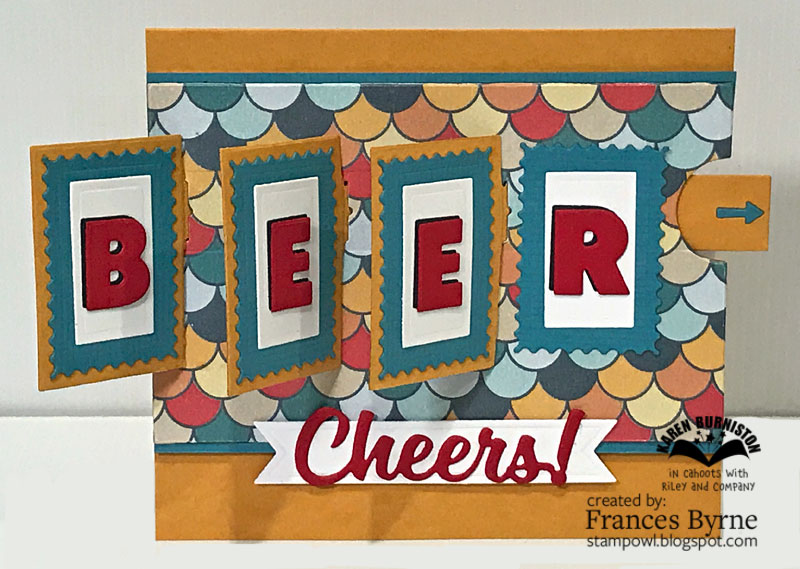
When you pull the "pull tab" at the side of the card, the 3 panels flip to the left revealing something underneath. On this card I used Karen Burniston's Alphabet die to spell the word "Beer" it seemed to be appropriate for this card. I die cut the letters from red and black cardstock and then offset the red letters over the black slightly so there was a slight shadow under each of the letters.


For the inside of my card I used two more stamps from Riley and Company. I just love that Cheers, Beers sentiment and it seems perfect to use for this card with what I used on the front of the card. 

Don't forget to check out the rest of the “Crazies” cards over on the Crazy 4 Challenges blog and also their individual blogs for more details.


Supplies:
For your shopping convenience, all products are linked below. Compensated affiliate links are used where possible with no extra cost to you. This helps me to continue to share all the projects I include on my blog. For the benefit of my Australia readers, I have started to include some links to Australian stores when available. Please note I only use and share products I love.


Friday, February 28, 2020

Fore!


Hi Crafty Friends,

Today I am sharing a card I made for a very good friend who celebrated her birthday about a week ago. My friend loves playing golf and for as many years as I can remember I have created a golf themed card to give to her for her birthday. After all this time she more or less expects it from me haha!


I had the idea to use the Surprise Ball Pop-up as a golf ball back in December. At the time I was busy with Christmas cards etc and I didn't need the card until the end of February, so I just wrote my idea onto my to do list for February. I then saw a card made by lilyhearts2day who had a similar idea, she had used some grass patterned paper and some golf ball pattern designer paper which I liked. As I was able to find both on Scrapbook.com and I had a few other things in my cart, I decided to order them. The black circle for the hole in the golf course was also an idea I got from the card on instagram, but other than that I kept with my idea I had in December.


Here is a quick video to see my card in action.


I used Karen Burniston's Surprise Ball Pop-up die set to create the pop-up golf ball on my card. I die cut the main die twice from white cardstock and then used the patterned paper which I created using an image online for the detail layer.

I added a black circle to the front of the card, so it looks like the golf ball is about to roll into the hole ... that is the aim of golf after all!

After so many years of making golf themed cards for my friend, I have accumulated a lot of golf themed sentiments, so I added on to the top of the golf ball .. which is an older Rubbernecker Stamps stamp.

I added the golf ball to the front panel of the card, so that the card can either be displayed flat or in the folded position so you can see the image on the back panel.


I added another sentiment to the back panel of my card, this time using a stamp from an older stamp set from Clear Dollar Stamps. I also added Magnolia Stamps Golf Tilda to the back panel ... she is swinging a golf club, so maybe she is trying to hit the golf ball hehe!


I kept the front of the card fairly simple seeing the focus of the card is the inside. The golf ball patterned paper I purchased, the pattern was too big for the golf ball but was perfect for the front of the card. 


I created a belly band for my card, to help keep the card closed. I added a golf cart that I received for Christmas which is from Paper Rose Studio.


Here is a look at the front of the card, complete with the belly band ready to be placed in an envelope.


Supplies:
For your shopping convenience, all products are linked below. Compensated affiliate links are used where possible with no extra cost to you. This helps me to continue to share all the projects I include on my blog. For the benefit of my Australia readers, I have started to include some links to Australian stores when available. Please note I only use and share products I love.

Fore! Three Two One sentiment stamp - Rubbernecker Stamps (retired)
Live, Laugh, Golf Stamp set - Paper Pretties (retired)
Golf Set - Clear Dollar Stamps (retired)
Golf Tilda - Magnolia Stamps 


Thursday, February 27, 2020

You're Owl Old


Hi Crafty Friends,

It's challenge time with my friends over on the CCEE Stampers challenge blog. Anne Harmon our challenge hostess for the month, finishes off the month with one last challenge.

Anne tells us that pocket cards are fun, so for our challenge this week we were to make a pocket card of some sort.


Earlier in the month I made a Penguin & Panda Surprise Ball Pop-up animals. I also made pockets for the animals to be put in, so that I could use this to present the animals to the recipient. Since then I have also been wanting to make an owl, so I thought this was the perfect opportunity to make it.

The owl is sitting on a branch of a tree that is attached to a circle using the Crosshatch -Ovals die set. I also added a sentiment to the front of the circle.


Here is a quick video to see my Owl Surprise Ball Pop-up in action.


To create the owl I used Karen Burniston's Surprise Ball Pop-up die set to create two balls which were both die cut from tan cardstock. I then die cut another one die from beige speckled paper and added this to the front of the bottom all for the owls belly.


I added the owls tail by using folding a piece of tan cardstock in half. I then used a segment that was left over from a previous surprise ball to cut out the shape of the segment, so that the wider side of the segment was placed on the fold. I then used a scalloped border die to die cut the bottom panel to give it a fancy edge. I die this twice so I could have a wide tail. I die cut another scalloped border from tan cardstock and patched this on either side of the tail piece cut previously to fill in the gap.


I die cut two ovals from the Crosshatch - Ovals die set to use for the owl wings which I placed on either side of the owl. 

The ears were created using a kite shaped die and then altered slightly to get the look I wanted.


I die cut another circle using the Crosshatch - Circles die set and stamped an owl themed sentiment from Art Impressions. This was then attached underneath the circle the owl is attached to.


Of course I needed a pocket for my owl which is what the challenge is about! I created a simple rectangle pocket and added some owl patterned paper on the front. I added the sentiments over the paper for some extra interest. 

I added the "Pull Here" to the centre of the right hand side of the card so the recipient knows to use the tail to pull out the owl.

Don't forget to check out the CCEE Stampers blog (goes live 12 AM EST) to see the rest of the creations the CCEE Stampers created this week. You can also see more details of their creations on their individual blogs:

Supplies:
For your shopping convenience, all products are linked below. Compensated affiliate links are used where possible with no extra cost to you. This helps me to continue to share all the projects I include on my blog. For the benefit of my Australia readers, I have started to include some links to Australian stores when available. Please note I only use and share products I love.

Chatting Whoots Stamp set - Art Impressions (retired)
Birthday Owl Stamp Set - Lil' Inker Designs (retired)


Wednesday, February 26, 2020

Imagining I'm With You Right Now


Hi Crafty Friends,

My card today is for a challenge I do with a friend of mine. Each month we challenge each other to create something using supplies we all own.

Last month when we went shopping together we both purchased MFT Stamps Magical Friends stamp set, so we decided to use that stamp set for our challenge today.


I love pop-up cards, so I decided to create one using this stamp set. As one of the images in the stamp set was a flying dragon, it was easy to decide to use Karen Burniston's Katherine Label Pop-up for my card today.

I stamped each of the dragons and children as well was a bunch of the flower images and cut them out using my Scan N Cut.

For the card I added a rectangle panel of blue patterned paper to each side of the card. I used Lawn Fawn's Grassy Hillside Border to die cut green cardstock and then used Catherine Pooler's Garden Party ink to sponge around the top and sides of the grass.


I die cut a lot of clouds and sponged them using Catherine Poolers Pink Champagne ink. I used the largest cloud to add a sentiment also included in the stamp set.

I also added the thought bubble and another of the sentiment to the dragon that is with the girl & book.


I added the Katherine Label Pop-up to the right side of the card and adhered the flying dragon & clouds to the pop-up.

I added another of the thought bubbles to the other dragon with another of the sentiments from the set.


I kept the front of the card fairly simple, seeing the inside is the focus of the card. I repeated a few of the elements that I used on the inside to create a simple scene.

Supplies:
For your shopping convenience, all products are linked below. Compensated affiliate links are used where possible with no extra cost to you. This helps me to continue to share all the projects I include on my blog. For the benefit of my Australia readers, I have started to include some links to Australian stores when available. Please note I only use and share products I love.


Tuesday, February 25, 2020

Rebus - Meryl Streep Movies


Hi Crafty Friends,

It's time to share another rebus puzzle swap with you. This month the theme is Movies Starring Meryl Streep.

If you would like to solve my rebus puzzle, why not post a comment on my blog post with your answers. I will let you know what the correct answers are next time I post a rebus card here.

How did you go solving my January Rebus which was "Abba Songs". Here are the correct answers so you can check how you did.

  1. Fernando
  2. Mamma Mia
  3. Waterloo
  4. Take a Chance on Me
  5. Ring Ring
  6. Money Money Money
  7. Dancing Queen
  8. The Winner Takes It All


You can find all my past Rebus Cards here.


Monday, February 24, 2020

Hope Your Birthday IS On Point


Hi Crafty Friends,

A couple of weeks ago I mentioned in a post that Slimline Cards had become very popular and a couple of stamp companies had released dies to help make this style of card. In my previous post I shared a Slimline Card using a Slimline die from Whimsy Stamps. Today I am sharing a Slimline card I created using Slimline dies from Trinity Stamps.

These Slimline dies are made to work to make a card that measures 8 1/2 inches x 3 1/2 inches, they fit into a business size envelope.

For my card today I used Trinity Stamps Slimline Stitched Card Panels & Windows die set for the main panel and Slimline Scallop Card Panels & Banners die set for the scalloped layer. The Scalloped panel is adhered to a side folding white card measuring just under the 81/2" x 3 1/2".

I die cut two of the stitched panels. On the first I used inks from Catherine Pooler Designs in Shea Butter; Tiara; Sauna & Tiki Torch inks to the top portion of the card.

For the second stitched panel, I die cut "hills" using Lawn Fawn's Stitched Hillside Borders die set. Trinity Stamps does sell a die set that let's you die cut a 8 3/4 inch hill, clouds and grass, but as I was die cutting on the narrow width rather than the long side, it was easier to use the Lawn Fawn ones being they were shorter and easier to go through the die cutting machine easily.

I used Distress Oxide inks in Antique Linen, Brushed Corduroy and Vintage Photo to each of the four die cut hills. I then used Vintage Photo ink to splatter ink over each of the hills. These were then mounted to the bottom section of the card.

To decorate my card I used Cacti images from MFT Stamps Let's Stick Together stamp set.

I did some surgery on the sentiment to make it a two line sentiment rather than one line. This was stamped onto black cardstock using white embossing powder and then die cut using one of the rectangle banners from Honey Bee Stamps Banner Builders die set.


For the inside of my card I added two sentiments. The cactus sentiment is from the Let's Stick Together stamp set, and the birthday one is from MFT Stamps Bitty Birthday Sentiments.

I added two more of the cacti images to the inside of my card.


Supplies:
For your shopping convenience, all products are linked below. Compensated affiliate links are used where possible with no extra cost to you. This helps me to continue to share all the projects I include on my blog. For the benefit of my Australia readers, I have started to include some links to Australian stores when available. Please note I only use and share products I love.


Sunday, February 23, 2020

Pocket Full Of ...


Hi Crafty Friends,

Today I am sharing a Magic Iris Card I created using Lawn Fawn's new Magic Iris die set. As soon as I saw a sneak peek of this die set early in the new year, I knew it was a must have. It was finally Lawn Fawn's release day last Thursday and as my local store had them in stock and I had put in a preorder I was able to get them in my hands on Friday, thanks to express post.

Of course I had to pull out the Magic Iris die set and create a card using it. I wanted to do something different than what I had already seen done by the Lawn Fawn Design Team, so after a little thought I decided to pull out my Honey Bee Stamps Stacking Pocket dies which I have also wanted to play with and make a pocket card where the inside of the pocket is revealed when you pull the tab.


Here is a quick video to see my card in action.


I had recently come across this denim patterned paper in my stash which I had already put aside for whenever I made a pocket card using Honey Bee Stamps Stacking Pockets die set. So I used that to die cut my pocket, the cover and layers for the Magic Iris.

I used a white pen to highlight the stitching around the pocket and the cover.  To make my card look a little more like the back of a pair of jeans, I added another panel of denim paper to create a "belt" at the top of the card. 

I used Honey Bee Stamps Pocket Full Of Love stamp and coordinating die set to add the decorations to the jeans/pocket and the sentiments.


When you pull the tab at the top right hand side of the card down, the panels in the centre of the pocket magically disappear and reveals an image and/or sentiment inside.

As I wanted to make this card into a birthday card, I decided to create a birthday scene inside the pocket using the new Honey Bee Stamps "High Five" stamp set. I also added a tiny birthday sentiment which is from Hero Arts Mini Messages stamp set.


In the photo above, you can see the images of my card with the magic iris closed, starting to open and then finally fully open to reveal the bear and balloons.


For the inside of the card, I added the left over strip of patterned paper to the left side of the card, that I used on the front of the card.

I added a smaller pocket to the white area of my card and then stamped a birthday sentiment over the top of the pocket.

Supplies:
For your shopping convenience, all products are linked below. Compensated affiliate links are used where possible with no extra cost to you. This helps me to continue to share all the projects I include on my blog. For the benefit of my Australia readers, I have started to include some links to Australian stores when available. Please note I only use and share products I love.

Birthday Wishes Stamp Set - Stampendous


Saturday, February 22, 2020

Dog Gone It!


Hi Crafty Friends,

It’s challenge time with the “Crazies” over on the Crazy 4 Challenges blog. Kathleen Adams our challenge hostess for the month, continues to issue the challenges.

Apparently today is “Walk the Dog” day!  Put a dog or any kind of pet on your project.  It could even include a picture of your pet!


I have had this Simon Says Stamp Bone-A-Fide stamp set for a while sitting on my desk waiting to be used, so I thought this challenge was the perfect opportunity to use it. I make so many female themed card that I decided to create something that would be suitable for a male for today's challenge.


I created a Sliding Window Card using the die set from Sunny Studio Stamps. When you pull the tab at the top of the card, the centre portion of the card pops up revealing a message underneath. 

For the background of the panel on the base of the card I created an ombre background using Distress Inks in Weathered Wood, Faded Jeans and Chipped Sapphire. I then used a Newton's Nook Woof Stencil to add the stencilled background on this panel before die cutting the Sliding Window Card.


The two sentiments stamped in black are three of the stamps included in the Bone-A-Fide stamp set. I also added a sentiment using Taylored Expressions Simple Strips - Birthday stamp & die set to the bottom of the cake.

The pull tab at the top of the slider is from Lawn Fawn's Double Slider Surprise die set.


I kept this card as a flat card rather than adding it to a folded card. I created a stencilled background to the bottom of the panel, the same as the front of the card.

I added sentiments from Lawn Fawn's Critter Chatter stamp set and another of the sentiments from Simon Says Stamp Bone-A-Fide stamp set.

Don't forget to check out the rest of the “Crazies” cards over on the Crazy 4 Challenges blog and also their individual blogs for more details.


Supplies:
For your shopping convenience, all products are linked below. Compensated affiliate links are used where possible with no extra cost to you. This helps me to continue to share all the projects I include on my blog. For the benefit of my Australia readers, I have started to include some links to Australian stores when available. Please note I only use and share products I love.