Friday, September 30, 2022

Let It Snow


Hi Crafty Friends,

I have Christmas card to share with your today, using items from the September 2022 Papercraft Society Kit available from Craft Stash. I hadn't planned on getting this kit, however I must have signed up for the next kit which is one by Sam Calcott of Made To Surprise, a few hours before the cut off time for the September kit. As it doesn't snow where I live and it is summer at Christmas, this was one I probably would have normally ignored, but seeing I have it I had fun making my card.


For the card base, I used another of the Creative Craft Products Easy Fold Die sets. This one is the Hexagon Easy Fold die set. I added a holographic layer before the patterned paper and the base for a little bit of extra fun.

I die cut the snowflakes included in the kit using silver glitter cardstock and vellum, both these products were also in the kit. As well as the dies and stamps used.


On the inside of my card, I added a strip of the patterned paper and two more snowflakes, this can be seen when the card is closed.

I also added the "Dreaming of a White Christmas" to the white area of the card.


Rebus - Kylie Minogue Songs


Hi Crafty Friends,


It's time to share another rebus puzzle swap with you. This month the theme is "Kylie Minogue Songs".

If you would like to solve my rebus puzzle, why not post a comment on my blog post with your answers. I will let you know what the correct answers are next time I post a rebus card here.

How did you go solving my August Rebus which was "Books written by Jeffery Archer"

 Here are the correct answers so you can check how you did.

  1. Kane and Abel
  2. The Sins of the Father
  3. Sons of Fortune
  4. Shall We Tell The President
  5. Heads You Win
  6. A Twist in the Tale

You can find all my past Rebus Cards here.


Thursday, September 29, 2022

Fa-Brew-Lous Birthday


Hi Crafty Friends,

It's challenge time with my friends over on the CCEE Stampers challenge blog. Kelly Santi our challenge hostess of the month continues to issue the challenges.

Apparently today is National Coffee Day! Yes this is a definite holiday in my eyes! Make a card using any coffee theme. Coffee images, coffee dyed paper, etc.

As you can see I created a Slimline card using mostly products from Trinity Stamps, especially for the front of my card. The coffee mug background is one I have had for a while now waiting to be used and this was the perfect opportunity ... it's called Fa-Brew-Lous and is a Slimline stamp which includes this background, a number of sentiments and some extra coffee themed images.

To create the Slimline card I used Trinity Stamps Slimline Stitched Card Panels & Windows and Slimline Scalloped Card Panels & Banners die sets. I layered the panels to a top folding 3 3/4 inch x 8 3/4 inch Slimline card.

For the sentiment I used the "FA-BREW-LOUS" from the Trinity Stamps stamp set and used words from Honey Bee Stamps Rainbow Dreams stamp set to create the birthday sentiment. I die cut the sentiment using one of the banner dies included in the Slimline Scalloped Card Panels & Banners die set.


For the inside of my card, I used the Coffee Word die from La La Land Crafts. I then added the "A Hug in a Mug" using an older Honey Bee Stamps Perfect Blend stamp set.

Finally I added the two coffee mugs from the Trinity Stamps stamp set.

Don't forget to check out the CCEE Stampers blog (goes live 12 AM EST) to see the rest of the creations the CCEE Stampers created this week. You can also see more details of their creations on their individual blogs:


Other Supplies:
Perfect Blend Stamp Set - Honey Bee Stamps (discontinued)


Wednesday, September 28, 2022

Hollyhock Friend

Hi Crafty Friends,

I have a Mini Slimline card to share with you today.

This time around I pulled out another of the Creative Expressions Edger dies to create my card. This one is the Hollyhock Edger die. I covered my mini slimline card with pink glitter cardstock. I then cut a rectangle panel the same size as the mini slimline card and used the edger die to cut along the bottom edge of the card, I adhered this over the glitter front.

For the sentiment I used one of the sentiments included in a Made To Surprise stamp set, which I stamped to the top right hand corner using black ink.

I pulled out Spellbinders' So Many Butterflies die set to create the little butterflies which I randomly adhered to my card. I also added a silver pearl to the centre of the full flower.


I adhered a strip of glitter cardstock along the bottom edge of my card. 

I added the birthday sentiment which is also included in the same stamp set as the one on the front of my card. I also added two more of the tiny butterflies.


Tuesday, September 27, 2022

Christmas Wishes


Hi Crafty Friends,

Thanks for visiting my blog. As you can see I have a Christmas card to share with you.


Earlier in the month I shared my first Christmas card for 2022 when I used the new Karen Burniston Fireplace Pop-up die set in a Slimline card. The card had plenty of room on the side of the fireplace to add other details like a tree etc, but not much room above the fireplace for anything. Today I decided to share a 5 inch square version where I was able to use more of the accessories to decorate above the fireplace. I love that this die set will fit in all sizes of cards that we like to create.

The accessories for the fireplace above and around come from the Fireplace Extras 1 and Fireplace Extras 2 die sets


It's hard to tell by the photo above, but if you look carefully you can see that Santa is trying to come down the chimney ... see his boots! I think you can tell a little better by the side view photo above. In real life, it is a lot easier to see and the boots jiggle around a little too.

I used two oval dies from the Ovals - Crosshatch die set which I added in front of the fireplace, this serves as a rug and a place to add a Christmas sentiment.


I kept the front of the card simple, as the focus is on the inside of this card, I added the left over strip of patterned paper and then added the Merry Christmas sentiment using the Merry Christmas and Merry Christmas Shadow die sets.


Monday, September 26, 2022

Noel


Hi Crafty Friends,

Yesterday was the 25th September which made it just 3 months to Christmas!!! Scary isn't. So for my card today I have decided to share a Christmas card I created.

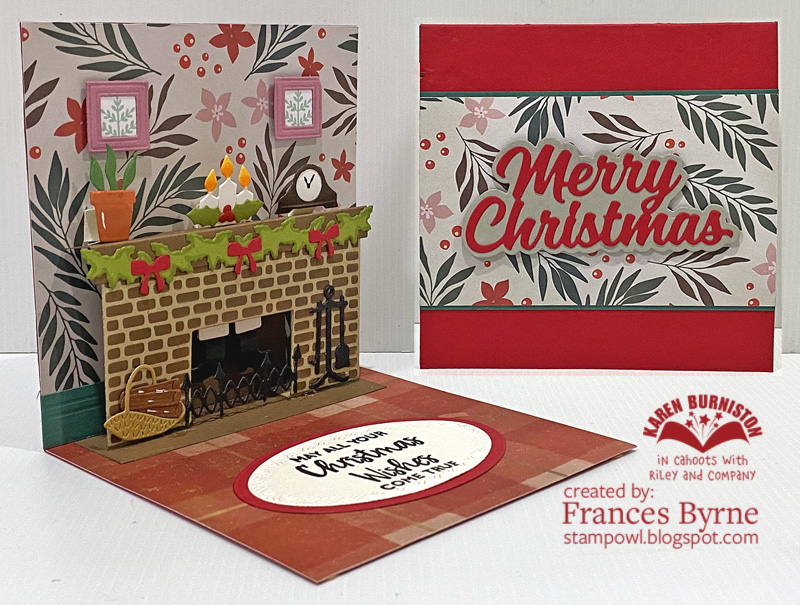
I just feel in love with this Noel die set and coordinating paper pad, dies and stamps, that I had to add them to my collection.The flowers on the "O" use the Poinsettia Delights paper pad which coordinates with this die set ... it has 48 pages of poinsettias to die cut, so I guess I will be making a few cards using this set in the future. Besides the paper pad, there is also a coordinating stamp set, which isn't the flower and a number of sentiments. There is also a coordinating die set to die cut the flowers from the paper pad and stamp set, this die also adds texture to the images. And of course there is the main NOEL die set which included the die to create the card base and. the word NOEL.


For my first card using this set, I die cut the base from white cardstock. The die has a section on the die which doesn't cut, to make it easy to make a folded shaped card. I then used the word die to die cut the word NOEL from white cardstock that had clear double sided adhesive tape on the front and also from gold mirror cardstock. I removed the adhesive from the white die cut and covered the adhesive with Bright Cranberry Silk Microfine Glitter. I then adhered the red glitter word over the gold word, offsetting the one over the other to create a slight shadow. I then adhered the words to the front of my shaped card base.

I die cut the poinsettia paper using the coordinating dies and then used foam tape to layer the various pieces. This was then adhered to the centre "O".

I used the "With Love At Christmas" sentiment which is included in the coordinating stamp set which I added to flowers.

Finally I added three gold pearls to the top of the letter "O"

This card measures approximately 7 inches x 4 1/4 inches.


For the inside of the card, I die cut a piece of burgundy paper to layer on the inside of the card. I stamped the "Merry Christmas" which is another of the stamps included in the stamp set. I added it at an angle across the "O", so that it is hidden by the sentiment on the front of the card, so it can't be seen when the card is closed.

Of course I will be back over the next few months with more cards using this set.


Friday, September 23, 2022

Monster Hugs


Hi Crafty Friends,

Thanks for visiting my blog. Today I am sharing a Wiper Card that I created recently.

It's actually been a couple of years since I have made this style of card, so it was fun to get to make this one.

Here is a quick video to see my card in action.

To create the Wiper Card part of this card I used Made To Surprise by Sam Calcott's 5 x 7 Wiper Card die set. This die set includes all the dies needed to create the Wiper Card base, including the layers and wiper mechanism etc. There are three different versions of this die for different sizes which I have linked in my supply list below.


To decorate my card I used Elizabeth Craft Designs Monster Collection which was designed by Joset Designs. I die cut the monsters using various rainbow colours ... four seen from the front and one on the back.


When you pull the sides of the card, it reveals the red monster that is holding a cookie. The monster is attached to a clear acetate wiper mechanism using one of the dies included in the Wiper Card die set.


I have added a white panel to the back of the card, so that I could add a sentiment and write a personal greeting to whoever ends up receiving this. I also added one more of the cute monsters to the panel.


Thursday, September 22, 2022

Sunflower Birthday


Hi Crafty Friends,

It's challenge time with my friends over on the CCEE Stampers challenge blog. Kelly Santi our challenge hostess of the month continues to issue the challenges.

Apparently in the Northern Hemisphere, today is the first day of Autumn! Create a fall themed card.


Of course as I live in Australia, it is not autumn down here ... but spring! and for us, the reasons always start on the first day of the month. I don't really need autumn themed cards as we don't celebrate Thanksgiving and Halloween isn't that big down here. Spring means flowers ... so I compromised by using a sunflower which seem to be very popular in the USA at this time of year, even though they are a summer flower down here in Australia.

I recently purchased Crafter's Companion's The Sunflower Collection Paper Pad which I just love and have been wanting to use it for a while. Today's challenge was the ideal time to cut into it.

I created a 6 inch x 6 inch Gatefold Pop Up Card using a tutorial by Sam Calcott which you can find here. I wanted something that would feature the paper, and this card seemed ideal and as the paper pad is 6 x 6 that was the best size for my card.

I added the large sunflower and leaves to the centre panel using the Bright Rosa Sunflower Band and Fern Border die sets. I layered the sunflower onto the diamond panel which is die cut using Waffle Flower Crafts' Radiating Diamond Frame die.


When the card is closed it becomes a Gatefold Fold Card, and is held closed using a Belly Band.


I used the Waffle Flower Crafts Radiating Diamond Frame die again for the diamond layer and added the copper foiled birthday sentiment using a foil plate from Waffle Flower Crafts.

I also added some Champagne Metallic Pearls to the diamond frame and belly band.


Here is a look at the back of my card. The two side panels form the front of the gatefold card when the card is closed. 

I added two white panels to the next two panels, for a place to stamp a sentiment and also to be able to write a personal greeting when this card is given to someone. Both sentiments are from two different Made To Surprise stamp sets which are listed in the supply list below.

I was going to leave the centre panel plain, but as I had a scrap I would have thrown out, I decided to add that to the centre.

Don't forget to check out the CCEE Stampers blog (goes live 12 AM EST) to see the rest of the creations the CCEE Stampers created this week. You can also see more details of their creations on their individual blogs:


Other Supplies:
Sunflower Band Die Set - Bright Rosa (discontinued)
Fern Border Die Set - Bright Rosa (discontinued)


Wednesday, September 21, 2022

STAMPtember - Riley and Company


Hi Crafty Friends,

As many of you probably know this month is "STAMPtember" over on Simon Says Stamp. During this month Simon Says Stamp collaborates with other stamp manufacturers to bring you special limited edition collaboration sets. These sets are only available through Simon Says Stamp and as they are limited edition, once they are sold out, they are not available anymore. STAMPtember stamps are only available for the month of September.


Available now from Simon Says Stamp is today's STAMPtember Limited Edition Collaboration set from Riley and Company. You can purchase either the exclusive stamp set or the exclusive stamp and die set for a limited time, while supplies last.  The exclusive collaborations are selling out in record time this year, so act fast if you can.


I was excited to see "Riley" featured again in this years STAMPtember, especially since I have been involved with Riley since he first made his debut many years ago. Like previous years Riley is with his friend Simon (from Simon Says Stamp). 


I love that the sign the Riley and Simon are holding is blank so that your can stamp 
either the sentiments included in the stamp set or any other that you may already have to suit any occasion.


I created a pop up card using Karen Burniston's Label Charm Pop-up card die set. I stamped out some of the balloons, a sentiment and party hats also included in the stamp set to decorate the card.


Tuesday, September 20, 2022

All My Love


Hi Crafty Friends,

Thanks for dropping by today. I have a fun new to me pop up style card to share with you all. This card uses virtually no stamps or. dies ... there is one stamped sentiment on the back and the circles are cut using a circle die, but that is all there is. The card is made using patterned papers.


This style of pop up card is called a Winged Pop Up Card, you can see the "wings" on each side of the card. I recently discovered this card while on YouTube, it popped up in my feed and I so loved the look that I had to watch the video to see how it was made. The tutorial was another one done by Sam Callcot and you can find the details on how to make it here

I used patterned papers from two different paper pads, you will find the links to the pads in my supply list below.


When you close the card, the "wings" fold back to form a 5 inch x 7 inch card. The card stays closed with the help of the belly band. I used one of the toppers included in the Watercolour Spring paper pad to add to the belly band.


Here is a look at the front of my card without the belly band.


Here is a view of the back of my card, I added layered panels to the two back side panels using patterned paper. I added a stamped birthday sentiment to one panel, the other is blank to add a personal greeting. 

I love the way this turned out.


Other Supplies:
Birthday Wish Stamp Set - Stampendous