Showing posts with label Cascading Tag Card. Show all posts

Monday, July 11, 2016

July 2016 Pop It Ups Designer Challenge #1


Hi everyone,

Welcome to our July Karen Burniston Designer Challenge. Karen is changing things up with our Designer Challenges starting this month. Instead of just one challenge a month we will offer Two challenges a month! Challenges will be posted on Karen's blog on the 2nd and 4th Tuesdays of each month. The first challenge of the month will be a theme that Karen chooses for the team and the second challenge theme for the month will be chosen by a team member. For each challenge the team will make just one card and post it on their own personal blogs on Monday of Challenge week. This new format will provide the same number of amazingly inspiring cards per month, but spaced out onto two dates instead of all lumped together.

 This time round Karen has given us the theme ....  "Up!" - Let's get things airborne with high-flying cards featuring the sky.


Last month for our June Designer Challenge, Karen shared an amazing video tutorial on how to create a Cascading Tag Card using the chair from the Adirondack Pop Up Card and the Tag from the Tag Pivot Card. Since then I have been having so much fun creating cards using this fun technique, that I decided to make another for this challenge. If you missed Karen's video you can find it here.

To decorate my card this time around, I used Lucky the Rabbit and also the Kites die set. 

To create the cloudy background on the tags I used the Stage It Stencils Party Cloudy, sponging the clouds with blue ink. 

The sentiments used on the inside are from the What's Up? and Steampunk Clear Stamp sets.


Here is a view of my card taken from overhead so you can see the folds of the card.


I kept the front of my card simple as the focus is on the inside of the card. So I just added designer paper and added the A Way with Words Celebrate Sentiment.
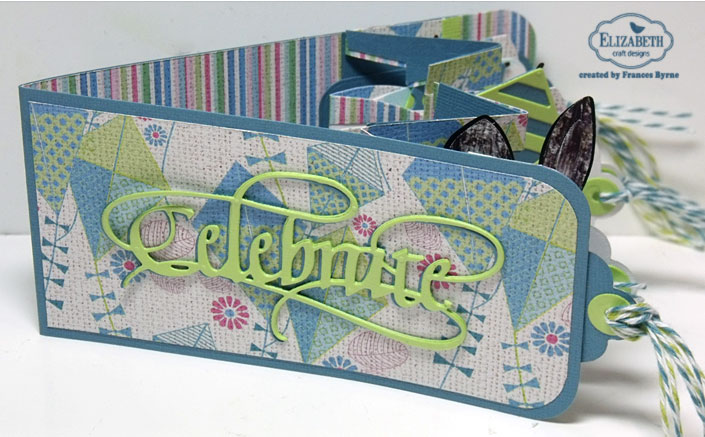

And one last look at my card so you can see it partly open.


If you are looking to purchase Karen's Pop It Ups dies in Australia you can find them at Craft Giraffe (now online only).

Don't forget to check out  Karen Burniston's blog  on Tuesday when you will be able to see what all the designers created for the challenge this month, plus an amazing card/video tutorial from Karen Burniston.


Stamps: What's Up? Clear Stamp Set; Steampunk Greetings Clear Stamp Set - designed by Karen Burniston for Elizabeth Craft Designs
Paper: White; Blue; Green; Through The Lens Wood Patterned Cardstock - Elizabeth Craft Designs; Kites & Stripes DP - FabScraps
Dies: Adirondack Pop Up Card; Tag Pivot Card; Lucky the Rabbit - designed by Karen Burniston for Elizabeth Craft Designs; Kites; A Way with Words Celebrate - Elizabeth Craft Designs
Other ECD Products: Clear Double Sided Adhesive Tape 64mm; Stage It Stencil Partly Cloudy; Transparent/Silver Glitter Dots Peel Off Stickers;
Other: Black Ink; Tumbled Glass Distress Ink; Foam Tape


Thursday, June 30, 2016

Steampunk Greetings


Hi everyone,

It's challenge time with my friends over on the CCEE Stampers challenge blog.This week our challenge hostess for the month Vicky Gould finishes of the month with one last challenge.

Vicky has challenge us to a Mixed Media challenge ... 

Quoting Splitcoaststamers: A "medium" can be any of the following: 
  
Pencils - wax, oil, watercolour, graphite/charcoal. chalk/pastel
Pastels - Chalk, oil
Markers - watercolor, pigment, water-based acrylic
Pens - ink, glitter
Pigments - Gelatos, watercolor crayons, metallic rubons
Paints - watercolor, acrylic, oil, poster, tempera
Inks - dye, chalk, distress, reinkers, pigment, hybrid
Powders - mica, pigment, chalk
Sprays & airbrushing
Dimensionals - embossing paste, gesso, fabric, found items, papers (collage, piecing) & ephemera, foils
Heated elements - encaustic wax, embossing 


As you can see I have created another Cascading Tag Card using the chair die from the Adirondack Pop Up  Card and one of the tags from the Tag Pivot Card. You can find Karen Burniston's video tutorial here on how to create this style of card.

To decorate my card I used Poppy the Owl along with the Steampunk Charm die set and Steampunk Clear Stamp set.

I used the Gears Stage It Stencil  and Viva Walnut Brown Metallic 3D Stamp Paint to add gears to the designer paper I used which is one of the papers from the Through the Lens Cardstock. I also  sponged gears onto each of the Owl's hats.


These are the various mixed media materials I used to create my card : Stencil; Embossing Paste; Shimmer Sheetz; Distress Ink; Fibers; Glitter; Glitter Dot Peel Off Stickers; Glitter Border Peel Off Stickers; Designer Paper; Die Cuts.


For the front of my card I used the Clock and Gears die set along with the wings from the Steampunk Charms die set which were cut from Shimmer Sheetz. The clock face was die cut with Clear Double Sided Adhesive Tape on the front and then covered with Copper Silk Microfine Glitter. 


Don't forget to check out the CCEE Stampers blog (goes live 12 AM EST) to see the rest of the creations the CCEE Stampers created this week. You can also see more details of their creations on their individual blogs:


Stamps: Steampunk Clear Stamp Set - Elizabeth Craft Designs
Paper: Brown; Through the Lens Metal DP; Through the Lens Wood DP - Elizabeth Craft Designs
Dies: Poppy the Owl; Adirondack Pop Up Card; Tag Pivot Card; Steampunk Charms; Clock & Gears- designed by Karen Burniston for Elizabeth Craft Designs
Other ECD Products: Gears Stencil; Clear Double Sided Adhesive Tape; Bronze Metallic Shimmer Sheetz; Fire Opal Shimmer Sheetz; Silver Shimmer Sheetz Copper Silk Microfine Glitter;
Other: Black Ink; Tea Dye Distress Ink; Picket Fence Distress Ink; Viva Walnut Brown Metallic 3D Stamp Paint; Fibres; Foam Tape


Monday, June 27, 2016

Flying by to Say


Hi everyone,

On Wednesday for the June Karen Burniston Designer Challenge, Karen shared an amazing video tutorial on how to create a Cascading Tag Card using the chair die from the Adirondack Pop Up  Card and one of the tags from the Tag Pivot Card. You can find her tutorial here.

Of course as soon as I viewed her tutorial, I knew it was a must do card and although I had other things I should have been doing, I sat down and started to create this card and could not stop until it was done :).


To decorate my card I used the Bee and Bee Hive die sets from the Joset Designs range of dies, the flower border is from the Susan's Garden range all available from Elizabeth Craft Designs.


Here is another view of my card taken from above so you can see the folds in this style of card.


For the front of my card I used one of the sentiments from Karen Burniston's What's Up? Clear Stamp set which is layered onto the fancy labels from the Fancy Label Accordion Card die set. I also added two more bees.


Here is one more photo of the front of my card.


Stamps: What's Up Clear Stamp Set; Bee Sentiments Clear Stamp Set - Elizabeth Craft Designs
Paper: White Soft Finish Cardstock - Elizabeth Craft Designs; Black; Yellow; Type T DP - FabScraps
Dies: Adirondack Pop Up Card; Tag Pivot Card; Fancy Label Accordion Card - designed by Karen Burniston for Elizabeth Craft Designs; Bee; Bee Hive; CountryScapes Garden Edges Tulips - Elizabeth Craft Designs
Other ECD Products: Clear Double Sided Adhesive Tape
Other: Black Ink; Tumbled Glass Distress Ink; Mustard Seed Distress Ink; Carved Pumpkin Distress Ink; Peeled Paint Distress Ink; Foam Tape