Showing posts with label Tag. Show all posts

Sunday, October 13, 2019

Peace On Earth Tag Card


Hi Crafty Friends,

About a month ago I shared some tags I created using on of the sets from the Tonic Studios Christmas  Scenes Tag series.  For the tags I used the Wondrous Woods Tag die set, you can see my tags here.

At that stage I had the Wondrous Woods & Enchanted Forest Tag die sets. These two die sets contain the smaller tag shapes, tag pockets and various scenes that can be incorporated in the tags. I hadn't thought I needed the Mythical Glades die set which consists of various sized tags, some basic and some fancy which can be used for layering with the other two die sets. But I was wrong and ordered it while it was still easy to get hold of.


Well today I am sharing my first card I created using the Mythical Glades die set. As you can see I created a Tag Shaped card. This card measures 7 inches x 5 inches and I only used the second largest die from the set. I am not sure if I will use the largest tag for a card, but I do think there are other things it may be useful for.

To decorate the card I used the pocket, tags and decorate dies from the Enchanted Forest Silhouette Tag die set. 

At the base of the tag pocket, I added a sentiment which I gold embossed. 


The background behind the deer scene was created using distress oxide inks, using a circle to mask part of the area being inked for the moon.


To make this tag shape into a card, I die cut a scene large tag from cardstock, scored just below the shaped part at the top of the tag and adhered this to the back of my main tag.

I then used some of the tags from the Mythical Glades die set for my sentiment and deer images which are both included in the Enchanted Forest die set.

Supplies:
For your shopping convenience, all products are linked below. Compensated affiliate links are used where possible with no extra cost to you. This helps me to continue to share all the projects I include on my blog. For the benefit of my Australia readers, I have started to include some links to Australian stores when available. Please note I only use and share products I love.


Thursday, January 24, 2019

60th Anniversary


Hi Crafty Friends,

It's challenge time with my friends over on the CCEE Stampers challenge blog. Liz Williams our challenge hostess for the month, continues to issue the challenges.

Apparently Gold was discovered in California on Jan. 24, 1848. For our challenge this week we are to use some “gold” on our creations.


A couple that attend a club I attend are celebrating their 60th wedding anniversary this month, so I wanted to create a special card to give to them. Of course this challenge was the perfect opportunity to create my card for them.

To create my card I have used Karen Burniston's new Circle Tag Pop-up die set to create a tag book pop-up. This die set is one of the new die sets being released at the end of the month, this and all the other new die sets are available for pre ordering now ... link at the bottom of this post. I used vanilla pearlescent cardstock for the base of the card and then used gold cardstock and gold patterned papers to decorate the card.


I used some of the heart dies from the Hearts Pivot Panels die set which is another new die set being released this month. I also used the Numbers die set to add the "60th" to one of the circle panels.  


I used the congrats sentiment from the  Word Set 1 - Greetings die set to add the sentiment to the card.


For the front of the tag book I used one of the ovals from the Crosshatch Ovals die set as the base for my sentiment. the Congrats is from the new Word Set 9 - Congrats die set.


Don't forget to check out the CCEE Stampers blog (goes live 12 AM EST) to see the rest of the creations the CCEE Stampers created this week. You can also see more details of their creations on their individual blogs:


Supplies:
For your shopping convenience, all products are linked below. Compensated affiliate links are used where possible with no extra cost to you. This helps me to continue to share all the projects I include on my blog. Please note I only use and share products I love.


Tuesday, January 22, 2019

You're Tweet!


Hi Crafty Friends,

Today I am excited to share a card I created using one of Karen Burniston's new dies which are being released at the end of the month. Karen will be releasing 18 brand new dies which I am sure you are all going to love!!!! Pre-ordering for the new dies is now available and I have links to all the new dies in my supply list below.


For my card today I have used the new Circle Tag Pop-up die set which is similar to the Tag Book Pop-up available, but this time round the tag is rounded and of course the pop-up portion of the card on the inside are circles rather than rectangles/squares. 


Here is a quick video to see my card in action.


To decorate my card I used MFT Stamps Tweet Friends Clear Stamp set. To create the "grass" mound on each of the circles I die cut each circle a second time using green patterned paper and then used one of the ovals from the Crosshatch Oval die set to die cut the rounded shape at the top.


Here is a close-up look at the right hand side of the inside of the card.


For the front of the card I die cut the same patterned paper I used for the inside using the large tag die and adhered it to the front. I also die cut the tag again using a scrap of green patterned paper and then used the snow/dirt die from the Nature Edges die set for the grassy area at the bottom.

For the sentiment I used the new "You're Sweet!" die set. I wanted it to say tweet rather than sweet, seeing the images were of birds. So I cut off the "S" from the front of the "Sweet. and die cut the "T" from the Thank You die. To enable to "T" to fit on the sentiment I also had to cut the "you're" away from the "weet" and then rearrange the two new words on the front of the card.

I added a few more of the birds, mushroom, flowers and leaves around the card.

Supplies:
For your shopping convenience, all products are linked below. Compensated affiliate links are used where possible with no extra cost to you. This helps me to continue to share all the projects I include on my blog. Please note I only use and share products I love.


Tuesday, December 18, 2018

Say What Gift Tags


Hi Crafty Friends,

It's only a week until Christmas day, so today I am  sharing a few gift tags I created to use on a few last minute gifts I need to wrap.

For my gift tags today I used Lawn Fawn's Say What stamp set with coordinating dies. This stamp set contains 4 cute critters to help decorate the tags, for my tags today I used two of the critters.


I created 4 of each tags. The snow at the bottom of each character has glitter on the top of the snow drift. 


On the penguins hat I added White Blizzard Nuvo Drops.

Supplies:
For your shopping convenience, all products are linked below. Compensated affiliate links are used where possible with no extra cost to you. This helps me to continue to share all the projects I include on my blog. Please note I only use and share products I love.


Monday, June 27, 2016

Flying by to Say


Hi everyone,

On Wednesday for the June Karen Burniston Designer Challenge, Karen shared an amazing video tutorial on how to create a Cascading Tag Card using the chair die from the Adirondack Pop Up  Card and one of the tags from the Tag Pivot Card. You can find her tutorial here.

Of course as soon as I viewed her tutorial, I knew it was a must do card and although I had other things I should have been doing, I sat down and started to create this card and could not stop until it was done :).


To decorate my card I used the Bee and Bee Hive die sets from the Joset Designs range of dies, the flower border is from the Susan's Garden range all available from Elizabeth Craft Designs.


Here is another view of my card taken from above so you can see the folds in this style of card.


For the front of my card I used one of the sentiments from Karen Burniston's What's Up? Clear Stamp set which is layered onto the fancy labels from the Fancy Label Accordion Card die set. I also added two more bees.


Here is one more photo of the front of my card.


Stamps: What's Up Clear Stamp Set; Bee Sentiments Clear Stamp Set - Elizabeth Craft Designs
Paper: White Soft Finish Cardstock - Elizabeth Craft Designs; Black; Yellow; Type T DP - FabScraps
Dies: Adirondack Pop Up Card; Tag Pivot Card; Fancy Label Accordion Card - designed by Karen Burniston for Elizabeth Craft Designs; Bee; Bee Hive; CountryScapes Garden Edges Tulips - Elizabeth Craft Designs
Other ECD Products: Clear Double Sided Adhesive Tape
Other: Black Ink; Tumbled Glass Distress Ink; Mustard Seed Distress Ink; Carved Pumpkin Distress Ink; Peeled Paint Distress Ink; Foam Tape


Monday, March 28, 2016

Monkey


Hi everyone,

Today I am playing with my Stampendous Jungle Friends stamp set to make a birthday card.

I have added an action wobble to the monkey's head so that when you touch it the head wobbles.


For the inside of my card I added a sentiment.

Stamps: Jungle Friends - Stampendous; Sprinkles & Sparkles - Penny Black
Paper: White; Brown; Blue; DP
Dies: Tag Stax; Lead the Way - MFT Stamps; Label
Other: Black Ink; Antique Linen Distress Ink; Action Wobble; Rhinestones; Ribbon; Foam Tape; Copics


Sunday, December 13, 2015

More Gift Tags


Hi everyone,

Today I am sharing a few more tags I created using the MFT Stamps Tag Builder Blueprints 2 die set. This time round I paired it up with a die set from Craft Concepts called Frosty & Friends.

Now I am off to wrap a few more presents :)

Paper: White; Teal; Candy Cane Lane DP - Bo Bunny; 
Dies: Tag Builder Blueprints 2 - MFT Stamps; Frosty & Friends - Craft Concepts


Friday, December 11, 2015

Christmas Tree Tags


A few months back I purchased the MFT Stamps Tag Builder Blueprints 2 die set as I thought these would make quick and easy gift tags at Christmas.

Today I am sharing some gift tags I created using this die set with the Christmas Tree included in the set.

Paper: White; Red; Green; Twas the Night Before Christmas DP - Graphics 45
Dies: Tag Builder Blueprints 2 - MFT Stamps; 


Friday, December 4, 2015

Christmas Gift Tags


Hi everyone,
It’s my turn to post a project on the Elizabeth Craft Designs blog today.  It’s December and my Christmas Tree has been put up and decorated and it is time to start thinking about wrapping the presents and put them under the tree, so when my Grandchildren come over they get all excited! Of course wrapping presents means I need some gift tags so I know who the present is for. Today I am sharing 5 gift tags I created using the Christmas Ornaments 2 Peel-Off Stickers and the Tags and More 1 – Lace die set.
I made made 5 gift tags as I wanted to use all the pieces from the Peel-Off Sticker sheet, but of course if you only want to make one that is easy enough to do too.


Here’s how I created my gift tags:
  1.  Cut five pieces of red cardstock so they measure 3 1/4 inches x  5 1/2inches.

  • Using the tag edge from the Tags & More 1 – Lace die set place this as close as you can to one of the 3 1/4 inch edges of the card and run through die cutting machine.

  • Place the  decorative die from the Tags & More 1 – Lace die set onto the card so it lines up with the curve and hole created from the tag edge die and run through die cutting machine. Set Aside.
2.  Creating  the Peel-Off Sticker images:
a.  Before reading the instructions below, you can see a video Els created using this technique here.
b.  Place a sheet of Transparent Double-Sided Adhesive onto cardstock that is big enough for your peel-offs and remove the release sheet.
c.  Be careful not to touch the adhesive or it will leave fingerprints in the glitter.
d.  From the Christmas Ornaments 2 Peel-Offs, place the ornaments, holly leaves and bows  onto the release sheet (sticky side up).
e. Place the cardstock that has Transparent Double-Sided Adhesive, sticky side down, on top of the peel-offs (In other words, place sticky onto sticky.)
f.  Use release sheet in handling the cardstock until you cover the adhesive with glitter so you don’t leave fingerprints.
g.  Cover the adhesive with Warm Diamond Silk Microfine Glitter, polish glitter with your finger and brush excess off.
h.  Color your images as desired using alcohol-based markers on the glitter.
i.  Cut around all peel off pieces.
j. Color white edges with a black permanent marker to give a more finished look.
k. Attach the ornaments to the top portion of the tags and then decorate the ornaments using either the holly pieces or bows (refer to photo at top of post)
* Coloring Tips for alcohol-based markers and glitter: Remember that when using alcohol-based markers, such as Copics, work quickly and don’t let the tip of the marker linger on the glittered surface. Too much alcohol ink can dissolve the adhesive and remove the glitter. It takes very little ink to color the surface of the glittered image so work with a light touch. To get the faded look, lay a line of color down along one edge of the section you want to color and then use your Blender pen to pull the color across the rest of the image. You may have to lay more color down to get deeper shading after you blend it out.
3. Creating the Glittered Panel at Bottom of Tags:


  • Cut a piece of white card which is approx 31/2 inches x 6 inches. (TIP: I always cut my card slightly bigger than I need so I can trim down when the card is covered with glitter so any blemishes around the edges of the card can be removed.
  •  Lay a length of 10 mm Elizabeth’s Transparent Double Sided Tape diagonally onto the white card as per first photo above. Next lay a length of 3 mm Elizabeth’s Transparent Double Sided Tape next to the 10 mm piece so it is butted up close. Add an additional length of 3 mm Double Sided Tape next to the first piece. Then lay a piece of 6 mm Elizabeth’s Transparent Double Sided Tape next to the 3 mm piece. Continue placing the tape onto the card until it is completely covered. Trim excess tape off around the edges of the card. (TIP: You may want to remove some of the excess tape from the edges while you are laying out the tape to make it easier to lift off your work surface when finished cover completely with tape)
  •  Randomly remove the protective backing from the covered card and then every third piece of tape after that, being careful not to touch the adhesive you are uncovering. When you have removed the backing from the tape for the first color, cover the adhesive with Soft Green Silk Microfine Glitter. Brush off any excess glitter from the card, and polish the glitter on the card before continuing to the next step. (TIP: For Silk Microfine Glitter projects, Elizabeth Craft Designs recommends that you work with the lightest colors first, then the darker ones. This is not a rigid rule but usually produces the crispest and most accurate results. (Remember, if any of the glitter colors get mixed together during the process of polishing one color and then another, keep a separate jar for the random mixture and use it for interesting and unexpected textures.)
  •  Remove the protective backing from every third piece of tape next to the Soft Green pieces and this time cover with Forest Green Silk Microfine Glitter. Repeat steps as per above.
  •  Remove the remaining protective backing from the tape on the card and cover with True Red Silk Microfine Glitter.
  • Use black line stickers from the Borders Assortment Peel-Off Stickers to embellish the glittered card. (TIP: Look at your glittered piece and if you have areas that may not have been glittered select these areas to cover with the line Peel-Off Stickers.
  •  Cut this piece into 1 inch x 3 1/2 inch pieces.
4.  Using the Merry Christmas Stand Up Helper Word die, die cut this from dark green card so you have about 1/2 edge at the bottom of the word.
  • Attach the sentiment to the back of the striped glittered piece we created in step 3.
  • Attach strip to the bottom edge of tag so that the letter “S” from Christmas is lined up to the right hand side of the card.
  • Trim off any excess glittered strip from sides of tag.
5.   Add ribbon to top centre hole of tag (Note: the Tags and More 1 – Lace die set comes with various reinforcement decorative dies if you wish to add one to your tags.)
Thanks for stopping by today! I hope you enjoyed my tutorial.
Supplies: 
Elizabeth Craft Designs
951 Tags & More 1 – Lace 
939 Merry Christmas Stand Up Helper Word Die
2536 Christmas Ornaments 2 Peel Off Stickers
7018 Red/Gold Glitter Dots Peel Off Stickers
Borders Assort Peel-Off Stickers (1167)
Warm Diamond Silk Microfine Glitter (639)
True Red Silk Microfine Glitter (614)
Soft Green Silk Microfine Glitter (631)
Forest Green Silk Microfine Glitter (633)
Elizabeth’s Transparent Double Sided Tape Sheet (502)
Elizabeth’s Transparent Double Sided Tape – 3mm (505)
Elizabeth’s Transparent Double Sided Tape – 6mm (506)
Elizabeth’s Transparent Double Sided Tape – 10mm (507)
 
Other
 White Card
Red Card
Dark Green Card
Foam Tape
Green Ribbon


Saturday, October 31, 2015

Elizabeth Craft Designs October Designer Challenge


Hi everyone,

It's time for our September Elizabeth Craft Designs Designer Challenge. Check out the Elizabeth Crafts Designs blog today where you will be able to see what all the designers created for the challenge this month.

Our challenge this month was to create a holiday gift and a coordinating gift tag using Shimmer Sheetz and at least one die and one embossing folder.


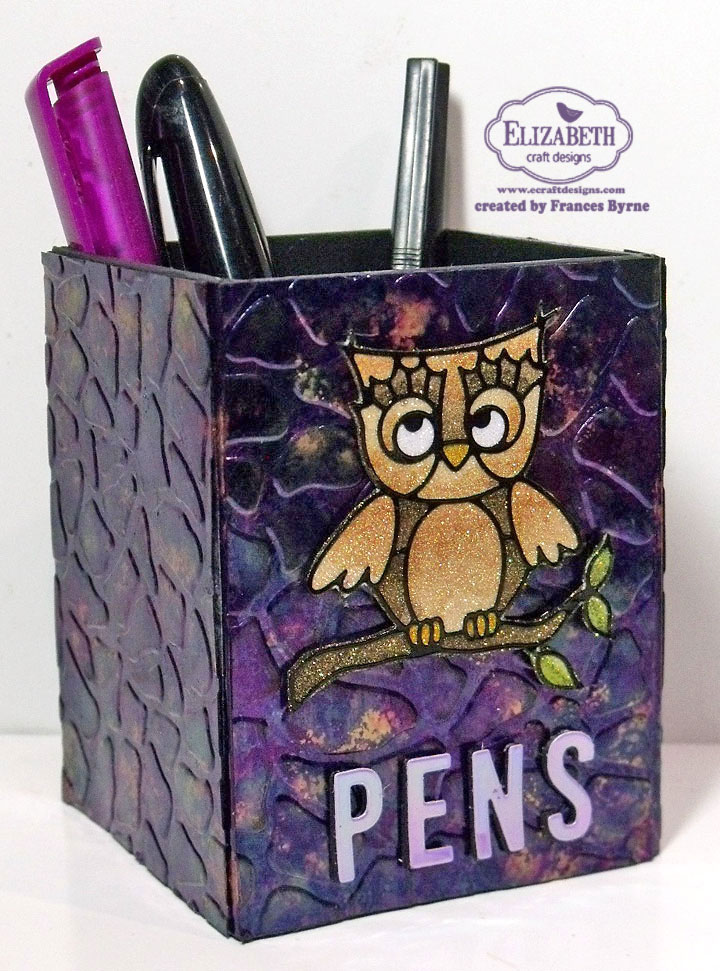
While out shopping recently I found a pen holder which I thought would be fun to alter for this challenge. The first thing I did was paint the pen holder inside and out using black paint.

I cut four pieces of Black Iridescent  Shimmer Sheetz to fit the size of my pen holder and also cut four addition pieces the height of the holder but only 2 inches wide. I scored and folded these narrow pieces in half.

Next I used my alcohol inks to color my Shimmer Sheetz pieces. For this project I used Stream; Wild Plum and Gold Metallic Adirondack Alcohol Inks. 

Once the pieces where all dry I added Transparent Double Sided Adhesive Tape to the back of the larger pieces and embossed these pieces using the Sea Glass Embossing Folder.


I added  Transparent Double Sided Adhesive Tape to the scored pieces and then attached these to my Pen Holder on each corner. Once these were in place I then attached the four embossed pieces to each side of the Pen Holder.

As this Pen Holder had originally be decorated with owls, I decided to keep with that theme and hey I like owls so why not haha!

 The owl is from the Lots of Owls Peel Off Stickers.  I adhered the owl on branch onto Transparent Double-Sided Adhesive Tape which had been attached to card and then covered this with Warm Diamond Silk Microfine Glitter and then colored with Copics. For more details on how to do this technique you can see a video Els created using this technique here.

Finally I die cut the letters "P E N S" from black card and Purple Iridescent Shimmer Sheetz which had Transparent Double-Sided Adhesive Tape adhered to the back and layered together and added to the bottom of my Pen Holder.


For my coordinating gift tag, I selected another of the owls from the Lots of Owls Peel Off Stickers. I added the owl onto Transparent Double-Sided Adhesive Tape which had been attached to card and then covered this with Warm Diamond Silk Microfine Glitter and then colored with Copics.

I cut a piece of Soft Finish Cardstock 100b to 2 1/4 inches and scored the card in half. Next I positioned the tag shaped die from the Tags and More 6 - Daisy die set at the top of the open end of the card and ran this through my die cutting machine.

I then opened up the tag/card and positioned the decorative edge so it would only die cut on the front and die cut this too.


I sponged around the edge of the front of the card using the Violet Tint PanPastel from the Susan's Garden PanPastel Flower Coloring Kit 2.

To finish off the front I die cut the Merry Christmas (944) from Purple card and added it to the front.


For the inside of my gift tag I used the tag shape die from the Tags and More 6 - Daisy die set to cut a piece of purple card. I trimmed it down to approx 1 3/4 inches and adhered it to the inside of my card. I added a Gold Ribbon Fantasy Peel Off Stickers Border to the edge of the purple card.

To create the "To:" and "From:" I used the Black Alphabet 1 Upper Key Peel Off Stickers.

That's it from me today, thank you for visiting my blog. To see what the other designers created for this challenge don't forget to check out the Elizabeth Craft Designs blog post which goes live 8AM MT.


Supplies:

Elizabeth Craft Designs:


Other:
Adirondack Alcohol Inks - Stream; Wild Plum; Gold Metallic and Blending Solution
Black Acrylic Paint
Purple Ribbon
Foam Tape