Showing posts with label Outlines Rubber Stamps. Show all posts

Monday, October 17, 2011

‘Tis The Season!

Outlines-Snowman-Tower-wm

Hi everyone,

I have another Christmas card to share with you all today, yes Christmas is getting frightfully close so it is about time I got my act together and started to get organised for it.

For my card I used Snowman Tower from Outlines Rubber Stamps,  isn’t it adorable! The sentiment is one of Whimsy Stamps sentiment sets.

Stamps: Snowman Tower – Outlines Rubber Stamps: Holiday Ticket Sentiments – Whimsy Stamps
Paper: Mistletoe Kisses – Papermania
Other: Black Ink; Pink Ribbon; Snowflake Embellishment; Foam Tape; Copics

aa-owl-signature

Saturday, October 15, 2011

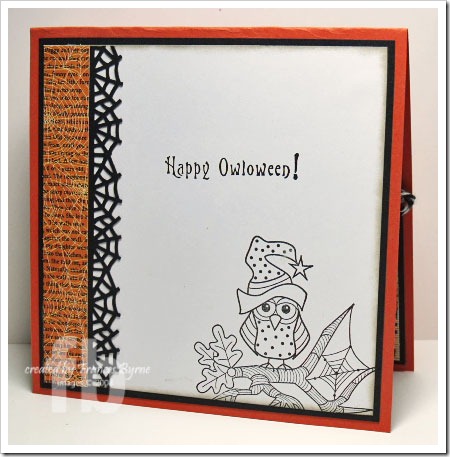
Happy Owloween!

C4C109-Owloween2-wm

Hi everyone,

It’s Saturday which means it’s time for another challenge with the “Crazies” over on the Crazy 4 Challenges blog. This week our challenge hostess Tammy Hershberger has another fun challenge for us.

The holiday season is heating up! Create something today for an upcoming holiday and incorporate heat embossing in your creation!

Being the 3rd Saturday of the month it is a sponsored challenge and our sponsor this month is Outlines Rubber Stamps. They have lots of fun stamps on there site, so if you haven’t visited them before you might want to head on over there to see their range.

When I was looking to see what stamps to select for this challenge, I found this fun owl stamp & sentiment … Owl Branch and Hoooo!. Halloween isn’t big in Australia, so it is something I don’t celebrate (although I make sure I have some candy just in case we get a call or two on the night … but of course I am an owl lover, so it didn’t take much for me to decide to use these for my card.

Now the challenge also calls for heat embossing somewhere on our cards. I didn’t want to emboss my image or sentiment, so after some thought I decided to emboss my black spider web, oval & circle nestabilities borders using Iridescent Ice Embossing powder. I also added some brushed pewter distress stickles to my owl and it’s hat after I had colored it.

For the sentiment, I stamped just the first two lines to use on the outside of my card.
C4C109-Owloween-wm

Here is the inside of my card, I added the final part of the sentiment to my card. I also stamped the owl again on the lower right hand corner of my card.

Don't forget to check out the rest of the “Crazies” cards over on the Crazy 4 Challenges blog and also their individual blogs for more details.

Stamps: Owl Branch; Hooooo! – Outlines Rubber Stamps
Paper: White; Black; Orange; Haunted Hallows DP – Teresa Collins
Other: Black Ink; Picot Circle Nestabilities; Oval Punches; MS Web Border Punch; Black Twine; Orange Button; Black Brads; Sewing Machine; Brushed Pewter Distress Stickles; Iridescent Ice Embossing Powder; Foam Tape; Copics

aa-owl-signature

Saturday, May 10, 2008

Outlines 3D Ornaments


On Thursday I attended a stamp club which I go to each month. This month the project we all got to do was to create these two ornament cards using Outlines Rubber Stamps.

Each kit contained enough materials to create both cards as long as we used our craft knives to cut out all the pieces rather than scissors. We received 4 images of the ornament ..... 1 in white; 1 in burgundy and 2 in green, it was then a matter of cutting out the various pieces as per the instructions also supplied to create the cards .... lots of cutting but the results are well worth it.

Once the cutting was all done it was time to assemble our pieces on our card using foam squares to 3 D it. We also attached red, green & clear gems in various sizes to our ornament.

Here is a close up photo of the card to show better how this card is 3 D ... it is hard to show when you take a front on shot. Both cards use this technique but I only took the one pic of the first card rather than both.


This card here was made using all our leftovers from card #1 ... great to get 2 cards for the price of 1 ;) . The original sample we were shown didn't include the middle star (the one with the circle of red gems on it) but one of the women in our group had the bright idea of including this piece and as it was leftover anyway and I liked the look I decided to also add it to mine. I also ended up putting the additional red gems to mine too once I got home and found them.

Thursday, May 10, 2007

Bleached Cards & Mini Tutorial

I have had a pretty busy today! First it was club day down the coast and today I arranged to take a friend down for her first time which was fun - strange to have company on the drive there and back but very nice. Our project for today was to use bleach on our cards, it has been a while since I have had the bleach out to play so it was fun to revisit this technique.

If you haven't as yet used bleach in your stamping here are a few pointers on using bleach to create your cards.

1. Use fresh bleach! Bleach does have the tendency to go off even in their opaque containers.

2. Make sure you work in a well ventilated area - I like to work so a fan is behind me and blowing the fumes away from me. It's also a good idea to wear old clothes just in case they get bleach on them.

3. Make sure your work area is protected!!!!

4. Stamp your image onto colored card - you can emboss if you wish but it is not necessary. The card at the top was stamped using brilliance ink and left unembossed. The card down the bottom was embossed.

5. Expect the unexpected. Experiment with different colors of card and even different brands of the same color. In the samples included here the area that I bleached turned white, but this can vary from cardstock to cardstock.

6. For an outline image stamp your image on your cards as per #3 and then paint parts of the image using a paintbrush to apply the bleach. You can also use the aquawash type brushes - the ones you normally fill with water - buy a second to use for bleach - make sure the bleach is fresh each time you use it.

7. You can either leave your bleached outline image as is or if desired you can color them using your coloring medium of choice.

8. Fill a spray bottle with bleach and spritz your card with it (this is how I got the background on the top card which was originally the same color and the piece the tulips are stamped on) Again the results will differ depending on the fineness of your spray.

9. Create a temporary stamp pad using folded paper towel (place this on a plate or plastic container of some sort). Add your bleach and use this as a stamp pad to stamp your images directly onto your card. Remember to clean you stamps well when you have finished stamping. (this is how the flower background was created in the bottom card).

I think I have covered most of the things you need to know to get started stamping with bleach, most important have fun. These are two quick cards I made up when I came home after creating a number of bleach pieces.

Recipe for cards:
Stamps: Tulips - Outlines Rubber Stamps; Girls - Paperbag Studio; Verse - Hero Arts; Flower - unknown
Card: Hot Pink Card; White; Black
Other: Black Ink; Clear Embossing Powder; Bleach; Ribbon; Metal Charm.


Do you like the ribbon I used on the top card, my friend who I went with told me about some ribbon on sale today at a local store so after club we went shopping - 40 rolls of ribbon for $28 (that is cheap in Australia believe me). We also found some other ribbons in another store and then went elsewhere to find some card, charms and buttons - all in all it was a fun day!