Showing posts with label Nestabilities. Show all posts

Thursday, February 11, 2016

Pawesome


Hi everyone,

It's challenge time with my friends over on the CCEE Stampers challenge blog. Lyn McAuley our challenge hostess for February continues to issue the challenges.

Apparently way back when Lyn was in grade school, every Valentines Day her classmates and Lyn had such fun creating Valentine Critters to decorate their Valentine boxes. The task for today is to create an animal of any kind on your card in which you use heart shapes for some of its body parts. 

I must confess when I first read the challenge I went eeekkk! But then I remembered some card my friend Dianne shared sometime last year using hearts to create animal easel cards and I knew what I was going to create for this challenge. This card is also inspired by one I saw on Pinterest by Susan Campfield which you can see here.
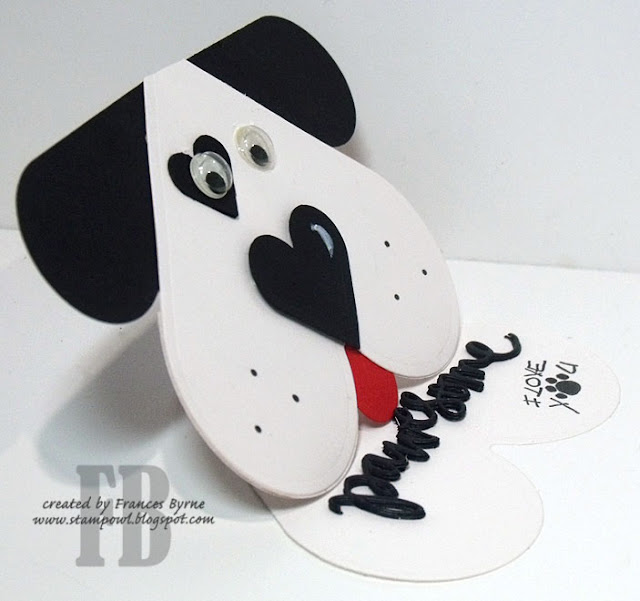


All the different elements that went to create the dog was made with the same Hearts Nestablities die set .... the easel card; the face; the nose; the ears, the tongue and the eye patch. 


When my card is closed it looks like this.


To create the easel I selected the largest heart in the die set and cut a piece of white card which I folded in half. I positioned the pointy end of the heart so it was slightly over the fold in the card so that part wouldn't cut. One it was die cut, I folded the top heart in half. 

I die cut another heart which I used to create the dogs face and then adhered the bottom part of the face to the bottom of the easel card.

I added the word "Pawesome" to the base card which is layered up about 5 layers so help keep the card open. 

Finally I added the I Love You to the right side of my card.


Don't forget to check out the CCEE Stampers blog (goes live 12 AM EST) to see the rest of the creations the CCEE Stampers created this week. You can also see more details of their creations on their individual blogs:

Stamps: Message Pup - Paper Pretties
Paper: White; Black; Red
Dies: Heart Nestabilities - Spellbinders; Pawesome - Simon Says Stamp
Other: Black Ink; ECD Clear Double Sided Adhesive Tape 64mm; Googly Eyes; Picket Fence Distress Marker; Foam Tape;


Wednesday, April 3, 2013

Just for Mother’s Day

Mothers-Day-wm

Hi everyone,

I have been playing with Spellbinders new M=Bossabilities Framed Labels 18 embossing folder to create this card. This is a large die, larger than I was expecting so it makes a large card.

I used the Letter Press technique to get the pink color on my card. This embossing folder also co ordinates with the Spellbinders Labels 18 dies which is what I used for the sentiment. I added some pearls to the centre of the flowers on the card and also added some ribbon.

Stamps: Just for Mother’s Day – Print Blocks
Paper: White; Pink
Other: Pink Pink; Spellbinders M-Bossabilities Framed Labels 18; Labels 18 Dies; Ribbon; Buttons; Pearls; Foam Tape

#aa-owl-signature

Sunday, March 24, 2013

A Special Christening Card

HayleyChristening-B-wm

Hi everyone,

Today is a very special day … not only is today my birthday … but it is also my Granddaughter’s Christening Day. We now share two things … our middle name and that the 24th March is special to us.

Of course I had to make her a special card for the occasion, a year or two ago I purchased a Slice form CD containing SVG files to create various different slice form patterns … one of them was a Church for a Christening. I have been wanting to use this pattern for some time now and of course this was the perfect opportunity.

HayleyChristening-B2-wm

The Slice forms do  fold but I wanted mine to be part of a Magic Box which is what I have created for her card today.

This blog post contains a ton of pictures … there is lots to see Smile.

First up the outside of course … I create my magic box from a 12 inch square piece of card … I scored this at 4 inch intervals and then cut out the 4 outside squares to form the box base. The Cross on the side of the box is an SVG file I found online which I cut out 4 times and added to each side of the box. I added pearls to each of the crosses.

HayleyChristeningA-wm

Here is a view of my magic box looking down from the top.

HayleyChristening10-wm

Here is a closer look at the lid … I decorated the lid using a stamp from Lili of the Valley … this is my favorite stamp to use for Christenings … I added flowers and the flourish were created using MFT Die-namics Fancy Flourish die.

HayleyChristening1a-wm

Now for the inside of my Magic Box … in the centre is my Christening Church … it’s hard to see but if you look inside the doors you can see the guests at the back of the church.

The Christening Church is the bit that is done in what is called Slice form …. I purchased the CD which contains the SVG file from Jenigami.

HayleyChristening1b-wm

Here is another view of the front of the church and the inside of my Magic Box.

HayleyChristening1c-wm

Here you can see the back of the church and of course I have also used the baby again that I used on the lid, this time on the back flap.

HayleyChristening1d-wm

And the other side of the church.

HayleyChristening2-wm

Here is a close up of the back flap which contains the baby.

HayleyChristening3-wm

This is on the right hand flap, I used my computer to generate all the wording for this.

HayleyChristening4-wm

On the front flap I have added a sentiment, again I used my computer for this.

HayleyChristening5-wm

My granddaughter’s name and her Christening date.

HayleyChristening6-wm

This is a close up of the Church … you can see the guests at the back of the church … what you can’t see from the photos that the center part there is a man and woman holding the baby (can be either parents of God Parents) and then in the front of the church is the Minister and Christening Font. There were also a couple of little animas on the outside but I cut those off as I didn’t want them to get in the way of the box closing.

HayleyChristening7-wm

Here is a close up of the dies … love the arched windows! … Both sides are the same, although if I had kept the animals on they wouldn’t have been.

HayleyChristening8-wm

And this is the back of the church … look at the detail in that stained glass! And if you peek inside through the stained glass you might be able to see the Minister and Christening/Baptismal Font I mentioned earlier.

HayleyChristening9-wm

And one last photo, if you have managed to stay with me this far LOL … this time of the inside and the lid together.

Stamps: Baby – Lili of the Valley
Paper: Pink; Light Pink; DP
Other: Black Ink; Oval Nestabilities; Flowers; MFT Die-namics Fancy Flourish; Jenigami Christening Church Slice Form SVG File; Sizzix Eclips; Scor-Pal; Pearls; Foam Tape; Copics


#aa-owl-signature

Friday, December 28, 2012

Pretty Ballerina!

pp-notecards-trio-wm

Hi everyone,

Today I am sharing a few Ballerina notecards I created a while back but never posted to my blog. The Ballerina is a stamp from Paper Prettiespp-notecards-wm

I stamped the image onto white card and then used a circle die to cut out the image.

Stamps: Ballerina Sophia – Paper Pretties
Paper: White; Light Pink; Dark Pink; DP
Other: Black Ink; Circle Nestabilities; Rhinestones


#aa-owl-signature

Saturday, December 1, 2012

Snowman What’s New!

C4C165 Snowman wm

Hi everyone,

It’s challenge time with the “Crazies” over on the Crazy 4 Challenges blog. This week it is my turn to host the challenge.

Our challenge this week is …. Snowman what’s new? – create a card that features a snowman

For my card this week I used one of the many snowmen from Alota Rubber Stamps Snowman/Tree, I seem to pull this snowman out a lot, it is one of my favs!

As this is a longish stamp  I decided to create a tall card. I added the MFT Die-namics Jumbo Snowflake and MFT Die-namics Let It Snowflake to the top left corner of my card.

C4C165 Snowman2 wm

Here is the inside of my card, I added a sentiment to the inside.

Don't forget to check out the rest of the “Crazies” cards over on the Crazy 4 Challenges blog and also their individual blogs for more details.

Stamps: Snowman/Tree – Alota Rubber Stamps; Seasonal Sentiments – MFT Stamps; Inside Sentiment – Dove Craft?
Paper: White; Red; Green; Christmas Cheer DP – LilyBee Design
Other: Black Ink; Red & White Ribbon; MFT Die-namics Jumbo Snowflake; MFT Die-namics Let it Snowflake; MFT Die-namics Fishtail Flags Layers Stax; Long Oval Nestabilities; Brad; Foam Tape; Copics

#aa-owl-signature

Saturday, November 10, 2012

Angels We Have Heard on High!

C4C162 Angel wm

It’s challenge time with the “Crazies” over on the Crazy 4 Challenges blog. This week Joycelyn Pelkey continues to bring us this month’s challenges.

Christmas Carols are likely playing all around you (and getting stuck in your head). Create a card inspired by your favorite holiday song!

I decided to use the Christmas Carol “Angels We Have Heard on High” as the inspiration of my card this week as I wanted to use this Marianne Design Angel Die I purchased at the craft show I attended a couple of weeks ago.

C4C162 Angel3 wm

Here is a close up of my Angel. This die can be joined at the back to create a Christmas Ornament so I created my card so the skirt of the Angels dress is rounded & 3D.

C4C162 Angel2 wm

Here is the inside of my card, I added a sentiment and used the MFT Die-namics Icicles Border along the top of the striped designer paper.

Don't forget to check out the rest of the “Crazies” cards over on the Crazy 4 Challenges blog and also their individual blogs for more details.

Stamps: Peace Joy Love – Stamp It (Aust); Sentiment inside – Print Works
Paper: White; Green; Aspen Frost DP – Basic Grey; Just Believe DP – Kaisercraft
Other: Black Ink; Marianne Design Angel Die; Circle Nestabilities; MFT Die-namics Icicles Border; Blue Pearls; Ribbon; Foam Tape

#aa-owl-signature