Hi everyone,
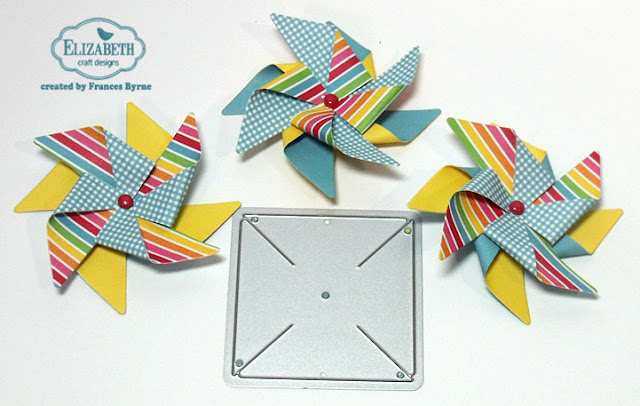
It's my turn to post a tutorial on the Elizabeth Craft Designs blog today. This time round I am playing with a couple of the new dies which were released last month. I used the new Pinwheel die set from the Joset Designs collection to create double pinwheels.
Here's how I created my card:
Creating the card base -
1. Cut a piece of aqua cardstock that is 5 1/2 inches by 11inches. Score along the 11 inch side at 5 1/2 inches and fold.
- Cut a piece of yellow cardstock that is 5 1/4 inches square. Adhere to the folded aqua card.
- Cut a piece of designer paper that is 5 inches square, adhere to yellow card as per photo above.
2. Counting from the small centre die, die cut the sixth die from the Stitched Circles die set and die cut from White Soft Finish Cardstock.
- Counting from the small centre die, die cut the sixth die from the Dotted Scallop Circles die set and die cut from aqua cardstock.
- Layer the white circle onto the aqua circle.
- Stamp the sentiments "Happy Birthday" and "Wishing You A Colourful Day" from the General Sentiments Clear Stamp set so that it is centred on the right hand side of the circle using black ink. Color sentiment with markers to match colors used to create pinwheels.
- Adhere the circle panel to the centre of the front of the card using foam tape.
3. Using the Pinwheel die from the Pinwheel die set die cut the following:
- (3) Pinwheels from Striped Designer Paper. (for the third pinwheel turn the paper over so the die is facing the blue checked side of the paper)
- (3) Pinwheels from Blue/Yellow Designer Paper. (for the third pinwheel turn the paper over so the die is facing the blue side of the paper)
4. Assemble the striped pinwheel using a red brad through the holes on each top point of the pinwheel and the centre hole. Then assemble the second pinwheel (blue/yellow) and use the same red brad to attach this pinwheel behind the first one. Twist second pinwheel slightly so you can see both the blue and yellow part of the pinwheel.
- Assemble two of the pinwheels in this way where the striped designer paper and yellow color are facing up when assembling.
- For the third pinwheel, assemble so that the blue check designer paper and blue color are facing u when assembling.
- Attach the pinwheels to the left side of the circle using foam tape on the front of the card.
5. The Inside of the Card:
- Cut a piece of yellow card that measures 5 1/4 inches square and attached to the inside of the card.
- Counting from the small centre die, die cut the fifth die from the Stitched Circles die set and die cut from White Soft Finish Cardstock.
- Counting from the small centre die, die cut the fifth die from the Dotted Scallop Circles die set and die cut from aqua cardstock.
- Layer the white circle onto the aqua circle.
- Stamp the sentiment "You're the Best" from the General Sentiments Clear Stamp set so that it is centred in the circle using black ink.
- Adhere circle to the centre of the yellow card.
- Cut two strips of designer paper 1/2 inch x 5 1/4 inches and adhere above and below circle as per photo above.
Thanks for stopping by today, I hope you enjoyed my tutorial.
Supplies:
Other:
Cardstock - Blue; Yellow
Designer Paper - Doodlebug Design Inc. Sun kissed 6 x 6 Designer Paper Pad


3 comments:
Such a great card and tutorial.
Awesome awesome awesome!
loving the festive pinwheels
Post a Comment