

Hi everyone,
It's time for our February Die Cut Designer Challenge. Check out the Elizabeth Craft Designs blog today to see what all the Designers created for the challenge this month.
Our challenge this month is ..... In Stitches - feature
any of the stitched dies on your card/project this month. Decorate your card
with anything else you like.
************

For today's challenge Elizabeth Craft Designs are giving away sets of the stitched dies ( a pack of 6 separate dies that includes: Stitched Hearts, Fishtails, Squares, Rectangles, Ovals and Circles) to 3 people.
To enter simply leave a comment on the Elizabeth Craft Designs Challenge post and tell us "What designer challenge would you like to see in the future?”
We will select 3 lucky winners in a random drawing
The winners will be announced on Friday, February 10 on the Elizabeth Craft Designs blog.
***************
I have had in my head for a week or two the idea to create a background using the Stitched Fishtail Banners, so I decided to give that ago for my challenge.

To create my card I die cut a piece of White Soft Finish Cardstock that had Clear Double Sided Adhesive Tape on the from using one of the Stitched Rectangles.
I also die cut three each of the second largest Stitched Fishtail Banners from Dark Fuchsia, Perfect Purple and Dusky Lavender Soft Finish Cardstock.

Remove the protective backing off the adhesive on your rectangle card and start laying the Stitched Fishtails onto the card on a diagonal. Refer to photo above for placement.

Continue laying the fishtail banners along the top of the card so that the fishtail part of the card is even. Once you have covered the top half of the card start on the bottom half layering the fishtail part of the card so it is between two colors on the top. See photo above.
After creating the background I decided that I needed to decorate the card so that the area where the fishtail join had to be seen rather than covered, otherwise I might as well have used a rectangle die instead. So I die cut a Stitched Circle from White Soft Finish Cardstock, and adhered it to the bottom left hand corner of the card using foam tape. I trimmed off any over hanging pieces of the circle so that two sides where straight.
The cupcakes are from the new Small Cupcakes die set. I cut all the pieces from White Soft Finish Cardstock and colored the pieces using Copic markers. The stars on the top of the cupcakes where cut with Clear Double Sided Adhesive Tape on the front and then covered with Lavender Ice Silk Microfine Glitters. I think this has become one of my favorite colors of all the Silk Microfine Glitters.
On the top right hand side of the card, I added another Stitched Fishtail Banner and added the sentiment "Celebrate"
I layered the large rectangle piece onto a White Soft Finish Cardstock Rectangle which had been die cut using the Dotted Scallop Rectangles and then onto a top folded Perfect Purple Soft Finish Cardstock base card.
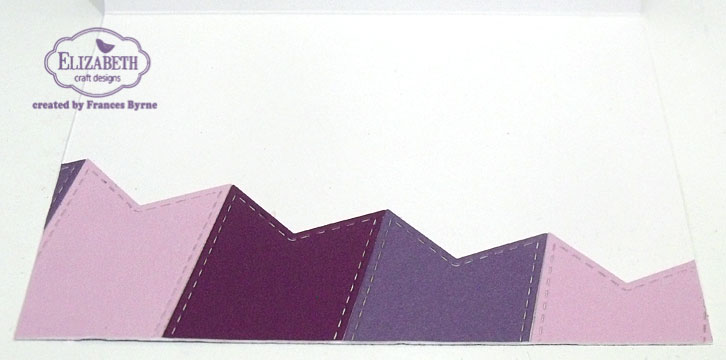
For the inside of my card I die cut more of the Stitched Fishtail Banners in the three colors I used for the front of my card and layered them along the bottom edge of my card.

To finish off the inside of the card I added the Happy Birthday sentiment.
That's it from me today, don't forget to check out the Elizabeth Craft Designs blog to see all the wonderful creations by our talented designers.
Supplies:
Elizabeth Craft Designs:
Other:
Copics
Foam Tape
3 comments:
Delicious, I want to lick a cupcake, I would like to see how you made them so tempting.
what a clever use of those die cuts to make your bkgd....thx for showing how you did it
Such a clever background technique. Fun card!
Post a Comment