Showing posts with label Diorama Card. Show all posts

Wednesday, May 25, 2022

Tropical Diorama


Hi Crafty Friends,

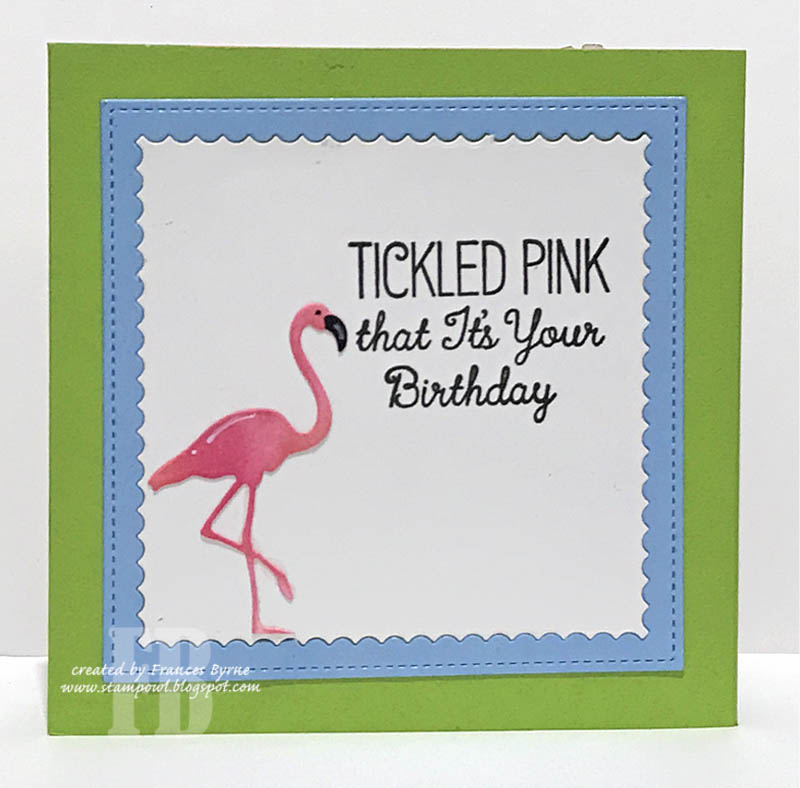
I have a tropical themed diorama card to share with you today using some new dies from Crafter's Companion.

This card uses the Tropical Paradise Interchangeable Scene die set which was recently released by Crafter's Companion. There are 6 different die sets that can either be used on there own or combined with another of the die sets to create wonderful 3D scene cards. These looked so much fun that I had to add them to my stash.


This diorama card measures 5 inches square, I added the accordion sides to add the various layers to the inside of my card, to give the look of depth.  The accordion piece on this card measures 5 inches x 3 1/2 inches and I scored along the piece at 1/2 inch intervals.

There are two different square panels on the inside of the diorama, one has palm trees and the other leaves. Also included in the die set are extra leaves, the parrot and flamingoes.


I blended various shades of yellow and orange inks to the back panel to create my sunset sky. I also added a moon using a circle die.


The blue frame around the opening was created using a frame included in Mama Elephant's Framed Tags Union Square die set.

I added a birthday sentiment using a stamp set from Colorado Craft Company.


I added another of the frames and the inner panel to the back of my card, so I had a place to add a sentiment and also to write a personal greeting.

The sentiment is one from MFT Stamps called Tickled Pink.

Other Supplies:
Tickled Pink Stamp Set - MFT Stamps (discontinued)


Friday, October 25, 2019

Happy Fall


Hi Crafty Friends,

Today I am sharing another card using a few of the new Divinity Designs products from the October Release.

This time around I created a diorama card using Divinity Designs Diorama Card with Layers die set. I used one of the wood papers from the Weathered Wood Paper Collection to layer the front of the diorama.

To decorate my diorama I used the Loads of Love Stamp/Die Duos set. The pickup truck included in the stamp set is empty and you have the choice to fill the back with either the pumpkins, apples, flowers or Christmas Tree. There are also a number of sentiments to suit many occasions. 


After die cutting the dividers for the inside of the diorama, I then used the two border dies from the Curvy Slopes die set to create two grassy hills.

I then used the Trees and Deer die set and die cut two sets of trees and one set of deers and adhered them to the inside.

The "Happy Fall" was stamped onto white cardstock and then I used one of the dies from the Sentiment Strips die set to die cut the sentiment.


The diorama folds flat so it can be placed in an envelope for mailing.


Supplies:

For your shopping convenience, all products are linked below. Compensated affiliate links are used where possible with no extra cost to you. This helps me to continue to share all the projects I include on my blog. Please note I only use and share products I love.


Wednesday, December 19, 2018

Elizabeth Craft Designs December Designer Challenge


Hi Crafty Friends,

It's time for our December Elizabeth Craft Designs Design Team Designer challenge. Check out the Elizabeth Craft Designs blog today to see what our talented designers created for the challenge. 

Our challenge this month is ..... 
Garden Notes - Frame It/Stitched Inspiration. For our challenge this month use any of the Garden Notes - Frame It/Stitched nested dies when you create your card or project. There are four different die sets in this collection … squares; rectangles; ovals and circles.


For today's challenge Elizabeth Craft Designs are giving away a $20 Gift Card to use on our website to 3 winners

To enter simply leave a comment on the Elizabeth Craft Designs Facebook Giveaway Blog Post or the Elizabeth Craft Designs Challenge post and tell us Which of the Garden Notes - Frame It/Stitched die sets would you use on a project and how would you use it.

We will select 3 lucky winners in a random drawing 

The winners will be announced on Friday, December 21st on the Elizabeth Craft Designs blog and our Facebook page.


For my card today I decided to create a Diorama or Shadow Box card using the Garden Notes - Frame It/Stitched Circles die set to die cut the centre circles out of the front of the Diorama and the patterned paper on the front of the card.

Here's how I created my card:

Step 1 - 

  • Cut two pieces of red cardstock that measured 4 1/2 inches x 6 1/2 inches.  Score each panel at 1/2 inch and 2 inches.
  • Using the 4 1/4 inch square from the Dashing Rectangles die set, die cut a rectangle from patterned paper. 
  • Centre the 3/12 inch circle from the Garden Notes - Frame It/Stitched Circles and die cut the centre of the square. 
  • Position the square onto the front of one of the red pieces cut earlier and then centre the 3 inch circle from the Garden Notes - Frame It/Stitched Circles in the circle area and die cut.
Step 2 - 
  • Apply adhesive to the tab of what will be the back panel and attach it to the front. 
  • Cut a panel of patterned paper 4 1/2 inch square and adhere to the back of the the inside of the card.
  • Using white cardstock, die cut a snow drift using the Adventure edges die set and adhere to the back over the bottom of the patterned paper.
Step 3 - 
  • Cut two pieces of white cardstock that are 5 1/2 inches x whatever height works for your design.
  • Using the Adventure Edges snow border to die cut both panels. Score each end at 1/2 inch.
  • Adhere the left hand side tabs of both snow drifts to the left hand panel of diorama card.
  • Apply adhesive to the right hand side of both snow drifts and close right hand side panel over the tabs.
  • Apply adhesive to final tab and adhere to the front.
Step 4 -
  • Decorate card as desired. For my card I used the Elf Clear Stamp set and coordinating dies which I adhered to the inside of the diorama. 
  • The North Pole sign was created using the sign from the Igloo die set and the sentiment from the Cute Winter Sentiments Clear Stamp set. I die cut the sign from white cardstock and colored using Copic markers.
  • I also added the Happy Holidays Banner to the front of the diorama at the top of the circle.

Here is a look at my card when it is folded flat ready to be placed in an envelope.


I added two square panels using the Dashing Squares die set to the back of the diorama and added a sentiment and another of the elves. This gives a place for the giver to write a personal message.


I hope you enjoyed my project today. Don't forget to check out the Elizabeth Craft Designs blog to see all the wonderful creations by our talented designers and for a change to win the giveaway.


Supplies:
For your shopping convenience, all products are linked below. Compensated affiliate links are used where possible with no extra cost to you. This helps me to continue to share all the projects I include on my blog. Please note I only use and share products I love.


Thursday, November 22, 2018

Lettuce Celebrate!


Hi Crafty Friends,

It's challenge time with my friends over on the CCEE Stampers challenge blog. Anne Harmon our challenge hostess for the month continues to issue the challenges.

Apparently today is Anne's daughter's birthday, who loves to get funny cards. Our challenge this week is to make a birthday card, extra points if it's humorous.

As you can see I have created a diorama card using Our Daily Bread Designs Diorama with Layers die set. I also used Art Impressions Gotta Garden Stamp set to decorate my card. Hopefully this can be classed as humorous to some degree.


I wanted to make use of the "Lettuce Celebrate" sentiment, so I pulled out an old Penny Black stamp I had in my stash and stamped the image a number of times and then cut out all the lettuces and the lettuce sign and added them to the vegetable garden beds inside the diorama.

The back panel (sky) of the card was created using Distress Oxide inks in various blue inks and then using the Earth & Sky Stencil and White Picket Fence Distress Ink. 

I added the man wheeling the woman in the wheelbarrow to the back of the diorama.

On the front of the diorama I added the woman jumping for joy, the tools and gloves and also two sentiments inside a yellow circle which represents the sun.


For the back of the diorama, I die cut two squares adding ground to the bottom of the squares. I then added the gnome and tool and again two more sentiments from the stamp set.


This card folds flat, so it is easy to pop in an envelope for mailing.

Don't forget to check out the CCEE Stampers blog (goes live 12 AM EST) to see the rest of the creations the CCEE Stampers created this week. You can also see more details of their creations on their individual blogs:


Supplies:
For your shopping convenience, all products are linked below. Compensated affiliate links are used where possible with no extra cost to you. This helps me to continue to share all the projects I include on my blog. Please note I only use and share products I love.

Lettuce Row Stamp - Penny Black


Friday, November 9, 2018

Signs of Santa Diorama


Hi Crafty Friends,

Today I am sharing a Christmas card I created recently.

This card uses the new Diorama with Layers die set from Our Daily Bread Designs and the Signs of Santa Clear Stamp set from Stampin' Up.


The diorama die set makes it so easy to create this card, no measuring ... just use the dies provided in the die set to create all the various layers etc.

For the background panel, I created a snowy sky by blending Distress Oxide inks and then splattering white paint over the background.


For the back of the card I added some of the patterned paper I used on the front of the card and also rectangle layers. I added two sentiments and a pile of presents from the stamp set.


This card folds flat, so it is easy to pop in an envelope for mailing.


Supplies:
For your shopping convenience, all products are linked below. Compensated affiliate links are used where possible with no extra cost to you. This helps me to continue to share all the projects I include on my blog. Please note I only use and share products I love.

Signs of Santa Stamp Set - Stampin' Up
Santa's Workshop Specialty Designer Series Paper - Stampin' Up