Showing posts with label Mini Ball Pop-up. Show all posts

Tuesday, March 5, 2024

March 2024 Karen Burniston Designer Challenge


Hi Crafty Friends, 

Welcome to our March Karen Burniston Designer Challenge.

Check out Karen Burniston's blog on Wednesday (US Time) when you will be able to see what all the designers created for the challenge this month, plus Karen will have an amazing video tutorial to share with us all.

Our challenge theme this month is ... "BUNNY EARS" - Use a bunny, bunnies or even just the ears for a card of any theme.


Here is a quick video to see my card in action.


As you can see, I have created an Easter themed Slimline Card. Actually my card is more a DL card, rather than a Slimline being that it is 8 1/4 inches wide by 4 1/4 inches, I opted for this size to make sure the Bunny Ball Character would fit inside the card properly.


For this card, I decided to not attach the bunny to the card, that way when the card is opened the bunny explodes out of the card. You can see this if you watch the video above. The bunny can't fall out of the card as the magnets on the flap keeps it safe inside.

I used the Long Flap and Closure die set to add the flap to the bottom portion of the Slimline card.

Along the top of the card I added a thin panel to which I added the bunnies from the Easter Borders die set.


The grass along the bottom of the card is from the Long Nature Edges die set. 

I also added a stamped sentiment to my card, which I die cut out using the smallest rectangle die included in the Short Rectangles die set.


To create the bunny, I used the Mini Ball Pop-up die set along with the new Animals Add-ons 5 die set. I added a green label to the bottom of the bunny to look like grass, the label is from the Rectangle and Labels Crosshatch die set.


For the front of the card, I used the dies from the Animals Add-on 5 die set to make two bunny faces. I also used the smallest circle included in the Circles Crosshatch die set.

I also used the Happy Easter die set to add the Easter sentiment.



Tuesday, November 1, 2022

November 2022 Karen Burniston Designer Challenge


Hi Crafty Friends, 

Welcome to our November Karen Burniston Designer Challenge.

Check out Karen Burniston's blog on Wednesday (US Time) when you will be able to see what all the designers created for the challenge this month, plus Karen will have an amazing video tutorial to share with us all.

Our challenge theme this month is ... "SNOWMAN" - create a card with any type of Snowman. (Die ideas - 1012 Snowman Twist Circle, 1017 Snowman, 1213 Snowman Add-ons)

For my card today I decided to using the Snowman Add-ons die set in conjunction with all the "Ball" dies ... Surprise Ball, Bitty Ball & Mini Ball to create two snowmen inside a trifold card.

You can see my card in action above.


As you can see by the photo above, I created two snowmen. The one in the centre panel of my trifold card using all three "Ball" dies and also all three of the "Ball Double Ups" die sets. You don't need the double ups to create the balls, but it does make it so much easier and quicker to die cut all those extra pieces to add to the balls. I also used the Snowman Add-On die set to add all the features all of the snowmen.


The smaller snowman or "snowgirl" as I gave her plaits etc, was created using the two smaller "Ball" dies ... the Bitty Ball and Mini Ball die sets. To decorate her I also used the plaits and hat from the Mini Ball Add-ons 1 - Gnomes die set. 

Rather than use a brad to attach each of the snowmen to my card, I have adhered each of them to an oval using the Crosshatch - Ovals die set. I then added strips card/patterned paper to each of the panels which the ovals can slip into. This makes them easily removed in case you want to display them after the occasion without the card.


When you close the right hand page of my card, ready to close the card, it reveals a "Merry Christmas sentiment using the Merry Christmas and Merry Christmas Shadow die sets. 

You can see the left page still in view. On this page added the sentiment "Hope Your Christmas is Snow Much Fun" This was created using stamps for the first part of the sentiment and then Word Set 13 - Snow die set. I layered the sentiment to my card using the Labels - Crosshatch die set.


Here is a look to the front of the card, which I tried to keep fairly simple seeing the focus is on the inside.

To create the snowman I used circles from the Circles - Crosshatch die set and the Snowman Add-ons die set. The brim of the hat and scarf, were both created using a circle die.


I used the closure Karen Burniston shared recently in a video. I also added another snowman to the hand side of the card.

The finished card measures 5 1/2 inches x 5 1/2 inches x 1/2 inch deep when closed. When fully opened it is 5 1/2 inches x 17 3/4 inches.

Other Supplies:
Holly Jolly 12 x 12 Paper Pack - Simply Made Crafts


Monday, August 8, 2022

Gnome One Like You


Hi Crafty Friends,

Today I am sharing a pop-up card I created using Karen Burniston's Mini Ball Pop-up and the Mini Ball Add-ons 1 Gnomes die sets.


I just love all the fun characters you can create using the "Ball" dies, there are now three different sized balls dies available which can be used either on their own or in conjunction with one or more of the other ball dies or the many add - on sets available now. The "Ball" dies available are ... Surprise Ball Pop-up; Bitty Ball Pop-up and the Mini Ball Pop-up. 

A few weeks ago, someone in the Karen Burniston Pop-up Peeps Facebook Group mentioned how she was looking for a way to add these characters inside a card so they  pop-up but was able to remove for the recipient to display after the occasion the card was sent for. In the past I have either added them to a card with a brad or included inside a pocket card. Of course Karen Burniston, never fails to disappoint and came up with a solution which she shared on a card she created for a Zoom Class which was held on the weekend. As I loved the idea, I decided to try. it for myself.

Here is a quick video to see my card in action.


As you can see I created a girl Gnome using the dies included in the Mini Ball Add-on Gnomes die set. Once I had finished creating my gnome, I adhered it to a small oval using one of the ovals included in the Ovals - Crosshatch die set. I then created my card as I would any pop-up card, adding two strips of decorated cardstock to either side of the card. The adhesive is only on the other side of the strips to allow the oval on the gnome to tuck under the strips.


I recently found a gnome themed sentiment set designed by Crafter's Companion. As I love making gnome cards of any type, I had to add this to my stash and added three of the sentiments to the inside of the card.

For the one on the back of the card, I added two sentiments, using the Labels - Crosshatch for the layering.

For the one of the front, I used the smaller dies from the Short Rectangles - Crosshatch and Long Rectangles - Crosshatch die sets. I had to reposition the Long Rectangle die to achieve the length I was after. This sentiment panel as well as adding another sentiment, acts as a stop to prevent the gnome falling out of the card when closed.


As you can see in the photo above, you either display your card as a normal pop-up card or lie it flat, depending on the space you have available.


As the focus of this card is on the gnome on the inside of the card, I kept the front fairly simple.

This style of pop-up does need a way to keep the card closed, so for this one I decided to opt for a belly band. I used the Ovals - Crosshatch for the layers on top of the belly band.

I decided to try making a flat gnome, using some of the dies included in the Mini Ball Add-on 1 - Gnomes die set. The only extra die I need to do this was a circle which I got from the Circles - Crosshatch die set.

To finish off the front of the card, I stamped the word "Hello" to the lower right hand corner of the card.


One last photo, to show the card with the gnome and the belly band removed.


Tuesday, June 7, 2022

June 2022 Karen Burniston Designer Challenge


Hi Crafty Friends, 

Welcome to our June Karen Burniston Designer Challenge.

Check out Karen Burniston's blog on Wednesday (US Time) when you will be able to see what all the designers created for the challenge this month, plus Karen will have an amazing video tutorial to share with us all.

Our challenge theme this month is ... "MINI SLIMLINE" - create a card in a mini-slimline size of 3.5" x 6".


Being a lover of Slimline and Mini Slimline cards, this challenge was right up my alley! Of course being a Karen Burniston challenge, I wanted to include some form of pop-up inside of the card. Many of Karen's dies will work inside of a Mini Slimline. Until recently one thing that wouldn't work was the ball dies, specifically the Surprise and Bitty Ball dies. However with the release of the Mini Ball last 
month we can now include those in slimline cards if you wish.

I turned the mini ball into a birthday cake, at 3 1/2 inches wide you need to be careful what "extra" pieces you add to then mini ball for it to fit inside the card. I was able to do a monkey last month inside a 4 inch slimline card.

For the layers of my card, both on the inside and front I used the new Short Rectangles - Crosshatch die set, using the largest rectangle included in the set to die cut my panels.

I also used the Long Flap and Closure die set to create the flap to my card which helps to keep the card closed.


To decorate my "cake" I added a ribbon trim using one of the border dies included in the Border Blends Trims die set. The candle and presents are all from the Big Birthday Charms die set.


On the back panel I added the birthday sentiment using the Happy Birthday & Happy Birthday Shadow die sets. The Happy Birthday was die cut using pink glitter paper.


To decorate the front of the card, I added four presents using dies from the Big Birthday Charms die set.

I also used the Mini Alphabet die set to create the HB2U on the flap.


Tuesday, May 10, 2022

May 2022 Karen Burniston Designer Challenge


Hi Crafty Friends, 

Welcome to our May Karen Burniston Designer Challenge.

Check out Karen Burniston's blog on Wednesday (US Time) when you will be able to see what all the designers created for the challenge this month, plus Karen will have an amazing video tutorial to share with us all.

Our challenge theme this month is ... "BALL AND SMALL" - create a ball animal and pair it with the same critter from our animal sets. 

Here is a quick video to see my card in action. 


Karen Burniston will be releasing 8 new die sets next week Monday 16th May, and today I am sharing my first sneak peek of what is being released. I actually used 5 of the new dies on my card today.

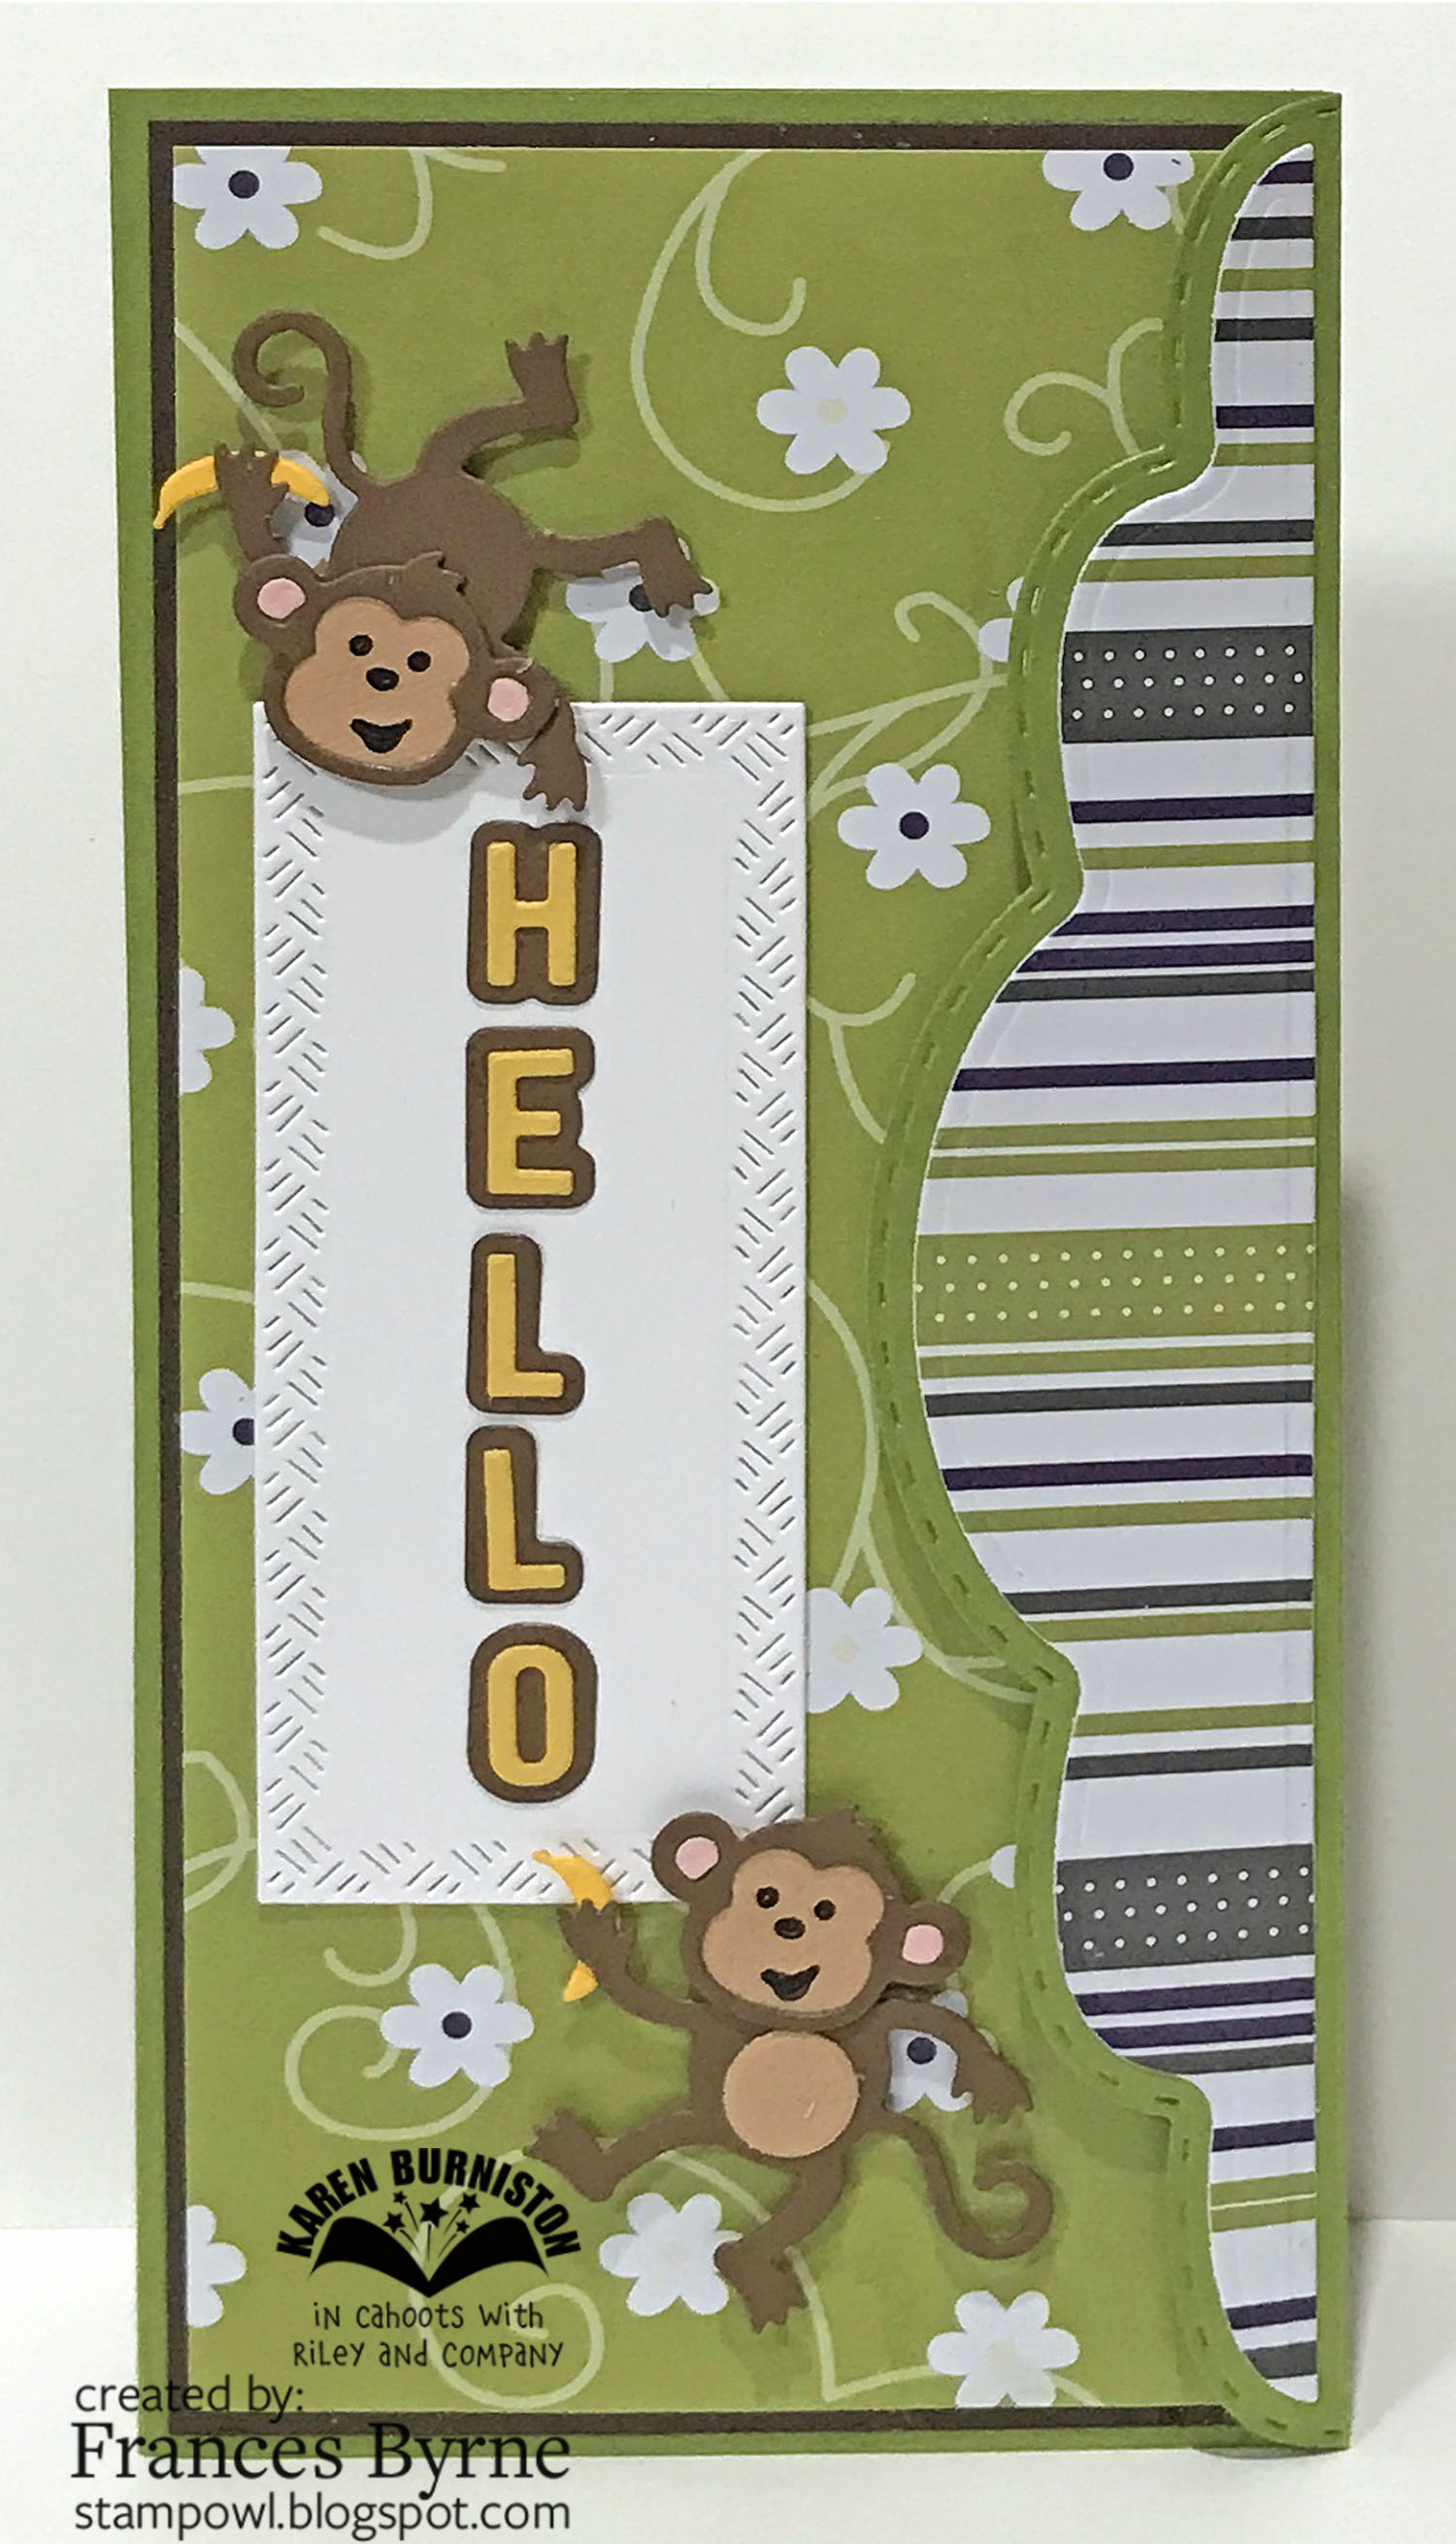
Everyone who follows me, knows I love Slimline cards. So I was super excited when Karen told us she was releasing a Mini Ball Pop-up which would fit into a slimline card. I made my slimline card 4 inches x 8 1/2 inches, it will depend on what pieces you add to your Mini Ball as to the size of Slimline card you will need.

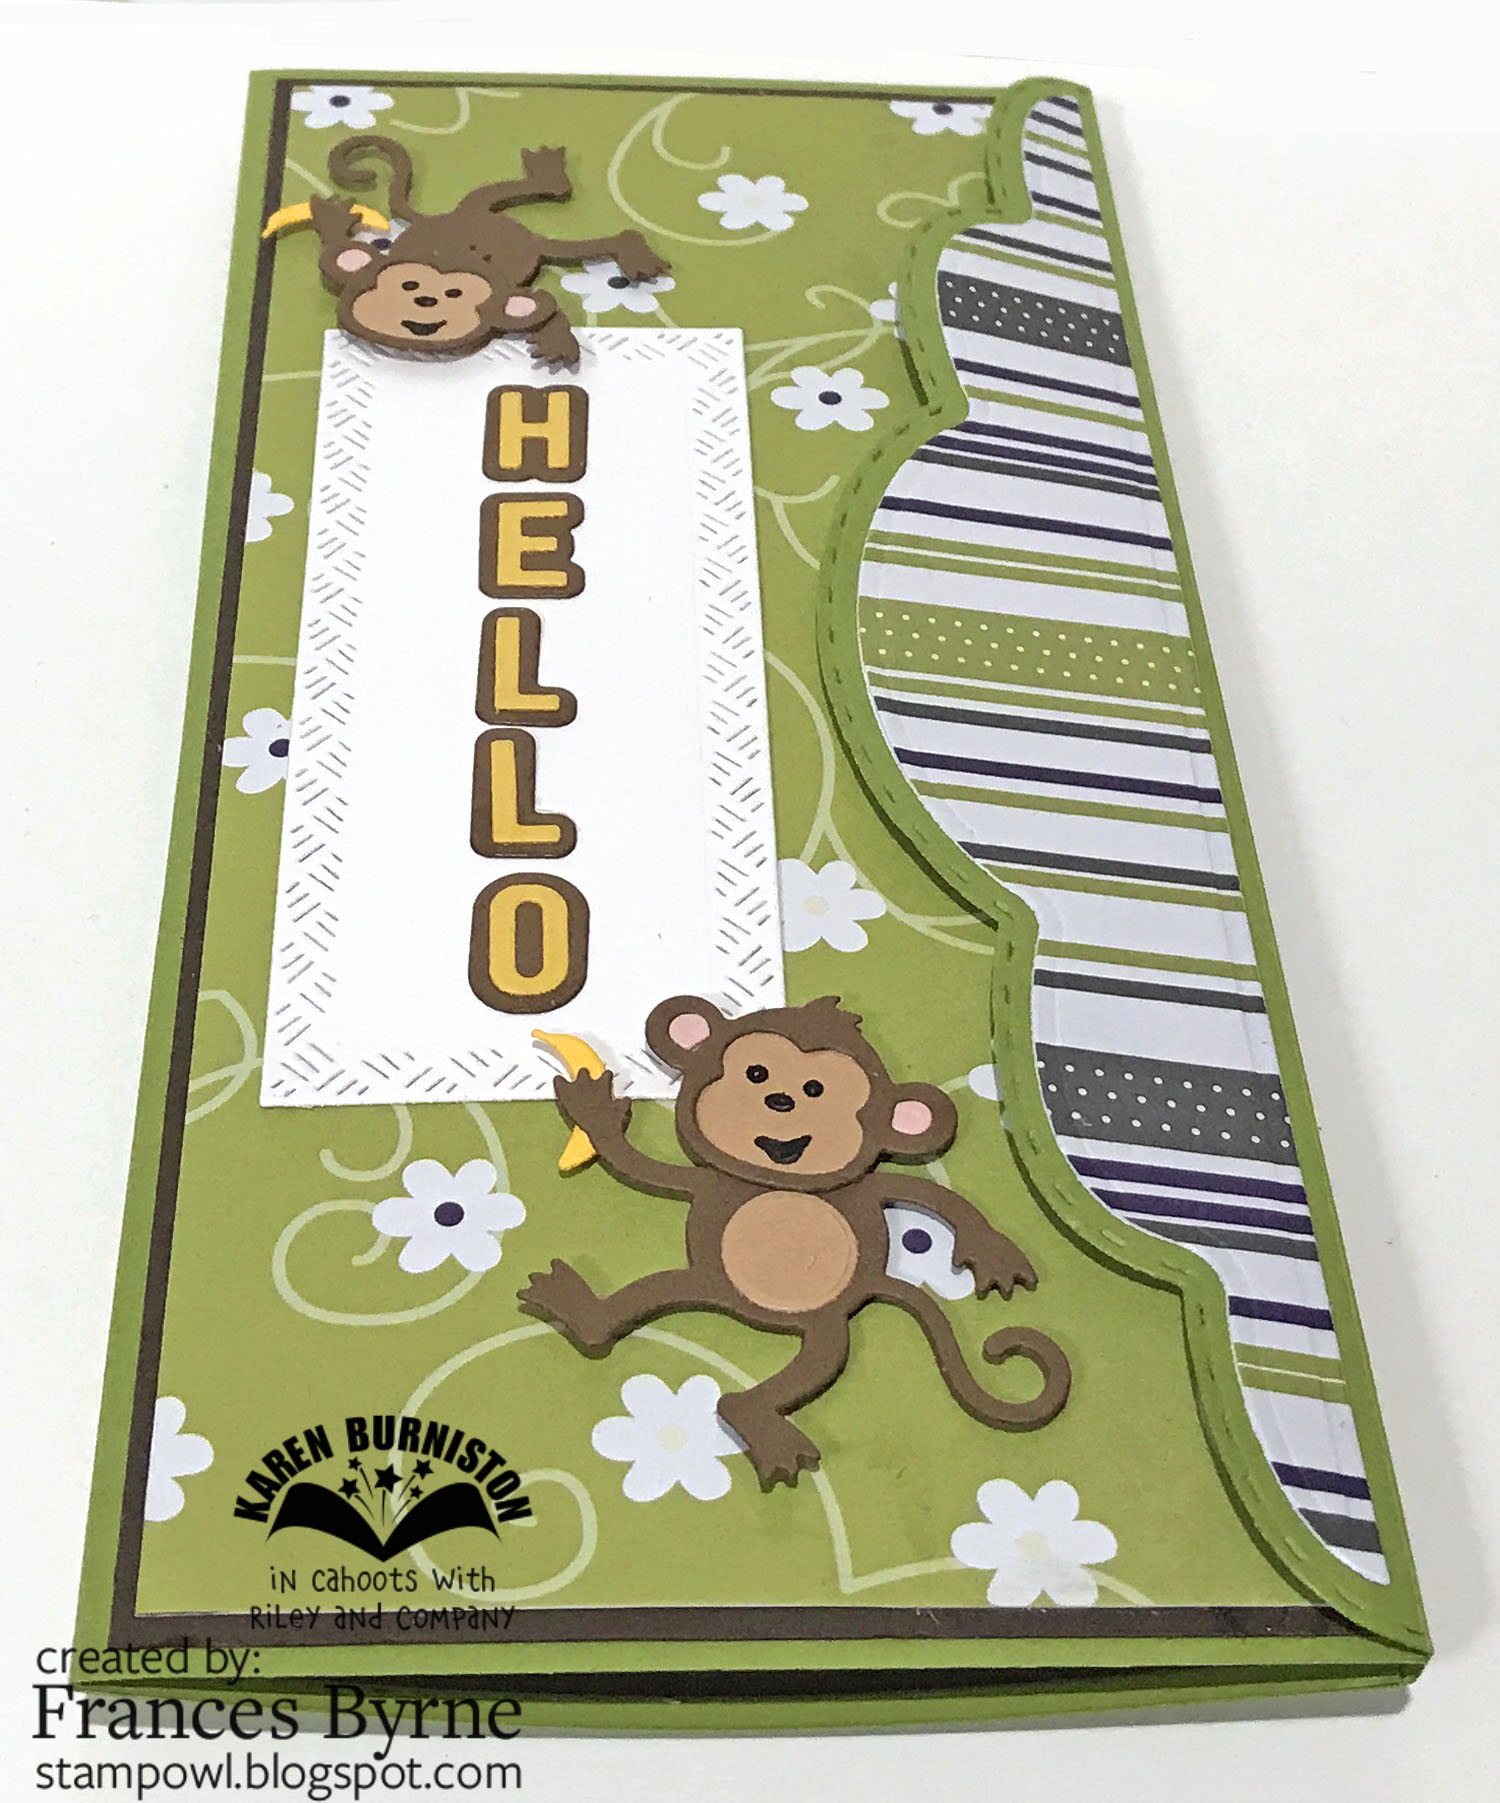
For the "Ball" portion of the challenge I used the new Mini Ball Pop-up and Mini Ball Add-ons 2 - Monkey and Lion die sets. 


On the left side of my card I added two of the monkeys from the Monkey and Lion die set. One is standing upright and the other is hanging by it's tail by a vine.


For the sentiment, I used the new Mini Alphabet die set. This die set includes the alphabet, numbers and some punctuation, along with the layering dies for each piece.


I added another. sentiment under the Monkey Mini Ball ... it's a little rebus. which says "Banana's 4 U" meaning I'm bananas for you!


To help keep the card closed I used the new Long Flap and Closure die set, this die set is designed to work with slimline cards. However the die does have notches along the die which allows you cut the flap down to suit any size card.


To decorate the front of my card, I added a rectangle from the new Short Rectangles - Crosshatch die set. I added the "Hello" again using the Mini Alphabet Die set.

To finish off the card I added the two monkeys to each end of the rectangle.