Showing posts with label Slimline Cards. Show all posts

Wednesday, May 7, 2025

Mailing You A Big Hello


Hi Crafty Friends,

Today I am sharing another card using Spellbinders Glimmer of the Month - Scattered Letters, this time to make a Slimline Card. 

First up I glimmered my panel using black glimmer foil. I glimmered once at the top and the again down the bottom. As I get the caboodle kit (all the kits) I get the bonus, which this time was a stencil to colour the envelopes. 

I then cut my panel and added it to a 3 1/2 inch x 8 1/2 inch slimline card.  To finish off the front of the card I added the black glimmer foiled sentiment which is also included in the glimmer set.


For the inside of my card I added the negative foiled panel along the bottom of my card, adding a postage edge border along the top edge. 

I added the big hello sentiment, which is an older Waffle Flower Crafts foil/die set. I then added the sub sentiments which is from Lisa Horton Designs A Little Hello Die/Stamp set. 


Monday, February 10, 2025

Butterfly Slimline

Hi Crafty Friends,

Today I am sharing a Slimline card using a few of the club kits from the Spellbinders January 2025 Club Kits.

I used the Hemstitch Slimline die set to create the layers of my card. I found this older pattern paper from a Made To Surprise Paper Pad which I thought would go well with the butterfly. The butterfly is from Spellbinders Take Flight Betterpress Set which is the January 2025 Betterpress of the Month.  The sentiments are from the Clear Stamp of the month for January called Nature’s Dance.


For the inside of my card I added another layer using the dies from the Slimline die set I used on the front.

I added another butterfly and a birthday sentiment which is also from the Nature’s Dance Stamp set.


Wednesday, November 15, 2023

Gnomefuls of Love This Christmas


Hi Crafty Friends,

Today I am sharing a Christmas themed Slimline card I created recently. For my card I used Woodware Craft Collection's Christmas Gang stamp set, I just love this cute gnome image.

I framed the image using Whimsy Stamps' Slimline Twisty Frame die set. 

I added the gnome themed Christmas sentiment to the bottom of the frame which is also from the stamp set.


For the inside of the card I stamped one of the names from the Christmas Gang Stamp set, I also stamped the arm for the other gnome at the opposite end of the stamp, so my gnome could have two arms.

The sentiment is from a Picket Fence Studios' "A Gnome Christmas stamp set". 

I also added a few stamped snowflakes randomly around the white panel.


Thursday, October 26, 2023

Santa's Sleigh


Hi Crafty Friends,

Today I am sharing a Christmas themed Slimline card I created using the stamps and dies included in the Papercraft Society Box 49 which was designed by Helen Griffin of Card Making Magic.

This was a nice quick card to make.


For the inside of the card, I used one of the sentiments from the stamp set and also stamped out the footprints along the bottom of the card.


Tuesday, October 17, 2023

You're A Big Deal


Hi Crafty Friends,

Apparently today (17th October), is National Playing Card Collection Day so of course I had to pull out my Karen Burniston House of Cards Pop-up die set to create a card.


This time round, I have created a Slimline card which measures 4 inches x 8 1/2 inches when folded.  My house of cards is 3 rows high.


To decorate my card, I used the Word Set 17 Congratulations die set to add the sentiment. I also added the poker chips which are from the Game Charms die set.


On the right side of my card, I added two more poker chips and also four ace cards which are from the same card pack that I used for the house of cards.


I used the same papers that I used on the inside of my card, on the front. I was limited with the amount of paper I had left over, so I had to get a little creative with it.

I added the "Happy Birthday" and "Happy Birthday Shadow" die set to add the birthday sentiment on the front of the card.

I also added two wax seals which are of playing cards & dice.


Here is a close up of the wax seal.


Thursday, October 12, 2023

Micey Nice Birthday


Hi Crafty Friends,

Thanks for stopping by my blog. Today I am sharing a Trifold Building Block Card I created recently, you can find a tutorial by Sam Calcott over on her Mixed Up Craft YouTube channel here.

To decorate my card, I used a cute mouse from Spellbinders called Dancin' and Giftin' Mouse which is part of their Dancin' Collection. The legs of the mouse move when you touch the legs or move the card.


To ground the mouse, I added snow to the base of my front panel using dies from Lawn Fawn.

The birthday sentiment at the top of the card is from Waffle Flower Crafts.


On the back of my card, I added a sentiment panel. I added a die cut sentiment using TEXT{ures} Floral Sentiment Panel die and an older mouse themed sentiment from Penny Black. 

Other Supplies:
  • "Micey" Nice Birthday Wood Mounted Stamp - Penny Black Inc.


Wednesday, October 4, 2023

Happy Birthday Hugs


Hi Crafty Friends,

Thanks for stopping by my blog, today I am sharing a Slimline Easel Card I created recently.

For my card, I used the Stampendous Bear Hugs stamp/die set which is part of the Hugs Collection that Spellbinders has been releasing. There were three different animals in the first collection ... bear, cat and dog. There is a Christmas collection also available now which includes Santa, Snowman & Gnome sets.


I used Lawn Fawn's Grassy Hillside Borders die set to create the grass areas of my card. Both bears and honey pot are included in the die set, and the bees are in the coordinating stamp set.

For the sentiment I used Alex Siberia's "It's Your Birthday" foil plate which I foiled using black foil.


Here is a look at my card, when it is closed ready to be placed in an envelope.


And finally a look at the bottom panel when it is opened up. I added the two bears on either side of the sentiment which acts as the stopper. The sentiment is from "Hugs Sentiments" stamp set.


Monday, October 2, 2023

It's Your Birthday


Hi Crafty Friends,

Thanks for stopping by my blog today. Today I am sharing a Slimline Pop-up card I created recently using stamps, dies and foil plates from various companies.


For the front of my card, I pulled out my Studio Katia Dotted Slimline 2 die set, to create all the layers of my card. I used a rainbow coloured patterned paper for the scallop layer.

The girl is die cut using Concord & 9th's Celebration Squad die set. I love all the different options you have in this die to create girl images.

I added a balloon to the girls hand, using a Lawn Fawn die set ... Outside In Stitched Balloon Stackables.

The sentiment is from Alex Syberia, a new company for me. It is a foil plate with a coordinating die to die cut out the sentiment. The sentiment was a little smaller than I was excepting, but I am more than happy with it. I foiled the sentiment with black foil and used a foiled foil plate so I could get the reverse image of the sentiment where the letters are white and the outline black.


For the inside of my card, I created a pop-up card, using Karen Burniston's new Stocking Pop-up die set. The pop-up mechanism in this die set, is generic and can be used with whatever you wish, in my case I added balloons using balloon dies from the same set that I used on the front. When you open the card, the balloons move up.

To finish off the card, I added a stamped sentiment using a Honey Bee Stamps Birthday Bliss stamp/die sets.


Tuesday, September 26, 2023

Hay There!


Hi Crafty Friends,

Today I am sharing a Slimline card I created recently.


For the background of my card, I pulled out Hello Bluebird's Slimline Summer Woods Scene die set. I die cut the background in white cardstock and then coloured the various pieces using Distress Oxide Inks.

To decorate the card, I used Lawn Fawn's New Hay There Hayrides stamp set and the Hay There Hayrides - Mice Stamp set which coordinates with the first set.

I white embossed a sentiment using sentiments included in the stamp set.


For the inside of my card I created a pop-up card. I adhered blue and green cardstock to the base of the card. For the grassy hills, I die cut the green cardstock using Lawn Fawn's Slimline Stitched Hillside Borders die set. 

I used the pop-up die included in the Street Lantern Pop-up die set to pop-up the tractor and trailers.


I used a circle die to die cut the yellow sun. I also stamped some birds in the sky using a Made To Surprise stamp set.

Finally I added a sentiment using three of the sentiments included in the Hay There Hayrides stamp set.


Thursday, September 21, 2023

All Aboard


Hi Crafty Friends,

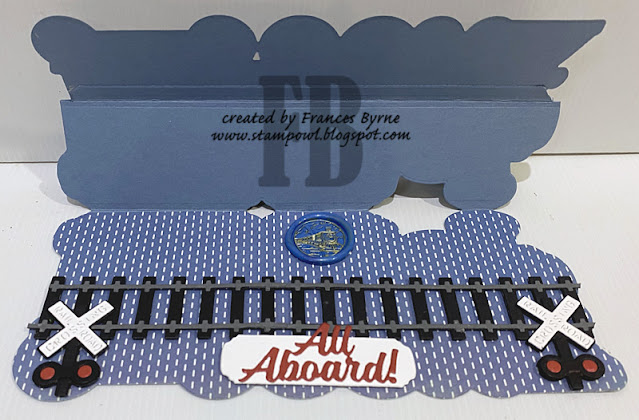
Today I am sharing a Train Easel Card that I created for my husband's birthday. It was such fun to make!

This card uses Anna Griffin's Antique Train Slimline Easel die set. I had been looking for this die set for ages, and unfortunately Anna Griffin doesn't sell to international customers and Scrapbook dot com didn't stock it either. Finally I checked eBay and found a seller there who was selling it new, so I took the opportunity to get it while I could.

I die cut the train from blue pearlescent cardstock and also gold and paper pieced the gold into the holes in the blue train. I die cut the easel portion from a smoky blue cardstock and then covered the base with patterned paper.


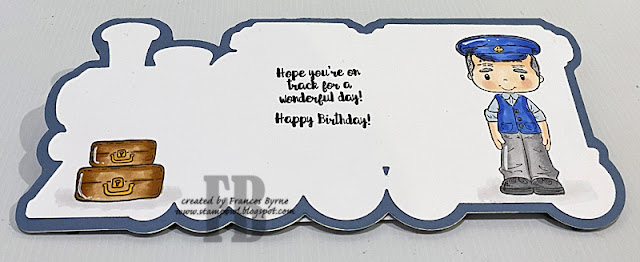
I used two stamps from Kanban's Patchwork Pals Grandpa's Trains stamp set, to create the train driver and the boy's face in the carriage.

For the stopper to keep the easel portion of this card upright, I used a Train Track Border Die set from Taylored Expressions.

The train signals and "All Aboard" sentiment, are all from Karen Burniston's Train Elements die set.


I had recently purchased a train wax seal stamp, which I also wanted to use. As it didn't look right on the front of the card, I decided to add it to the base. I can't be seen unless you open the card, but that is ok.


Here is a close up of the wax seal. I'll also add a wax seal to the envelope.


I die cut the train shadow die from white cardstock, so I could add to the back of the card. This gave me a place to stamp a sentiment and also write a personal greeting. I also added two images from the Kanban stamp set that I used on the front of the card.


Other Supplies:

  • Train Track Border Die Set - Taylored Expressions (discontinued)
  • Patchwork Pals Grandpa's Train - Kanban (discontinued)