Hi everyone,
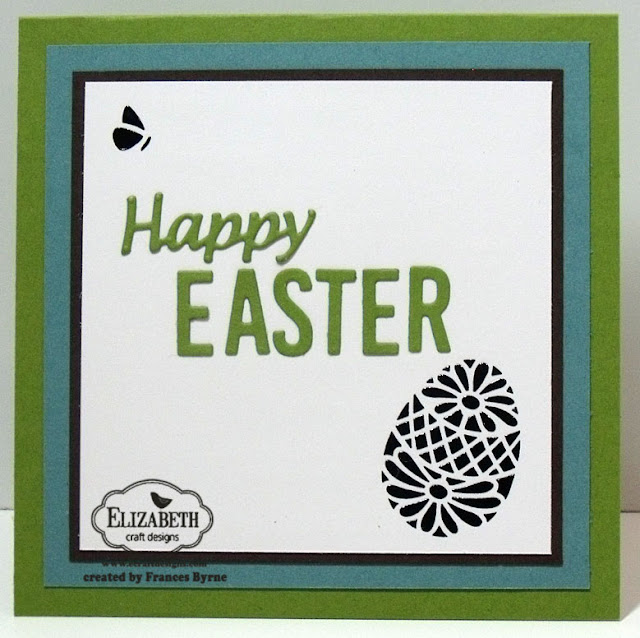
It's my turn to post a project on the Elizabeth Craft Designs blog today. As Easter is only two weeks away, I decided to create an Easter card for my tutorial today. I have used some of Elizabeth Craft Designs Peel Off Stickers and another one of the grids from Susan's Gardens Garden Patch range of dies.
Here is how I created my card:
1. Die cut the grid from the Garden Patch 7/8 inch & Mini Leaves die set using brown card and also designer paper.
2. Trim out the grids on the left hand side of the grid as per photo above. Layer grid to a piece of blue card which is 4 1/2 inches square. Add the designer paper squares to the outer grids. Cut a piece of white card 2 7/8 inches square and adhere it into the large grid.
3. Create a top folding card from green card which is 5 inches square and attach the layers created in step 2 to card.
4. From the Small Eggs Peel-Off Stickers, place three eggs and two butterflies onto white card that has Elizabeth Craft Designs Transparent Double Sided Tape on top. Remove release sheet, cover peel-offs with Cool Diamond Silk Microfine Glitter and polish glitter with your finger. You can see a video Els created using this technique here. Color your images as desired.
5. Cut a piece of green card 1 inch x 3 1/2 inches and another which is 2 inches x 3 1/2 inches. Use the grass die from the Outdoor Edges set to die cut grass, keeping the die near the top of the card so you keep the full depth of the card. Sponge edges using green ink. Trim grass so it is 2 7/8 inch wide.
6. Assemble Easter Eggs and grass, adhering one of the eggs to the white card first, then the 2 inch deep grass over this. The last two Easter Eggs are attached to card using foam tape and finally the 1 inch deep grass again adhering with foam tape.
The Inside of the Card:
7. Cut a piece of white card 3 7/8 inches square and layer this to a piece of brown card 4 1/16th inches square. Layer this to a piece of blue card 4 1/2 inches square which is adhered to the inside of the card.
8. Roughly trim around the negative Easter Egg and butterfly image which remains after using the peel-off for your card. Peel off any excess black peel off sticker that may be around your image until you just have the image as per photo above.
9. Cut a piece of Sticker Transfer Sheet large enough to fit over Easter Egg and butterfly. Remove the protective backing and place the tacky side of the Transfer Sheet onto the negative shapes/ Burnish with a bone folder or your fingers and carefully lift the Transfer sheet checking to ensure that all of the pieces lift at once. You can see Els’s video using this technique HERE.
Now move the Transfer Sheet with negative shapes attached to it over to the card. When it is in the right spot, place it down onto the card and rub the front of the Transfer Sheet to release the pieces onto the card. Carefully lift the Transfer Sheet to check and makes sure all of the negative image pieces are now on the card. (Don’t remove the Transfer sheet till all pieces are in place).
10. Use the Alphabet 1 - Caps die set die cut the letters E; A; S; T; E; R from green card that has Transparent Double Sided Adhesive Tape to the back of it. Adhere the letters so they are centred to the inside white card.
11. Die cut "Happy" from the Happy Birthday die from green card that has Transparent Double Sided Adhesive Tape to the back of it. Adhere this above and to the left of the word EASTER.
Thanks for stopping by today. I hope you have enjoyed my tutorial.
Supplies:
Elizabeth Craft Designs
Garden Patch 7/8 inch & Mini Leaves (1004)
Outdoor Edges (914)
Happy Birthday (783)
Alphabet 1 – Caps (967)
Small Eggs Peel Off Stickers (SKU 898)
Transparent Sheet (SKU 600)
Transparent Double Sided Tape 64mm (508)
Cool Diamond Silk Microfine Glitter (641)
Other
White Cardstock
Brown Cardstock
Blue Cardstock
Green Cardstock
Echo Park Bundle of Joy New Additions Boy 6 x 6 Paper Pad
Green Ink
Copics
Foam Tape


2 comments:
Thanks for sharing this wonderful information. I will be waiting for your next level post. Keep sharing. Very nice keep it up.
With Regards,
White Card Courses in Sydney
It's good learning material for the students.
Post a Comment