Showing posts with label Hanging Charm Pull Tab Card. Show all posts

Thursday, March 9, 2017

Happy Easter


Hi everyone,

It's my turn to post a Pop It Ups Wednesday tutorial on the Elizabeth Craft Designs blog today. With Easter being just over a month away, I thought it would be fun to share an Easter card with you all. For my card I have used the Pop It Ups Hanging Charm Pull Tab die set along with Lucky the Rabbit and the basket from Props 7.


Here is how I created my card:


Step 1 - Using the Lucky the Rabbit die set, die cut the following:
  • (1) Solid Body from Black Cardstock
  • (1) Each of all remaining Rabbit Body pieces from White Soft Finish Cardstock that has Clear Double Sided Adhesive Tape on the back.
  • Using the Props 7 die set, die cut the following:
  • (4) Baskets from White Soft Finish Cardstock
  • (4) Basket Detail pieces from White Soft Finish Cardstock
  • (4) Grass pieces from White Soft Finish Cardstock that has Clear Double Sided Adhesive Tape on the back.
  • 20 Easter Eggs from White Soft Finish Cardstock that has Clear Double Sided Adhesive Tape on the back.

  • Color basket pieces, grass and eggs. Assemble the basket (refer to Karen Burniston's photo above on how to do this).
  • Add the grass piece and 5 eggs to each basket.

Step 2 - Cut a piece of Rosebud Soft Finish Cardstock that measures 5 1/2 inches x 11 inches. Score along the 11 inch side at 5 1/2 inches and fold. (Optional - if you wish to have a flat card as I have for mine, adhere the folded card together. If you prefer to have the hanging charm on a folded card, leave card as is.
  • Cut a piece of designer paper which is 5 1/4 inches square and adhere to the front of the Rosebud Soft Finish Card.
Step 3 - Using the Hanging Charm Pull Card die set, die cut the die base from designer paper (Tip: depending on the thickness of your designer paper you may wish to die cut one from designer paper and one from card and glue together for extra strength,
  • Die cut the Tab from Pink Peach Soft Finish Cardstock (Tip - position the top cutting plate onto the die so that it doesn't cut the top section of the tab, so you can make it longer.)
  • Using the Rectangle from the Dotted Scallop Rectangles, die cut a rectangle that is closest to size of the Hanging Charm Pull Tab card base. 
  • Adhere the Card base to the Dotted Scallop Rectangle and assemble the Hanging Charm Pull Tab to the card referring to Karen Burniston's Assembly Video found here.


Step 4. Adhere the Hanging Charm Pull tab to the right hand side of the card as per photo above.
  • Using the Easter Egg die set, die cut two of the smallest eggs from White Soft Finish Cardstock that has Clear Double Sided Adhesive Tape on the front. 
  • Remove the protective backing from one of the eggs and cover the adhesive with Cool Diamond Silk Microfine Glitter. Color glittered egg as desired.
  • Use the Grass die from the Easter Egg die set and die cut one piece from cardstock, color green.
  • Position the two eggs on either side of the top of the tab, add the grass to the bottom of the egg. Refer to photo above as a guide.
  • Use the Happy Easter sentiment from the Happy Easter Peel Off Stickers to the bottom of the pink rectangle which is revealed when you pull the tab to make the Hanging Charm Pull Tab pop up.


Step 5. Die cut the smallest Stitched Oval from White Soft Finish Cardstock.
  • Die cut the second smallest Dotted Scallop Oval from Rosebud Soft Finish Cardstock, layer the two ovals together and attach to the bottom section of the pull up panel of the Hanging Charm Pull Tab.
  • Attach Lucky the Rabbit to the oval using foam tape.
  • Attach one of the basket of eggs to the rabbits arm as per photo above.
  • Adhere the other baskets to the left hand side of the card.

Step 6 - I prefer to create this style of card flat, so I decorate the back of the card. However if you prefer yours to be on a folded card, this could go on the inside of the card.

  • Cut a piece of White Soft Finish Cardstock that measures 5 1/4 inches square. Adhere to the back of the pink card.
  • Use the grass die from the Outdoor Edges die set, die cut grass from green cardstock. Adhere to the bottom edge of card.
  • Using the smallest egg from the Easter Egg die set, die cut four eggs using White Soft Finish Cardstock, adhere under the grass tufts on card.
Step 7.  Die cut the "Happy" from the A Way with Words - Happy Anniversary from black cardstock that has Clear Double Sided Adhesive Tape on the back. Attach to card as per photo above.
  • Add the "Easter" sentiment from the Happy Easter Peel Off Stickers to the left side of sentiment.
Thanks for stopping by today, I hope you enjoyed my tutorial.

Supplies:

Elizabeth Craft Designs:

Other: 
Designer Paper - Kaisercraft Fairy Bread 12 x 12 Paper; Graphic 45 Come Away With Me Cosmopolitan 12 x 12 Paper
Copics
Foam Tape


Saturday, February 11, 2017

BBQ Time


Hi everyone,

It’s challenge time with the “Crazies” over on the Crazy 4 Challenges blog. Tammy Hershberger our challenge hostess for the month continues to issue the challenges.


Valentine's Day is approaching, and it's a day when many take the opportunity to
go out and have a fancy dinner to celebrate.  So for today's challenge, incorporate a food/dining/dishes theme in  your design, AND you must use the color red. 


For my card today I have created a Pull Card using the Hanging Charm Pull Card die set designed by Karen Burniston for Elizabeth Craft Designs.

I used Stamping Bella's Uptown Couple Bella & Barney have a Barbecue, I have had this stamp for a little while now and have wanted an excuse to use it.


On the left side of the card I added the word "BBQ" using alphabet dies and then stamped the word "Time" on a Stitched Fishtail Banner.

For the pull tab part of the card I used the MFT Dienamics Place Setting die set to add the plate and cutlery to the top of the tab.


Here is a look at the front of my card when it is closed ready to be placed in an envelope.


And finally the back. I like to keep this style of card flat, so I add my layer and sentiment on the back of the card. Here i have made use of one of the designer paper pages in the paper pack I used for my card and added a birthday sentiment.


Don't forget to check out the rest of the “Crazies” cards over on the Crazy 4 Challenges blog and also their individual blogs for more details.
Lisa Henke (February Guest Designer)


Stamps: Uptown Couple Bella and Barney have a Barbecue - Stamping Bella; Grill Master Birthday - DRS Designs; Time - Stylish Images
Paper: White; Red; Yellow; Barbeque DP - Best Creations Inc
Dies: Pop It Ups Hanging Charm Pull Tab; Dotted Scallop Ovals; Dotted Scallop Rectangles; ModaScrap Stitched Fishtai Banners - Elizabeth Craft Designs; Place Setting; Aphabet - MFT Stamps
Other: Black Ink; Clear Double Sided Adhesive Tape - ECD;   Copics


Thursday, February 9, 2017

I Love You


Hi everyone,

It's challenge time with my friends over on the CCEE Stampers challenge blog. Liz Williams our challenge hostess for the month continues to issue the challenges.


With Valentine’s Day in 5 days, it’s time to show a little love by making a handmade Valentine. The challenge is a color challenge this week to use: red, black, and white. As a bonus: add a glimmer of silver. 


For my card I decided to create a Pull Card using the Pop It Ups Hanging Charm Pull Tab die set designed by Karen Burniston for Elizabeth Craft Designs.

To decorate my card I used the Fitted Hearts, Stitched Hearts, Love Sentiments and Arrows all from Elizabeth Craft Designs.


For the hearts I die cut the Fitted Hearts from White Soft Finish Cardstock that had Clear Double Sided Adhesive Tape on the front. I then covered the adhesive with True Red Silk Microfine Glitter. 

For the sentiments I used White Silk Microfine Glitter. The "You" which is revealed when the pull tab is pulled up is inlaid into the red panel so it doesn't catch when you open and close the pull tab.


Here is my card when it is closed ready to be placed in an envelope.


For this style of card you can either create a folding card or keep it flat. I prefer to keep it flat as most times you will display the card flat with the pull tab open. On the back of my card I added two more sentiments and an arrow.

Don't forget to check out the CCEE Stampers blog (goes live 12 AM EST) to see the rest of the creations the CCEE Stampers created this week. You can also see more details of their creations on their individual blogs:


Vicky Gould


Paper: White Soft Finish Cardstock - Elizabeth Craft Designs; Black; Sailing Cards DP - Carta Bella; Adhesive Paper Prints DP - DCWV
Dies: Fitted Hearts;  Stitched Hearts; Stitched Squares; Dotted Scallop Squares; Stitched Circles; Dotted Scallop Circles; Pop It Ups Hanging Charm Pull Tab; Love Sentiments; Arrows - Elizabeth Craft Designs
Other ECD Products: Clear Double Sided Adhesive Tape 101mm; True Red Silk Microfine Glitter; White Silk Microfine Glitter; Red/Gold Glitter Dots Peel Off Stickers; Kids Choice Glue


Monday, November 7, 2016

November 2016 Pop It Ups Designer Challenge #1


Hi everyone,

Welcome to our first Pop It Ups Designer Challenge for November. This time round our challenge was set by Karen Burniston. "Hat Attack" - there are 6 different hat choices in the Props sets - use one (or more) on a card. Characters are optional - it's all about the hats!

As mentioned above there are 6 different hats in the Props sets .... Props 1 - the Bowler Hat; Props 2 - the Party Hat; Props 5 - Santa's Hat; Props 6 - Cowboys Hat; Props 8 - the Chef's Hat; Props 9 - the Witches Hat. The is also a Top Hat in the Steampunk Charms die set too.


As I was thinking about what to do for this challenge I remembered a story which had something to do with hats and a monkey or monkeys ... can't really remember the whole story, just that there was one. So I decided to use that for my inspiration for my card this time round. 

As you can see I used the Hanging Charms Pull Tab die set to create the base of my card. 

You can also probably see that I used all the hats from each of the 7 die sets on my card.

Jinks the Monkey is holding three of the hands using his arms and tail and wearing a fourth of his head. The three hats I added to the left hand side of the card.

I also used one of the circles in the Labels and Circles die set for the sentiment which is inlaid into the panel so it doesn't interfere with the pull up mechanism of the card. 


The circles on the pop up part of the card are from the Twist Circle Pop Up die set. 

The "Pull" on the pull tab is from the Steampunk Clear Stamp set.


Here is my card when it is closed ready to be placed in an envelope.


With this style of card you have the option of either adhering the card to a folded card or keeping it flat and adding the sentiment panel on the back. I like to keep mine flat so that whoever receives the card knows to display the card flat.

I added a piece of designer paper to the left hand side of the card which is the same as what I used on the front of the card. I computer generate a sentiment and added another Top Hat from the Steampunk Charms die set to the upper right hand side of the card.


If you are looking to purchase Karen's Pop It Ups dies in Australia you can find them at Craft Giraffe (now online only).

Don't forget to check out  Karen Burniston's blog  on Tuesday when you will be able to see what all the designers created for the challenge this month, plus an amazing card/video tutorial from Karen Burniston.


Stamps: Steampunk Clear Stamps - Elizabeth Craft Designs; Hattitude - Stampin' Up
Paper: White; Black; Red; Blue; Brown; Tan; Flesh; Pink; Bright Pink; Grey; Going Places DP - Sugar & Spice Studio
Dies: Hanging Charm Pull Tab; Jinks the Monkey; Props 1; Props 2; Props 5; Props 6; Props 8; Props 9; Steampunk Charms; Labels & Circles; Twist Circle Pop Up;
Other ECD Products: Clear Double Sided Adhesive Tape 64mm; Warm Diamond Silk Microfine Glitter
Other: Black Ink; Foam Tape


Saturday, November 5, 2016

Cherries


Hi everyone,

It’s challenge time with the “Crazies” over on the Crazy 4 Challenges blog. Being a brand new month it is  time to introduce our new hostess which is Maryann Einam.

Maryann asks us "Who can resist fresh fruit when it is in season" for Maryann she loves strawberries. So for our challenge this week we were to add our favorite fruit to our card.


My favorite fruit has to be cherries, which should be hitting the shelves down here in Australia any time now! These days we are lucky enough to be able to purchase cherries when they are in season down here in Australia and we also get them available in stores when they are in season in California! Yum!!!!!


For my card I pulled out the Hanging Charm Pull Tab die set designed by Karen Burniston for Elizabeth Craft Designs. I used the Stage It Stencil Cherries Layering to create the background of the card, love how easy it is to create those cherries on a card.


To decorate my card I used the Cherries Peel Off Stickers from Elizabeth Craft Designs. I adhered Clear Double Sided Adhesive Tape to the front of a piece of white card and then placed the peel off stickers onto the adhesive and covered the adhesive with Warm Diamond Silk Microfine Glitter. I then colored the glitter using Copic markers.

The "pull" on the top of the pull tab is from the Steampunk Clear Stamps also designed by Karen Burniston.


With this style of card you have the option of either adhering the card to a folded card or keeping it flat and adding the sentiment panel on the back. I like to keep mine flat so that whoever receives the card knows to display the card flat.

On the left hand side of the card I added more stencilled cherries. I added two sentiments from the General Sentiments Clear Stamp set and a couple of spare cherries from the Peel Off Sticker sheet.

Don't forget to check out the rest of the “Crazies” cards over on the Crazy 4 Challenges blog and also their individual blogs for more details.
Liz Williams (November Guest Designer)

Stamps: General Sentiments Clear Stamps; Steampunk Clear Stamps - Elizabeth Craft Designs; Cupcake Birdy HoneyPop - Inky Antics; Vertical Happy Birthday - Lucy's Stamps
Paper: White; Red; Green
Dies: Hanging Charm Pull Tab; Anita Frames Pop Up - designed by Karen Burniston for Elizabeth Craft Designs; Stitched Circles; Fitted Circles - Elizabeth Craft Designs; Fishtail Flags Stax 1 & 2 - MFT Stamps
Other ECD Products: Cherries Layering Stage It Stencil; Cherries Peel Off Stickers; Clear Double Sided Adhesive Tape 101mm; Clear Double Sided Adhesive Tape 3mm; Warm Diamond Silk Microfine Glitter
Other: Black Ink; Candied Apple Distress Ink; Peeled Paint Distress Ink; Foam Tape; Copics


Monday, June 20, 2016

Karen Burniston June Designer Challenge Day 1


Hi everyone,

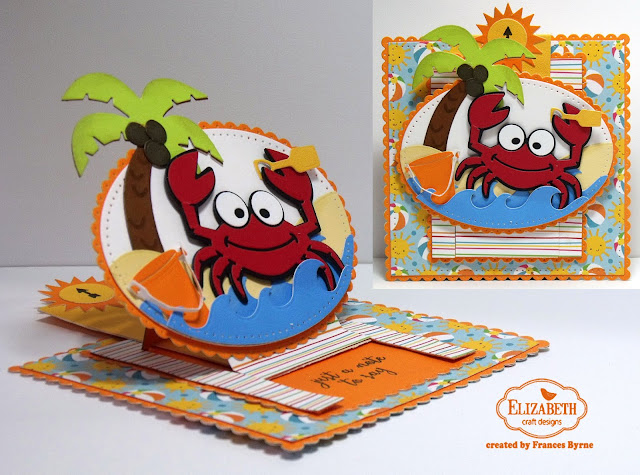
It's time for our May Karen Burniston Designer Challenge. This time round Karen has given us the theme ....  Summer Lovin'! Make a project to celebrate Summer - this could be nature, or beach or 4th of July or anything that means "summer" to you.

For my first card for this challenge, I decided to go with a beach theme.


As you can see I have created another Pull Tab card using the Hanging Charm Pull Tab die set. To create the layers for the base of my card I have used the Stitched and Dotted Scallop Square die set and the Dotted Scallop Rectangles die set.

Rather than use the frame that comes with the Hanging Charm Pull Tab, I decided to use the Stitched Ovals and Dotted Scallop Ovals.


Here is another look at my card taken at a different angle so you can see how the card pops up.

When the pull tab is pulled to the open position it reveals the message "Just a note to say" from the Just a Note Clear Stamp set.


To decorate my card I used Rocky the Crab, along with the Palm Tree and Pail die sets. 

To create the waves and sand along the bottom of the oval shape, I die cut the card stocks using the Stitched Oval die and then used the waves and sand dies from the Beach Edges die set. 

All the elements except for the crab were die cut using Soft Finish Cardstock (I already had Rocky made up waiting to be used)

I used the Sun from the Oval Pull Card die set on the top of the Pull Tab to which I stamped the arrow from the Steampunk Clear Stamp set.


I chose to keep my Pull Tab card a flat card, so I decorated the back of the card with more designer paper and a couple of sentiments.

The "hello" is from the Rectangle Accordion Card die set and the Summer is from the A Way with Words 4 Seasons die set.

If you are looking to purchase Karen's Pop It Ups dies in Australia you can find them at Craft Giraffe (formerly Photo Continental).

Don't forget to check out  Karen Burniston's blog  on Wednesday when you will be able to see what all the designers created for the challenge this month, plus an amazing card/video tutorial from Karen Burniston.


I will be back tomorrow with another card I created for this challenge.


Stamps: Just a Note Clear Stamps; Steampunk Clear Stamps - designed by Karen Burniston for Elizabeth Craft Designs
Paper: White; Sunflower; Bright Orange; Spring Green; Dark Chocolate; Rust; Bluebell; Buttercream Soft Finish Cardstock; Red; Black; Sunkissed Beach Party DP - Doodlebug Inc.
Dies: Hanging Charm Pull Tab; Palm Tree and Pail; Rocky the Crab; Beach Edges; Oval Pull Card; Oval Accordion Card  - designed by Karen Burniston for Elizabeth Craft Designs; Stitched Squares; Dotted Scallop Squares; Dotted Scallop Rectangles; Stitched Ovals; Dotted Scallop Ovals; A Way with Words 4 Seasons - Elizabeth Craft Designs
Other ECD Products: Clear Double Sided Adhesive Tape
Other: Black Ink; Gathered Twigs Distress Ink; Shabby Shutters Distress Ink; Foam Tape


Wednesday, June 8, 2016

Oceans of Joy


Hi everyone,

It's my turn to post the Pop it Ups Wednesday tutorial on the Elizabeth Craft Designs blog today. This time I have created a card using the Hanging Charm Pull Tab die set. Instead of using the frame that comes with the die set I have used the Oval dies from the Stitched Ovals and Dotted Scallop Ovals. I am also playing with the new Boat die from Joset Designs.


Here is how I created my card:


1. Die cut the following:
  • From Forest Green Soft Finish Cardstock die cut the largest rectangle from the Dotted Scallop Rectangle die set.
  • From Striped Designer Paper die cut the second largest rectangle from the Stitched Rectangles die set.
  • From Forest Green Soft Finish Cardstock die cut the third largest rectangle Dotted Scallop Rectangle die set.
  • From Dotted Designer Paper die cut the card base from the Hanging Charm Pull Tab die set.
  • From White Soft Finish Card Stock die cut the third largest oval from the Stitched Ovals die set.
  • From Forest Green Soft Finish Cardstock die cut the second largest oval from the Dotted Scallop Ovals die set.
  • From Mint Green Soft Finish Cardstock die cut the Pull tab die from the Hanging Charm Pull Tab die set.

2. Refer to Karen Burniston's video to assemble the Pull Tab die to the Card Base of the Hanging Charm Pull Tab.


  • Take the smaller of the Forest Green Scallop Rectangles and cut straight across the width of the rectangle.
  • Turn the larger piece over and run a piece of 3mm Clear Double Sided Adhesive Tape on the very edge of where we cut the rectangle.
  • Turn the smaller piece over and line up up the scallop on the edge and adhere together. 
  • The Scallop rectangle has now been cut down so it will fit under the Hanging Charm Pull Tab Card Base.

3.  Finish assembling the base of the card by layering the striped designer paper to the larger of the Dotted Scallop Rectangles.


  • Die cut two ships wheels from the Boat die set from Brick Red Soft Finish Cardstock that has Clear Double Sided Adhesive Tape adhered on the back. 
  • Adhere the ships wheels on either side of the top of the Pull Tab.
4. Using the Boat die set die cut the following:
  • (1) Boat Base from Rust Soft Finish Cardstock
  • (1) Set of Port Hole frames from Dark Chocolate Soft Finish Cardstock that has Clear Double Sided Adhesive Tape on the back.
  • (1) Set of Sails from Dove Gray Soft Finish Cardstock
  • (1) Set of Stars from Forest Green Soft Finish Cardstock that has Clear Double Sided Adhesive Tape on the back.
  • (1) Set of Flags from Brick Red Soft Finish Cardstock  that has Clear Double Sided Adhesive Tape on the back. 
  • Sponge edges of the Sails using brown ink. 
  • Adhere a scrap of Buttercream Soft Finish Cardstock to the back of the Port Holes.
  • Assemble boat referring to photo above.


5. Using the waves dies from the Boat die set, die cut both sets of waves from designer paper (I used the back of the dotted designer paper).
  • Line up the die cut wave designer paper so that both waves are approx 1 inch apart. Use the Stitched Oval die we used to cut the white oval in step 1 to die cut the waves.
  • Sponge the top of the waves using Evergreen Bough Distress Ink.

  • Adhere the convex wave to the bottom of the white oval panel as per photo above.
  • Adhere the boat on top of the wave using foam tape.
  • Adhere the concave wave using foam tape to the oval so it is overlapping the boat. Refer to photo above for placement.


6. Layer the white oval onto the Dotted Scallop Forest Green Oval.
  •  Use the pull tab on the card to bring up the middle section of the Hanging Charm Pull Tab Card Base and adhere the oval to the front. 
  • Refer to Karen Burniston's video for placement if this is the first Hanging Pull Tab Card you have made.
  • Using the Ahoy Sentiment Clear Stamp set, stamp the sentiment "Ahoy" onto White Soft Finish Cardstock, trim to a rectangle and adhere to the area revealed when the Pull Tab has been pulled.

7. The Back of the Card:
  • From Forest Green Soft Finish Cardstock die cut the largest rectangle from the Dotted Scallop Rectangle die set.
  • From White Soft Finish Cardstock die cut the second largest rectangle from the Stitched Rectangles die set.
  • Layer the white rectangle onto the green scallop rectangle.
8. Using the Ahoy Sentiment Clear Stamp set, stamp the anchor five times down the edge of the white card using black ink.
  • Stamp the "Wishing you Oceans of Joy" so it is centred on the right side of the card using black ink.


Thanks for stopping by today, I hope you enjoyed my tutorial.