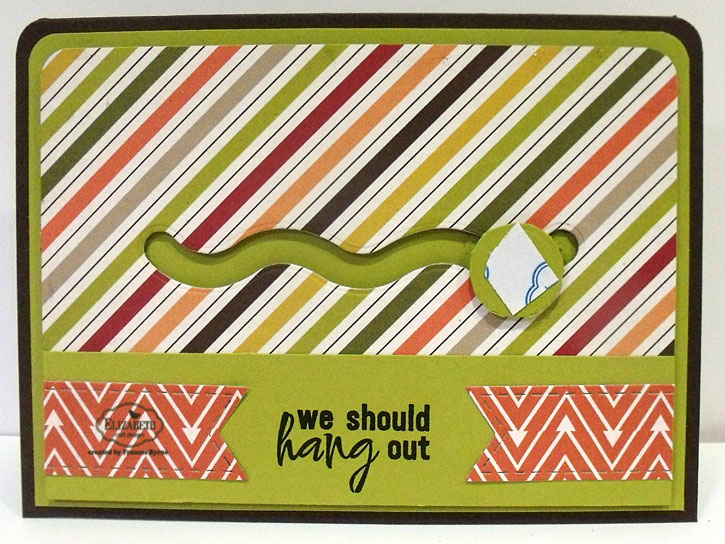
Stamps:
Wizard Friends - Kindred Stamps; Father's Day Greetings - Simon Says Stamps
|
Paper:
White; Black
|
Dies:
Maze - Neat and Tangled; Dashing Rectangles; Dotted Scallop Rectangles -
Elizabeth Craft Designs
|
Other:
Black Ink; Candied Apple Distress Oxide; Wild Honey Distress Oxide; Carved
Pumpkin Distress Oxide; Copic Opaque White; Fun Foam; Foam Tape; Copics
|
Tuesday, March 20, 2018
Amazing
Sunday, June 11, 2017
Hello Monkey Spinner
Here is a quick video to see my card in action.
Stamps:
Jungle Cuties; General Sentiments
|
Paper:
White Soft Finish Cardstock; Soft Sky Soft Finish Cardstock; Time for Teal
Soft Finish Cardstock; ModaScrap Color of Puppies Boy - Elizabeth Craft
Designs
|
Dies:
Jungle Cuties Dies; Sliders & Spinners; Stitched Rectangles; Dotted
Scallop Rectangles - Elizabeth Craft Designs
|
Other:
Black Ink; Foam Tape; Copics
|
Wednesday, May 17, 2017
ECD May Coloring Designer Challenge

I have made a couple of spinner cards this year using the Joset Designs Sliders & Spinners die set but as I hadn't made any slider cards I decided I would for this challenge. My card above is a Hidden Slider Card.
Here is a short video so you can see the slider card in action.
- The card base measures 5 3/4 inches x 4 1/2 inches.
- Die cut the largest Dotted Scallop Rectangles from brown cardstock
- Die Cut the striped paper from the ModaScrap My Little Girl Paper Pack using the second largest Stitched Rectangles.
- Die Cut the tan paper from the ModaScrap My Little Girl Paper Pack using the second largest Stitched Rectangles. Trim down to 1 1/4 inches.
- Layer the three large layers together to create the card base.
- Die cut two of the small corners from the Romantic Corners die set. Trim of the tabs and adhere to the top corners of the card.
- Stamp the giraffe/elephant image from the Krista Schneider Zoo Babies stamp set and die cut using the coordinating dies.
- Color as deslred.
- Cut two tabs approx 1/4 inch wide and adhere to the back of one leg of the elephant and one leg of the giraffe.
- Cut a piece of white cardstock that measures the same size as the tan panel we created in step 1.
- Place the long straight spinner/slider die to the centre of the card and die cut.
- Stamp the word "Baby" from the Baby Sentiments Clear stamps onto a piece of white cardstock. Color the letters.
- Trim the cardstock to approx 5/8 inch wide and approx 5 1/2 inches long
- Place the sentiment strip so that it is centre onto the white cardstock that we created in step 4.
- Place foam tape around the edges close to the strip.
- Attach to the bottom of the striped paper.
- Place the image towards the left side of the card so that the bottom of the image is just under the top edge of the white cardstock slider piece (see above)
- Adhere the tabs to the sentiment strip which shows through the die cut slider hole using foam tape.
- Adhere foam tape around the bottom, left and right edges.
- Stamp the sentiment "Congrats on your new" from the Baby sentiments clear stamps the tan panel and then adhere over the white slider panel.
- Add pearls to the bottom left side of the card.
- Decorate the inside of the card using photo above as a guide.
- Stamp the images from the Honey Bear Clear Stamp set onto White Soft Finish Cardstock, die cut using coordinating dies and color as using medium of your choice.
- Using the second largest rectangle from the Stitched Rectangles die set, die two from White Soft Finish Cardstock
- Place the bear on chair image on the card so that you can see where you need to die cut the curved spinner from the Spinners & Sliders die set. Die cut spinner.
- Sponge clouds using the Behinds the Scenes Earth & Sky stencil over both white rectangles.
- Die cut grass from the CountryScapes Clouds & Grass die twice for Green designer paper, layer to the bottom of the rectangle which as the spinner panel die cut into it.
- Assemble scene.
- Place a penny so it is under the spinner opening of the card (tip - I die cut a circle the same size as my penny which I sponged with clouds and adhered to the top of the penny so it couldn't be seen through the opening)
- Place two layers of foam tape to the centre of the penny (tip - I used the circle dies included in the Spinners & Sliders die set to create my own foam tape, not what is shown on the photo above which is much too large for it to spin)
- Attach the honey jar to the top of the foam tape.
- Adhere two layers of foam tape all around the back of the card making sure not to get any tape near where the penny will travel.
- Adhere this rectangle onto the second rectangle.
- Layer panel onto a scallop rectangle created using the Dotted Scallop Rectangles die set and then onto a folded white card.
- Decorate the inside of the card as per photo above.
That's it from me today, I hope you enjoyed my card and tutorial. Don't forget to check out the Elizabeth Craft Designs blog to see all the wonderful creations by our talented designers and for a change to win the giveaway.

Other:
Cardstock - Pink; Dark Pink; Brown; Red
Black Ink
Pearls
Foam Tape
Copics

Tuesday, March 14, 2017
Happy Easter Penny Slider
Here is a video of my card showing how the rabbit slides and spins along the sliding track to reach the basket of Easter Eggs.
- Cut a piece of blue cardstock that measures 5 inches x 5 1/8 inches.
- Cut a piece of green polka dot designer paper the same size as the blue cardstock. Place the cloud die from the CountryScapes Cloud & Grass die set in the centre of the designer paper and die cut.
- Adhere the die cut cloud designer paper to the bottom of the blue card to create grass.
- Using the middle sized curvy slider from the Sliders and Spinners die set, die cut approximately 3/4 inches up from the bottom of the card as per bottom photo above.
- Use the second largest fishtail banner from the Stitched Fishtail Banners die set to cut a banner from white cardstock.
- Using the "happy" from the A Way with Words - Happy Birthday 2 die set, die cut the sentiment from black cardstock that has Clear Double Sided Adhesive Tape on the back. Adhere the sentiment to the fishtail banner so the end of the word is close to the fishtail part of the die.
- Using the "Easter" sentiment from the Happy Easter Peel Off Stickers adhere under the "happy" die cut as per photo above.
- Adhere banner to the top left section of the card.

- Using the Props 7 die set, die cut the following:
- (1) Basket from White Soft Finish Cardstock
- (1) Basket Detail pieces from White Soft Finish Cardstock
- (1) Grass piece from White Soft Finish Cardstock
- (5) Easter Eggs
- Color basket pieces, grass and eggs. Assemble the basket (refer to Karen Burniston's photo above on how to do this).
- Add the grass piece and 5 eggs to each basket.
- Add the basket to the card on the left side of the slider track. (See photo below)
- Using the Woodland Pals stamp set, stamp the rabbit; tree; bird and two rows of flowers on White Soft Finish Cardstock using black ink.
- Using the Woodland Pals coordinating die set, die cut all the images.
- Color as desired.
- Optional - die cut two circles from designer paper to match the grass using the Circles Background die.
- Cover two pennies with the designer paper circles. (if you don't mind seeing the penny through the slider you can just use the pennies without the added designer paper on top).
- Adhere a piece of Clear Double Sided Adhesive Tape to the back of some white fun foam and use the 4 circles die included in the Sliders and Spinners die set to die cut the fun foam.
- Adhere two of the fun foam circles onto one of the pennies so that the fun foam circles are on top of each other.
- Place the penny to the back of the card so that that fun foam circle goes through the hole in the slider track. (See photo above on left)
- Attach the second penny over the top of the first penny as per photo above right.
- Turn the card over so that the front of the card faces the table and apply two layers of foam tape to the back of the card. (I forgot to take a photo of my card at this step, but you can get the idea of where to apply it using the photo above as a guide). Be careful to keep the tape well away from where the pennies will be travelling up and down the slider track.
Step 7 -
- Cut a piece of blue cardstock that measures 5 inches x 5 1/8 inches.
- Adhere the off cut designer paper that was left over when you die cut the cloud and adhere to the bottom of the card.
- Adhere the front of the card to this piece, so that the designer paper on the piece above can be seen through the slit in the slider track.
- Cut a piece of White Soft Finish Cardstock that measures 5 1/2 inches x 11 1/4 inches. Score at 5 5/8 inches to create a top folding card.
- Adhere front of card to card base.
- Adhere the bunny to the top penny.
Step 9 - Inside of the card:
- Cut a piece of designer paper that measures 5 1/2 inches x approximately 2 inches. Place cloud die at top of designer paper and die cut. Adhere the cloud designer paper to bottom of card.
- Using the Woodland Pals stamp set, stamp the rabbit; wide tree; bird and long row of flowers and small row of flowers on White Soft Finish Cardstock using black ink.
- Using the Woodland Pals coordinating die set, die cut all the images.
- Color as desired.
- Adhere the all images to card as per photo above.
- Stamp the "Thinking of You" sentiment from the General Sentiments stamp set to the card as per photo above.
Supplies:
Elizabeth Craft Designs:
Woodland Pals Stamp Set
Woodland Pals Dies
General Sentiments
Sliders and Spinners
A Way with Words - Happy Birthday 2
ModaScrap Stitched Fishtail Banners
CountryScapes Clouds & Grass
Circles Background (optional)
White Soft Finish Cardstock
Happy Easter Peel Off Stickers
Clear Double Sided Adhesive Tape 64mm
Other:
Cardstock - Blue
Designer Paper - Kaisercraft Pop! Collection Lollipop 12 x 12 paper
Inks - Black
Pennies
Fun Foam
Foam Tape
Copics

Wednesday, January 18, 2017
Monkey Spinner Card
For my card today I have created a Spinner card using the new Joset Designs Sliders & Spinners die set. I have also used the cute monkey which is from one of the new stamp set from one of our new Designers ... Stamps by Krista.
- Layer onto the front of the card base a piece of green card that measures 5 1/2 inches x 4 inches.
- Cut a piece of green cardstock that measures 5 1/4 inches x 1 1/4 inches and layer to the bottom section of the designer paper as per photo above.
- Using the middle sized curvy slider from the Sliders & Spinners die set, die cut about 3/4 inches up from the top of the green card as per photo above.
- Adhere a piece of Clear Double Sided Adhesive Tape to the back of some Fun Foam and use the 4 circles die included in the die set to die cut the fun foam.
- Die cut two of the smallest circles from the Stitched Circles die set.
- Adhere one of the fun foam circles to the back of one of the circles. Place the circle so that the fun foam goes through the hole the slider die created and then adhere the other circle to the other side of the fun foam. (Note: depending on the height of the foam tape, you may want to adhere to fun foam circles together for extra height.
- Stamp the "We should hang out" sentiment from the Cheeky Monkey Clear Stamp set to the green card between the two fishtail banners.
- Place a piece of Clear Double Sided Adhesive Tape to the front circle.
- Attach monkey image to circle.
- Adhere the designer paper panel to front of card.
5. Inside of Card:
- Cut a piece of White Soft Finish Cardstock that measures 5 1/4 inches x 3 3/4 inches.
- Adhere strip of green cardstock that measures 5 1/4 inches x 1 1/4 inches to the bottom of the white card.
- Layer onto a piece of green cardstock that measures 5 1/2 inches x 4 inches.
- Using the Stitched Fishtail Banner die set, die cut two fishtail banners using designer paper. Adhere to the bottom part of the card as per photo above.
- Stamp the "cheeky monkey" sentiment from the Cheeky Monkey Clear Stamp set to the green card between the two fishtail banners.
- Stamp the "You're the Best" sentiment from the General Sentiments Clear Stamp set to the centre of the white card.
- Adhere the card panel to the inside of the card.
Tuesday, September 17, 2013
Only One Glass of Wine
Hi everyone,
It’s challenge time again over on the Riley and Company blog. This week our challenge hostess is Laurie Clout.
Laurie tells us that they celebrate the season with a Grape & Wine festival in their town, be inspired by grapes or wine, literally or the colour, a sentiment etc.
I took my inspiration for my card today by the color of grapes and as I have also used wine related sentiments wine … so I think I am covered tee hee!
My card today is a Penny Slider or Spinner card … see my animated version below!
I have been wanting to make one of this for a long time, but never got around to it. Recently I discovered a die set that you can get to create the track and the mechanism that makes the image slide.
For my card I used Riley and Company’s Bouncy Ball Riley and also the funny bones sentiment I'll Only Have One Glass. I figured with a little imagination the bouncy ball might be a grape hehe … oh and maybe if you have too much wine this might be what you do .
Here is the inside of my card … I added Bouncy Ball Riley again along with another wine related Funny Bones Sentiment The Glass Half Empty.
Want to play along????
If you would like to play along with us of course we would love to have you! So get stamping Riley fans :).
To play create a card using Riley and Company images. Once you have created your card/project come back here and place a comment with a link to your card/project to this post so that we can see what you created. If you upload your card/project to SCS don't forget to include the keyword RILEY1913. We can't wait to see what you create!
Don’t forget to check out the rest of the Design Teams blogs today so see what they created for this challenge.
Stamps: Bouncy Ball Riley; The Glass Half Empty; I’ll Only Have One Glass – Riley and Company |
Paper: White; Purple; A Beautiful Life DP – My Mind’s Eye |
Other: Black Ink; Papertrey Ink Movers & Shakers Spinners Die Collection; MFT Die-namics Peek A Boo Chevrons; MFT Die-namics Fishtail Flags Stax; |