

Hi everyone,
It's time for our May Coloring Design Team Designer challenge. Check out the Elizabeth Craft Designs blog today to see what our talented designed created for the challenge.

For today's challenge Elizabeth Craft Designs are giving away a Joset Designs Sliders & Spinners die set to 3 winners.
Sliders
& Spinners - Using any of our stamp
sets create a card that slides or spins using the Joset Designs Sliders &
Spinners die set.
As you can see I created two cards for this challenge one that would slide and one that would spin.
*****************

To enter simply leave a comment on the Elizabeth Craft Designs Challenge post and tell us " What Elizabeth Craft Designs image would you make spin or slide?”
We will select 3 lucky winners in a random drawing
The winners will be announced on Friday, May 19 on the Elizabeth Craft Designs blog.


That's it from me today, I hope you enjoyed my card and tutorial. Don't forget to check out the Elizabeth Craft Designs blog to see all the wonderful creations by our talented designers and for a change to win the giveaway.
************************

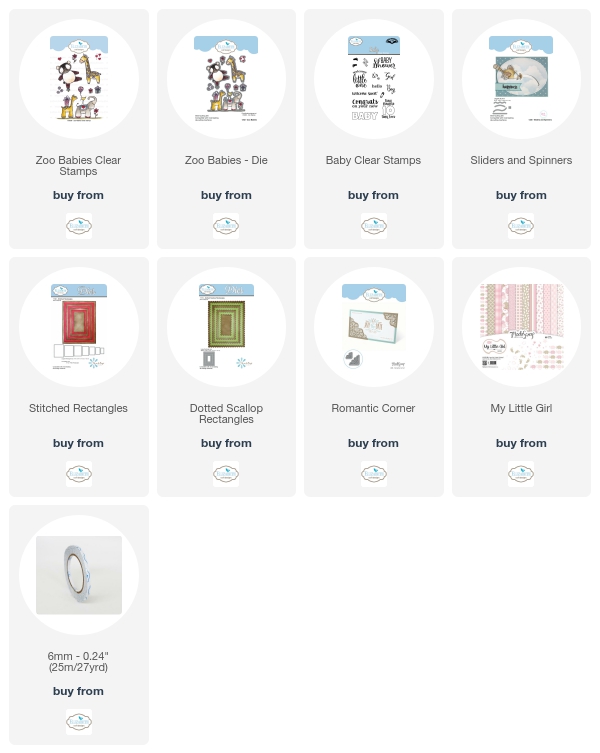
I have made a couple of spinner cards this year using the Joset Designs Sliders & Spinners die set but as I hadn't made any slider cards I decided I would for this challenge. My card above is a Hidden Slider Card.
Here is a short video so you can see the slider card in action.


Here is a short video so you can see the slider card in action.

I have made a couple of spinner cards this year using the Joset Designs Sliders & Spinners die set but as I hadn't made any slider cards I decided I would for this challenge. My card above is a Hidden Slider Card.
Here is a short video so you can see the slider card in action.
Here is how I created my card:

Step 1 -
- The card base measures 5 3/4 inches x 4 1/2 inches.
- Die cut the largest Dotted Scallop Rectangles from brown cardstock
- Die Cut the striped paper from the ModaScrap My Little Girl Paper Pack using the second largest Stitched Rectangles.
- Die Cut the tan paper from the ModaScrap My Little Girl Paper Pack using the second largest Stitched Rectangles. Trim down to 1 1/4 inches.
- Layer the three large layers together to create the card base.
Step 2 -
- Die cut two of the small corners from the Romantic Corners die set. Trim of the tabs and adhere to the top corners of the card.
Step 3 -
- Stamp the giraffe/elephant image from the Krista Schneider Zoo Babies stamp set and die cut using the coordinating dies.
- Color as deslred.
- Cut two tabs approx 1/4 inch wide and adhere to the back of one leg of the elephant and one leg of the giraffe.

Step 4 -
- Cut a piece of white cardstock that measures the same size as the tan panel we created in step 1.
- Place the long straight spinner/slider die to the centre of the card and die cut.
Step 5 -
- Stamp the word "Baby" from the Baby Sentiments Clear stamps onto a piece of white cardstock. Color the letters.
- Trim the cardstock to approx 5/8 inch wide and approx 5 1/2 inches long

Step 6 -
- Place the sentiment strip so that it is centre onto the white cardstock that we created in step 4.
- Place foam tape around the edges close to the strip.
- Attach to the bottom of the striped paper.
- Place the image towards the left side of the card so that the bottom of the image is just under the top edge of the white cardstock slider piece (see above)
- Adhere the tabs to the sentiment strip which shows through the die cut slider hole using foam tape.
- Adhere foam tape around the bottom, left and right edges.

- Stamp the sentiment "Congrats on your new" from the Baby sentiments clear stamps the tan panel and then adhere over the white slider panel.
- Add pearls to the bottom left side of the card.

Step 7 Inside of the Card -
- Decorate the inside of the card using photo above as a guide.

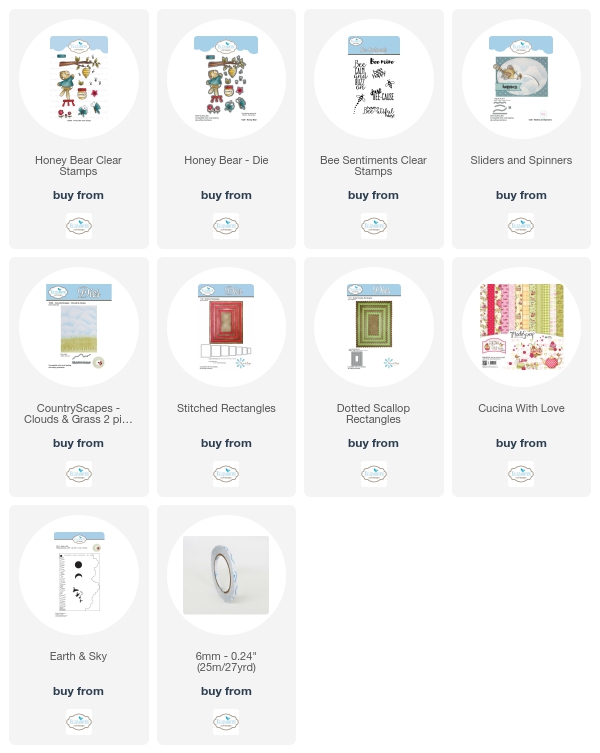
For my second card today I created a Spinner card using the Joset Designs Sliders & Spinners die set. I used the Krista Schneider Honey Bear Clear Stamp set with coordinating dies. The bear is catching the jar of honey he keeps throwing in the air.
Here is how I created my card:

Step 1 -
- Stamp the images from the Honey Bear Clear Stamp set onto White Soft Finish Cardstock, die cut using coordinating dies and color as using medium of your choice.
Step 2 -
- Using the second largest rectangle from the Stitched Rectangles die set, die two from White Soft Finish Cardstock
- Place the bear on chair image on the card so that you can see where you need to die cut the curved spinner from the Spinners & Sliders die set. Die cut spinner.

Step 3 -
- Sponge clouds using the Behinds the Scenes Earth & Sky stencil over both white rectangles.
- Die cut grass from the CountryScapes Clouds & Grass die twice for Green designer paper, layer to the bottom of the rectangle which as the spinner panel die cut into it.
- Assemble scene.
Step 4 -
- Place a penny so it is under the spinner opening of the card (tip - I die cut a circle the same size as my penny which I sponged with clouds and adhered to the top of the penny so it couldn't be seen through the opening)
- Place two layers of foam tape to the centre of the penny (tip - I used the circle dies included in the Spinners & Sliders die set to create my own foam tape, not what is shown on the photo above which is much too large for it to spin)
- Attach the honey jar to the top of the foam tape.

Step 5 -
- Adhere two layers of foam tape all around the back of the card making sure not to get any tape near where the penny will travel.
- Adhere this rectangle onto the second rectangle.
- Layer panel onto a scallop rectangle created using the Dotted Scallop Rectangles die set and then onto a folded white card.

Step 6 -
- Decorate the inside of the card as per photo above.
That's it from me today, I hope you enjoyed my card and tutorial. Don't forget to check out the Elizabeth Craft Designs blog to see all the wonderful creations by our talented designers and for a change to win the giveaway.
Supplies:
Elizabeth Craft Designs:
Baby Slider Card -
Other:
Cardstock - Pink; Dark Pink; Brown; Red
Black Ink
Pearls
Foam Tape
Copics
2 comments:
Great slider cards!
wow.....so much sweetness
Post a Comment