Today I am sharing a farm themed Slimline card I created recently.
For the background of my card I used Trinity Stamps Slimline The Great Outdoors Borders & Builders and Slimline Scenic Border die sets to create the farm scene background.
I used Find It Trading/Yvonne Creations Country Life Tractor to add to the top of the grassy hill.
Along the bottom edge of the card I added a farm boy, goat and chickens from Neat & Tangled's G.O.A.T stamp set.
For the inside of the card I used some of the dies I used on the front of the card to create a farm scene.
I added the farm boy, goat and chickens to the grass area.
Both sentiments used on this card are from Sugar Pea Designs Barn to Be Wild stamp set.
Other Supplies:
G.O.A.T Stamp Set - Neat & Tangled
Barn To Be Wild Stamp Set - Sugar Pea Designs
Country Life Tractor Die Set - Yvonne Creations/Find It Trading
It’s challenge time with the “Crazies” over on the Crazy 4 Challenges blog. Karen Ostergard our challenge hostess for the month, continues to issue the challenges.
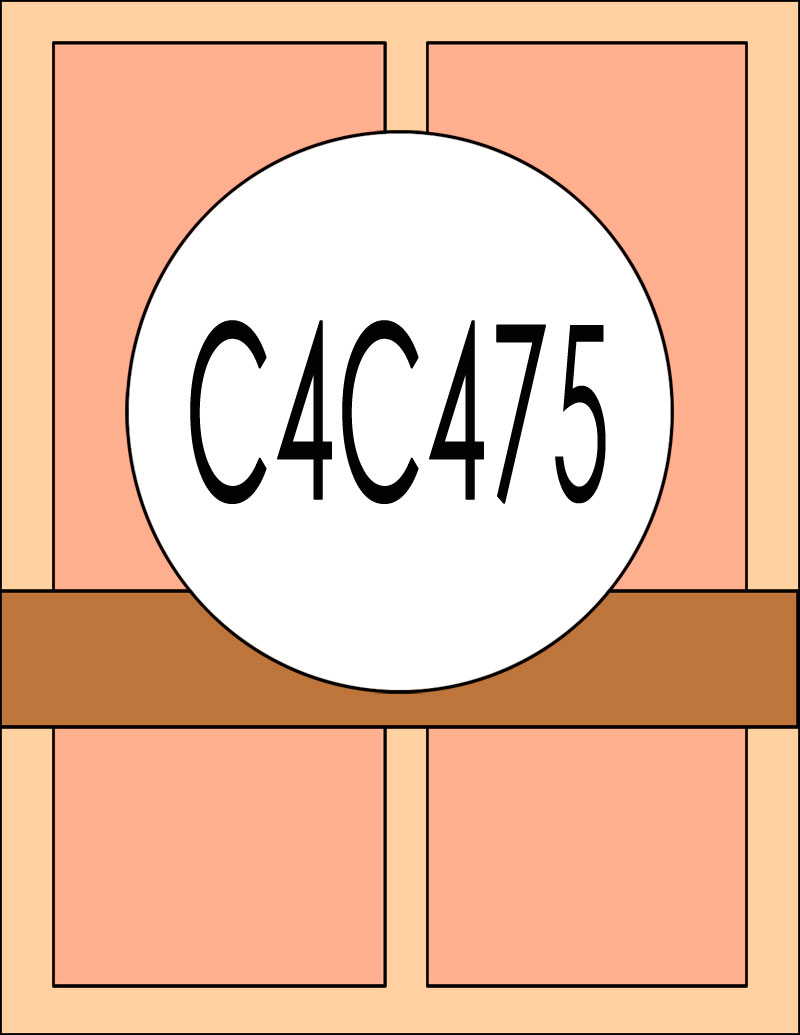
Being the third Saturday of the month, it is time for a Sketch challenge.
For my card today I pulled out Neat and Tangled's Piece of Cake stamp set. I just love this fun image!!!
This card is pretty sentiment heavy, as I decided to include the sentiments that were included in the stamp set on the layers of the cake. I also added two sentiments to the fishtail flags on the top right hand corner of the card as per the sketch. The sentiments used on the fishtail flags were created using Taylored Expressions Birthday Sentiment Strips and coordinating die.
I adde a pink glittered circle to the top corner too, because I recently got some glittered cardstock and this seemed like as good a time as any to use it.
For the inside of the card I created a pop-up card using Karen Burniston's Rockin' Rectangle Pop-up. I added the Happy Birthday sentiment which is die cut using the pink glitter cardstock.
The two stamped sentiments are from an older MFT Stamps stamp set, which I think has long been retired. I layered these sentiments using the Crosshatch - Squares and Crosshatch - Rectangles die sets.
Here is a side view of the inside of my card, so you can see the pop-up portion of the card a little better.
Don't forget to check out the rest of the “Crazies” cards over on the Crazy 4 Challenges blog and also their individual blogs for more details.
For your shopping convenience, all products are linked below. Compensated affiliate links are used where possible with no extra cost to you. This helps me to continue to share all the projects I include on my blog. For the benefit of my Australia readers, I have started to include some links to Australian stores when available. Please note I only use and share products I love. LLD Delicious Birthday - MFT Stamps (retired)
Today I am sharing an anniversary card I made for my hubby as we are celebrating 47 years of marriage today.
For the front of my card, I decided to use the Creative Expressions Champagne Celebration Edger die which I received in an order earlier in the month. I have been eyeing the edger dies from Creative Expressions for a while now and decided it was about time I added one to my stash. I figured this champagne one would be useful for a lot of occasions.
I die cut the champagne edger from Gold Cardstock and then adhered this to black, and trimmed around the left hand side of the black cardstock, so just the gold showed. I then layered this to some patterned paper and finally to a folded card.
Seeing I make lots of pop-up cards, I couldn't not make a card for such an important occasion without it being a pop-up or something special too. I decided to use Karen Burniston's Heart Pivot Panels. I die cut the main die from black cardstock, and then decorated the panel with hearts using gold, glitter gold and pearlescent cream cardstocks.
I also added three hearts from the new Love Charms die set. The "XOXO" and "Love You" sentiments are from the Word Set 9 - Love die set. I die cut these to sentiments using gold glitter cardstock.
I added the number 47 to the top of the card using the Numbers die set.
Finally I added the Happy Anniversary sentiment which is from a Neat & Tangled die set.
The rectangle & square panels in the two corners are from the Crosshatch - Squares and Crosshatch - Rectangles die set.
Supplies:
For your shopping convenience, all products are linked below. Compensated affiliate links are used where possible with no extra cost to you. This helps me to continue to share all the projects I include on my blog. For the benefit of my Australia readers, I have started to include some links to Australian stores when available. Please note I only use and share products I love.
Welcome to our October Karen Burniston Designer Challenge.
Check out Karen Burniston's blog on Wednesday (US Time) when you will be able to see what all the designers created for the challenge this month, plus Karen will have an amazing video tutorial to share with us all.
Our challenge theme this month is .... "AUTUMN" - use our autumn dies (Elements and/or Word Set 7) for a card celebrating fall.
For my card today I decided to pull out Karen's Photo Collage Pop-up die set to showcase the leaves and other elements included in the Autumn Elements die set.
I created my background panels using Gina K Designs Leafy Stencil sponging on Distress Oxide inks in fall/autumn colors.
Here is a quick video to see my card in action.
I die cut all the leaves, pumpkin, apples and acorn from white cardstock and then colored each of them using Distress Oxides.
I added the "Fall, Autumn & Colors" words from the Word Set 7 - Autumn Greetings die set to three of the photo frames. I also added the bulldog clips three of the frames too. I added squares from the Crosshatch - Squares die set to the top left and bottom right hand corners to the card. The bear, mice, tree trunk and stamp sentiment are from Neat & Tangled/Simon Says Stamps stamp set.
I kept the front fairly simple seeing the focus is on the inside of the card. I added the Happy Fall using the Happy from the Word Set 7 - Autumn Greetings and the Alphabet die set for the word "Fall" The sentiment was layered using circles from the Crosshatch - Circles die set. I finished off the card adding a few leaves to the card.
Here is one last photo of my card when it is partially closed. It does fold pretty flat and will fit inside a standard envelope.
Don't forget to visit Karen Burniston's blog on Wednesday when you will be able to see what all the designers created for the challenge this month.
Supplies:
For your shopping convenience, all products are linked below. Compensated affiliate links are used where possible with no extra cost to you. This helps me to continue to share all the projects I include on my blog. Please note I only use and share products I love.
Today I am sharing another pop-up card I created recently. Last week I shared a card I created using Karen Burniston's Rocket Pop-up die set that will be shipping mid July. Well after making that card I was wondering whether it could be used with a plane rather than a rocket. Of course I had to disguise the flames and moon surface, so I cover those up using clouds.
Here is a quick video to see my card in action.
The pop-up clouds, look greyish on this photo but they are white in real life, with a little blue around the edges.
The plane is Neat and Tangled's So Fly Clear stamp set.
To create the background I used Distress Oxide Inks in Tumbled Glass, Stormy Sky and Chipped Sapphire. After adding the colors to my panels, I then used MFT Stamps Mini Cloud Stencil and Hero Arts Unicorn White Pigment ink to add clouds over the panel.
Along the bottom of the card, I used the scallop/cloud border from Karen Burniston's Nature Edges die set to create bushes and then I added grey cardstock for a road.
On the left hand side of the card I added this cute dog riding a scooter, this is from Gerda Steiner Designs VROOMING Clear Stamp set.
I added a couple of large clouds to the background panels and then added two sentiments from the So Fly stamp set.
For the front of the card, I repeated a few of the elements used on the inside of the card and added a little girl with binoculars.
Supplies:
For your shopping convenience, all products are linked below. Compensated affiliate links are used where possible with no extra cost to you. This helps me to continue to share all the projects I include on my blog. For the benefit of my Australia readers, I have started to include some links to Australian stores when available. Please note I only use and share products I love.
t’s challenge time with the “Crazies” over on the Crazy 4 Challenges blog. As challenge hostess for March, I continue to issue the challenges.
Being the third Saturday of the month it is time for a sketch challenge.
To create my card I started by created the stencilled background on the two panels. For this I used Altenew's Beveled Squares Stencil using Distress Oxide inks.
I used Neat and Tangled's Swinging by Clear Stamp set, which I adhered to a Wonky Stitched Circle from MFT Stamps.
For the panel which goes across the card I used Crafter's Companion Edge'ables Word Dies - Thinking and then stamped the "Of You" in pink along the bottom edge of the sentiment.
For the inside of my card I added stencilled panels to both edges of the card.
I created a pop-up card using the KB Riley LLC's Rockin' Rectangles Pop-up die set, turning the die so it is in a portrait orientation and so the rectangle is at the top part of the card.
I added the "Swinging By" sentiment which is also included in the stamp set used on the front of the card.
For the "Hello" and sentiment on the lower part of the card, I used Crafter's Companion Edge'ables Word Die - Hello. The "from me to you" sentiment was stamped on white cardstock and then die cut using the Honey Bee Stamps Banner Builder die set.
Here is another photo of the inside of my card taken at a different angle, so you can see the pop up portion of the card a little better.
Don't forget to check out the rest of the “Crazies” cards over on the Crazy 4 Challenges blog and also their individual blogs for more details.
For your shopping convenience, all products are linked below. Compensated affiliate links are used where possible with no extra cost to you. This helps me to continue to share all the projects I include on my blog. Please note I only use and share products I love.
It's challenge time with my friends over on the CCEE Stampers challenge blog. Lynn McAuley our challenge hostess for the month, continues to issue the challenges.
Our challenge this week is ..... National Zookeepers Week
Trips to the zoo were always one of Lynn's favorite summer activities. Let's honour the zookeepers of the world by including zoo animals in our design this week.
As you can see by my card above, the zoo animals in my card are having a party to celebrate!
Here is a quick video to show my card in action.
To create my card, I started by die cutting three rectangle panels using the largest rectangle from Karen Burniston's Crosshatch Rectangles. I applied ink to the top two thirds of my card using Salty Ocean; Broken China & Peacock Feathers Distress Oxide. After applying the ink I spritz each panel with water.
I then created the grassy area by die cutting the rectangle again and then die cutting that rectangle using two of the dies from the Nature Edges die set.
The vine at the top of the card is from Mama Elephant's Swinging Borders Clear stamp set.
I stamped and colored the giraffe, monkey, turtle, bird and present from Neat & Tangled's Wild Ones Clear Stamp set, adhering them to the card using foam tape.
For the inside of my card, I created two more scenic panels which I adhered to each side of the card, adding the snake from the Wild Ones stamp set to the animals. I needed one more animal, so I used the lion from Gerda Steiner's Party Animals to the card.
I used Karen Burniston's Katherine Label Pop-up die set to the top right hand side of my card for the sentiment. I added the bird. The monkey is also attached to this panel, so that it goes up and down when the card is opened and closed.
Don't forget to check out the CCEE Stampers blog (goes live 12 AM EST) to see the rest of the creations the CCEE Stampers created this week. You can also see more details of their creations on their individual blogs:
Supplies: For your shopping convenience, all products are linked below. Compensated affiliate links are used where possible with no extra cost to you. This helps me to continue to share all the projects I include on my blog. Please note I only use and share products I love.
Today I have a fun slider card to share with you all today.
This card uses the Neat and Tangled Maze die which was released earlier this year. I decided to create a slider card using this die.
For the bottom panel which shows through the maze area, I created a background using Distress Oxide inks and then splattered the background using Copic Opaque White.
To decorate the card I used the Wizard Friends Clear Stamp set from Kindred Stamps. Harry and Hermoine are both on the outside of the maze with Ron trying to get to either of the other two.
I added the "Amazing" sentiment which is one from a Father's Day sentiment set I have.
For the inside of the card I added the sentiments and a few more images from the stamp set.
Stamps:
Wizard Friends - Kindred Stamps; Father's Day Greetings - Simon Says Stamps
Paper:
White; Black
Dies:
Maze - Neat and Tangled; Dashing Rectangles; Dotted Scallop Rectangles -
Elizabeth Craft Designs
Other:
Black Ink; Candied Apple Distress Oxide; Wild Honey Distress Oxide; Carved
Pumpkin Distress Oxide; Copic Opaque White; Fun Foam; Foam Tape; Copics
It’s challenge time with the “Crazies” over on the Crazy 4 Challenges blog. Karen Aicken our challenge hostess for the month continues to issue the challenges. Being the third Saturday of the month it is time for a sketch challenge.
As soon as I saw this sketch the first thing I thought about was the Sizzix Triple Circle Flip-its Card die. I haven't used mine in ages and have been wanting to pull it out to play, so I decide to make it work for the sketch today. It isn't an exact match, but I think it is close enough. To decorate the front of the card I added presents from a Neat & Tangled stamp set. I also added a strip of card across the middle of the card so it would match the strip in the sketch ... I did add some Nuvo Drops to the ends of mine.
When you "flip" the card open it reveals three different sentiments. The card is probably closer to the sketch when it is pulled completely open as then you have that middle layer. I forgot to take a photo of the card completely open.
Don't forget to check out the rest of the “Crazies” cards over on the Crazy 4 Challenges blog and also their individual blogs for more details.