Showing posts with label Pretty Pink Posh. Show all posts

Friday, June 26, 2026

Crawling By To Say Hi!


Hi Crafty Friends,

Today I am sharing a fun Double Z Fold Card using dies from Pretty Pink Posh.


I used their Caterpillar Holder and Stitched Dandelions die sets to create this card.

I put the caterpillar on the front brown panel and then added the flowers to the back panel and surrounding the caterpillar at the back.


For the sentiment on the sign the caterpillar is holding I used a sentiment set from Karen Burniston called Bug Greetings. 


I added another dandelion to the lower left side of my card and also added a ladybug. For the sentiment I used one from Made To Surprise's Bug Additions stamp/die set.


Friday, May 19, 2023

Rainbow Presents


Hi Crafty Friends,

 I recently ordered and received the Picket Fence Studios' Paper Pouncers, so of course I wanted to have a play with them. One of the things the Paper Pouncers are supposed to be good for is stencils, so I pulled out my Pretty Pink Posh Layered Presents Stencil set to create the background for this card. I used Catherine Pooler inks, using three colours per colour family that I used on the background. For the final layer after adding the ink, I cleaned the stencil and repositioned it to add some glitter glitz gel over the top.

I die cut the panel and the black layer using Creative Craft Products Notched Nested Squares die set.   

I wanted to have the colours of the presents repeated on the base of my card, so I used Slimline rectangle die to die cut the 5 colours and adhered them to a 6 x 6 panel. I then used the Made To Surprise Linen Embossing Folder to add texture to the panel before adding it to a top folding 6 x 6 card base.

I hot foiled birthday sentiment using Waffle Flower Crafts Birthday Duo Hot Foil Plate. I used Pinkfresh Studio's Solid Foil Plate to get the negative image of the sentiment.

To finish off the card I added some iridescent jewels to the card.


For the inside of the card, I used the Notched Nested Squares again for the layers of the card. I added two sentiments using two stamp sets from Creative Craft Products.


Tuesday, August 2, 2022

August 2022 Karen Burniston Designer Challenge

Hi Crafty Friends, 

Welcome to our August Karen Burniston Designer Challenge.

Check out Karen Burniston's blog on Wednesday (US Time) when you will be able to see what all the designers created for the challenge this month, plus Karen will have an amazing video tutorial to share with us all.

Our challenge theme this month is ... "LABELS" - create a card of any theme that incorporates a pop-up label.

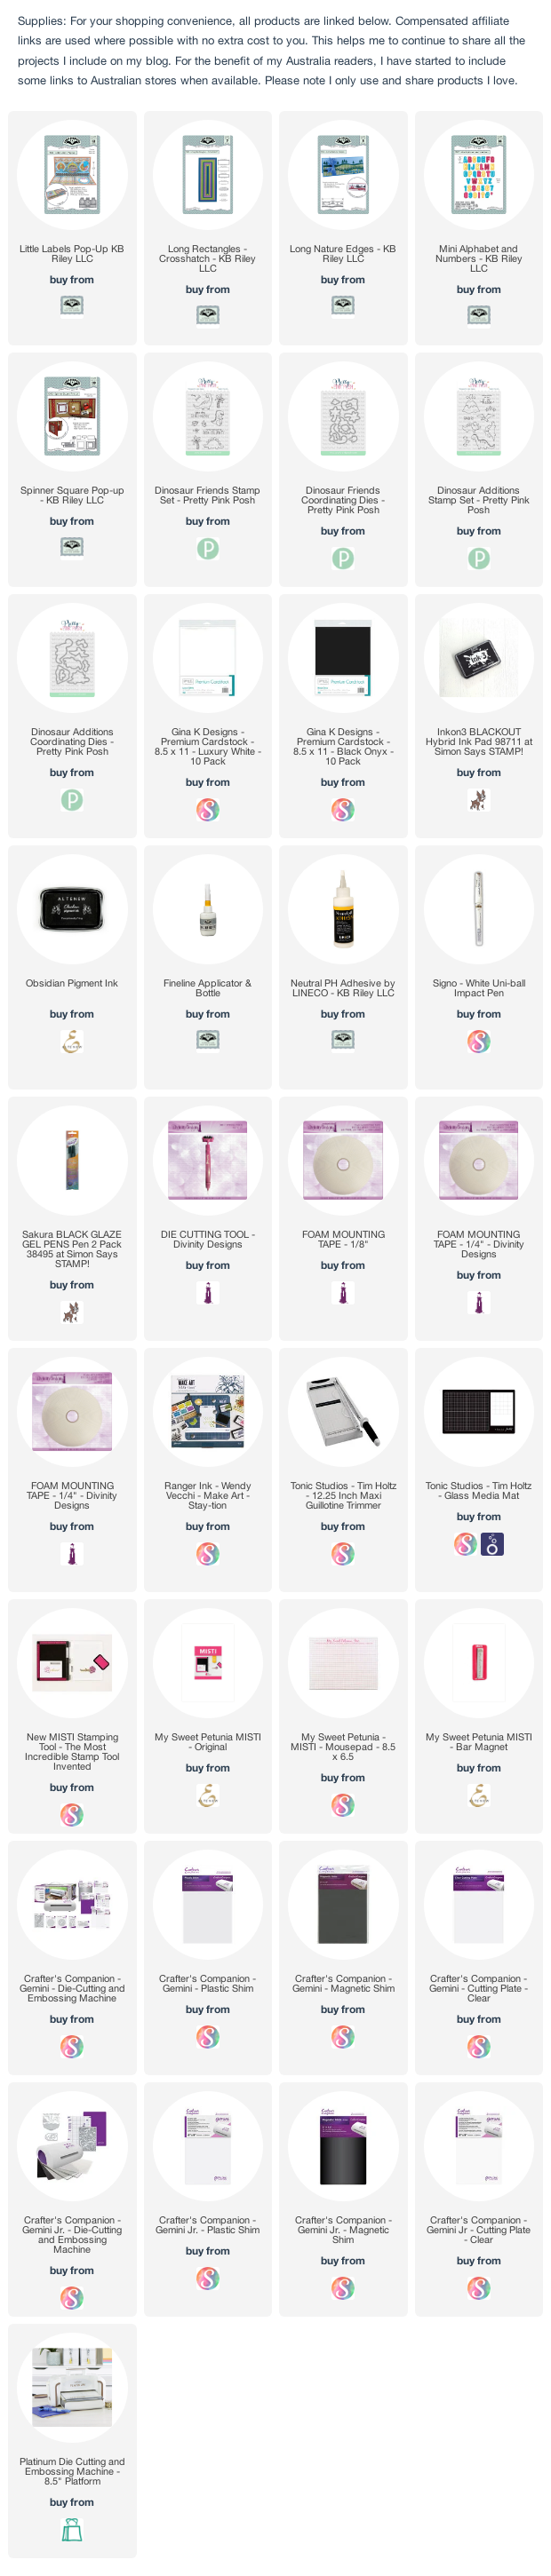
For my card today I decided to use the Little Labels Pop-up die set for the "label" part of this challenge. I love that this die will fit so many different card sizes including Slimline and Mini Slimline cards.

I used the largest rectangle die from the Long Rectangles - Crosshatch die set to die cut all the layers on this card. I used a blue patterned paper for the back (the sky area) and a green pattern paper for the base (the grass).


I used the grass die from the Long Nature Edges die set to crate a grass border which I adhered to the rectangle panel at the base of the Little Labels Pop-up die set as well as along the front edge of the base panel.

The "Dino-mite" along the front of the card was created using the Mini Alphabet and Numbers die set. This finishes off the sentiment which is in the centre label of the pop up. I also added a speech bubble above the purple dinosaur using the speech bubble included in the Spinner Square Pop-up die set, I repositioned the speech bubble in the die to shorten it a little.

The dinosaurs and stamped sentiments are from two Pretty Pink Posh stamp sets, details included in the supply list below.


For the front of my card, I used the Long Rectangles - Crosshatch die set to create the patterned paper layer, I used this on both the blue and green patterned paper. I also used one of the dies in the set to die cut the sentiment, again repositioning the die to shorten the length of the panel. The green paper was also die cut using the grass die included in the Long Rectangles - Crosshatch.

I used the remaining stamps included in the two stamp sets to complete my scene.


Monday, January 29, 2018

Sparkle Heart Love


Hi Crafty Friends,

With Valentine's Day only a few weeks away I thought I would make another Valentine card.

A few months ago I purchased the Pretty Pink Posh Sparkle Dot Pattern 1 stamp set, I thought it was about time I played with it. I used the heart from the stamp set to stamp onto a white heart shape and then adhered some jewels from Little Things from Lucy's Cards to each of the dots.

The heart, squares and sentiment are all from Elizabeth Craft Designs.


The "love" sentiment is die cut from gold & black and then when it was layered I offset it slightly.


For the inside of the card I die cut a heart from the same designer paper I used on the front of the card and then added a sentiment from the Elizabeth Craft Designs Love Sentiments.

Supplies:
Elizabeth Craft Designs:


Other: 
Pretty Pink Posh Sparkle Dot Patterns 1
Cardstock -  White; Red; Black; Gold
Ink: VersaMark Ink
White Embossing Powder
Little Things from Lucy's Cards Cherry Mix Jewels
Foam Tape