Showing posts with label Double Z Fold Card. Show all posts

Wednesday, August 13, 2025

Santa Mug Double Z Fold Card


Hi Crafty Friends,

Welcome to my blog! Today I am sharing a Christmas card using a few products from Spellbinders. The Santa Mug is from the Cocoa Wonderland die set.

 This card is a Double Z Fold Card, for the pink background I started with a panel of white cardstock and then used the Snowfall Shimmer Glitter Plate and Aura Glimmer Foil to create the foiled background. I then coloured the panel pink using Spun Sugar Distress Oxide Ink.

On the far right panel I added the "Santa" word which is from an old Crafters Companion Edgeable Word die set. 

I added the Merry Christmas to the centre panel using one of the sentiments included in the Merry Messages Betterpress Plate. This I gold glimmered onto red cardstock.


The red card base measures 5 1/2 inches x 8 1/2 inches and is scored at 4 1/4 inches & 2 1/8 inch.
The decorative pink panel at the top is 4 1/2 inches x 7 1/2 inches and scored at 3 1/4 inches & 5 3/8 inches.


Here is a look at my card when it is closed ready to be placed in an envelope. The finished card measures 4 1/2 x 5 1/2 inches.


I added a panel to the back of the card which I decorated using the tree from the Cocoa Wonderland die set. The sentiment is another sentiment from the Merry Messages Betterpress Set.


Monday, June 9, 2025

Have A Classic Birthday


Hi Crafty Friends,

Today I am sharing a fun male themed birthday card I created using products from Spellbinders Classic Road Legends Collection designed by Mindy Eggen. I am always on the lookout for male themed products to create cards.

I decided to create a Double Z Fold Card, it seems ages since I made one of these. My base card measures 5 inches x 11 inches, then I scored at 2 3/4 inches & 5 1/2 inches. The smaller panel on the front is 2 inches in height, all other measurements are the same.

The road & grass are both older MFT Stamps dies that I have had in my stash for years.


I used the Classic Car which I die cut from red cardstock and the Speedometer. I also used the sentiment die set.


I decided to add panels to the back, one to add another sentiment and one to hand write a message. I used the Betterpress Radiant Starburst, part of the Speedometer die set & the sentiment stamp set.


Tuesday, November 22, 2022

Believe in the Magic of Christmas


Hi Crafty Friends,

It's now just over a month until Christmas Day, so pretty much most of my blog posts from now until Christmas will be Christmas related. For my card today I have created a Double Z Fold Card using a Crafter's Companion stamp/die set called Christmas Eve.

For this card I pretty much took my inspiration from the packaging of the dies to create my Double Z Fold Card.


For my night sky background, I used papers from Made To Surprise by Sam Calcott's Card kit that was included in the Papercraft Essentials Issue 217, I still hadn't received my magazine when I made this but as I had downloaded the papers I was able to print them out.

I die cut all the buildings from black cardstock and then covered the windows with yellow cardstock. For those buildings that could be seen from the back, I coloured over the back of the yellow card with a black marker. It looks so much nicer doing this then seeing yellow on the back.


I cut the front "Z" panel from black cardstock and attached this to the card. I then added two levels of buildings onto this panel. The top one I glued flat and the one along the very bottom using foam tape. I also added buildings along the back of the card as well. The die set, comes with a die to die cut bridge pieces for the inner square, so I die cut two of these and added more buildings to this.

To finish off the front of the card, I added the moon to the right panel and then added Santa & his sleigh. I stamped the Santa image on a piece of patterned paper leftover from doing the background so that the image worked with the night sky.

I also added a sentiment from an older Bebunni stamp set.


I added a panel to the back of my card so I could add a sentiment. For this I used Picket Fence Studios' Slim Line Have Yourself A Merry Little Christmas Word Topper. As this had the trees on either side of the sentiment I figured this worked well with the Crafter's Companion set. I added the sentiment along the bottom of the card and then stamped Santa at the top. 


The card folds flat and measures approximately 5 1/2 inches x 5 3/4 inches, it does have a bit of bulk to it, so if you are hand delivery should fit in a 6 x 6 envelope. If posting it will probably need a padded or box envelope.

Other Supplies:
Night Sky Patterned Paper - Made To Surprise by Sam Calcott's Card Kit from Papercraft Essentials #217
Bebunni - Christmas Story Stamp Set - Crafter's Companion


Tuesday, October 25, 2022

Noel Double Z Fold Card


Hi Crafty Friends,

In case you didn't know already, it's now only two months until Christmas! Wow this year is definitely flying by! 

Last month I shared a Shaped Card using Crafter's Companion's Noel die set and the coordinating Poinsettia Delights Paper Pad and dies. As the paper pad has 48 pages of the decoupage poinsettias that decorate the "NOEL" word, I decided last month that I need to use this set at least once a month this year to add Christmas cards to my stash. So for my card today I created a Double Z Fold Card.


The papers used as layers on my card are from Crafter's Companion's Frosty & Bright 12 x 12 Paper Pad. I will be using this a bit this year too, I just love the papers in this pad. Unfortunately I couldn't find a link to this product for my supply list below.

I used Crafter's Companion's Baby Pink Glitter Card to die cut the "NOEL" letters to layer over the white outline.

In the "Noel" Collection, there is also a stamp set that you can use to stamp and colour the flowers however you like and some sentiments. I decided not to use that for this particular card, instead I pulled out an older Penny Black stamp set called Season's Gifts. I also added a few of the smaller poinsettia layers around my sentiment.


Here is a look at my card, when it is folded ready to be placed in an envelope. The base of the Double Z Fold Card is 5 3/4 inches square, however because the "NOEL" word hangs over both edges the finished card size is approximately 7 1/4 inches wide x 5 3/4 inches high.


Other Supplies:
Frosty and Bright 12 x 12 Paper Pad - Crafter's Companion
Season's Gifts Sentiment Set - Penny Black (discontinued)


Friday, July 15, 2022

Pickup Truck Scene


Hi Crafty Friends,

Today I am sharing another card that I created using products from Divinity Designs July release.

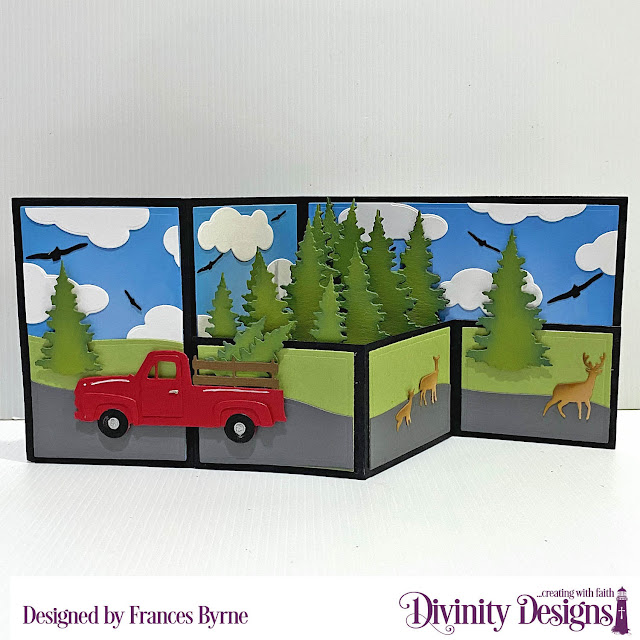
This card is what I have always called a Double Z Fold Card and was created using the new Divinity Designs Surprise Box Card with Layers die set. 

I die cut the base of the card from black cardstock. For the layers along the back of the card I die cut the layers from blue cardstock. I inked around the edges of the card using China Beach Distress Oxide inks using a blender brush. I then added clouds using the Clouds & Raindrops die set on the top portion of my card.


Along the front shorter border panel, I die cut the layers from green and also from grey cardstock. I then die cut the grey panels using the border die included in the Tree & Hill Silhouettes die set. As I wanted the grass and road to go along the whole width of the card I used the layering die from that panel to die cut a green and grey panel and then used the same border die to die cut the border so it matched up with the rest of the card.

I die cut the trees using the Trees and Deer die set, as you can see I die cut a lot of trees. I added them to the centre square portion of the card using the divider/bridge pieces included in the Surprise Box Card with Layers die set. I also added a couple more of the trees on the grass area of the card. I die cut the deers from the same die set to add to the two lower panels on the right side of the card.


I die cut the pickup truck using the Pickup Truck die set, I added a couple of the smallest trees to the back of the 
truck before adhering it across the two panels on the left of the card.

To finish off the card I added birds from the Beach Silhouettes die set randomly in the sky area of the card.


I added a panel to the back of the card, this is a great place to add a sentiment and a personal greeting for the recipient.

I decorated the panel using the Tree & Deers die set and the Tree & Hill Silhouettes die set. The sentiment is one included in the Let's Celebrate stamp set.


Friday, July 1, 2022

Divinity Designs July Release


Hi Crafty Friends,

I have lots to share with you today as it is time for Divinity Designs July 2022 Release. This time around Divinity Designs are releasing three die sets, two foiling sets and an embossing folder.


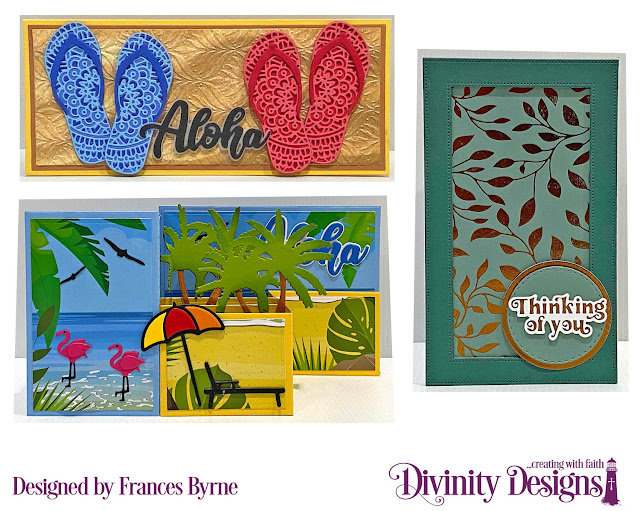
For my first card, I have created a Slimline card. I used the Slimline Card Base; Slimline Rectangles and Slimline Layering Rectangles to create the card base. The top layer of my card using the sand patterned paper included in the Beautiful Beaches Slimline Paper Pad. After die cutting the rectangle, I then used the new Palm Leaves Slimline Embossing Folder to add texture to my card.

For the flip flops, I used the new Flip Flops Layering Combo die set. I created one pair using shades of blue and the other using shades of pink/red.

I added the "Aloha" sentiment using the Aloha die set included in the April 2022 Blessings Box.

For the inside of my card, I used the Slimline Curvy Slops die to create a sand hill along the bottom of the card. I also added a sentiment from the Let's Celebrate stamp set.


For my next card I created a Z Fold Card using the new Surprise Box Card with Layers Die set. I have again used papers from the Beautiful Beaches Slimline Paper Pad for all the layers of my card.


To decorate my card I used the Beach Silhouettes and Aloha sentiment die sets both of which are included in the April 2022 Blessings Box.


Here is an overhead view of my card so you can see the dividers in the box portion of the card where I adhered the palm trees.


Here is a look at my card when it is closed ready to be placed in an envelope.


For my final card I have created a Mini Slimline Card. I used the Mini Slimline Card Base; Mini Slimline Rectangles and the Mini Slimline Pierced Frames die sets.

The leafy background was created using the new Leafy Background Foiling Plate. I used a chocolate/copper foil for all the foiling.

The sentiment is from the All Occasions Foiling/Die Duo set. I used the Solid Foil Plate to create a background the same color as the leaves and sentiment. I used this panel to die cut the larger circle under my sentiment.


For the inside of my card I added another die cut panel which has been foiled using the Leafy Background Foiling Plate.

I added another sentiment from the All Occasion Foil/Die Duo set. This was layered using the smallest rectangle included in the Mini Slimline Pierced Frames die set.


Wednesday, December 25, 2019

Believe In The Magic Of Christmas


Merry  Christmas Everyone!!!!

It's Christmas Day already down here in Australia! I must have been a good girl this year as I did very well 😀

There are many of you who visit my blog regularly, so I would like to take this opportunity to thank you all so much for your support throughout the year. Hope you all have a wonderful and safe Christmas!


I recently discovered this fun stamp set using the artwork from Raymond Briggs and sold by the Craft Stash UK. I couldn't resist buying it and adding it to my collection, and after making my card today I am very glad I did. I love how this card turned out.

As you can see I created a Double Z Fold Card. 

Normally when I am creating skies, I start of with white cardstock, but this time around I decided to use a teal colored cardstock. I then applied Distress Oxide inks in Faded Jeans, Chipped Sapphire, Blueprint Sketch and Black Soot to the card.

Once I had added the inks to my back panel, I then splattered the card with water, white paint and Lawn Fawn's Liquid Stardust.


I stamped the chimney, eight times and adhered 4 along the back panel, one of the left side and the other three to the bridges in the middle of the card.

The short panel on the front of the card is a piece of glittered type paper I have had in my stash for years ... I thought that would look like a snowy rooftop. I stamped the footprints along the roof.

I added Santa in his sleigh and the moon to the top part of the back panel.


Here is a look at my card when it is closed, ready to be placed in an envelope.

I used Crafter's Companion's Believe Edge'ables die/stamp set to add the die cut "Believe" along the edge of the card and the coordinating stamped sentiment underneath. I die cut the word "Believe" from red and white cardstock and then offset the red over the white so a white shadow appeared.

I used the "Ho Ho Ho!" die from the Raymond Briggs Stamp/die set to add that sentiment to the top left hand panel.


I added a panel to the back of the card to add a sentiment and a place to write a personal greeting. 

Along the bottom of the panel, I stamped a row of houses. I also stamped the moon and the reindeers to the top part of the card.

Finally I added the "Jingle All The Way" which is also included in the Raymond Briggs stamp set. The Merry Christmas is from MFT Stamps Bitty Holiday  Wishes sentiment set.


Supplies:
For your shopping convenience, all products are linked below. Compensated affiliate links are used where possible with no extra cost to you. This helps me to continue to share all the projects I include on my blog. For the benefit of my Australia readers, I have started to include some links to Australian stores when available. Please note I only use and share products I love.


Saturday, October 12, 2019

You're A Rockstar


Hi Crafty Friends,

It’s challenge time with the “Crazies” over on the Crazy 4 Challenges blog. Tracey Farr our challenge hostess for the month continues to issue the challenges.

Our theme for the challenge this week is ..... Music - Incorporate something, anything to do with music on your card


For my card today I created a Double Z Fold Card. I pulled out my Wooly Bear stamps from Kansan which I haven't used for a while. I stamped out the singer, drummer and guitarist and used my Scan N Cut to fussy cut the images. 

I used Honey Bee Stamps Rockstar Sentiments for both of the sentiments. 


I used three stars which I had saved after die cutting Mama Elephant's Star Grid Window die.

I also added music notes and a small record which are both from Sugar Pea Designs Greatest Hits die set.


I added a panel to the back of the card. I added some patterned paper I had leftover from decorating the front of the card. I added a sentiment, this time from Honey Bee Stamps For The Record stamp set and a larger record die cut using Sugar Pea Designs Greatest Hits Stamp/Die set.

Don't forget to check out the rest of the “Crazies” cards over on the Crazy 4 Challenges blog and also their individual blogs for more details.


Supplies:
For your shopping convenience, all products are linked below. Compensated affiliate links are used where possible with no extra cost to you. This helps me to continue to share all the projects I include on my blog. For the benefit of my Australia readers, I have started to include some links to Australian stores when available. Please note I only use and share products I love.

Wooly Bear Rock On - Kanban 
Wooly Bear Make A Noise - Kansan