Showing posts with label Hot Foil Stamps. Show all posts

Monday, December 25, 2023

Merriest Christmas


Merry  Christmas Everyone!!!!

It's Christmas Day already down here in Australia! I must have been a good girl this year as I did very well! 😀

There are many of you who visit my blog regularly, so I would like to take this opportunity to thank you all so much for your support throughout the year. Hope you all have a wonderful and safe Christmas!

For my card today, I created a Christmas themed Showstopper Card using Made To Surprise by Sam Calcott's 5 in x 7 in Tri-Fold Card die set. 

To create the showstopper, I die cut the main tri-fold panel twice from white cardstock and then adhered the two side by side. 

I used Spellbinder Paper Art's Chic Merry Christmas Betterpress plate to black foil the sentiment which was then die cut using an oval die.

I added poinsettia's from an older Spellbinders Ornament die set to decorate the oval.


The card folds flat and will fit in a 9 inch x 7 inch envelope.


I added a panel to the back of my card, so I could add another sentiment and a place to write a personal greeting.

I used another Spellbinders Betterpress plate to black foil the sentiment. This Betterpress plate is Merriest Christmas.

Other Supplies:
  • Ornament Glimmer Plate set - Spellbinders Paper Arts


Monday, November 6, 2023

Butterflies & Flowers


Hi Crafty Friends,

Today I have birthday card to share with you.

My card uses Crafter's Companion's Curved Border Edge'ables - Ditsy Butterflies die set. This die is designed to cut through two layers of cardstock, which is what I have done for this card. I placed the border die along the right edge of my card and die cut the two together. 

On the left side of the card I added a panel of patterned paper. 

I added the "Happy Birthday" sentiment from Waffle Flower Crafts which is hot foiled using black foil.
I added a butterfly to the card, using Made To Surprise by Sam Calcott's Butterflies Galore stamp/die set.


For the inside of the card I added a sentiment using Creative Craft Products Perfect Sentiments stamp set. 


Friday, October 27, 2023

Big Thanks


Hi Crafty Friends,

Today I am sharing another Thank you card I created recently. This one uses the Spellbinders Thank You Very Much Glimmer Plate which I foiled using Navy Blue foil and the Solid Plate, so I could use the reverse image of the foiled panel.


For my card, I used Made To Surprise by Sam Calcott's Side Panel 5 x 7 inch Card die set from the Showstoppers Collection.

I also used the Sympathy Additions die set which is also from Made To Surprise. The pink leaves use a die included in My Creative Life's The Gift of Giving die set.

The wax seal on the foliage was created using the Made To Surprise's Happy Mail All Occasions Wax Seal set.


On the back of the card, I added another "thanks" sentiment using Pink Fresh Studio's Fancy Script Words Hot Foil Plates and coordinating die set.


Other Supplies:
  • Thank You Very Much Glimmer Plate - Spellbinders
  • Navy Blue Foil - Go Press & Foil


Tuesday, October 24, 2023

Foiled Merry Christmas


Hi Crafty Friends,

Today I am sharing a quick Christmas card I created recently. For the background I used Creative Craft Products Poinsettia Embossing Folder, I embossed it onto red cardstock and then rubbed over the poinsettia's using gold metallic rub-ons. This was layered to a gold mirror card panel and then onto a 5 x 7 top folding card.

For the "Merry Christmas" I used Spellbinders Chic Merry Christmas Betterpress Plate. Rather than letter pressing the plate I decided to use gold foil. I used the solid plate to get the negative image from the left over gold foil, which is what I used on this card.


For the inside of the card, I used one of the sentiments from Divinity Designs Christmas Wishes stamp set.


Wednesday, September 27, 2023

On Your Special Day


Hi Crafty Friends,

Today I am sharing a card I made using two of Spellbinders Betterpress plates. For this card, rather than use them with the Betterpress System, I decided to foil them instead. That is one of the advantages of the Betterpress plates, they work well for hot foiling.


I started off by foiling the flower image using gold foil. I used a larger piece of cardstock in my foil platform as I wanted to be able to position the image so that I could die cut it using the Pinkfresh Studio's Rounded & Braided Rectangle die set. As I have a larger die cutting machine, it was easy to have a larger piece of cardstock hanging out of my foil platform.

While I was foiling I also foiled some sentiments using the "A Little Message Sentiments" Betterpress set also from Spellbinders. I love using the negative piece of foil with a solid foil plate, which is what I did to get the fold outline with white words for the sentiment.

I mounted my panel onto a 5 x 7 inch card base, adding patterned paper to the background.

To finish off the card, I added gold metallic pearls.


For the inside of my yard, I cut a white panel which I had also gold foiled the flower design. I then added a birthday sentiment using the solid reverse foiled technique to the image.


Friday, May 19, 2023

Rainbow Presents


Hi Crafty Friends,

 I recently ordered and received the Picket Fence Studios' Paper Pouncers, so of course I wanted to have a play with them. One of the things the Paper Pouncers are supposed to be good for is stencils, so I pulled out my Pretty Pink Posh Layered Presents Stencil set to create the background for this card. I used Catherine Pooler inks, using three colours per colour family that I used on the background. For the final layer after adding the ink, I cleaned the stencil and repositioned it to add some glitter glitz gel over the top.

I die cut the panel and the black layer using Creative Craft Products Notched Nested Squares die set.   

I wanted to have the colours of the presents repeated on the base of my card, so I used Slimline rectangle die to die cut the 5 colours and adhered them to a 6 x 6 panel. I then used the Made To Surprise Linen Embossing Folder to add texture to the panel before adding it to a top folding 6 x 6 card base.

I hot foiled birthday sentiment using Waffle Flower Crafts Birthday Duo Hot Foil Plate. I used Pinkfresh Studio's Solid Foil Plate to get the negative image of the sentiment.

To finish off the card I added some iridescent jewels to the card.


For the inside of the card, I used the Notched Nested Squares again for the layers of the card. I added two sentiments using two stamp sets from Creative Craft Products.


Wednesday, February 1, 2023

Butterfly Birthday


Hi Crafty Friends,

Today I have birthday card to share with you.

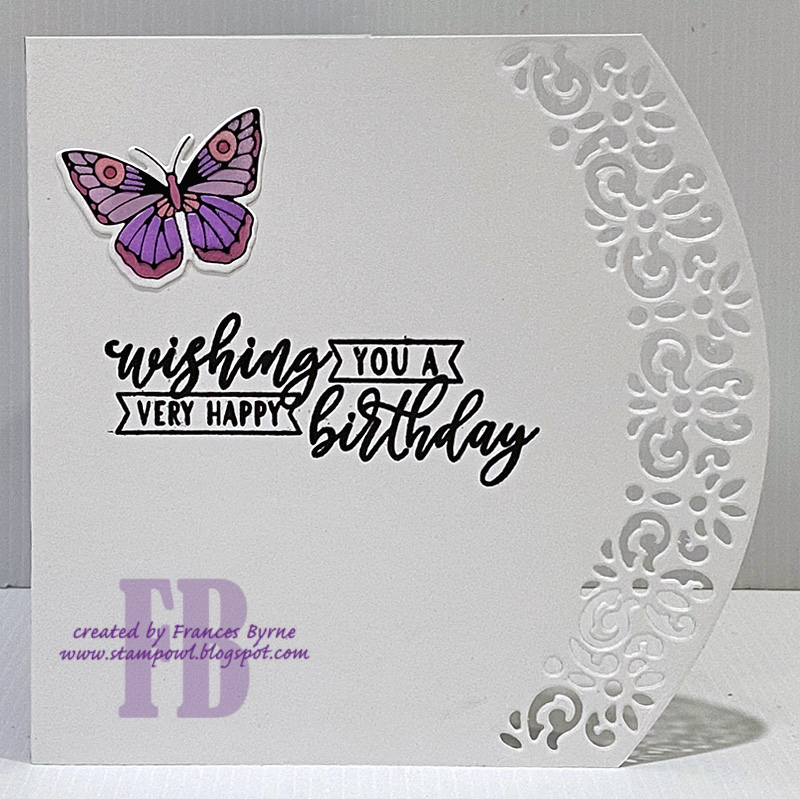
My card uses Crafter's Companion's Curved Border Edge'ables - Delicate Lace die set. This die is designed to cut through two layers of cardstock, which is what I have done for this card today. I placed the border die along the right edge of my card and die cut the two together. I adhered a panel of purple cardstock behind the front, so that you could see the purple colour peeking out through the lacy pattern.

On the left side of the card I added a panel of patterned paper. 

I added the "Happy Birthday" sentiment which is hot foiled using black foil and using the solid hot foil plate to get the negative sentiment which gives you white lettering with a black outline.

I added three butterflies to the card, using Pinkfresh Studio's Small Butterflies hot foil plate, stencil and coordinating die sets. The butterflies are also foiled using black foil.

To finish off the card, I added Pinkfresh Studio's Glacier Jewels to the circle holes in the lacy border.


For the inside of the card I added a birthday sentiment using LDRS Essential Birthday Sentiments stamp set. I also added another of the foiled butterflies to the top right hand corner of the card.


Monday, December 19, 2022

Poinsettia Christmas


Hi Crafty Friends,

Thanks for visiting my blog today. I have a stencilled and foiled Christmas card to share with you all today.

For the background of my card I used Waffle Flower Crafts Layering Poinsettia Stencil. This is a two layer stencil which allows you to create a colourful background.

I cut my stencilled background to a 4 5/8 inch square panel and then used one of the square dies from the Creative Craft Products Filigree Squares Nesting die set to die cut the layering filigree panel from gold mirror cardstock. This was then layered onto a top folding 5 1/2 inch square red card.

To decorate the top of the card I added Waffle Flower Crafts Radiating Diamond Frame again die cutting from Gold Mirror cardstock. 

I used Waffle Flowers Craft Merry Christmas Duo Foil Plate, foiling the sentiment using gold foil and then die cutting using the coordinating die.


For the inside of the card, I die cut another square white panel and used the stencils to add some of the poinsettia details to two of the corners of the card. I then added a sentiment to the centre of the card.

This time I used Creative Craft Products' Inverted Scallop Squares die set to add the gold layer under the white panel.


Monday, November 28, 2022

Slim Merry Christmas


Hi Crafty Friends,

Today I am sharing a Christmas themed Slimline card I created recently.

For the background of my card I used Creative Craft Products Festive Bold Words - Winter Wishes die set.   I die cut the panel from a pale green pearlescent cardstock and paper pieces the trees, stars & dots using glitter and gold mirror cardstock. My finished card measures approximately 8 inches x 3 3/4 inches.

For the sentiment I used Waffle Flower Crafts Merry Christmas Duo Hot Foil Plate and coordinating die. I foiled the sentiment using gold foil onto red cardstock.


For the inside of my card I used Picket Fence Studios' Slim Have Yourself a Merry Little Christmas Word Topper die.


Friday, October 21, 2022

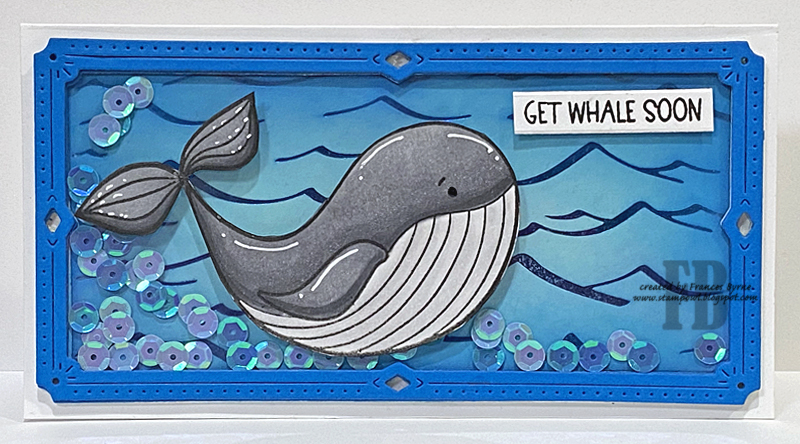
Get Whale Soon


Hi Crafty Friends,

I am sharing a Get Well themed Mini Slimline Shaker card that I created recently. I actually went whale watching on Wednesday with a group of friends. The water was a bit rough but we managed to see a mama whale with her calf and boyfriend. 

For my card today I used Trinity Stamps Whale Done stamp set and also the Shimmering Sea Hot Foil Stamp. I hot foiled the Shimmering Sea Hot Foil Plat onto blue cardstock using Cobalt Blue Hot Foil and then blended blue Distress Oxide inks around the edge.

To create the frame for my card, I used Pinkfresh Studio's Mini Slimline Frame die set, die cutting the frame from both white and blue cardstock and layering them together to create the area for my shaker. I added two shades of blue sequins to the centre of my shaker card.

I added the whale and sentiment to the outside of the acetate.


For the inside of my card, I added one of the inner panels left over from die cutting the frame. I stamped another whale themed sentiment from the Whale Done stamp set as well as the water that spouts from the whale.


Wednesday, October 5, 2022

Happy Birthday


Hi Crafty Friends,

Welcome to my blog, today I am sharing a card I created using one of the Creative Craft Products Easy Folds die sets. When I first saw these dies a few months ago, they reminded me of some fun templates I used to have that created unusual shaped cards. Dies are always much easier to use than templates, so of course I had to buy all four die sets. Two dies sets make 5 x 7 inch cards and the remaining two make 6 x 6 inch cards. I have included links to all four die sets in my supply list below. 

For my card today I used the 5 x 7 inch Diamond Fold Die set, keeping the design fairly simple. I die add a layer between the patterned paper and base of the card which was fairly simple to do, even with the odd shape. I have been wanting to use this patterned paper from Carta Bella for a while, and being that it was double sided I was able to make use of both sides for this card. You can see the reverse paper on the inner panel which shows when the card is closed.

I added a Happy Birthday sentiment using Waffle Flower Crafts' Happy Birthday Duo Foiling die set with coordinating dies. I foiled the sentiment using black foil. 

To finish off the front of the card I added some Pink Fresh Studio Champagne Metallic Pearls around the sentiment.


Here is a look at the inside of my card, after layering the patterned paper I used the layering die to die cut a white panel, trimming down the left side slightly and adhering to to the left side of my card. I then added a birthday sentiment using MFT Stamps Inside & Outside Birthday Greetings  stamp set.


Thursday, September 22, 2022

Sunflower Birthday


Hi Crafty Friends,

It's challenge time with my friends over on the CCEE Stampers challenge blog. Kelly Santi our challenge hostess of the month continues to issue the challenges.

Apparently in the Northern Hemisphere, today is the first day of Autumn! Create a fall themed card.


Of course as I live in Australia, it is not autumn down here ... but spring! and for us, the reasons always start on the first day of the month. I don't really need autumn themed cards as we don't celebrate Thanksgiving and Halloween isn't that big down here. Spring means flowers ... so I compromised by using a sunflower which seem to be very popular in the USA at this time of year, even though they are a summer flower down here in Australia.

I recently purchased Crafter's Companion's The Sunflower Collection Paper Pad which I just love and have been wanting to use it for a while. Today's challenge was the ideal time to cut into it.

I created a 6 inch x 6 inch Gatefold Pop Up Card using a tutorial by Sam Calcott which you can find here. I wanted something that would feature the paper, and this card seemed ideal and as the paper pad is 6 x 6 that was the best size for my card.

I added the large sunflower and leaves to the centre panel using the Bright Rosa Sunflower Band and Fern Border die sets. I layered the sunflower onto the diamond panel which is die cut using Waffle Flower Crafts' Radiating Diamond Frame die.


When the card is closed it becomes a Gatefold Fold Card, and is held closed using a Belly Band.


I used the Waffle Flower Crafts Radiating Diamond Frame die again for the diamond layer and added the copper foiled birthday sentiment using a foil plate from Waffle Flower Crafts.

I also added some Champagne Metallic Pearls to the diamond frame and belly band.


Here is a look at the back of my card. The two side panels form the front of the gatefold card when the card is closed. 

I added two white panels to the next two panels, for a place to stamp a sentiment and also to be able to write a personal greeting when this card is given to someone. Both sentiments are from two different Made To Surprise stamp sets which are listed in the supply list below.

I was going to leave the centre panel plain, but as I had a scrap I would have thrown out, I decided to add that to the centre.

Don't forget to check out the CCEE Stampers blog (goes live 12 AM EST) to see the rest of the creations the CCEE Stampers created this week. You can also see more details of their creations on their individual blogs:


Other Supplies:
Sunflower Band Die Set - Bright Rosa (discontinued)
Fern Border Die Set - Bright Rosa (discontinued)