Showing posts with label TEXT{ures}. Show all posts

Tuesday, March 12, 2024

Big Birthday Wishes


Hi Crafty Friends,

I was recently asked to make a 40th birthday card by someone and as you can see I was happy to do so.

This gave me the opportunity to pull out one of the dies from Made To Surprise by Sam Calcott's Showstoppers 3 Collection ... the Double Concertina Gatefold die set.


I kept the front of the card fairly simple as the focus is on the inside. I added another of the circles to the front with a sentiment. I also added a butterfly from Text{ures}.


On the back of the card, I added a white panel and added another birthday sentiment. This also gives us a place to add a handwritten sentiment.


Thursday, March 7, 2024

Winged Butterflies


Hi Crafty Friends,

Thanks for dropping by my blog. Today I am sharing a Winged Pop Up Card I created using dies from Made to Surprise by Sam Calcott's Showstoppers 3 Collection. 


 The die used here is called 5in x 7in Showstoppers Winged Pop Up Card die set,  this die set can be used to make a number of different styles of card.


I made this style of card a year or two ago without dies, but I was pleased when I found out that I could use this die set to make them. It's always a lot easier and quicker with a die set and not having to measure.


As you can see by the photo above, this card has extra panels on the back of the card which gives it a winged effect.


Here is another photo of my card, showing the other winged panel.

To decorate my card, I used the butterfly die from Text{ures} and some of the gold foiled sentiment ephemera from the Papercraft Society Box 53.


Here is an overhead view of my card, so you can see the style of card a little better.


When you close the card, the "wings" fold back to create a 5 inch x 7 inch card. The card stays closed with the help of a belly band. I decorated the belly band using another of the butterflies and a gold foiled sentiment from the Papercraft Society Box 53.


Here is a look at the front of my card without the belly band.


Here is a view of the back of the card. I added layered panels to the two back side panels. I added two sentiments using Made To Surprise's Sentiment set from the Showstopper Collection. I gold embossed both sentiments. There is also space on this panels to add a personal greeting to the recipient.


Friday, October 20, 2023

Birthday Love


Hi Crafty Friends,

Today I am sharing a fun new style of card I made recently using a tutorial by Sam Calcott. You can find here tutorial here.

Sam calls this card style a "Kissing Frog" card, which is a strange name but if you look at the overhead version of the card (photo below), you can understand why she called it that. 


Sam also released a new Showstoppers Collection in her Made To Surprise line. This time around Craft Stash was offering a few digital paper pad if you got the bundle ... as I was going to anyway I got the paper and it great to be able to play with that while I am waiting for my dies etc to arrive.

To decorate the front of the card, I added the birthday sentiment which is from TEXT{ures}.


Here is the overhead shot of my card, it's a little bit harder to see in the single version of the card, but if you make a double it definitely does look like two fish or frogs kissing.


Here is a look at the back of my card. I made one panel white, so that I could add a stamped sentiment and have a place to write a personal greeting.


Thursday, August 17, 2023

Whale Hello There


Hi Crafty Friends,

Today I am sharing a whale themed Slide and Lock Box Card I created recently.

Sam Calcott recently shared a tutorial on this style of card. The oval panel on the front of the card is designed to slide onto the card to keep the card shut. You can see Sam's tutorial here.


I used one of the ovals from the Supersized Nestables Ric Rat die set for the oval which slides onto the front of the card. I splattered ink over the oval.

To decorate my card I used the whale from Text{ures} Layering Sea Creatures die set from the Deep Blue Collection. The sentiment is from the Sea and Sentiments stamp set.


This basically is a gatefold card, but I scored the centre of the back of the card so that the back folds which means the whale oval panel card be on the card when displayed. 


For the white panels on the centre of the card, I added the sea creatures which are also from the Sea and Sentiments stamp set. I added the "Whale-ly" birthday sentiment from Trinity Stamps, stamp part of the sentiment on each of the panels.


Here is a closer look at the oval panel. I cut two ovals, and added two score lines at the centre of one of the ovals and then adhered this to the front oval. The front of the gatefold card then slides in between the two ovals.


Wednesday, August 16, 2023

Magnolia Birthday


Hi Crafty Friends,

Welcome to my blog, today I am sharing a floral 5 x 7 birthday card with you.

A couple of months ago  I shared Slimline card using Text{ures} Magnolia Washi Tape from the Magnolia Drive Collection. At that time the Magnolia Half Tone Stamp/Die set was out of stock. It finally came back in, so of course I had to get it. I love the dotty effect the stamp gives to the flower.

I used the magnolia stamp to stamp onto my white rectangle panel, I then splattered gold paint over the white areas of the card. I used the outline die included in the set and die cut from gold mirror cardstock and adhered this over the stamped magnolia.

I added the Happy Birthday sentiment using the Creative Craft Products Modern Sentiments die set.


For the inside of my card I added a birthday sentiment and added part of the flower to the lower right hand corner.


Thursday, June 15, 2023

Enjoy Today


Hi Crafty Friends,

Today I am sharing a floral Slimline Card I created recently.

For this card I used products from Text{ures} and Creative Craft Products, which are both available on Craft Stash.

The floral image was created using Text{ures} Magnolia Drive Washi Tape Sheets. This pack contains 8 A4 Washi Sheets, 5 of the sheets include two Magnolia Flowers (each sheet being a different colour) and then three sheets of leaves. I managed to decorate my card using just one of the magnolia images on a sheet decorating both the front and inside of the card.

For the Slimline portion of the card I used Slimline dies from Creative Craft Products, the Slimline Straight Edged Rectangles and the Slimline Filigree die sets.

I added a sentiment using Creative Craft Products Birthday Sentiments stamp set.


For the inside of the card, I added a birthday sentiment from the Creative Craft Products Birthday & Celebration Stamp set.

I also added a few more of the magnolia flowers, using offcuts left over from decorating the front of my card.


Friday, March 10, 2023

Teacher Thank You


Hi Crafty Friends,

Today I am sharing another Teacher Thank You card I created recently.


Late last year, I purchased TEXT{ures} Book Stack die set when it was released. I thought this would a good set to use when I was making teacher cards. I ran out of time to use it last year, so I decided I would pull the set out and create a Teacher Thank You card. 

We have a long time before I will need this, as my grandchildren's school year goes from the end of January to the beginning of December. But I like to be able to make the cards during the year when the inspiration grabs me.

I die cut a whole bunch of the books in different colours. I probably have enough die cut now for about 3 or 4 more cards, but that will just make the next few times I want to use this set easier. I ended up selecting books in rainbow order to add to my book stash in the centre panel of my card.

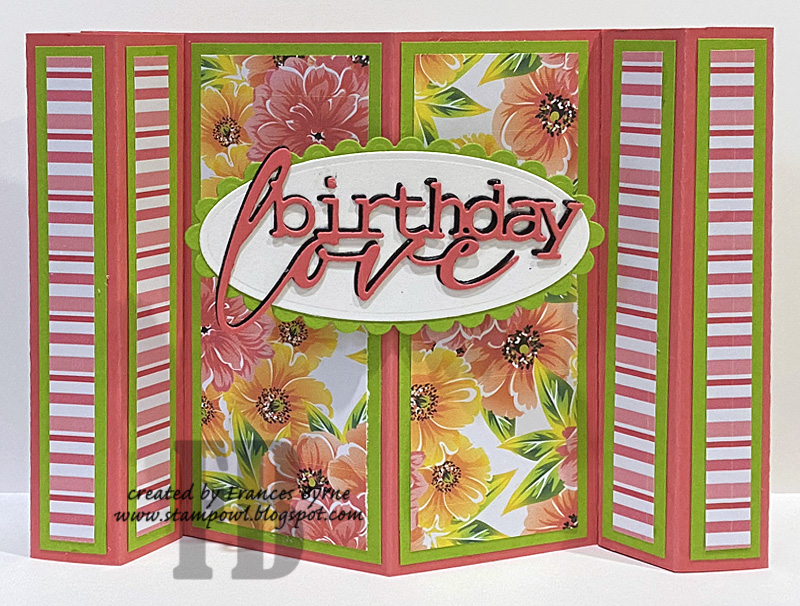
I created a 5 x 7 Side Panel Card using Made To Surprise by Sam Calcott's 5 x 7 Side Panel Card die set from her Showstopper Collection. For the red layers, I used the Linen Embossing Folder to add texture to the panels.

I used Made To Surprise's Chunky Alphabet die set to die cut the letters and number to create the "#1 Teacher" sentiment, the "#" came from an older Papertrey Ink die set.

To finish off the card, I added the owl which is from Darcie's Heart and Home Best Teacher stamp set. I wanted to add the academic cap/mortarboard to the owl, so I used another Owl stamp set this time from Dare 2B Artsy for that.


For the back of the card, I added two additional panels. the one of the left side of the card, I left blank other than the row of books along the bottom. This is so that a personal message can be written to whoever this card is for.

The other panel, I added another of the open books included in the TEXT{ures} die set. The sentiments are all from Sunny Studio Stamps Teacher Appreciation stamp set.