Saturday, February 28, 2015

Elizabeth Craft Designs February Designer Challenge


Hi everyone,

It's time for our February Elizabeth Craft Designs Designer Challenge. For our first challenge for 2015 we were challenged to Mix and Match Tags (Create a project using a combination of the various tag dies. Small with large, mix overlays, mix corners, let your creativity flow!).

After a little bit of thought on what I would create for this month's challenge, I decided to create a Waterfall Tag book. I made a few of these some years back, so it was fun to revisit a fun technique.

Here is a quick video so you can see how the waterfall works on my book.


For the front of my book, I have used the Tags and More 8 - Lattice for the main tag, the overlay and the zigzag border at the bottom. I used the Star from Star Accordion Card die to which I added "Baby Boy" using the Alphabet 1 - Caps. The corners are from the Tags and More 2 - Deco


Once you open up the book on the left hand side I have used the Tags & More 6 - Daisy and It's A Boy/Girl .

The baby bottle was created using the Tags and More 8 - Lattice,  I explained how to make the baby bottle on my recent Baby Girl Stand Up Card which you can find here


To create the tags on the right hand side of my book I used the Tags and More 2 - Deco for the basic tag  and also the reinforcement holes. I used the Tags and More 1 - Lace for the overlay at the top. The zig zag border at the bottom is from the Tags and More 8 - Lattice .


I decorated each of the tags using the Star Buddies Peel-Off Stickers ... I love love love these little cuties!!!!!!

This blog post would be amazing long if I gave you a step by step of everything I did to create my book. So I will just give you the basics of how to create this style of book, as I think you can figure out how I decorated it yourself.

1. To create my Waterfall Tag Book I started with a folded 6 1/2 inches tall by 11 inches, score along the 11 inches edge at 5 1/2 inches so you have a folded card 6 1/2 inches x 5 1/2 inches. Decorate as desired. 


2. Cut a piece of card 12 inches x 4 3/4 inches the same color as the book cover. Score along the 12 inch side at 6 inches; 6 3/4 inches; 7 1/2 inches and 8 1/4 inches as per diagram above. Fold and unfold along each score line (I like to score in both directions)

Add a piece of Elizabeth Craft Designs Transparent Double Sided Tape 10mm so it is on the right side of the 6 inch score line; the 6 3/4 inch score line and 7 1/2 inch score line.

3. Create your 3 tags using the Tags and More 2 - Deco for the basic tag  and also the reinforcement holes. I used the Tags and More 1 - Lace for the overlay at the top. The zig zag border at the bottom is from the Tags and More 8 - Lattice . Cut your tags so they are 5 3/4 inches long.

4. Attach the left side of each tag to the adhesive tape applied in step 2, starting with the tag along the 7 1/2 inch score line and moving left.


5. Cut a piece of card which is 2 inches x 6 1/2 inches. Score at 3/4 inch at each end. Place a piece of adhesive double sided tape, along the right edge of the 12 inch x 4 3/4 inch panel waterfall panel, the tape will be at the top side of the card. Adhere the waterfall panel underneath the skinny panel above so it is centred between the score lines and both edges are flush with the right side.

6. Fold back the 6 inch fold line on the waterfall panel so it goes behind the right side of the panel with the tag and the left hand side when opened is now underneath the right side edge. Fold  the score lines on the skinny panel above so they are now under both edges of the waterfall panel. Place adhesive double sided tape to the underside of both 3/4 inch scored lines. 

7. Open the folded card we created in step 1 and adhere the folded skinny panel to the edge of the right side of your card  so that tags are centred.

8. Decorate as desired...... I hope that makes sense!


Paper: White; Green; Orange; Blue; Baby Mine Boy - Carta Bella
Dies: Tags & More 1 - Lace; Tags & More 2 - Deco; Tags & More  4 - Flourish; Tags & More 6 - Daisy; Tags & More 8 - Lattice; Alphabet 1 Caps - Elizabeth Craft Designs; Star Accordion Card - designed by Karen Burniston for Elizabeth Craft Designs
Other ECD Products: Star Buddies Peel-Off Stickers; Transparent Double Sided Tape 152mm; Transparent Double Sided Tape 10mm; Cool Diamond Silk Microfine Glitter
Other: Ribbon; Foam Tape; Copics


Smelling the Salt of the Ocean


Hi everyone,

It’s challenge time with the “Crazies” over on the Crazy 4 Challenges blog. Kelli Hull our challenge hostess for February, finishes off the month with one last challenge. 

Today we will celebrate the two Zodiac signs of February... Aquarius and Pisces.  They have something in common... both are water signs!  So our challenge this week is to make a card with a water scene!!!


For my card today I decided to create a pop up card using the Beach Chair Pop Up Card die and Rocky the Crab designed by Karen Burniston for Elizabeth Craft Designs. I thought it might get a little lonely for Rocky being on the beach on his own so I die cut the Beach Chair Pop Up twice on my card side by side and gave Rocky a girlfriend .... Rockene!


Along the bottom edge of the card I added some waves using the Beach Edges die set. Along the back part of the card I added three palm trees and also some sand.

I thought Rocky needed to say something nice to his girlfriend, so I used the speech bubble from the Rectangle Accordion card set and computer generated the sentiment.


I kept the front of the card fairly simple, as the inside in the focal point of this card. I added another crab, sand & waves and a sentiment.


Don't forget to check out the rest of the “Crazies” cards over on the Crazy 4 Challenges blog and also their individual blogs for more details.

Stamps: Free Spirit - Lucy's Stamps
Paper: White; Red; Black; Green; Kraft; Brown; Aqua; Yellow; DP
Dies: Beach Chair Pop Up Card; Palm Tree & Pail; Beach Edges; Rocky the Crab; - designed by Karen Burniston for Elizabeth Craft Designs; Fishtail Flags - MFT Stamps
Other: Black Ink; Kraft Ink; Brown Ink; Transparent Double Sided Tape; White Iridescent Shimmer Sheetz; Foam Tape


Friday, February 27, 2015

Rebus - Names Starting with 'D'


Hi everyone,

It is time for another Rebus swap to share with you all. This time round our theme is "Names starting with the letter 'D" ".  

If you would like to solve my rebus puzzle, why not post a comment on my blog post with your answers. I will let you know what the correct answers are next time I post a rebus card here.

How did you go working out my January Rebus which was Herbs .... here are the correct answers for you to check how you did.

  1. Mustard
  2. Mint
  3. Garlic
  4. Taro
  5. Chives
  6. Caraway
  7. Dill
  8. Catnip
  9. Aniseed
  10. Motherwort
  11. Cilantro


You can find all my past rebus cards here


Thursday, February 26, 2015

Baby Boy


Hi everyone,

It's challenge time with my friends over on the CCEE Stampers challenge blog. This week Sabrina finishes off her February challenges with one last fun challenge. 

Sabrina tells us that It wouldn’t be a month of challenges from me without a technique challenge, grins, and the various ones for “the month of the pearl” were all optional, so here’s a technique challenge pure and simple...or not so simple; it’s up to you.

Inlaid die-cuts

Here are a few links which might help you create something using this technique.

More Complex:


As you can see I have created a baby card for my card this week. I started my card by die cutting the Simon Says Stamp Full Glass Hourglass die from white and teal card. I covered the back of the white panel with thin white card that had Transparent Double Sided Tape adhered to the front and then I filled in the empty panels with the teal triangles. 

I then lay the baby die directly onto my card and die cut the word from the panel. I also die cut another baby word from a darker teal card and inlaid the darker word where the white baby word had been on my card. I layered this all onto a folded dark teal card. I stamped the word "Boy" to the lower bottom corner of my card.

The two rattles aren't inlaid (I guess I could have) but I added those after the card was assembled and I thought it was nice to have something with a bit of depth on the front of the card.


For the inside of my card I created a Pop Up Card using the Lorna Label Pop Up Card designed by Karen Burniston for Elizabeth Craft Designs

On the lower bottom edge I die cut the SSS Full Glass Hourglass die again from teal and white and this time just used the triangle pieces which fall out of the die to create the border. I added some thin stripes of white card above the triangle panel and also on the edge of the top portion of the card.

I used a sentiment and the rattles from a MFT Stamps Beautiful Baby stamp set to finish off the inside of my card.


Don't forget to check out the CCEE Stampers blog (goes live 12 AM EST) to see the rest of the creations the CCEE Stampers created this week. You can also see more details of their creations on their individual blogs:


Stamps: LJD Beautiful Baby - MFT Stamps
Paper: White; Teal; Aqua
Dies: Lorna Label Pop Up - designed by Karen Burniston for Elizabeth Craft Designs; Wonderful Words Baby - PTI; Full Card Hourglass - Simon Says Stamps; Beautiful Baby - MFT Stamps
Other: Black Ink; Teal Ink; ECD Transparent Double Sided Tape; Hemp Twine; Foam Tape


Wednesday, February 25, 2015

London Here I Come!


Hi everyone,

Well yesterday my youngest daughter left Australia to live in London for the rest of the year. She has moved over there as part of a Teacher Exchange. I am going to miss her big time and the house is going to feel pretty strange without her!

Of course I had to make her a card to celebrate the occasion. When I went looking at what to use to create my card, I had found a few cute stamps I planned on buying, but alas they weren't in stock anywhere in Australia and by the time I had thought about buying anything there was no time left to order from overseas. So I had to rethink and see if I could find any in digital stamps. Fortunately I found just what I was looking for from Digital Delights by Louby Loo and Pretty Grafik.


As you can see I have created a Pull Card using the Rectangle Pull Card die set designed by Karen Burniston for Elizabeth Craft Designs. As she is going over there to teach I wanted to include some school related images as well as London themed images.


Here is a closer look at the left hand side of the card. The union jack (flag) is attached to a spiral so it moves as the card is opened. I used the new Elizabeth Craft Designs Alphabet 1 - Caps for the word "London". 


Here is a close up of the right side of my card. I computer generated the "Here I Come!"

Digital Stamps: Guardsman Scott; School Accessory Set; School Girl - Digital Delights by Louby Loo; London Stamps (Phone Box; Big Ben; Bus) - Pretty Grafik
Paper: White; Red; Grey; British Stripe - Fab Scraps
Dies: Rectangle Pull Card - designed by Karen Burniston for Elizabeth Craft Designs; Alphabet 1 Caps - Elizabeth Craft Designs; MFT Die-namics Fishtail Flags Stax
Other: Foam Tape; Copics


Tuesday, February 24, 2015

Snow


Hi everyone,

It's time for another CHF challenge over on the Cornish Heritage Farms Blog. This week the challenge is hosted by Amber.

Amber loves snow and she tells us that the Snow is almost over, so make a snowy card. (Snow Scene, Snowman etc.)

Of course the snow never started where I live down here in Australia ... but I do enjoy making snowy cards so I pulled out my favorite Cornish Heritage Farm's Dancing Snowman Digital Stamp to create my card.


I decided to to create a pull card using the Rectangle Pull Card die set designed by Karen Burniston for Elizabeth Craft Designs. I also added snow using the Outdoor Edges die set and snowflakes using the Circle Spiral Pull Card die set.

One thing I love about digital stamps, is that you can make the images whatever size you want and also flip the images if you want and I did both with the snowmen  I used on my card, so I have different sizes and look a tiny bit different.


Here is my card when it is opened. You can see the snowman on the top of the card is attached to a spiral so that it gets hidden when the card is closed and gives the recipient a surprise when they open it.

On the left hand panel, I added two of the sentiments from the new Birthday Greetings stamp set

If you didn't know Cornish Heritage Farms has recently released a number of new stamp sets which you can see here


Want to play along?????

If you would like to play along with us of course we would love to have you!

To play create a card using CHF images. You can use either CHF digi or rubber stamps to create a card or project ... anything you like as long as the stamps are Cornish Heritage Farms. (Yes, they can be older stamps.)

Once you have created your card/project come back here and place a comment with a link to your card/project to the CHF blog post so that we can see what you created. If you upload your card/project to SCS don't forget to included the keyword CHF73. We can't wait to see what you create!

Don't forget to check out the rest of the Design Teams blogs today to see what they created for this challenge.


  • Amber Hillman
  • Steph Ackerman
  • Monica Taylor


  • Stamps: Birthday Greetings; Dancing Snowman Digital Stamp - Cornish Heritage Farms
    Paper: White; Aqua; Candy Lane DP - Bo Bunny
    Dies: Rectangle Pull Card; Outdoor Edges; Circle Spiral Pull Card - designed by Karen Burniston for Elizabeth Craft Designs
    Other: Black Ink; ECD Cool Diamond Silk Microfine Glitter; ECD Transparent Double Sided Tape Sheet; Foam Tape; Copics


    Monday, February 23, 2015

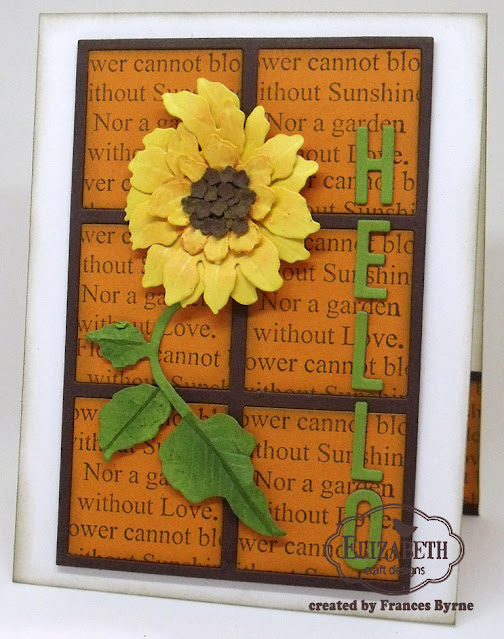
    Hello


    Hi everyone,

    It's my turn to post a card on the Elizabeth Craft Designs blog today. This time round I have created my card using a couple of the new Susan's Garden range of dies recently released by Elizabeth Craft Designs. I was super excited when I saw that Susan's was releasing the Garden Patch dies as these can be used in so many ways. You can use the grid and the square together or just the grids or the squares on their own.

    Here is how I created my card:

    1. Cut a piece of cream card 4 1/4 inches x 11 inches, score at 5 1/2 inches to create a top folding card. Sponge around the edges using a light brown ink.

    2. Cut a piece of brown card and orange card large enough to fit the large grid from the Garden Patch - 1 1/2 inches & Mini Roses die. To the back of each piece of card adhere some Transparent Double Sided Tape. Run through die cutting machine.

    Cut another piece of brown card 3 3/8 inches x 5 inches. Layer the brown grid onto the brown card. Attach to the folded cream card using foam tape.

    3. Using dark brown ink stamp the Sunshine & Love Rubber Stamp on each of the orange squares. (Note: I used a stamp positioner for mine to help centre the sentiment on the square, but you could also eyeball it if you prefer. You will need to stamp a second time underneath the first stamping, to fill the square). Sponge the edges of each square using light brown ink. Attach the squares into the brown grid on the folded card.

    4. Die cut 2 each of the  Garden Notes - Sunflower using yellow card for the flower; green card for the leaves and brown card for the centre head of the sunflower.

    Use orange chalk to color the centre yellow portion of the sunflower and green chalk to color the leaves. Use balling tool and moulding mat to shape flowers & petals. Glue both large flowers on top of each other offsetting one a little and then and the smaller single petals around the top centre about  1/4 inch from centre.

    Place brown florets onto moulding mat and use styles to cup each floret and glue these to centre of the sunflower.

    Use balling tool to shape leaves and use stylus to create veins in leaves.

    Attach flower to card as per photo above.

    5. Use the Alphabet 1 - Caps die to die cut the letters "H; E; L; L; O" from Green card. (Tip: Add Transparent Double Sided Tape to back of card before die cutting letters). Attach letters to form the word "HELLO" down the right side of the card.
     

    The Inside of the Card:

    6. Sponge the edges of the inside of the card using light brown ink.

    7. Cut a piece of brown card and orange card large enough to fit the large grid from the Garden Patch - 1 1/2 inches & Mini Roses die. To the back of each piece of card adhere some Transparent Double Sided Tape. Run through die cutting machine. (Tip: You only need to use half of the grid and squares so if preferred on cut through just over half the grid when die cutting). Trim off any extra lines so  the top edge is flush.

    Adhere the brown grid to the bottom of the card ensuring that it is centred.

    Stamp the Sunshine and Love sentiment onto the orange squares as we did in step 3. Sponge edges using light brown ink. Adhere the orange squares to brown grid on bottom of the card.

     Trim off any overhang so the side edges of the card are even.

    8. Stamp Sunshine and Love sentiment to top section of inside of the card using black ink.
     
     
    Thanks for stopping by today, I hope you enjoyed my tutorial.

     
    Supplies: 
    Elizabeth Craft Designs
    Garden Patch - 1 1/2 inch & Mini Roses (1001)
    Garden Notes - Sunflower (999)
    Alphabet 1 – Caps (967)
    Sunshine and  Love Rubber Stamp (RS001)
    Transparent Double Sided Tape – 152 mm (509)
     
    Other
    Cream Card
    Orange Card
    Brown Card
    Green Card
    Yellow Card
    Light Brown Ink Pad
    Dark Brown Ink Pad
    Black Ink Pad
    Orange Chalk
    Green Chalk
    Foam Tape


    Sunday, February 22, 2015

    Paris


    Hi everyone,

    Today I am sharing a Pop Stand card using the Eiffel Tower Pop Stand Card die designed by Karen Burniston for Elizabeth Craft Designs

    This card was inspired by a couple of cards Karen has created recently. 

    I posted a card last Monday which is pretty similar to this one .... I actually made this one first, and I just changed the designer papers, the color of the Eiffel Tower etc.


    For this card I die cut the Eiffel Tower using Pink Iridescent Shimmer Sheetz, after embossing the detail on the Eiffel Tower, I sanded the raised areas to reveal the white core of the Shimmer Sheetz.


    For the front of the card I die cut the small Eiffel Tower edge from the Paris Edges die set and added some designer paper and some black Peel-Off Stickers along the edge. I also stamped the sentiment using the speech bubble from the Rectangle Accordion Card die set.

    Paper: White; Pink; Black;  Paris DP - Fab Scraps
    Dies: Eiffel Tower Pop Stand Card; Rectangle Accordion Card; Paris Edges - designed by Karen Burniston for Elizabeth Craft Designs
    Other: Black Ink; ECD Pink Iridescent Shimmer Sheetz;  ECD Pink Border Peel-Off Stickers; ECD Pink Glitter Dots;  Ribbon; Foam Tape


    Saturday, February 21, 2015

    Party Animal


    Hi everyone,

    It’s challenge time with the “Crazies” over on the Crazy 4 Challenges blog. Kelli Hull our challenge hostess for February, continues to bring us fun challenges. 

    Being the third Saturday of the month it is time for a Sketch Challenge.


    For my card this week I have used Simon Says Stamps Birthday Farm Animals stamp set and coordinating dies.


    Of course I seldom make a card these days without doing something on the inside no matter how simple ... for this card I decided to make a pop up card using the Lorna Label Pop Up Card die set designed by Karen Burniston for Elizabeth Craft Designs

    As you can see I have added all the animals from the Birthday Farm Animals stamp set to the inside. 


    Here is a side on view of my card, so that you can see the pop up portion of the card a little easier.

    Don't forget to check out the rest of the “Crazies” cards over on the Crazy 4 Challenges blog and also their individual blogs for more details.
    Stamps: Birthday Farm Animals - Simon Says Stamp; Wild Thing - MFT Stamps
    Paper: White; Green; That's My Boy DP - Echo Park
    Dies:   Lorna Label Pop Up Card; Fancy Seasons Frame Edges - designed by Karen Burniston for Elizabeth Craft Designs; Birthday Farm Animals; More Birthday Farm Animals - Simon Says Stamp
    Other: Black Ink; Button; Yellow Hemp Cord; Foam Tape; Copics
     

    Friday, February 20, 2015

    Happy Birthday


    Hi everyone, 

    My card today is for a challenge I am doing with a couple of friends of mine. Each month we get together and go to our favorite stamp/scrapbook store and come home with one or two new goodies. So we decided to also challenge ourselves each month using a product we all have.


    This time round our challenge was to use one of the Tags & More dies from Elizabeth Craft Designs. As I also have the new larger Tags & More die sets which have recently been released I decided to create a Tag Shaped card. 

    I also decided to use the new Tag Pivot card die set designed by Karen Burniston for Elizabeth Craft Designs. So I guess I have made a Tag Pivot Tag Card haha!


    The Tag Pivot Card die normally die cuts a large tag shaped on the left side and two smaller tags on the right side. For my card today I decided to change it up by die cutting two larger dies in my card instead. To do this I just kept my card folded and lined just the large tag onto my card.

    My images is one from Penny Black Stamps.


    Here is the back of my card, I love that you can see the greeting from the back of the card.


    Stamps: Cool Chicks - Penny Black; Yummy Treats - Hero Arts
    Card: White; Orange; Bright Pink; Sugar DP - Kaisercrafts
    Dies: Tag Pivot Card - designed by Karen Burniston for Elizabeth Craft Designs; Tags & More 7 Vine; Happy Birthday Stand Up Helper - Elizabeth Craft Designs
    Other: Black Ink; Green Hemp Cord; Foam Tape; Copics