Showing posts with label Baby. Show all posts

Friday, May 23, 2025

Hello Baby


Hi Crafty Friends,

Today I am sharing a baby card with you. A few weeks ago I shared a baby boy card, so this time around I made a baby girl card.

The base of my card uses Creative Craft Products Accordion Stepper Card die set. The die makes it so easy to create.

To decorate my card, I used products from Spellbinders Little Smiles Collection. 

To create the background that is on each of the panels, I used the Falling Stars Betterpress Plate. I foiled this using white glimmer foil doing each of the panels separately. Once the foiling was completed, I used the coordinating 3D embossing folder Wishing Stars which embosses in the empty spaces.

The panel on the top left was decorated using the Bundle of Joy die set. The large star on the bottom panel is from the Swinging Among the Stars die set.

To finish the front of the card, I added some Betterpress sentiments which is also included in the collection.


For the back of the card, I added the two larger panels. The blank one is to write a personal message. The other I decorated the same as those on the front, I then added the baby girl sentiment using stamps & dies from Trinity Stamps.


Monday, April 14, 2025

Hello Baby


Hi Crafty Friends,

Welcome to my blog, today I am sharing a fun baby themed Slimline card I created recently.

For my card base I have used the DL Diamond card using the Creative Craft Products die set,

 
To decorate my card I used Spellbinders Swinging Among the Stars die set. The elephant in the basket moves from side to side. 


For the background panel I used blue cardstock, I then used the Falling Stars Betterpress Plate & the Wishing Stars 3D Embossing Folder to create the sky. I also added clouds that are included in the die set. 


The sentiments on the inner panel are from the Little Smiles Sentiments Betterpress Plate set. 

The “baby” sentiment on the front diamond is from a Trinity Stamps stamp set called Simply Sentiments Baby.


I added a panel on the back to add another sentiment and a place to write a personal greeting to the recipient. I decorated this panel using various items from the products used on the front of the card.


Tuesday, June 6, 2023

June 2023 Karen Burniston Designer Challenge


 Hi Crafty Friends, 

Welcome to our June Karen Burniston Designer Challenge.

Check out Karen Burniston's blog on Wednesday (US Time) when you will be able to see what all the designers created for the challenge this month, plus Karen will have an amazing video tutorial to share with us all.

Our challenge theme this month is ... "WEDDING or BABY" - create a card celebrating a new couple or a new baby.


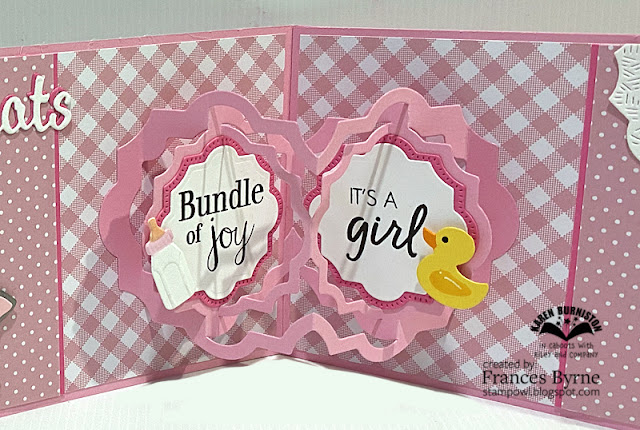
For my card today I used the Paper Frames Pop-up die set for the pop-up mechanism of my card. I have used this previously in A5, Square and even Slimline cards so I figured this time around I would create a 5 inch x 7 inch card, which gives you plenty of room to decorate.

I used the elephant & giraffe from the Safari Animals die set to add the "stuffed toys" to the side panels of the card.

On the top left side of the card I added the "Congrats" die using Word Set 8 - Congrats die set.

On the upper right hand side of my card I used one of the labels from the Labels - Crosshatch die set, to have a place to write a personal message.


Here is a close up view of my Paper Frames pop-up. I added baby themed stamped sentiments to the panels and decorated the edges of the labels using dies from the Baby Charms die set.


For the front of the card, I used the gingham patterned paper I used on the inside of the card. Rather than use a third piece of paper I joined the paper left over from decorating the inside. To hide the join I added the border using the Border Blends - Party die set.

I used the Ovals -  Crosshatch die set for my oval panels which I decorated using dies from the Baby Charms die set and also the "Welcome" from the Welcome die set.


Tuesday, May 9, 2023

Precious Little One Circle Easel Card


Hi Crafty Friends,

Last week I shared a square baby card using dies and stamps from Made To Surprise by Sam Calcott. Today I am sharing another baby card using the same dies, but this time as a Circle Easel Card.

I had this idea to make a circle easel card using the circle die included in the Whatever the Weather die set. I couldn't decide what I wanted to use for the wedges inside the circle so I die cut a few things ... the pastel colours I used on the other card and the glitter card I used on this card. Originally I thought the purple glitter was pink, it looked that on the sheet but it turned out to be the purple colour which is okay was it worked well for a baby boy card. 


I used stamps and dies from the Baby, Baby Additions and Circular Frame Bubbles die sets to decorate my card. I love the "Mini Boss" word on the base of the card, new babies definitely rule the house.


I added part of the poem from the Baby Additions stamp set on the back of the card and the foot prints included in the Baby die set.


The card folds flat so it can be placed in an envelope. 

The placement of the baby elements on the circle panel is pretty much the same on both cards.


Wednesday, May 3, 2023

Precious Little One Square Card


Hi Crafty Friends,

Today I am sharing a baby card that I created recently using stamps and dies from Made To Surprise by Sam Calcott.

One of the die sets included in the Made To Surprise Reveal Wheel Collection is the Whatever the Weather die set. I created this fun sun/pie shaped piece and all the wedges. When I was thinking about what I can use it for other than a sun look which Sam Calcott did with it, I thought about a baby circle card. I die cut the die three times from white, blue and pink and then paper pieced the coloured wedges into the white piece. When I went to add it to a circle card I didn't like the look of the pastel colours on the circle card, so I decided to use this on a square card and I ended up making another into a circle easel card which I will share next week.

I used the Baby and Baby Additions to decorate the card with all the baby themed elements. The small duck is from the Circular Frame Bubbles die set. I also used Circle, Oval and Square Nested dies from Creative Craft Products to create this card.


For the inside of the card I used the Baby Additions Stamp Set to add the new baby poem. I also added a couple more baby elements to the panel.


Wednesday, March 8, 2023

Baby Stepper Card


Hi Crafty Friends,

Today I am sharing a baby card I have created using stamps and dies from Made To Surprise by Sam Calcott and Creative Craft Products.


I recently purchased Creative Craft Products 4 Stepper Card die set from their Step On Up Collection when Craft Stash had a sale offering 40% off some of the Creative Craft Products dies. While my die was on it's way I noticed a thread on a Facebook Group commenting on how the die cut card doesn't fold perfectly flat ... one of the steps peeks out of the back when the card is folded flat. So when my die arrived a few days later, I pulled it out and die cut it in white cardstock to see what the issue was. Yes there is an issue if you want to use the die without adding it to a card base. But I cut out the card base to see what size I would need and temporary adhered the two together and the issue was solved. I actually like it in the folded card, as it gives more room to decorate and a place at the back to write a personal greeting.

Seeing I had both pieces cut out I decided to use the base and pulled out some baby stamps/dies to decorate it. I used Sam Calcott's Baby Additions Stamp set and Pop-up Baby Additions die set from her recent Pop-up Wiper Book Collection. I used Lawn Fawn's Oliver's ABC's die set to add the word "BABY" down the step. Sam does have dies to do this in a more recent stamp/die set, but mine hasn't arrived as yet. 

The "Welcome To The World" sentiment is from a New Baby Stamp/Die/Stencil Set also from Creative Craft Products.


For the front of my card, I added more of the die cut pieces from the Pop-up Baby Additions die set. I also added two banners using a die included in the New Baby stamp set from Creative Craft Products.


Thursday, February 2, 2023

It's A Boy


Hi Crafty Friends,

Yesterday I shared a card using one of Crafter's Companion's Curved Border Edge'ables dies. I loved the look it created that I decided to pull with another of the dies today to make an Easel Card. This one is the Traditional Swirls die. These dies are designed to cut through two layers of cardstock, which I did for the edge which stands up behind the easel stopper. After I had die cut all the borders, I adhered royal blue cardstock behind each of the panels so the blue shows through the design.

I had made a baby girl card a week or two ago, so I decided to make another baby card this time for a boy.


I used Dress My Craft's It's A Boy Sentiment for the main sentiment, adding Royal Blue Silk Microfine Glitter to the front of the die cut. 

The bear, balloon & stamped sentiment are all from Creative Craft Products New Baby stamp/die set. I layered the sentiment to two oval panels which help keep the front of the card standing up.


Here is a look at my card when it is closed, ready to be placed in an envelope.


I kept the base of the card simple, just adding the patterned paper and sentiment.


I added a panel to the back of the card so that I could add another sentiment and have a place to write a personal greeting. The sentiment is an older one from my stash by Printwork's.

Other Supplies:

A Baby Is Teddy Bears Stamp - Printworks (retired)


Tuesday, January 24, 2023

It's A Girl


Hi Crafty Friends,

Today I am sharing a Baby themed Slimline card I created recently.


This card started by creating the cute little bear which uses Studio Light's Creative Craft Lab Ted die set. After I had made it, I had to decide what I was going to do with it and as you can see it was to make a baby themed Slimline card. I added a nappy to the bear to help it suit the theme a little better.

For the Slimline portion of the card I used Spellbinders' Half Diamond Fleur Bouquet Slimlines die set. I added white glitter cardstock underneath the diamond panels, so that it would look different to just white cardstock. 

For the sentiment I used Dress My Craft It's A Girl die set. The "It's a" portion of the sentiment is normal attached above the "Girl", but I trimmed that off and added it to the left of the word.

To finish off the front of the card I added flowers using Spellbinders Pettit Floral Potpourri die set.


For the inside of the card I added the diamond panels to each of the edges of the card. 

When I was looking through my baby themed dies for something to add to this card, I found Tailored Expressions Block Party - Baby die. I decided to die cut it into the front of a basic pop up block that I created. 

I added the "Welcome" sentiment to the top of the pop-up using a sentiment from an older MFT Stamp set.


To finish off the inside of the card I added some more flowers using the Spellbinders Pettit Floral Potpourri die set.


Other Supplies:

  • Block Party Die - Taylored Expressions (retired)
  • Baby Onesie Stamp Set - MFT Stamps (retired)


Monday, February 21, 2022

Congrats Nana


Hi Crafty Friends,

Today I am sharing a baby card I created for a friend who became a Grandma (or Nana) for the first time recently. Being a Grandmother is the best thing in the world!

I created a 5 inch x 7 inch Fabulous Flip Card using Made To Surprise by Sam Calcott's Fabulous Flip Card die set.


To decorate the front of my card I added the baby using a die set from Marianne Design. The "Congrats" sentiment uses an older Alphabet die set from Elizabeth Craft Designs which I don't think is available anymore.

I adhered the flip card onto a top folding white card that measures 5 inches x 7 inches. I cut a strip of cardstock that measures 3 inches x 7 inches. I scored along the 3 inch side at 1/2 inch; 1 1/2 inches and 2 1/2 inches and then folded to create an "M" shape.I adhered this piece to the bottom of the inside of the card to turn it into a tent style card. This makes it easier to display.


I die cut a pink arrow using Karen Burniston's Waterfall Card die set and adhered it to the centre of the right edge. This tells the recipient to pull in that direction. When you pull the arrow, the front of the card flips to reveal the other side of each panel and a sentiment on the inside.


The "It's a Girl" sentiment is from Dress My Craft. It's a new one for me so I had to include it on this card.

I added the stork to the first flip panel which is an older die from Impression Obsession. I paper pieced the baby bundle the stork is holding in it's beak.

My friend told me to call her "Nana", so I added that to the next panel rather than "Grandma". I also added a pair of baby feet to the bottom of the panel.


Seeing the card doesn't open, because I turned it into a tent card, I added a few panels to the back so that I could add a sentiment and hand written greeting to the new Nana.

I found a sentiment online which was suitable for this occasion which I created using my computer & printer.

I added two baby bottles using a die included in Karen Burniston's Baby Charms die set.

Some of the products used to make this card are fairly old and may no longer be available anymore. Those that are fairly new I have included in the supply list below, those that may no longer be available are listed at the end of the supply graphic.


Other Supplies:
Stork Die - Impression Obsession (discontinued)
Baby Die - Marianne Design
Feet Die - Marianne Design
Alphabet Caps 1 Die Set - Elizabeth Craft Designs (discontinued)