Showing posts with label Crafter's Companion Edge'ables. Show all posts

Thursday, December 21, 2023

Christmas Bells are Ringing


Hi Crafty Friends,

Thanks for visiting my blog today. I have a Christmas themed 5 x 7 card to share with you all, using an Intri'lace die from Crafter's Companion.

I have made a few cards in the past year or so, using dies from this collection and I love them. So when I found this one for sale at a really good price last year I snapped it up.


I used the Festive Bells die to die cut the front of a white side folding 5 x 7 card. I die cut the image once more from gold glitter cardstock and cut out the bells and adhered them over the white bells.

For the sentiment, I used my computer to create the sentiment "Christmas bells are ringing".


For the inside of the card, I added a red watercolour patterned paper panel and layered it to a gold card. I then added another sentiment, which I put on the same angle as the sentiment on the front, so it wouldn't be seen when the card is closed.


Monday, November 6, 2023

Butterflies & Flowers


Hi Crafty Friends,

Today I have birthday card to share with you.

My card uses Crafter's Companion's Curved Border Edge'ables - Ditsy Butterflies die set. This die is designed to cut through two layers of cardstock, which is what I have done for this card. I placed the border die along the right edge of my card and die cut the two together. 

On the left side of the card I added a panel of patterned paper. 

I added the "Happy Birthday" sentiment from Waffle Flower Crafts which is hot foiled using black foil.

I added a butterfly to the card, using Made To Surprise by Sam Calcott's Butterflies Galore stamp/die set.


For the inside of the card I added a sentiment using Creative Craft Products Perfect Sentiments stamp set. 


Thursday, August 10, 2023

Dog Coffee Mug


Hi Crafty Friends,

Today I am sharing a dog & coffee themed card that I made recently. This card uses Trinity Stamps Bear Mug die set for the mug shape and the Cat & Dog Mug Add-on die set to decorate the mug and turn it into a dog mug.


To decorate the edge on the right side of my card, I used Crafter's Companions Dainty Daisies Border Edgeables die set.

The birthday sentiment is one from a Creative Craft Products stamp set.


For the inside of the card, I added a sentiment using stamps from Lawn Fawn's Critter Chatter stamp set.


Wednesday, March 1, 2023

The One I Love


Hi Crafty Friends,

According to the Days of the Year website, today is National Wedding Planning Day. As I purchased this Crafter's Companion's "The One I Love" Intri'lace die, I decided to pull it out and make a wedding card.

For my card today I made a 5 x 7 Trifold Card with an acetate front. I die cut the wedding image into the front of a 5 x 7 Centura Pearl white card. I adhered white glitter cardstock behind the wedding dress portion of the image, I then die cut the panel using various colours so that I could add colour to the groom's suit, hair, brides hair etc. 


I added a panel of acetate behind the die cut panel.

I added a silver line sticker to the left side edge of the card.

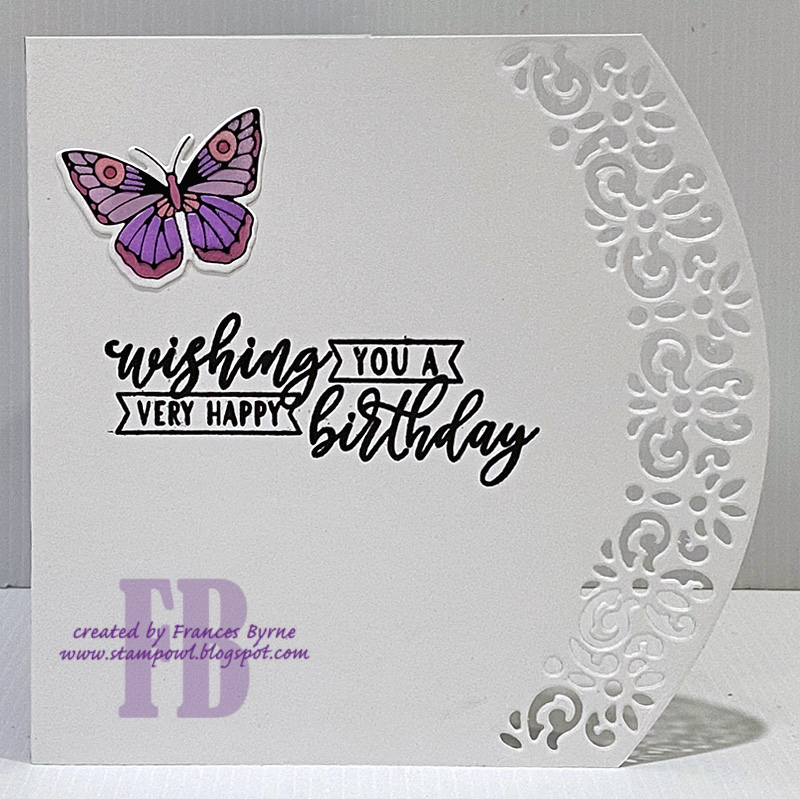
For the sentiment I used Creative Craft Products Celebration Sentiments die set. This sentiment has a long tail on either side of the word, which I cut off.

I added Silver Matte Pearls to the centres of all of the flowers on the image.


To create the trifold card, I adhered the back of one 5 x 7 card, to the other 5 x 7 card.

For the layers of my card I used silver holographic card and pale purple cardstock. I dry embossed the pale purple panels using Made To Surprise's Ditsy 8 x 8 embossing folder.

I added the "Mr & Mrs" sentiment to the lower right hand side of the panel, so that it was hidden when the card is closed.


I added a stamped sentiment to the centre panel of my card, using an older wood mounted stamp from my stash ... Marriage Calligraphy by Paper Inspirations. I layered this sentiment using Creative Craft Products Nested Rectangles and Nested Filigree Rectangles die sets.

For the panel on the right side of my card. I added a stamped sentiment from Divinity Designs Cheers stamp set. I silver embossed each each of the stamped sentiments. On the lower right hand corner of the rectangle panel, I added two glasses of champagne using Karen Burniston's Wedding Charms die set. I made sure to leave plenty of empty space on this panel, so that there was a place to hand write a personal greeting.

I didn't like the look of being able to see the colours through the acetate on the left hand panel, so I die cut another of the "The One I Love" images from white cardstock with double sided adhesive tape on the front and paper pieced this to the back of the image.

Other Supplies:
  • Mr. & Mrs. Wedding Cake Die Set - Spellbinders Paper Crafts (discontinued)
  • Marriage Calligraphy Wood Mounted Stamp - Paper Inspirations (discontinued)


Thursday, February 2, 2023

It's A Boy


Hi Crafty Friends,

Yesterday I shared a card using one of Crafter's Companion's Curved Border Edge'ables dies. I loved the look it created that I decided to pull with another of the dies today to make an Easel Card. This one is the Traditional Swirls die. These dies are designed to cut through two layers of cardstock, which I did for the edge which stands up behind the easel stopper. After I had die cut all the borders, I adhered royal blue cardstock behind each of the panels so the blue shows through the design.

I had made a baby girl card a week or two ago, so I decided to make another baby card this time for a boy.


I used Dress My Craft's It's A Boy Sentiment for the main sentiment, adding Royal Blue Silk Microfine Glitter to the front of the die cut. 

The bear, balloon & stamped sentiment are all from Creative Craft Products New Baby stamp/die set. I layered the sentiment to two oval panels which help keep the front of the card standing up.


Here is a look at my card when it is closed, ready to be placed in an envelope.


I kept the base of the card simple, just adding the patterned paper and sentiment.


I added a panel to the back of the card so that I could add another sentiment and have a place to write a personal greeting. The sentiment is an older one from my stash by Printwork's.

Other Supplies:

A Baby Is Teddy Bears Stamp - Printworks (retired)


Wednesday, February 1, 2023

Butterfly Birthday


Hi Crafty Friends,

Today I have birthday card to share with you.

My card uses Crafter's Companion's Curved Border Edge'ables - Delicate Lace die set. This die is designed to cut through two layers of cardstock, which is what I have done for this card today. I placed the border die along the right edge of my card and die cut the two together. I adhered a panel of purple cardstock behind the front, so that you could see the purple colour peeking out through the lacy pattern.

On the left side of the card I added a panel of patterned paper. 

I added the "Happy Birthday" sentiment which is hot foiled using black foil and using the solid hot foil plate to get the negative sentiment which gives you white lettering with a black outline.

I added three butterflies to the card, using Pinkfresh Studio's Small Butterflies hot foil plate, stencil and coordinating die sets. The butterflies are also foiled using black foil.

To finish off the card, I added Pinkfresh Studio's Glacier Jewels to the circle holes in the lacy border.


For the inside of the card I added a birthday sentiment using LDRS Essential Birthday Sentiments stamp set. I also added another of the foiled butterflies to the top right hand corner of the card.


Sunday, December 25, 2022

Believe in the Magic of Christmas


Merry  Christmas Everyone!!!!

It's Christmas Day already down here in Australia! I must have been a good girl this year as I did very well! 😀

There are many of you who visit my blog regularly, so I would like to take this opportunity to thank you all so much for your support throughout the year. Hope you all have a wonderful and safe Christmas!


For my card today I have created a pop up card, using some pop-up word dies by Creative Craft Products available from Craft Stash. I love pop up cards, so when I saw these dies I knew I needed to add them to my stash. I used the pop-up die to die cut my pop up base card from white cardstock, I then cut the "Merry Christmas" again using holographic cardstock and adhered this over the white words. I then added the red border, also included in the die set above and below the word.

A while back when Sam Calcott of Mixed Up Crafts demoed these dies on her YouTube channel, she mentioned chimney's on the top section of the card. This reminded me of the Raymond Briggs Father Christmas stamp/die set which I purchased some years back. This is a favourite of mine, so I pulled it out to make this card.


Along the bottom edge of my card, I used Crafter's Companion Dear Santa die/stamp set. I also added an additional chimney to the right side of the word "Santa"


I kept the front of the card fairly simple seeing the focus of the card is on the inside. I used Crafter's Companion Believe in Magic die/stamp set along the bottom of the square panel. 

The holographic layer was die cut using one of the square dies from the Creative Craft Products Inverted Scalloped Squares die set.

To finish off the card I stamped the Santa and reindeers from the Crafter's Companion's Christmas Eve Scene Builder stamp/die set.

My card measures 6 inches square when closed.


Monday, December 12, 2022

Candy Cane Wishes


Hi Crafty Friends,

Thanks for visiting my blog today. I have a Christmas themed 5 x 7 card to share with you all, using an Intri'lace die from Crafter's Companion.


I used the Sweet Candy Canes die to die cut the front of a white side folding 5 x 7 card. I then backed the candy canes using a piece of 5 x 7 acetate. I then die cut the candy cane die from green mirror card for the bow and red cardstock to paper piece all the candy canes.

For the sentiment, I used a sentiment from Divinity Designs Candy Cane Wishes Stamp/Die set, masking off the first part of the sentiment as I only wanted "Candy Cane Wishes".


I adhered a panel of red striped paper to the inside of the card, so it can be seen when the card is closed.


As there is acetate on the front of my card, it means that you can see the inside of the card from the front. So I didn't want to add a sentiment that could be seen on the inside of the card. Instead I added a panel to the back of the card and added my sentiment to this.


Tuesday, November 29, 2022

From Our Family To Yours

Hi Crafty Friends,

I have two Christmas themed Slimline cards to share with your today.


Back in October, Crafter's Companion were celebrating their 17th birthday. I happened to watch one of their Crafter's TV videos on the first day of the celebration, where they were showing everyone a special party bag they were selling. I don't normally buy grab type bags, but this seemed pretty good even with shipping to Australia that I checked it out and purchased the bag full of goodies. When my parcel arrived, I was more than happy with what I received. One of the dies was this From Our Family To Yours Edge'able die set. I was planning on putting this away for after I had made all my Christmas card, but then I thought that sentiment suited Christmas so got it out to play.


For this Slimline card, I used the width of a A4 card to determine the width of my card. This makes the most of my cardstock. I completed card is 8 1/4 inches x 4 inches.

I die cut the edge'ables die onto a olive green top folding card. I used patterned papers from Simply Made Crafts Holly Jolly 12 x 12 Paper Pad to decorate the card.

I added acetate behind the front panel so it was level with the base of the card.


I added patterned paper to the inside panel of my card, the bottom section of this paper can be seen when the card is closed.

I added a Christmas sentiment using Made To Surprise by Sam Calcott's Christmas Fun Sentiments stamp set.


I used different patterned papers for my cards, but they are both from the same pad. I paper pieced the letters to create the sentiment using red cardstock, which makes it easier to read.


To finish off the front of my card, I added the pointsettia and branches using two die sets from Divinity Designs ... Peaceful Poinsettias and Pinecone & Pine Branches die sets. 


Here is a look at the inside of my second card I created.