Showing posts with label Foil. Show all posts

Friday, July 25, 2025

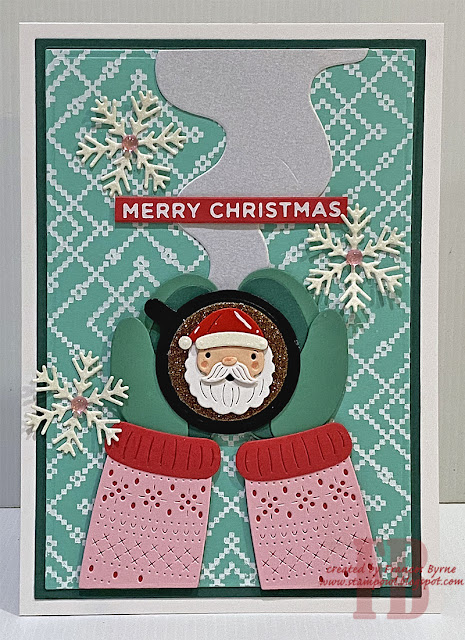
Holding Santa Mug


Hi Crafty Friends,

I'm back today with another Christmas card using the products from Spellbinders July 2025 Club Kits which had a Christmas in July theme.

For my card I created a 5 x 7 card. I used the Betterpress Plate of the Month - Festive Press which I white foiled onto teal cardstock. I love how easy this Betterpress Plate was to line up so I could create a 5 x 7 panel.

I used Spellbinders Matting Basics A & B die sets to die cut my panels to add to my 5 x 7 top folding white card base.

I used the Large Die of the Month - Mugs & Mittens to create the hands holding the mug with Santa. This is such a fun die set, I used it with the mug for this card, but I am looking forward to looking for other images to add to the hands.

The Merry Christmas is an older Glimmer set which I also glimmered using white foil.


For the inside of my card, I printed a digital sentiment I received from Verve Stamps many years ago, I like that it relates to both Christmas & the mug. I added another mug to the top of the sentiment, adding the snowman to the top of the mug.


Friday, July 18, 2025

Nativity Open Book


Hi Crafty Friends,

Today I have three Nativity themed Mini Slimline cards I created for Christmas in July.


For this card I used Waffle Flower Crafts Open Book die set along with the Open Book Nativity Stencil.

The background was created using Trinity Stamps Time Warp Letterpress Plate which I gold foiled onto white cardstock. I die cut the panel using Waffle Flower Crafts Mini Slimline Layers die set. 

The sentiment is from the Open Book Holiday sentiment stamp set. 


For the inside I added another sentiment from the stamp set. I added a star above using one of the stencils.


Friday, May 23, 2025

Hello Baby


Hi Crafty Friends,

Today I am sharing a baby card with you. A few weeks ago I shared a baby boy card, so this time around I made a baby girl card.

The base of my card uses Creative Craft Products Accordion Stepper Card die set. The die makes it so easy to create.

To decorate my card, I used products from Spellbinders Little Smiles Collection. 

To create the background that is on each of the panels, I used the Falling Stars Betterpress Plate. I foiled this using white glimmer foil doing each of the panels separately. Once the foiling was completed, I used the coordinating 3D embossing folder Wishing Stars which embosses in the empty spaces.

The panel on the top left was decorated using the Bundle of Joy die set. The large star on the bottom panel is from the Swinging Among the Stars die set.

To finish the front of the card, I added some Betterpress sentiments which is also included in the collection.


For the back of the card, I added the two larger panels. The blank one is to write a personal message. The other I decorated the same as those on the front, I then added the baby girl sentiment using stamps & dies from Trinity Stamps.


Wednesday, May 21, 2025

Gardenia Faux Post


Hi Crafty Friends,

Welcome to my blog! Today I am sharing another postage themed card, I know I have had a lot of this theme here lately, but I am enjoying making them.

For this card I combined the Waffle Flower Crafts 5 x 7 Postage Collage Die Set with Lisa Horton Crafts Gardenia Stencil. There is a coordinating embossing folder for this stencil, but I couldn't use it for this particular card. The stencil is a fraction shorter than the postage collage area, so after I had finished stencilling in the gardenia, I had to make a couple of touchups to the top and bottom of the panel, so it didn't look like it finished mid way. Adding the sentiment at the top left of the card also helped with this.

Talking of sentiments, I used Spellbinders You Are Everything Sentiments Betterpress Plate for the birthday sentiment. I black foiled this and the sentiment is the negative piece using the left over black foil and the solid foil plate.


For the inside of the card, I used Spellbinders You Are Everything Sentiments & Let's Celebrate Sentiments  Betterpress plates. Again using the negative pieces from black foiling.

I quickly stencilled in the gardenia in the lower two sections of the postage collage die. After I had finished stencilling, I cut them apart to add to the lower right corner of my card.


Wednesday, April 23, 2025

Hey There, How Are You?


Hi Crafty Friends,

Today I created a 5 x 7 postal themed card using postal themed products from The Ton.

I used the Postage Party die set & the Postage Simple Sunflowers Layering Stencils. I used Spellbinders Lush Leaves Embossing Folder to add texture to my card background.

The sentiments used on my card are all from Waffle Flower Crafts, the ‘Hey There’ is a foil plate & was foiled using black foil,


For the inside of my card I used a Sentiment from Honet Bee Stamps. I added postage stamps that are cut apart using another panel like the one of the front of my card.


Friday, February 14, 2025

Stencilled Flowers


Hi Crafty Friends,

Today I am sharing two cards I created using a number of club kits from the Spellbinders January 2025 Clubs. Both cards use the same products, I just changed up the colours and the occasion.


For my first card I created a Get Well card using purple inks & card. I first created the floral frame using the Stencil of the Month, Natures Frame. 

I was inspired by a card by Flávia Cavaliéri where after she had created the stencilled frame she used the Glimmer Plate of the Month, Elliptical Weave to add a foiled background over the stencilled panel. I used Aura foil to do this.

The sentiment is one from the Betterpress of the Month. Take Flight which I also foiled onto purple cardstock.

I layered this panel onto a top folding 5 x 7 card. The layering panel was embossed using the 3D Embossing Folder of the month, Stylized Lattice.


For the inside of the card I added more of the stencilled flowers along the bottom of the card.

The sentiment is one from Waffle Flower Crafts.
 

For my second card I created a birthday card, this time using various shades of pink inks & cardstock. 

This card uses the same products as the first except for the sentiment, this time I used a birthday sentiment from the Clear Stamp of the Month, Nature’s Dance Stamp set.


I again added the flowers along the bottom of the card on the inside. I also added another sentiment from the Nature’s Dance Stamp set.


Friday, November 29, 2024

Blue Christmas

Hi Crafty Friends,

Today I am sharing the final card I created after playing with Spellbinders Festive Poinsettias Betterpress Plate. I love that the Betterpress plates can be foiled and that when foiling you can make use of both the positive & negative pieces of foil. So two cards instead of one! 

For this card I used another piece of the negative foiled papers, gold foil on blue card. I layered onto gold card and then onto a pale blue card which i embossed using Made to Surprise by Sam Calcott’s Tartan Embossing Folder. 

To finish off the card, I added the foiled Christmas sentiment from Waffle Flower Crafts.


For the inside of the card, I added an older Christmas sentiment from my stash. 


Wednesday, November 20, 2024

Pink Poinsettias


Hi Crafty Friends,

Today I am sharing three more Christmas cards I created using Spellbinders Festive Poinsettias Betterpress plate. 

This time around I used gold foil to create all the poinsettia backgrounds & foiled sentiments. All cards are 5 x 7 in size.


For all these cards, I coloured the flowers using various shades of pink inks. I created a top folding 5 x 7 card. I added texture to all of my cards using the Festive Tartan Embossing Folder from Made to Surprise by Sam Calcott.

I added a gold foiled sentiment using Spellbinders Yana’s Christmas Sentiments Glimmer plate.


Another top folding 5 x 7 card using a sentiment foil plate from Waffle Flower Crafts.


This is a side folding landscape style 5 x 7 card .