Showing posts with label Picket Fence Studios. Show all posts

Monday, August 21, 2023

You're Sweet!


Hi Crafty Friends,

Today I am sharing a Slimline Pop-up card I created recently.


For my card today I used stamps that were included in Creative Stamping Magazine Issue 122. This stamp set included afternoon tea related stamps included a number of different popular biscuit images.

One of the cards included in the the magazine was a square card with the background full of biscuits that had been masked. I love the look of the card, so I decided to do something similar, but as a slimline card.

I used two Picket Fence Studios Slimline die sets to die cut the background and layers. 

To finish off the front of the card, I added the "You're Sweet" sentiment which is a Karen Burniston die.


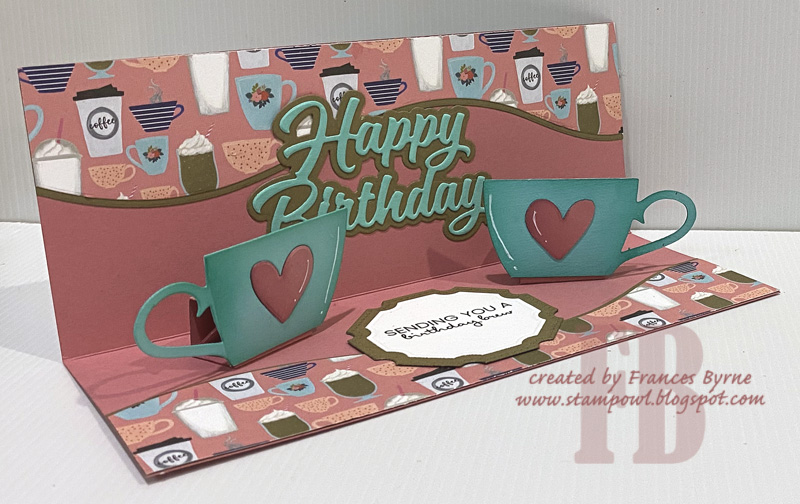
As you can see by the photo above, I created a pop-up card for the inside of my card using Karen Burniston's Katherine Label Pop-up die set. The sentiment used on the label also comes from the stamp set that the biscuits are in.

I created two more smaller panels full of biscuits, to use on the top and bottom edges of my card.


Here is another look at the inside of my card. 


Tuesday, July 25, 2023

Wood Slice Birthday


Hi Crafty Friends,

Today I am sharing a Masculine themed Slimline Easel Card that I created recently.

I am always looking for stamps and dies that are suitable to use to create masculine cards, so when I saw this Lovely Layers Slice & Stump die set from Honey Bee Stamps I had to add it to my stash. It's also kind of generic being nature themed so would work for any male person.

I die cut the wood slice from the die set from Kraft and brown cardstock and then used brown. ink to add texture to my card. I added the wood slice to the background of two blue slimline rectangle panels. 

I used Picket Fence Studios' Slimline Stitched Nesting Rectangles die set to die cut both the blue and black layers of my card.


I used Creative Craft Products Modern Sentiments die set to add the "Happy Birthday" sentiment to the top portion of my card.


On the bottom layer of my card, I added a stamped sentiment as a stopper. The sentiment is from Creative Craft Products Funny Sentiments stamp set. I then used oval dies to die cut the sentiment and layer.


On the back of the card I added a rectangle panel, as a place to add another sentiment and a personal greeting. I also added two more wood slices on either end of the rectangle panel.

Here is a look at my card when it is closed ready to be placed in an envelope.


Friday, June 9, 2023

Have A Novel Birthday


Hi Crafty Friends,

Thanks for visiting my blog. Today I am sharing a book themed Slimline Pop-up card I created recently.


To create the slimline portion of my card, I used Picket Fence Studios Slimline Die Cutting System including their new Slimline Oval Fence die set.

To decorate my card, I used Mama Elephants Book Club stamp set and one of the sentiments from the Storybook Sayings stamp set.

The grass & mushrooms behind the fence is from Lawn Fawn and the grass in front of the fence is from Trinity Stamps. 


For the inside of the card, I created a pop-up card using Karen Burniston's Little Labels Pop-up die set. I also used one of the slimline borders from the Long Nature Edges die set.

I again used stamps from Mama Elephant's Book Club and Storybook Sayings stamp sets to decorate the labels.


Here is a look at the inside of the card showing the card at an angle, so you can see the pop up portion of the card a little better.


Friday, March 17, 2023

Stop By For A Cup


Hi Crafty Friends,

Today I am sharing a coffee themed Slimline card I created recently using dies from both Picket Fence Studios and Karen Burniston.

Here is a quick video to see my card in action.


The inspiration of the card started by using the Picket Fence Studios Slimline Stop By For A Cup Word Topper die. This die is a long slimline die complete with the words you see on the front and the coffee cup that I have used on the inside of the card. I was a little disappointed when I discovered this die measured approx 9 1/2 inch rather than the normal 8 1/2 inches - 9 inches length. As I didn't want to make a 9 1/2 inch wide card, I decided to trim the cup off the left side of the topper.

I used Slimline Nesting dies from Picket Fence Studios to create my layers and ended up making a 3 1/2 inch x 8 1/2 inch card. I die cut the topper in aqua and brown, offsetting them slightly and then adding foam tape to the topper to give it some height.

I added the words "of coffee" to the right hand side of the wide panel using a couple of older coffee themed stamp sets.

When I was looking through my coffee themed stash, I discovered the small coffee mug already coloured, and as it matched the color of some of the cups on the paper, I added that to the left side instead of the bigger one that came on the die.

I also added a couple of coffee beans to the card. The coffee beans and mug are both from La La Land Crafts.


For the inside of the card, I added some curved panels to the top and bottom edges using Lawn Fawns Slimline Stitched Hillside Borders die set.

I added the "Happy Birthday" sentiment to the back of the card which is from Karen Burniston.


I die cut two of the coffee cups, reversing one of the cups so I had a mirror image to use as the pop-up element of the card.

To make the coffee cups pop-up I used Karen Burniston's Bam Box Pop-up die set. These are such fun and allow you to create a pop-up anywhere on the card. 

You can see on the photo on the left, how the bam box and cups fold flat to allow the card to close. The photo on the right shows how the bam box looks when the card is open.


Monday, January 30, 2023

One Martini, Two Martini ...


Hi Crafty Friends,

Today I am sharing a 5 x 7 Gatefold Shutter card using Made To Surprise by Sam Calcott's Effortless 5" x 7" Shutter Card die set. This die set had been out of stock for ages and it snuck back in about a month or so before Christmas, so my friend ordered it for me as a Christmas present. 


Late last year I purchased this martini themed patterned paper, so decided to pull that out to use on my card today. I used the layering die included in the die set to die cut the patterned paper for the four panels and then hand cut some holographic cardstock for the layers.

The belly band was created also using the die included in the set. I used circle dies included in the die set and also the Creative Craft Products Circles die set for the layers. 


The martini is from a card kit I purchased a year or so ago from Picket Fence Studios. I used some Ombre Cardstock that had the right shade of teal on it to die cut the actual martini to put in the glass.

The "Cheers" sentiment is from the Here's To You stamp set from MFT Stamps. I also added the Martini Sentiment which is an older wood mounted stamp from Inky Antics.

To finish off the front of my card I added the Clear Drops Iridescent Pearls from Pink Fresh Studio.


Here the card is partially opened, starting to reveal the sentiment which is hidden behind the shutters.


Finally the full reveal. The sentiment in the centre of the card is also from MFT Stamps Here's To You stamp set. I also added two smaller martini glasses using dies from an older MFT Stamps die set called Let's Toast.


Other Supplies:

  • One Martini, Two Martini ... Wood Mounted Stamp - Inky Antics (retired)
  • Let's Toast Die-namics - MFT Stamps (retired)
  • Martini Shaker Die - Picket Fence Studios (retired)


Friday, December 2, 2022

Merry Little Christmas


Hi Crafty Friends,

I have a Christmas themed 5 x 7 card to share with you today.

For my card I used Trinity Stamps Deck the Farm stamp set, which is this adorable gnome image. I also used their Slimline Forest Border die set, which included the tree border you can see and also a die to die cut the border for the snow.

I used Creative Craft Products Rectangles Inverted Scallops die set to create the layer for my card.

I white embossed the sentiment which is also included in the stamp set.


For the inside of my card, I have again used an inverted scallop rectangle die to die cut the white panel. I added a sentiment using Picket Fence Studios A Gnome Christmas stamp set.

To finish off the card, I stamped the front part of the gnome using red ink so it appears to be coming in from the right of the card.


Monday, November 28, 2022

Slim Merry Christmas


Hi Crafty Friends,

Today I am sharing a Christmas themed Slimline card I created recently.

For the background of my card I used Creative Craft Products Festive Bold Words - Winter Wishes die set.   I die cut the panel from a pale green pearlescent cardstock and paper pieces the trees, stars & dots using glitter and gold mirror cardstock. My finished card measures approximately 8 inches x 3 3/4 inches.

For the sentiment I used Waffle Flower Crafts Merry Christmas Duo Hot Foil Plate and coordinating die. I foiled the sentiment using gold foil onto red cardstock.


For the inside of my card I used Picket Fence Studios' Slim Have Yourself a Merry Little Christmas Word Topper die.


Tuesday, November 22, 2022

Believe in the Magic of Christmas


Hi Crafty Friends,

It's now just over a month until Christmas Day, so pretty much most of my blog posts from now until Christmas will be Christmas related. For my card today I have created a Double Z Fold Card using a Crafter's Companion stamp/die set called Christmas Eve.

For this card I pretty much took my inspiration from the packaging of the dies to create my Double Z Fold Card.


For my night sky background, I used papers from Made To Surprise by Sam Calcott's Card kit that was included in the Papercraft Essentials Issue 217, I still hadn't received my magazine when I made this but as I had downloaded the papers I was able to print them out.

I die cut all the buildings from black cardstock and then covered the windows with yellow cardstock. For those buildings that could be seen from the back, I coloured over the back of the yellow card with a black marker. It looks so much nicer doing this then seeing yellow on the back.


I cut the front "Z" panel from black cardstock and attached this to the card. I then added two levels of buildings onto this panel. The top one I glued flat and the one along the very bottom using foam tape. I also added buildings along the back of the card as well. The die set, comes with a die to die cut bridge pieces for the inner square, so I die cut two of these and added more buildings to this.

To finish off the front of the card, I added the moon to the right panel and then added Santa & his sleigh. I stamped the Santa image on a piece of patterned paper leftover from doing the background so that the image worked with the night sky.

I also added a sentiment from an older Bebunni stamp set.


I added a panel to the back of my card so I could add a sentiment. For this I used Picket Fence Studios' Slim Line Have Yourself A Merry Little Christmas Word Topper. As this had the trees on either side of the sentiment I figured this worked well with the Crafter's Companion set. I added the sentiment along the bottom of the card and then stamped Santa at the top. 


The card folds flat and measures approximately 5 1/2 inches x 5 3/4 inches, it does have a bit of bulk to it, so if you are hand delivery should fit in a 6 x 6 envelope. If posting it will probably need a padded or box envelope.

Other Supplies:
Night Sky Patterned Paper - Made To Surprise by Sam Calcott's Card Kit from Papercraft Essentials #217
Bebunni - Christmas Story Stamp Set - Crafter's Companion


Monday, November 21, 2022

HB2U Slimline

 
Hi Crafty Friends,

I have a birthday themed Slimline Pop-up card to share with you today. 


To create the background for my card I used Picket Fence Studios' Slimline Plumeria Stencil using Catherine Pooler inks in the following colours: Samba; Mandarin Spice; Glitz; Lime Rickey and Aquatini. I then used the two larger dies from Spellbinders Hemstitch Slimline die set to die cut the panel before adding it to a side folding 3 1/2 inch x 8 1/2 inch card.

I used Picket Fence Studios' HB2U die which I die cut from black cardstock and added to the front of the card. Finally I added the "You're How Old?" sentiment which is from MFT Stamps Bitty Birthday Sentiments stamp set.


For the inside of my card, I used the Picket Fence Studios stencil once again to add the strips to the edges of my card.

For the pop up I used Karen Burniston's Katherine Label Pop-up die set to add the two pop up panels.

The sentiment at the top of the card is from a Spellbinders stamp set, the second one is from Honey Bee Stamps.