Showing posts with label Lisa Horton Crafts. Show all posts

Friday, August 22, 2025

Poinsettia Trio Christmas


Hi Crafty Friends,

As you can see, I have another Christmas themed card to share with you today. I have been having so much fun playing with my Christmas supplies.

Recently I came across an older Sam Calcott YouTube video on how to adapt the 5 x 7 Trifold die set from the Showstopper Collection into a Top Fold Tri-fold Stepper Card. I love been able to use my supplies in different ways, so of course I had to play with the idea. You can find Sam's video here.


I kept my card reasonable simple. I was just playing with the idea. So I pulled out a few supplies that were sitting near my desk ... manly the new Merry Christmas sentiments, which are from two die/stamp sets, each have one of the parts of the sentiments as a die accompanied with some coordinating stamp setniments.

I used the 2D Embossing Folder from the July Spellbinders Club Kits for the white panel of my card. I then added the Merry Christmas using red glitter cardstock and white card. To finish off the card, I added some poinsettias from an older Spellbinders Glimmer/die set called Ornament.


I kept the inside of my card very simple, just adding the stamped sentiment which is from a Made To Surprise Christmas sentiment set.



Wednesday, May 21, 2025

Gardenia Faux Post


Hi Crafty Friends,

Welcome to my blog! Today I am sharing another postage themed card, I know I have had a lot of this theme here lately, but I am enjoying making them.

For this card I combined the Waffle Flower Crafts 5 x 7 Postage Collage Die Set with Lisa Horton Crafts Gardenia Stencil. There is a coordinating embossing folder for this stencil, but I couldn't use it for this particular card. The stencil is a fraction shorter than the postage collage area, so after I had finished stencilling in the gardenia, I had to make a couple of touchups to the top and bottom of the panel, so it didn't look like it finished mid way. Adding the sentiment at the top left of the card also helped with this.

Talking of sentiments, I used Spellbinders You Are Everything Sentiments Betterpress Plate for the birthday sentiment. I black foiled this and the sentiment is the negative piece using the left over black foil and the solid foil plate.


For the inside of the card, I used Spellbinders You Are Everything Sentiments & Let's Celebrate Sentiments  Betterpress plates. Again using the negative pieces from black foiling.

I quickly stencilled in the gardenia in the lower two sections of the postage collage die. After I had finished stencilling, I cut them apart to add to the lower right corner of my card.


Wednesday, May 14, 2025

Magnolia


Hi Crafty Friends,

Thanks for stopping by my blog. Today I am sharing a square card I created using Lisa Horton Crafts Corner Magnolia Embossing Folder & coordinating stencils. 

I added the die cut sentiment & stamped sub sentiment using the Little Hello stamp/die set also from Lisa Horton Crafts. 

To finish off the card I added some apricot gems.


For the inside of my card, I grabbed the stencil again and applied ink to part of the stencil using 5 of 6 stencils. I added the sentiment which is an older Honey Bee Stamps stamp set.



Monday, May 12, 2025

Hello Tulips


Hi Crafty Friends,

Well April is well and truly over, but today I am sharing two cards I created using the April Embossing Folder - Tulips from Lisa Horton Crafts A Year in Bloom Embossing Folder set. I did create these in April but I have had a fair bit to share here recently.

Both cards have been coloured using inks from Lisa Horton Crafts. 


For my first card, I used white cardstock to emboss my design. I then used a fine blending brush Tropical Paradise Interference Ink for the flowers & Summer Garden Interference ink for the leaves. This has a beautiful shimmer effect to it.

Recently while looking at some cards I made previously, I remembered I had a few Spellbinders 5 x 7 frame die set., so I pulled out the Scallop Favade Frame die set to create my card base.

I added the sentiment using Lisa Horton Crafts A Little Hello Die/Stamp set.


For the inside of my card I added a sentiment using Spellbinders Clear Stamp of the Month April 2025 - Send & Seal. I also embossed a scrap of white card to add another tulip to the lower right hand corner.


My send card is the same as the previous card, other than I used teal Cardstock to emboss my design and then used Lisa Horton Crafts Silver metallic ink to add colour to the flowers,


I added the same sentiment as I did on my first card and added another tulip to the corner.


Wednesday, March 19, 2025

Sending Get Well Wishes

 
Hi Crafty Friends,

Thanks for visiting my blog! Today I am sharing four get well cards I created recently. I have been needing lots of get well cards lately, so it was good to be able to add these four to my stash.


To create my cards I used the “ March - Daffodil” 3D Embossing Folder from Lisa Horton’s A Year in Bloom Embossing Folder Collection. As I work my way through using these embossing folders I am trying to use different techniques. For these cards I applied the ink to the debossed parts of the embossing folder before running the folder through the die cutting machine. The card on the right was the first one I did, which wasn’t perfect. So I tried again and got the one on the left, which I was happier with.

Once I had put one piece of card through my die cutting machine, I decided to see what it would look like putting it through again with new Cardstock but without reinking … I like the look.

I used the “sending” from Made To Surprise by Sam Calcott’s Big Words die set. The “get well wishes”. Is from an older stamp set.

All of the above three cards are 5 x 7.


For the inside of my 5 x 7 cards, I added the “take care” die cut sentiment from Waffle Flower Crafts. The remainder of the sentiment is from a Made To Surprise stamp set.


For my fourth card, I created a mini slimline card as this panel wasn’t playing nice when I was trimming it down. 


I kept the inside very simple here, just adding the stamped sentiment.


Saturday, February 22, 2025

A Year In Bloom - January


Hi Crafty Friends,

Welcome to my blog. Today I am sharing an Arch Shaped card using the January Embossing Folder from Lisa Horton Crafts A Year in Blooms Embossing Folder set. This set includes 12 floral 5 x 7 embossing folders featuring a different flower for each month. The flower used for January is the Crocus. There a lots of gorgeous embossing folders in this set, and I am looking forward to featuring at least one a month if not more. 

For my card today, I embossed a piece of black cardstock using the January Crocus Embossing Folder. I then added Silver Shine Metallic Pigment ink over the top of the raised portion of the card.

I used Arch dies from Trinity Stamps Arch-Shaped Card die set to create my 5 x 7 inch card.

For the sentiment I used Papertrey Inks Line It Up: Birthday die set. I die cut the sentiment three times from white cardstock, layering them together for height.


For the inside of the card, I used more of the arch shaped dies to add the layers.

The senitment is from Papertrey Inks This is a Big Sentiments: Birthday stamp set.


Thursday, August 11, 2022

Embossed Hello


Hi Crafty Friends,

It's challenge time with my friends over on the CCEE Stampers challenge blog. As challenge hostess for the month, I continue to issue you the challenges.

A few months ago, Jennifer McGuire shared a technique using embossing folders. So for our challenge this week, we are playing with this technique. You can find Jennifer's tutorial here. 


It seems I don't have as many 3D embossing folders as I thought I had, I had tossed up buying one especially for this challenge, but in the end I didn't. Fortunately I do have a few 3D Slimline Embossing Folders, so I pulled one out to use for today's challenge. 

This card uses a 3D embossing folder from Lisa Horton Crafts that I purchased late last year called Christmas Rose. I am not ready yet to make Christmas cards but I didn't think it looked particularly Christmasy so I just created a generic card.

I played around with a few different colours of gloss cardstock when I was trying out this technique and decided to make two cards that I liked the look of. For my first card I used black glossy cardstock and then coloured the sanded areas using pink, yellow and green inks.

For the sentiments I used Waffle Flower Crafts Oversized Hello and Subsentiments Hot Foil Plates, as I layered the black panel onto holographic cardstock before adding to the white card base, I used silver foil for my foiling.


For my second card I used some matt gold cardstock for the embossing, this cardstock doesn't have a white back, but I knew it had a white core so I decided to give it a try. As I like the end results I used it for this card.

I used the same foil stamps for the sentiment this time using black foil and a pink glitter foil.

I added pearls to both of the cards before completing the card.

Don't forget to check out the CCEE Stampers blog (goes live 12 AM EST) to see the rest of the creations the CCEE Stampers created this week. You can also see more details of their creations on their individual blogs:


Friday, January 28, 2022

Butterfly Trio


Hi Crafty Friends,

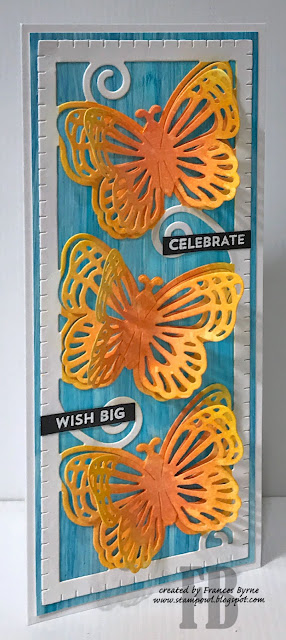
Today I am sharing a Slimline card I created using a slimline die from Lisa Horton Crafts.

I purchased a couple of Lisa Horton's Slimline Embossing Folders and one Slimline die set late last year. The slimline die is slightly shorter than a standard Slimline card measuring 7 3/4 inches x 3 1/4 inches, which means it won't work with other slimline dies out there. But it doesn't look that much different and it will at least still fit in a Slimline Envelope, so I am happy with the die set.

I had a panel of blue alcohol inked yupo paper in my stash which I have had for sometime, so I pulled that out to use for my background. I forget what color alcohol inks were used on this panel, as it was created a long time ago.


The butterfly die allows the butterflies to be 3D, however I wanted to see wings under the image when the wings were lifted up. So I die cut another butterfly panel and colored all the butterflies using Catherine Pooler Inks in Glitz and Orange Twist. I carefully masked the full panel so that the frame and swirls were still white after ink. I cut out the butterflies from the second panel and adhered them on top of the butterfly slimline frame.

I added two sentiments using MFT Stamps Bitty Birthday Stamp set.


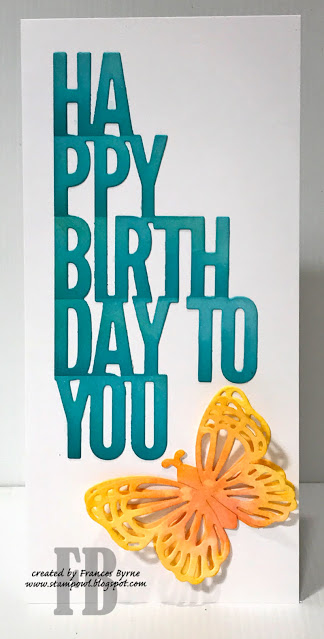
For the inside of my card, I die cut the birthday sentiment from Concord & 9th's Perfect Pairings die set from white cardstock and then applied ink from Catherine Pooler's It's a Boy and All That Jazz.

I die cut two more butterflies, ink blended them and layered them together to add to my card.