Tuesday, October 9, 2018

October 2018 Karen Burniston Designer Challenge


Hi Crafty Friends,

Welcome to our October Karen Burniston Designer Challenge.

Check out Karen Burniston's blog on Wednesday (US Time) when you will be able to see what all the designers created for the challenge this month, plus Karen will have an amazing video tutorial to share with us all.

Our challenge theme this month is .... "HAPPY FALL, Y'ALL!" - make a card celebrating fall, autumn or Thanksgiving.


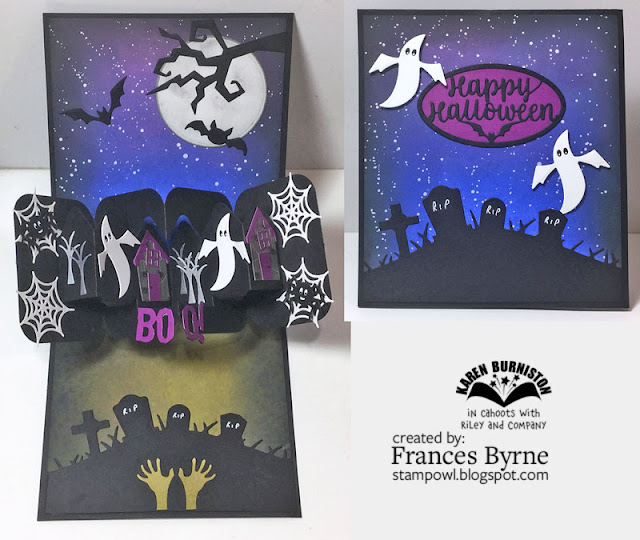
For my card today I have combined the House Pivot Panels die set along with the Twist Panel die set to create my Halloween scene. I decorated this panel using the dies from the House Pivot Panels, Halloween Scene, Halloween Elements and Halloween Charms die sets.

To create the base of the card I sponge on Distress Oxide inks onto a white card base using Blueprint Sketch, Dusty Concord & Black Soot inks for the top panel and then sprinting white paint all over the background to create a starry night sky.

For the bottom panel I used Forest Moss and Black Soot Distress Oxide inks and then spritzed with water from a distress sprayer.


Here is a look at my card as it is starting to close.

Along the bottom panel I have used the graveyard from the Halloween Scene die set and the hands from the Halloween Elements die set.

For the top panel I die cut a circle from white cardstock using one of the circles from the Crosshatch Circles die set and then pouncing black soot ink to the circle using a blending tool. I added the tree branch & bat from the Halloween Scene die set. The second bat is from the Halloween Charms die set.


As the focus is on the inside of the card I kept the front of the card simple,  repeating some of the elements I used on the inside of the card. I also added the Happy Halloween oval sentiment which is from the new Halloween Charms die set.


And finally a look at my card when it is closed. It may look a little thick, but it does flatten down a little more and will fit into an envelope easily.


Don't forget to visit Karen Burniston's blog on Wednesday when you will be able to see what all the designers created for the challenge this month.


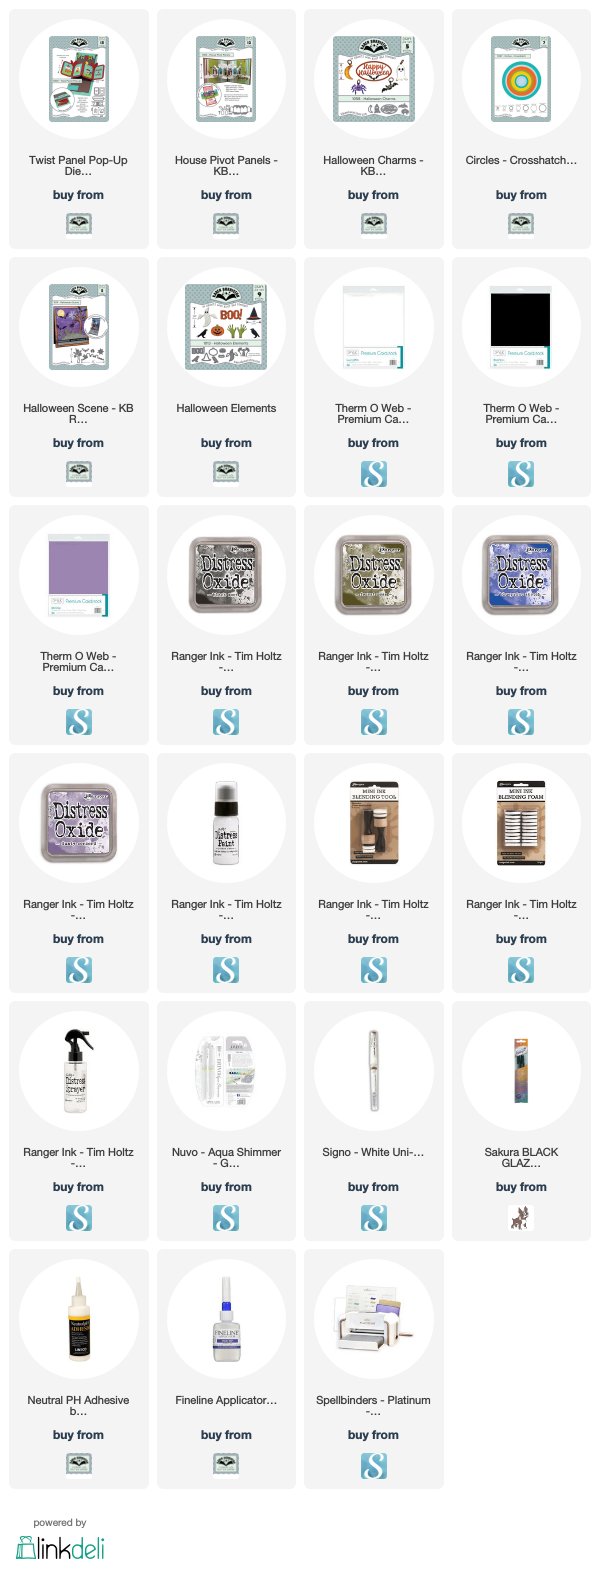
Supplies:
For your shopping convenience, all products are linked below. Compensated affiliate links are used where possible with no extra cost to you. This helps me to continue to share all the projects I include on my blog. Please note I only use and share products I love.


Monday, October 8, 2018

Hello ... Seas The Day


Hi Crafty Friends,

Apparently today (8th October) is World Octopus Day, so of course I had to pull out Karen Burniston's new Ocean Animals die set that contains an Octopus and large Crab to create a card.


To create my card I used Karen Burniston's Circle Charm Pop-up die set. 

I created the background on each panel of the card by die cutting the largest rectangle from the Crosshatch Rectangles die set. I then added color to the panels using Shaded Lilac and Blueprint Sketch Distress Oxide ... I then added some rays using Honey Bee Stamps Ocean Builder stencil set and white pigment ink.


Along the bottom of each panel I added sand using the Nature Edges die set and Crosshatch Rectangles adding color using Antique Linen and Tea Dye Distress Oxide inks.

The sea animals were created using the Ocean Animals and Sea Animals die sets.

For the sentiments I used stamps from a Honey Bee Stamps stamp set.


Here is another look at the inside of my card, taken at a different angle so you can see the pop up parts of the card.

Supplies:
For your shopping convenience, all products are linked below. Compensated affiliate links are used where possible with no extra cost to you. This helps me to continue to share all the projects I include on my blog. Please note I only use and share products I love.


Sunday, October 7, 2018

Reindeer Crossing


Hi Crafty Friends,

The other day I posted some Christmas gift tags I created using the Lawn Fawn Woodland Critter Hugger die set. Seeing I was making so many, it was just as easy to make another one while I was at it and keep it to create a card.

I die cut a background panel using the largest rectangle from Elizabeth Craft Designs Dashing Rectangles die set and then added sky to the rectangle using distress oxide inks. I then splattered white paint over the background for snow.

I added snow to the bottom of the card using Lawn Fawn's Stitched Hillside Borders and ECD's Warm Diamond Silk Microfine Glitter.

I also add the Reindeer Crossing sign using the sign from Elizabeth Craft Designs Igloo die set ... the "reindeer crossing" is from a Hero Arts stamp/die set I got last year.

To finish off the front I added the solid Santa and sleigh flying in the sky.


For the inside of the card I added a "Merry Christmas" die cut sentiment which is a Tim Holtz/Sizzix die and again stamped Santa in his sleigh.

Supplies:
For your shopping convenience, all products are linked below. Compensated affiliate links are used where possible with no extra cost to you. This helps me to continue to share all the projects I include on my blog. Please note I only use and share products I love.


Saturday, October 6, 2018

Merry Christmas


Hi Crafty Friends,

It’s challenge time with the “Crazies” over on the Crazy 4 Challenges blog. Being a brand new month it is time to introduce our new challenge hostess which is Kathleen Adams.

Today is World Card Making Day! So for our challenge this week we have to make a card ... any shape and any theme you want to make.


It has been a while since I have made a Vertical Step Card, so I pulled out my Spellbinder's Happy Days die set to create my step card today. This time around I also added the solid panel on the left hand side which gave me a lot more room to decorate.

To decorate the left hand panel, I used two stamp sets from Honey Bee Stamps. 

For the centre "step" panel I added the "Merry Christmas" sentiment using gold cardstock.

I used Mama Elephant's Basic Circles die set to create the window on the far right panel adding santa on his sleigh in the sky.


On the step squares I added the sentiment "Peace, Love & Joy" embossing with gold embossing powder. 


This is a look at my card when it is closed ready to be placed in an envelope. As the focus is on the inside of the card, I kept the front simple ... adding a sentiment and Nuvo Drops.

Don't forget to check out the rest of the “Crazies” cards over on the Crazy 4 Challenges blog and also their individual blogs for more details.


Supplies:
For your shopping convenience, all products are linked below. Compensated affiliate links are used where possible with no extra cost to you. This helps me to continue to share all the projects I include on my blog. Please note I only use and share products I love.

Jolly Sentiments Clear Stamp Set - Kaisercraft


Friday, October 5, 2018

Thanks, Teacher


Hi Crafty Friends,

Apparently today is World Teachers Day, so I thought I would take this opportunity to make a card to add to the stash for my grandchildren to give to their teachers at the end of the year when school finishes.


For my card today I have used the pop-up die from Karen Burniston's Explosion Pop-up die set to create a pop-up card.

To decorate my card I used stamps and dies from Lawn Fawn. The small sentiments are from a Heffy Doodle stamp set.


Here is another view of  my card taken at a different angle so you can see the pop-up part of the card a little better.


For the front of the card I used many of the same elements I used on the inside of my card, adding a large teacher sentiment from Honey Bee Stamps.

Supplies:
For your shopping convenience, all products are linked below. Compensated affiliate links are used where possible with no extra cost to you. This helps me to continue to share all the projects I include on my blog. Please note I only use and share products I love.


Thursday, October 4, 2018

I've Carved Out Time To Say


Hi Crafty Friends,

It's challenge time with my friends over on the CCEE Stampers challenge blog. Being a brand new month it is time to introduce our new challenge hostess which is Joanne Grzelak.

Our challenge this week is to make Halloween cards with nontraditional Halloween colors.  If you don’t celebrate Halloween, do the same for Thanksgiving cards.

This is as close as I could get to making a Halloween card using untraditional colors. I had to use orange for the pumpkins, but I would have also used black and purple if I could use normal Halloween colors. For my card today I have used Lawn Fawn's Pick of the Patch stamp set I get back in August to create a square reveal wheel card.


Here is a quick video to see my card in action.


Here is a look at the 4 pumpkin faces which are revealed when you turn the wheel of my card.


For the inside of my card I stamped a couple of sentiments from the stamp set and a few left over images I had already cut and colored. I also added glasses to each of the pumpkins on the inside just for fun.

Don't forget to check out the CCEE Stampers blog (goes live 12 AM EST) to see the rest of the creations the CCEE Stampers created this week. You can also see more details of their creations on their individual blogs:

Vicky Gould
Kelly McKown-Santi


Supplies:

For your shopping convenience, all products are linked below. Compensated affiliate links are used where possible with no extra cost to you. This helps me to continue to share all the projects I include on my blog. Please note I only use and share products I love.


Wednesday, October 3, 2018

Woodland Critter Hugger Gift Tags


Hi Crafty Friends,

Seeing that we are now in October, it is about time I started making a few Christmas Gift Tags to put onto the presents for my family and friends.  

Last year I purchased Lawn Fawn's Woodland Critter Hugger die set so when the Winter Add-on was released in August I knew I had to add that to my stash.

Here I have made 6 reindeer gift tags, there are various animals that can be created with this set, I made a penguin earlier in the year ... but reindeers so say Christmas so that is what I went with this time around.


I decorated two of each of the reindeer using various colors and adding different images into their hands. For the two above I cut the hat, scarf and mittens from red cardstock and added white dots to the scarf using white gel pen.


For my next two reindeers I die cut the scarf from Lawn Fawn's Knit Picky papers from 2017. I colored the mittens using a copic marker to get as close a match to the color of the scarf as possible. For the hat I used a dark pink cardstock.

This time around I added gingerbread men to the reindeer's hands.


For my final two reindeers I have added green papers from the same Knit Picky paper pad and this time around I added candy canes to the hands.


I cut a piece of brown cardstock to measure 2 1/4 inches x 7 1/2 inches and scored along the long edge at 3 3/4 inches and adhered the reindeers onto the front to create a gift card.

On the inside I die cut a rectangle using one of the rectangles from Elizabeth Craft Designs Dashing Rectangles and then stamped the sentiments from the Say What? Clear Stamp set using red ink.

I can't wait to start wrapping Christmas presents, so I can add these to the front.

Supplies:
For your shopping convenience, all products are linked below. Compensated affiliate links are used where possible with no extra cost to you. This helps me to continue to share all the projects I include on my blog. Please note I only use and share products I love.


Tuesday, October 2, 2018

Merry In My Christmas


Hi Crafty Friends,

Welcome to our October Paper Pros challenge, we are a week early this month as we have swapped weeks with the Karen Burniston Designer Challenge. This month our challenge is Holiday Cheer.

For my card today I wanted to play with the Christmas Tree from the Christmas Tree Pop Stand die set. I used this tree a lot when it was previously released as a 3D tree on a solid background instead of the normal pop up or pop stand card, so I wanted to use it that way again.


I created a window card using the Katherine Label Pop-up die set, the Christmas Tree Pop Stand die set and the reindeer from the Christmas Animals die set.

To create the 3D Christmas tree that I added to the front (and also on the inside) follow the directions below:

Using the Tree dies from the Christmas Tree Pop Stand Card die set, die cut 1 of each of the tree pieces from green card stock. Sponge around edges of trees using green ink.
  • Die cut 1 of the tree trunks using brown card.
  • Assembling the Trees: Note – these are assembled slightly differently to how Karen Burniston assembles the tree for the Pop Stand Card so that we can still achieve the 3D look on a solid surface.

  • Apply a thin strip of glue around the edge of the large solid tree that has a slit in the centre and adhere it to the tree with the tree shaped hole in the middle. 

  • Adhere the brown trunk over the green one on the outline tree. As per photo above.
  • Now take the two trees with the slots and thread the tree which only has slots at the top and the bottom through the middle slot of the other tree. You may need to bend one of the top slots of the first tree to do this.

  • Next thread one half of one of the 3D trees through the slot of the large tree. Turn the tree over to the back side and places some adhesive to one side of the half tree, fold this over and adhere it to the back of the tree.
  • Turn tree back over and fold the inner trees so that you have the middle  tree standing upright and the other two trees are sitting on either side of the tree.
  • Decorate your tree as desired ... for my trees I added Red/Gold Glitter Dot Peel Off Stickers as they are so easy.


Die cut the window into the top right hand side of the front of the card using the middle label die from the Katherine Labels Pop-up die set and then add the frame by using the two larger dies to create a frame.

Add the completed tree to the left side of the card and then add a reindeer under the window.


The Katherine Label Pop-up die set was designed to cut a window into the centre of the front of the card so that the pop-up arm that holds the labels/sentiment will line up with the window. Because I added the window to the side of on longer card, I had to make an adjustment to the pop-up arm. 

Basically all I did was die cut the pop-up arm and fold as normal. I then cut the box section (that holds the label/sentiment and attaches to the back of the card off the card. Trimmed a piece of cardstock the same width as the arm but longer and adhered this to the existing arm and onto the cut off box. The first time I did this I didn't cut my cardstock long enough, but it was easy enough to fix.

I added another 3D tree to the left side of the card, I also added the solid trees that come from the centre of the outline tree to the right hand side of the card and another reindeer.

You can see what the other "Paper Pros" created for this challenge on their blogs:


Supplies:
For your shopping convenience, all products are linked below. Compensated affiliate links are used where possible with no extra cost to you. This helps me to continue to share all the projects I include on my blog. Please note I only use and share products I love.

Jolly Sentiments Clear Stamp set - Kaisercraft


Monday, October 1, 2018

Halloween Pumpkin & Ghost Scene


Hi Crafty Friends,

Today I have a Halloween card to share with you all today.

One of the new dies that were recently released by Elizabeth Craft Designs by designer Susan Tierney-Cockburn was this beautiful large French Pumpkin. Of course it was designed to be filled with any of her gorgeous flowers. Other than for eating, for me when I think of pumpkins, the first thing I think about is Halloween and when I saw this die I envisaged ghosts flying in and around the pumpkin .... so of course as you can see I decided to take my idea and bring it to life by creating it into a card.

To create my night sky I die cut the largest rectangle from the Dashing Rectangles die set and then blended Blueprint Sketch and Black Soot Distress Oxides over the sky and then splattered white paint over the background to create a starry sky.

To ground the pumpkin I die cut the snow/ground border from the Adventure Edges die set from black cardstock.

I die cut the pumpkin and leaves from white cardstock and then colored using orange and yellow distress oxide inks and also yellow and orange copics. I decided I needed a face on my pumpkin ... so for the mouth I used a die from the Pumpkins die set and hand cut the triangles for the eyes and nose ... I did try using the smaller eyes/nose from the same set but it looked odd on such a large pumpkin.

I die cut both ghosts from the Ghosts die set and added them to my scene.


For the inside of my card I used the Happy Halloween sentiment from the Words 3 - Happy Holidays die set and added the bats and spider from the Halloween Scenery die set.


Supplies:
For your shopping convenience, all products are linked below. Compensated affiliate links are used where possible with no extra cost to you. This helps me to continue to share all the projects I include on my blog. Please note I only use and share products I love.