Showing posts with label Lawn Fawn. Show all posts

Friday, February 7, 2025

An Adventure Was Going to Happen


Hi Crafty Friends,

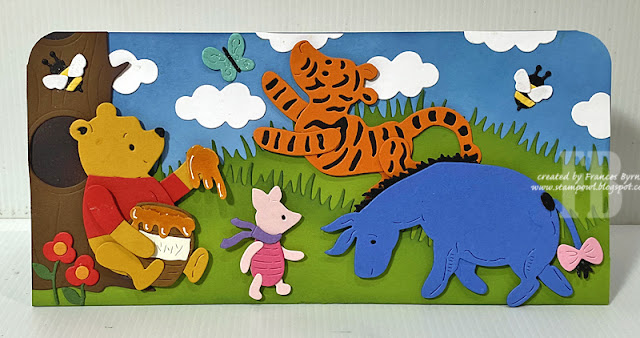
Thanks for stopping by my blog, today I am sharing a Pooh themed Slimline Easel Card I created recently.

For my card, I used the dies from the new Spellbinders Classic Pooh Collection.I saw these were going to be released in January when I was checking out the "Coming Soon" section on the Spellbinders website before Christmas  and have been impatiently waiting all year (yeah ok a month) for them to make it downunder.

My Slimline Easel Card measures 8 1/2 inches x 4 inches. I wanted the extra height so I could include all the characters from the various sets.


To create the card base, I used Lawn Fawns Lawn Fawn's Grassy Hillside Borders die set to add all the grassy areas on both the front and inside of the card.

I also wanted Pooh to be sitting against a tree, so I pulled out a tree die from Hello Bluebird to use for that. 


All the other die cut elements used to create this scene are included in the three "Pooh" themed die sets from Spellbinders. I spent a day assembling a heap of characters and so far have been able to make two cards from what I created and have enough left over for at least 2 or 3 more cards, which I will share as I make them.


And finally a look at the bottom panel when it is opened up. I added the honey pots and flowers to each side of the card and then a sentiment for a stopper, which will hold the front of the card up. The sentiment is from the Silly Old Bear Betterpress Plate set.


Monday, October 2, 2023

It's Your Birthday


Hi Crafty Friends,

Thanks for stopping by my blog today. Today I am sharing a Slimline Pop-up card I created recently using stamps, dies and foil plates from various companies.


For the front of my card, I pulled out my Studio Katia Dotted Slimline 2 die set, to create all the layers of my card. I used a rainbow coloured patterned paper for the scallop layer.

The girl is die cut using Concord & 9th's Celebration Squad die set. I love all the different options you have in this die to create girl images.

I added a balloon to the girls hand, using a Lawn Fawn die set ... Outside In Stitched Balloon Stackables.

The sentiment is from Alex Syberia, a new company for me. It is a foil plate with a coordinating die to die cut out the sentiment. The sentiment was a little smaller than I was excepting, but I am more than happy with it. I foiled the sentiment with black foil and used a foiled foil plate so I could get the reverse image of the sentiment where the letters are white and the outline black.


For the inside of my card, I created a pop-up card, using Karen Burniston's new Stocking Pop-up die set. The pop-up mechanism in this die set, is generic and can be used with whatever you wish, in my case I added balloons using balloon dies from the same set that I used on the front. When you open the card, the balloons move up.

To finish off the card, I added a stamped sentiment using a Honey Bee Stamps Birthday Bliss stamp/die sets.


Tuesday, September 26, 2023

Hay There!


Hi Crafty Friends,

Today I am sharing a Slimline card I created recently.


For the background of my card, I pulled out Hello Bluebird's Slimline Summer Woods Scene die set. I die cut the background in white cardstock and then coloured the various pieces using Distress Oxide Inks.

To decorate the card, I used Lawn Fawn's New Hay There Hayrides stamp set and the Hay There Hayrides - Mice Stamp set which coordinates with the first set.

I white embossed a sentiment using sentiments included in the stamp set.


For the inside of my card I created a pop-up card. I adhered blue and green cardstock to the base of the card. For the grassy hills, I die cut the green cardstock using Lawn Fawn's Slimline Stitched Hillside Borders die set. 

I used the pop-up die included in the Street Lantern Pop-up die set to pop-up the tractor and trailers.


I used a circle die to die cut the yellow sun. I also stamped some birds in the sky using a Made To Surprise stamp set.

Finally I added a sentiment using three of the sentiments included in the Hay There Hayrides stamp set.


Friday, August 18, 2023

Drive Me Happy


Hi Crafty Friends,

Today I am sharing a 5 x 7 Card I created recently.

For the layers of this card I used Card Making Magic's 5 x 7in Alternative Stitched Nestables die set. 

I used Lawn Fawn's On the Road die set for the road at the bottom of the card.

The car is Studio Light's Creative Craft Lab Car die set. I also used Benny Bear from the Missees Pets line from Studio Light.

I pulled out an older Pine Tree die from Sizzix to add the trees on either side of the card.

Finally I used a sentiment from Stampendous, which is one I have had in my stash for years.


For the inside of the card, I added the road again to the bottom portion of my card. I used a mix of sentiments from two Honey Bee Stamps stamps sets to add the sentiment.

Other Supplies:
  • Missees Pets Benny Bear Stamp/Die Set - Studio Light 
  • Drive Me Happy Stamp - Stampendous (discontinued)
  • Pine Tree Die - Sizzix (discontinued)
  • Love Bug Stamp Set - Honey Bee Stamps (discontinued)


Thursday, June 29, 2023

Sew It's Your Birthday


Hi Crafty Friends,

Thanks for visiting my blog. Today I am sharing a sewing themed Slimline Flip and See Card I created for a friend who likes sewing.

Here is a quick video to see my card in action.


To create the interactive Flip and See portion of my card, I used Made to Surprise by Sam Calcott's DL Flip and See die set. This die allows you to create a Slimline/DL sized card with either 1, 2, 3 panels that flip up and down.


To decorate my card, I combined two different Lawn Fawn stamp sets ... Sew Very Mice and Sewn With Love. The sentiment in the centre of the panel that is revealed when the front flaps flip up is from Creative Craft Products/Craft Stash.


For the inside of the card I added a couple more of the images from Lawn Fawn. The sentiment is from Your Next Stamp.


Monday, June 12, 2023

You're the Bees Knees

Hi Crafty Friends,

Today is the 3rd Anniversary of the Slimline Card Addicts Facebook Group, a group I started with my friends Karen Aicken three years ago because of our love of Slimline Cards. Neither of us ever dreamed that the group would grow so. quickly and now has a membership of over 9500 members.

Of course I had to make a Slimline card to celebrate the occasion, for my card I have mostly used stamps and dies from Lawn Fawn's recent May release.


Here is a quick video to see my card in action.


One of the dies that came out in the May release was the Magic Iris Bee Hive Add On, this can be used as a stand alone die or used in conjunction with the Magic Iris and Magic Iris Add On die sets. 

Lawn Fawn's Magic Iris dies were designed to work with an A5 card (4 1/4 inches x 5 1/2 inches), however I wanted to make a Slimline Card. I had to do a few little alterations to make it work, but I am happy with how it turned out. I used the largest Slimline Rectangle die from Lawn Fawn's Large Slimline with Sliders die set, so I could get the stitching around the edge of my panel. I then used Distress Oxide inks to add my sky background. I couldn't use the Magic Iris Add On die set to die cut the panel, so I used this instead to mark the placement of the circle and the semi circles on my card. I then used circle dies to cut these pieces out. I also needed to layer my slimline panel to a white panel for some extra width to hid the magic iris mechanism. I did need to do a little trimming once the mechanism was in place and if you look closely you can see a tiny bit of brown poking out on the left side, but for the most part it is ok. I also had to play around with the lever piece as my semi circle wasn't the exact size as the magic iris one.


Here you can see the magic iris starting to open and reveal the hidden message.

I used the grass die from Made To Surprise's Perky Pooches die set to add the grass layers.


And finally the full reveal of the hidden message. I used an older bee themed sentiment die from Darcie's Stamps for my message, which I white embossed onto brown cardstock.

To decorate the remainder of the card, I used the Hive Five stamp set, as well as the branch & small flowers from the Bee Hive die set.

Here is a quick look at my card showing the Magic Iris closed, partially open and fully open.


Of course seeing this is a bee themed card and Lawn Fawn also released a Bee Pop-up die set, I had to incorporate that into the inside of my card.

First I die cut two Slimline Rectangle Panels using a Picket Fence Studios die set. I then used  the first layer of a Honey Bee Stamps Stacking Hexagon Stencil set to add the hexagons randomly over my background. I also added a few black splatters.


After assembling the bee, I added it to the centre of my card.


Finally I added two sentiments to the inside panels using an older Honey Bee Stamps stamp set called Hi Honey.


Monday, May 8, 2023

Flying By To Say


Hi Crafty Friends,

Today I am sharing a fun interactive card that I created recently using dies from Lawn Fawn and Studio Light.


Here is a quick video to see my card in action.


For the bear and plane I used Studio Light's Craft Lab Bear Ted and Airplane Accessories die sets. 

I used the new Lawn Fawn Pull 'n Pop Pull Tab die set to create the interactive portion of the card. I love how the plane can go up and down on this card.


To create the clouds, I used the cloud border die from Mama Elephant's Slim Card Basics die set. Slimline border dies work well on 5 x 7 cards.


For the sentiments on the front of the card I used sentiments from Hello Bluebird's Maverick stamp set.


For the inside of my card I used the Card Making Magic's 5 x 7 Alternative Stitched Nestables die set.

The sentiments are from two different stamp sets ... the "It's Plane to see" is from Neat and Tangled's So Fly stamp set and the "It's a Birthday" from Made to Surprise.

To finish off the inside of the card, I added part of a plane to the lower right hand side of my card.


Wednesday, April 19, 2023

Have A Wheely Great Day!


Hi Crafty Friends,

Welcome to my blog! Today I am sharing a fun Slimline card I created using products from Lawn Fawn and Hello Bluebird.

In Lawn Fawn's latest release back in February, they released a fun Ferris wheel stamp set called Wheely Great Day which as you can see I purchased and used on my card today along with an older Lawn Fawn Stamp set called Coaster Critters. I didn't have enough room on my card to used the roller coaster from the Coaster Critters stamp set, however the cute animals and accessories in that set were handy to use to complete the scene on this card. 

I pulled out my Black Widow Wax Colouring Pencils to colour all of the images, I figured as they were all small it was a good way to practise.

I used Hello Bluebird's Slimline Skating Pond Scene die set, which I have been wanting to use for a while. As you can see, I didn't use it as intended with ice in the area that I coloured grey. I figured that area could be concrete and a perfect place for a fair.


For the inside of the card I created a pop-up card, using Karen Burniston's Katherine Label Pop-up die set. 

I also decorated the inside of the card, using Lawn Fawn's Raffle Ticket die set. As I only used 5 colours of the rainbow when colouring the images on the front of the card, I decided to only use those same colours on the inside.

I used sentiments from both the Wheely Great Day and Coaster Critters stamp set to add my sentiment to the pop-up label.


Friday, April 7, 2023

Easter Chick Money Holders


Hi Crafty Friends,

Welcome to my blog. Today I am sharing two Easter themed Money Cards I created to give to my grandchildren for Easter ... what kid doesn't like money!!!


I am loving the money gift card dies and stamps being released by MFT Stamps over recent months. One of their recent releases included the Universal Money Loops Die-namics which can be die cut from cardstock and used to and the money to the card or image.

For my two money cards today, I grabbed the Step Into Spring Honeycomb Cardmaking Kit that came with Papercrafts Essentials Issue 222. I used the patterned paper and the Easter Chick from the set to decorate my card. Once I had attached the chick to the money card, I added the Universal Money Loops to the chicks belly and then added the money.


I used MFT Stamps Money Card Die-namics to create the money card and the money value. I used the large rectangle die for the card shape and then used this die to cut some green cardstock to get the rounded edges of the card. I then used Karen Burniston's Natures Edges grass die to create the grassy edge.

I added some Easter Eggs on either side of the chick using the Mini Easter Eggs die set from Lawn Fawn.

The "Happy Easter" sentiment is from a Gerda Steiner Designs stamp set.


For the reverse side of the money card, I added some grass along the bottom edge and two more Easter Eggs.

I used an older Rubbernecker Stamps sentiment which I layered using oval dies from Creative Craft Products/Craftstash.


Other Supplies:

"Egg"specially Good! Wood Mount Stamp - Rubbernecker Stamps (discontinued)